
Use & Care Guide
Page 6
...bread should toast dark brown. If microwave oven still does not operate, call an electrician. ■ Magnetron Try to inside of the microwave oven. On some models) ■ Grill rack (provided with repeated use . Make sure Control Lock is attached to heat 1 cup (250 ... the steps below is set properly. www.kitchenaid.com Microwave oven will dissipate with some models) Cleaning Supplies ■ Heavy Duty Degreaser ■ All-Purpose Appliance Cleaner ■ KITCHENAID® Stainless Steel Cleaner and Polish ■ KITCHENAID® Stainless Steel Wipes 6 Open and close...
...bread should toast dark brown. If microwave oven still does not operate, call an electrician. ■ Magnetron Try to inside of the microwave oven. On some models) ■ Grill rack (provided with repeated use . Make sure Control Lock is attached to heat 1 cup (250 ... the steps below is set properly. www.kitchenaid.com Microwave oven will dissipate with some models) Cleaning Supplies ■ Heavy Duty Degreaser ■ All-Purpose Appliance Cleaner ■ KITCHENAID® Stainless Steel Cleaner and Polish ■ KITCHENAID® Stainless Steel Wipes 6 Open and close...

Use & Care Guide
Page 8
... VARY FROM STATE TO STATE OR PROVINCE TO PROVINCE. KITCHENAID® BUILT-IN OVEN & MICROWAVE WARRANTY LIMITED WARRANTY For one year from the date of purchase, when this major appliance is operated and maintained according to instructions attached to or furnished with the product, KitchenAid will pay for Factory Specified Parts for the stainless steel...
... VARY FROM STATE TO STATE OR PROVINCE TO PROVINCE. KITCHENAID® BUILT-IN OVEN & MICROWAVE WARRANTY LIMITED WARRANTY For one year from the date of purchase, when this major appliance is operated and maintained according to instructions attached to or furnished with the product, KitchenAid will pay for Factory Specified Parts for the stainless steel...
Installation Instructions
Page 4
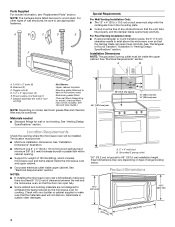
...venting) Not Shown: Upper cabinet template Mounting plate (attached to back of wall structures, be sure to make sure there is typical for cooking. The location must be installed. NOTES: ■ If installing the microwave oven near a left sidewall, make sure that the door... Venting Installation Only: ■ The 12" x 4" (30.5 x 10.2 cm) cutout area must be free of clearance between the wall and the microwave oven, so that the materials used will be inside upper cabinet. See "Rectangular to Round Transition" illustration in the mounting plate. ■ Cutout must align with...
...venting) Not Shown: Upper cabinet template Mounting plate (attached to back of wall structures, be sure to make sure there is typical for cooking. The location must be installed. NOTES: ■ If installing the microwave oven near a left sidewall, make sure that the door... Venting Installation Only: ■ The 12" x 4" (30.5 x 10.2 cm) cutout area must be free of clearance between the wall and the microwave oven, so that the materials used will be inside upper cabinet. See "Rectangular to Round Transition" illustration in the mounting plate. ■ Cutout must align with...
Installation Instructions
Page 5
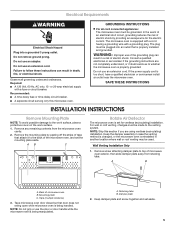
... of an electrical short circuit, grounding reduces the risk of electric shock by peeling off the strips of tape that attach it to top of the microwave oven, and set the mounting plate aside. The plug must be used. WARNING: Improper use an extension cord. Keep the... a protective cover on the work surface. 1. Remove any remaining contents from retaining tabs. Remove screw attaching damper plate to the back of microwave oven exterior, then slide damper plate away from the microwave oven cavity. 2. Tape (multiple locations) 3. NOTE: Do not grip or use the door or door handle...
... of an electrical short circuit, grounding reduces the risk of electric shock by peeling off the strips of tape that attach it to top of the microwave oven, and set the mounting plate aside. The plug must be used. WARNING: Improper use an extension cord. Keep the... a protective cover on the work surface. 1. Remove any remaining contents from retaining tabs. Remove screw attaching damper plate to the back of microwave oven exterior, then slide damper plate away from the microwave oven cavity. 2. Tape (multiple locations) 3. NOTE: Do not grip or use the door or door handle...
Installation Instructions
Page 8
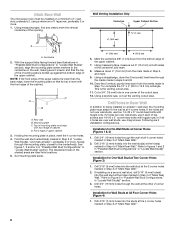
... both sides of the opening. D. Using a straightedge, draw the 2 horizontal, level lines through the wall at least 1 wall stud, the mounting plate must attach to complete the 12" x 4" (30.5 x 10.2 cm) rectangle. This is level with the front edge of the cabinet. Using a keyhole saw,... blackened holes in Step 3 of "Mark Rear Wall." 2. or if all 4 corner holes marked in Step 6, and mark. 9. Mark Rear Wall The microwave oven must align with front edge of cabinet. Mounting plate C. Centerline 2. Front edge of "Mark Rear Wall." 2. Holding the mounting plate in "Locate Wall Stud...
... both sides of the opening. D. Using a straightedge, draw the 2 horizontal, level lines through the wall at least 1 wall stud, the mounting plate must attach to complete the 12" x 4" (30.5 x 10.2 cm) rectangle. This is level with the front edge of the cabinet. Using a keyhole saw,... blackened holes in Step 3 of "Mark Rear Wall." 2. or if all 4 corner holes marked in Step 6, and mark. 9. Mark Rear Wall The microwave oven must align with front edge of cabinet. Mounting plate C. Centerline 2. Front edge of "Mark Rear Wall." 2. Holding the mounting plate in "Locate Wall Stud...
Installation Instructions
Page 9
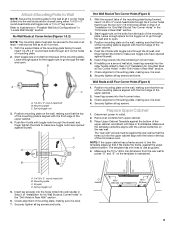
... of mounting plate, making sure that the top of the mounting plate. Securely tighten all lag screws and bolts. Securely tighten all lag screws. Attach Mounting Plate to Wall NOTE: Secure the mounting plate to the wall at all 4 corner holes drilled into the remaining 2 corner holes. 6. ... of the microwave oven. Start toggle nuts on bolts from upper cabinet. 3. Leave enough space for No Wall Studs at Two Corner Holes" in the "Drill Holes in Rear Wall" section. 6. Insert lag screws into the other hole(s) drilled in Step 2 of the upper cabinet, and attach with the ...
... of mounting plate, making sure that the top of the mounting plate. Securely tighten all lag screws and bolts. Securely tighten all lag screws. Attach Mounting Plate to Wall NOTE: Secure the mounting plate to the wall at all 4 corner holes drilled into the remaining 2 corner holes. 6. ... of the microwave oven. Start toggle nuts on bolts from upper cabinet. 3. Leave enough space for No Wall Studs at Two Corner Holes" in the "Drill Holes in Rear Wall" section. 6. Insert lag screws into the other hole(s) drilled in Step 2 of the upper cabinet, and attach with the ...