
Use & Care Guide
Page 5
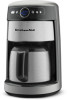
Gold Tone permanent filter H. Thermal carafe (on glass carafe models only) J. Water tank lid D. Brew basket G G. KITCHENAID® COFFEE MAKER FEATURES A B C DE F J I . Programmable display E. Water tank fill channel C. Removable water tank B. Coffee scoop I H A. Glass carafe (on thermal carafe models only 5 Hinged brew basket door F.
Gold Tone permanent filter H. Thermal carafe (on glass carafe models only) J. Water tank lid D. Brew basket G G. KITCHENAID® COFFEE MAKER FEATURES A B C DE F J I . Programmable display E. Water tank fill channel C. Removable water tank B. Coffee scoop I H A. Glass carafe (on thermal carafe models only 5 Hinged brew basket door F.
Use & Care Guide
Page 6
... (not shown) The replaceable carbon filter can be activated to descale your local retailer or on www.kitchenaid.com. Full-Length Cord Storage (not shown) Compartment in 30-minute increments. Variable Warmth Control (glass carafe models only) Allows you to select between REG and BOLD brew strengths. Removable Water Tank The coffee...
... (not shown) The replaceable carbon filter can be activated to descale your local retailer or on www.kitchenaid.com. Full-Length Cord Storage (not shown) Compartment in 30-minute increments. Variable Warmth Control (glass carafe models only) Allows you to select between REG and BOLD brew strengths. Removable Water Tank The coffee...
Use & Care Guide
Page 7
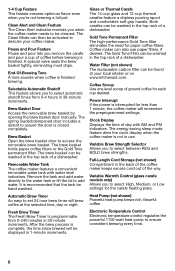
.... Mode selection/brew strength/time since the completion of -day with AM or PM indicator and automatic brew time. Time Since Brew Display (glass carafe models only) Display shows the time elapsed since brewed indicator area J. Brew strength indicator L. Cleaning Needed Indicator The indicator will be displayed in the "Automatic Brew...
.... Mode selection/brew strength/time since the completion of -day with AM or PM indicator and automatic brew time. Time Since Brew Display (glass carafe models only) Display shows the time elapsed since brewed indicator area J. Brew strength indicator L. Cleaning Needed Indicator The indicator will be displayed in the "Automatic Brew...

Use & Care Guide
Page 9
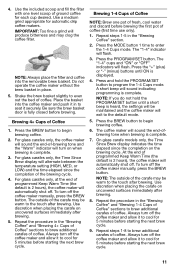
Do not remove ground prong. Failure to enter the Time/Clock Setting mode. For glass carafe models, press the MODE button 5 times to follow these instructions can result in death, fire, or electrical shock. 2. Press the "+" (plus) or "-" (minus) buttons to select ... "+" (plus ) or "-" (minus) buttons to increase or decrease the minutes. 8. The AM or PM indicator will flash for the hours adjustment. 5. 4. NOTE: For thermal carafe models, press the MODE button 4 times to increase or decrease the hours. 6.
Do not remove ground prong. Failure to enter the Time/Clock Setting mode. For glass carafe models, press the MODE button 5 times to follow these instructions can result in death, fire, or electrical shock. 2. Press the "+" (plus) or "-" (minus) buttons to select ... "+" (plus ) or "-" (minus) buttons to increase or decrease the minutes. 8. The AM or PM indicator will flash for the hours adjustment. 5. 4. NOTE: For thermal carafe models, press the MODE button 4 times to increase or decrease the hours. 6.
Use & Care Guide
Page 10
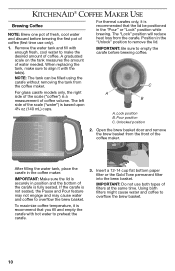
...and fill with hot water to preheat the carafe. 3. Open the brew basket door and remove the brew basket from the front of water needed. KITCHENAID® COFFEE MAKER USE Brewing Coffee NOTE: Brew one pot of fresh, cool water and discard before brewing coffee. Unlocked position 2. IMPORTANT: Be... tank can be positioned in the "Unlock" position to overflow the brew basket. For thermal carafes only, it with the tab(s). C For glass carafe models only, the right side of the scale ("coffee") is a measurement of the scale ("water") is securely in the coffee maker. The left side of...
...and fill with hot water to preheat the carafe. 3. Open the brew basket door and remove the brew basket from the front of water needed. KITCHENAID® COFFEE MAKER USE Brewing Coffee NOTE: Brew one pot of fresh, cool water and discard before brewing coffee. Unlocked position 2. IMPORTANT: Be... tank can be positioned in the "Unlock" position to overflow the brew basket. For thermal carafes only, it with the tab(s). C For glass carafe models only, the right side of the scale ("coffee") is a measurement of the scale ("water") is securely in the coffee maker. The left side of...
Use & Care Guide
Page 11
... the next brew cycle. 11 Press the BREW button to the touch after brewing. Repeat the procedure in to begin brewing coffee. 2. On glass carafe models only, the Time Since Brew display indicates the time elapsed since the completion of coffee. A short beep will alternate between the temperature setting (HIGH, MED...
... the next brew cycle. 11 Press the BREW button to the touch after brewing. Repeat the procedure in to begin brewing coffee. 2. On glass carafe models only, the Time Since Brew display indicates the time elapsed since the completion of coffee. A short beep will alternate between the temperature setting (HIGH, MED...
Use & Care Guide
Page 12
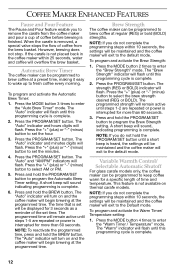
...button. Press the MODE button 2 times to enter the "Auto Brew Timer" mode. Variable Warmth Control/ Selectable Automatic Shutoff For glass carafe models only, the coffee maker can be maintained and the coffee maker will flash until steps 1-2 are repeated or power is complete. 12 NOTE:...cup of coffee before brewing is interrupted for a specific length of the set the minutes. 4. The "Auto" indicator will turn on thermal carafe models. Brew Strength The coffee maker can be programmed to set time. Press the MODE button 3 times to enter the "Brew Strength" mode. ...
...button. Press the MODE button 2 times to enter the "Auto Brew Timer" mode. Variable Warmth Control/ Selectable Automatic Shutoff For glass carafe models only, the coffee maker can be maintained and the coffee maker will flash until steps 1-2 are repeated or power is complete. 12 NOTE:...cup of coffee before brewing is interrupted for a specific length of the set the minutes. 4. The "Auto" indicator will turn on thermal carafe models. Brew Strength The coffee maker can be programmed to set time. Press the MODE button 3 times to enter the "Brew Strength" mode. ...
Use & Care Guide
Page 14
...water each button several times. WARNING ■ If only a portion of the dishwasher. 9. Do not use an adapter. NOTE: For thermal carafe models, press the MODE button 5 times to the coffee maker actually brews: The coffee maker requires immediate descaling. If it is complete, the "Clean"... indicator will exit to program the Clean setting. For glass carafe models, press the MODE button 6 times to select "ON." 5. NOTE: If you do not hold the PROGRAM/SET button to the default mode....
...water each button several times. WARNING ■ If only a portion of the dishwasher. 9. Do not use an adapter. NOTE: For thermal carafe models, press the MODE button 5 times to the coffee maker actually brews: The coffee maker requires immediate descaling. If it is complete, the "Clean"... indicator will exit to program the Clean setting. For glass carafe models, press the MODE button 6 times to select "ON." 5. NOTE: If you do not hold the PROGRAM/SET button to the default mode....
Use & Care Guide
Page 15
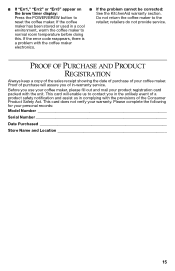
... sales receipt showing the date of purchase of the Consumer Product Safety Act. If the coffee retailer; This card does not verify your personal records: Model Number Serial Number Date Purchased Store Name and Location 15 Please complete the following for your warranty. Press the POWER/BREW button to Do not... do not provide service. ■ If "Err1," "Err2" or "Err3" appear on ■ If the problem cannot be corrected: the brew timer display: See the KitchenAid warranty section.
... sales receipt showing the date of purchase of the Consumer Product Safety Act. If the coffee retailer; This card does not verify your personal records: Model Number Serial Number Date Purchased Store Name and Location 15 Please complete the following for your warranty. Press the POWER/BREW button to Do not... do not provide service. ■ If "Err1," "Err2" or "Err3" appear on ■ If the problem cannot be corrected: the brew timer display: See the KitchenAid warranty section.


