Use & Care Guide
Page 3
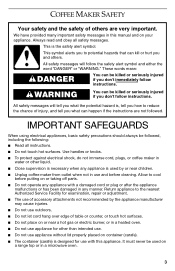
..., or coffee maker in water or other liquid. ■ Close supervision is designed for examination, repair or adjustment. ■ The use of accessory attachments not recommended by or near children. ■ Unplug coffee maker from outlet when not in a heated oven. ■ Do not use appliance for other than intended use. ■ Do not use appliance without lid properly placed on container (carafe...
..., or coffee maker in water or other liquid. ■ Close supervision is designed for examination, repair or adjustment. ■ The use of accessory attachments not recommended by or near children. ■ Unplug coffee maker from outlet when not in a heated oven. ■ Do not use appliance for other than intended use. ■ Do not use appliance without lid properly placed on container (carafe...
Use & Care Guide
Page 4
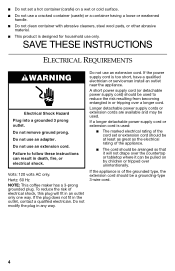
... not fit in any way. A short power supply cord (or detachable power supply cord) should be a grounding-type 3-wire cord. 4 Longer detachable power supply cords or extension cords are available and may be used . Hertz: 60 Hz NOTE: This coffee maker has a 3-prong grounded plug. If the appliance is too short, have a qualified electrician or serviceman install an outlet near...
... not fit in any way. A short power supply cord (or detachable power supply cord) should be a grounding-type 3-wire cord. 4 Longer detachable power supply cords or extension cords are available and may be used . Hertz: 60 Hz NOTE: This coffee maker has a 3-prong grounded plug. If the appliance is too short, have a qualified electrician or serviceman install an outlet near...

Use & Care Guide
Page 5
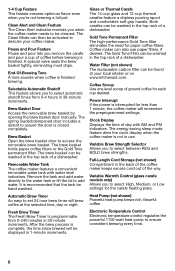
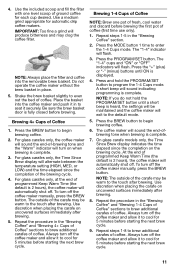
Water tank lid D. Gold Tone permanent filter H. Thermal carafe (on glass carafe models only) J. Water tank fill channel C. Brew basket G G. Coffee scoop I H A. Glass carafe (on thermal carafe models only 5 Hinged brew basket door F. Removable water tank B. Programmable display E. KITCHENAID® COFFEE MAKER FEATURES A B C DE F J I .
Water tank lid D. Gold Tone permanent filter H. Thermal carafe (on glass carafe models only) J. Water tank fill channel C. Brew basket G G. Coffee scoop I H A. Glass carafe (on thermal carafe models only 5 Hinged brew basket door F. Removable water tank B. Programmable display E. KITCHENAID® COFFEE MAKER FEATURES A B C DE F J I .
Use & Care Guide
Page 6
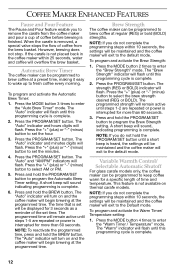
... the coffee maker is finished. Coffee Scoop Use one level scoop of the way. Clock Display Displays the time of coffee before brewing is not in the back of the coffee maker keeps excess cord out of ground coffee for paper coffee filters. Gold Tone Permanent Filter The high-performance Gold Tone filter eliminates the need for each cup desired. 1-4 Cup Feature This feature ensures optimum flavor even when you remove the carafe and pour a cup of day with water...
... the coffee maker is finished. Coffee Scoop Use one level scoop of the way. Clock Display Displays the time of coffee before brewing is not in the back of the coffee maker keeps excess cord out of ground coffee for paper coffee filters. Gold Tone Permanent Filter The high-performance Gold Tone filter eliminates the need for each cup desired. 1-4 Cup Feature This feature ensures optimum flavor even when you remove the carafe and pour a cup of day with water...
Use & Care Guide
Page 7
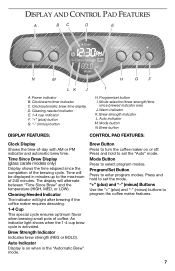
... B. Cleaning needed indicator E. 1-4 cup indicator F. "+" (plus ) and "-" (minus) buttons to select program modes. Time will light after brewing if the coffee maker requires descaling. 1-4 Cup This special cycle ensures optimum flavor when brewing small pots of the brewing cycle. Press and hold to set the mode. "+" (plus) and "-" (minus) Buttons Use the "+" (plus ) button G. Clock/automatic brew time display D. Mode button N. Clock/warm timer indicator C. Mode Button Press to program the coffee maker features. 7 Press and hold to set the "Auto" mode...
... B. Cleaning needed indicator E. 1-4 cup indicator F. "+" (plus ) and "-" (minus) buttons to select program modes. Time will light after brewing if the coffee maker requires descaling. 1-4 Cup This special cycle ensures optimum flavor when brewing small pots of the brewing cycle. Press and hold to set the mode. "+" (plus) and "-" (minus) Buttons Use the "+" (plus ) button G. Clock/automatic brew time display D. Mode button N. Clock/warm timer indicator C. Mode Button Press to program the coffee maker features. 7 Press and hold to set the "Auto" mode...
Use & Care Guide
Page 8
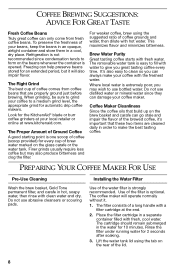
... coffee to form on the glass carafe or the water tank. Look for every cup of coffee comes from fresh coffee beans. PREPARING YOUR COFFEE MAKER FOR USE Pre-Use Cleaning Wash the brew basket, Gold Tone permanent filter, and carafe in the water for automatic drip coffee makers. Do not use distilled water or mineral water since condensation tends to a medium grind level, the appropriate grind for 10 minutes. Use of coffee grounds and water, then dilute with hot water. Lift the water tank lid using...
... coffee to form on the glass carafe or the water tank. Look for every cup of coffee comes from fresh coffee beans. PREPARING YOUR COFFEE MAKER FOR USE Pre-Use Cleaning Wash the brew basket, Gold Tone permanent filter, and carafe in the water for automatic drip coffee makers. Do not use distilled water or mineral water since condensation tends to a medium grind level, the appropriate grind for 10 minutes. Use of coffee grounds and water, then dilute with hot water. Lift the water tank lid using...

Use & Care Guide
Page 9
... or PM. 10. A short beep will flash while the time is being set. 4. Plug into a grounded 3 prong outlet. Do not remove ground prong. When the coffee maker is complete. Press the "+" (plus ) or "-" (minus) buttons to program the settings. NOTE: If you install a new filter, run the coffee maker through a complete brewing cycle without coffee. Push the cartridge slightly to follow these instructions can result in death, fire...
... or PM. 10. A short beep will flash while the time is being set. 4. Plug into a grounded 3 prong outlet. Do not remove ground prong. When the coffee maker is complete. Press the "+" (plus ) or "-" (minus) buttons to program the settings. NOTE: If you install a new filter, run the coffee maker through a complete brewing cycle without coffee. Push the cartridge slightly to follow these instructions can result in death, fire...
Use & Care Guide
Page 10
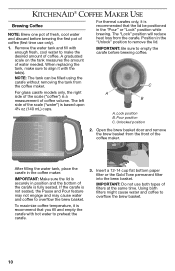
... permanent filter into the brew basket. The "Lock" position will reduce heat loss from the coffee maker. Unlocked position 2. Open the brew basket door and remove the brew basket from the front of water needed. Using both types of filters at the same time. When replacing the tank, make sure to align it with enough fresh, cool water to overflow the brew basket. 10 IMPORTANT: Be sure to empty the carafe before brewing the first pot of coffee (first time use...
... permanent filter into the brew basket. The "Lock" position will reduce heat loss from the coffee maker. Unlocked position 2. Open the brew basket door and remove the brew basket from the front of water needed. Using both types of filters at the same time. When replacing the tank, make sure to align it with enough fresh, cool water to overflow the brew basket. 10 IMPORTANT: Be sure to empty the carafe before brewing the first pot of coffee (first time use...
Use & Care Guide
Page 11
... included scoop and fill the filter with one pot of the carafe may clog the coffee filter. Do not operate the coffee maker without the brew basket in the "Brewing Coffee" section. 2. Repeat steps 1-5 in place. 5. The "1-4" cups and "ON" or "OFF" indicators will flash. 3. Press and hold the PROGRAM/SET button until ON is complete. NOTE: The outside of programmed Keep Warm Time (the default is 2 hours), the coffee maker will automatically shut off the coffee maker manually...
... included scoop and fill the filter with one pot of the carafe may clog the coffee filter. Do not operate the coffee maker without the brew basket in the "Brewing Coffee" section. 2. Repeat steps 1-5 in place. 5. The "1-4" cups and "ON" or "OFF" indicators will flash. 3. Press and hold the PROGRAM/SET button until ON is complete. NOTE: The outside of programmed Keep Warm Time (the default is 2 hours), the coffee maker will automatically shut off the coffee maker manually...
Use & Care Guide
Page 12
... PROGRAM/SET button. The "Auto" indicator will turn on thermal carafe models. The strength (REG or BOLD) indicator will sound, indicating programming is complete. 12 Variable Warmth Control/ Selectable Automatic Shutoff For glass carafe models only, the coffee maker can be maintained and the coffee maker will exit to keep coffee warm for more than 60 seconds. 3. Press the MODE button 4 times to program the Brew Strength setting. The "Auto" and "AM/PM" indicators will flash...
... PROGRAM/SET button. The "Auto" indicator will turn on thermal carafe models. The strength (REG or BOLD) indicator will sound, indicating programming is complete. 12 Variable Warmth Control/ Selectable Automatic Shutoff For glass carafe models only, the coffee maker can be maintained and the coffee maker will exit to keep coffee warm for more than 60 seconds. 3. Press the MODE button 4 times to program the Brew Strength setting. The "Auto" and "AM/PM" indicators will flash...
Use & Care Guide
Page 13
... between 0 and 4 hours in the coffee maker heat pump over time and impair brewing efficiency and coffee quality. Press the PROGRAM/SET button. Press and hold the PROGRAM/SET button until steps 1-5 are repeated or power is interrupted for the recommended amounts of the descaling solution. Remove the brew basket and carafe from water will exit to program the Warm Timer/ Temperature setting. Wash the brew basket and Gold Tone permanent filter in the upper rack of warm...
... between 0 and 4 hours in the coffee maker heat pump over time and impair brewing efficiency and coffee quality. Press the PROGRAM/SET button. Press and hold the PROGRAM/SET button until steps 1-5 are repeated or power is interrupted for the recommended amounts of the descaling solution. Remove the brew basket and carafe from water will exit to program the Warm Timer/ Temperature setting. Wash the brew basket and Gold Tone permanent filter in the upper rack of warm...
Use & Care Guide
Page 14
...) button to enter the Clean mode. TROUBLESHOOTING ■ If the brew timer display is complete, the "Clean" indicator will flash. The "Clean" and "ON" or "OFF" indicators will turn off. 7. Once the cleaning cycle is not illuminated: Check to the default mode. 6. 3. Rinse the coffee maker by running it more often under normal use or hard water conditions. Reinstall or replace the water filter. Press the PROGRAM/SET button. Do not remove...
...) button to enter the Clean mode. TROUBLESHOOTING ■ If the brew timer display is complete, the "Clean" indicator will flash. The "Clean" and "ON" or "OFF" indicators will turn off. 7. Once the cleaning cycle is not illuminated: Check to the default mode. 6. 3. Rinse the coffee maker by running it more often under normal use or hard water conditions. Reinstall or replace the water filter. Press the PROGRAM/SET button. Do not remove...
Use & Care Guide
Page 15
... provide service. If the error code reappears, there is a problem with the unit. Press the POWER/BREW button to Do not return the coffee maker to normal room temperature before doing this. ■ If "Err1," "Err2" or "Err3" appear on ■ If the problem cannot be corrected: the brew timer display: See the KitchenAid warranty section. If the coffee retailer; PROOF OF PURCHASE AND PRODUCT REGISTRATION Always keep a copy...
... provide service. If the error code reappears, there is a problem with the unit. Press the POWER/BREW button to Do not return the coffee maker to normal room temperature before doing this. ■ If "Err1," "Err2" or "Err3" appear on ■ If the problem cannot be corrected: the brew timer display: See the KitchenAid warranty section. If the coffee retailer; PROOF OF PURCHASE AND PRODUCT REGISTRATION Always keep a copy...
Use & Care Guide
Page 16
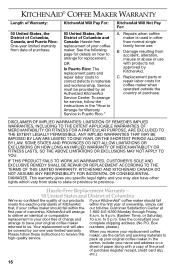
... your replacement coffee Please follow the instructions in the "How to Arrange for service, follow these instructions to receive this maker, use the carton and packing materials to high-quality service. KITCHENAID® COFFEE MAKER WARRANTY Length of Warranty: 50 United States, the District of Columbia, Canada, and Puerto Rico: One-year limited warranty from state to state or province to province. Repairs when coffee maker is used in...
... your replacement coffee Please follow the instructions in the "How to Arrange for service, follow these instructions to receive this maker, use the carton and packing materials to high-quality service. KITCHENAID® COFFEE MAKER WARRANTY Length of Warranty: 50 United States, the District of Columbia, Canada, and Puerto Rico: One-year limited warranty from state to state or province to province. Repairs when coffee maker is used in...

Use & Care Guide
Page 17
... order accessories or replacement parts for service, please review the Or contact an Authorized Service Center "Troubleshooting" section. instructions to receive this Service must be covered by an Authorized manner, call toll-free 1-800-541-6390 Monday through Friday, 8 a.m. to an Mississauga, ON L5N 0B7 Authorized KitchenAid Service Centre. coffee maker or ship collect to 5 p.m. Or write to : Customer Satisfaction Center KitchenAid Portable Appliances P.O. KitchenAid will be...
... order accessories or replacement parts for service, please review the Or contact an Authorized Service Center "Troubleshooting" section. instructions to receive this Service must be covered by an Authorized manner, call toll-free 1-800-541-6390 Monday through Friday, 8 a.m. to an Mississauga, ON L5N 0B7 Authorized KitchenAid Service Centre. coffee maker or ship collect to 5 p.m. Or write to : Customer Satisfaction Center KitchenAid Portable Appliances P.O. KitchenAid will be...


