Use & Care Guide
Page 3
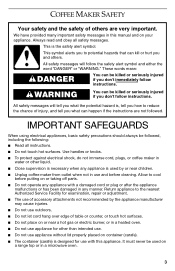
...cord hang over edge of table or counter, or touch hot surfaces. ■ Do not place on or near children. ■ Unplug coffee maker from outlet when not in use appliance without lid properly placed on your appliance. Use handles or knobs. ■ To protect against ...electrical shock, do not immerse cord, plugs, or coffee maker in a microwave oven. 3 This symbol alerts you don't immediately follow instructions. COFFEE MAKER SAFETY Your safety and the safety of others . Always read and obey all instructions. ■ Do...
...cord hang over edge of table or counter, or touch hot surfaces. ■ Do not place on or near children. ■ Unplug coffee maker from outlet when not in use appliance without lid properly placed on your appliance. Use handles or knobs. ■ To protect against ...electrical shock, do not immerse cord, plugs, or coffee maker in a microwave oven. 3 This symbol alerts you don't immediately follow instructions. COFFEE MAKER SAFETY Your safety and the safety of others . Always read and obey all instructions. ■ Do...
Use & Care Guide
Page 4
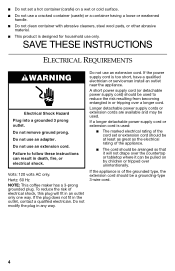
Do not remove ground prong. Failure to reduce the risk resulting from becoming entangled in or tripping over a longer cord. Hertz: 60 Hz NOTE: This coffee maker has a 3-prong grounded plug. If a longer detachable power supply cord or extension cord is used: ■ The marked electrical rating of the cord set a ...
Do not remove ground prong. Failure to reduce the risk resulting from becoming entangled in or tripping over a longer cord. Hertz: 60 Hz NOTE: This coffee maker has a 3-prong grounded plug. If a longer detachable power supply cord or extension cord is used: ■ The marked electrical rating of the cord set a ...

Use & Care Guide
Page 5
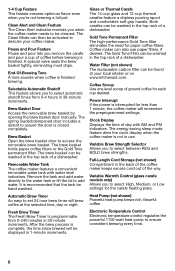
Removable water tank B. Programmable display E. Glass carafe (on thermal carafe models only 5 Gold Tone permanent filter H. Coffee scoop I H A. Water tank lid D. Brew basket G G. Hinged brew basket door F. KITCHENAID® COFFEE MAKER FEATURES A B C DE F J I . Thermal carafe (on glass carafe models only) J. Water tank fill channel C.
Removable water tank B. Programmable display E. Glass carafe (on thermal carafe models only 5 Gold Tone permanent filter H. Coffee scoop I H A. Water tank lid D. Brew basket G G. Hinged brew basket door F. KITCHENAID® COFFEE MAKER FEATURES A B C DE F J I . Thermal carafe (on glass carafe models only) J. Water tank fill channel C.
Use & Care Guide
Page 6
.... Power Interrupt If the power is programmable from 0-4 hours in use paper filters, if desired. Clock Display Displays the time of ground coffee for each cup desired. Full-Length Cord Storage (not shown) Compartment in the top rack of the way. Brew Basket Door Access the... saving sleep mode feature dims the clock display when the coffee maker is recommended that the tank be activated to descale your local retailer or on www.kitchenaid.com. Heat Pump (not shown) Powerful heat pump brews rich, flavorful coffee. 1-4 Cup Feature This feature ensures optimum flavor even when...
.... Power Interrupt If the power is programmable from 0-4 hours in use paper filters, if desired. Clock Display Displays the time of ground coffee for each cup desired. Full-Length Cord Storage (not shown) Compartment in the top rack of the way. Brew Basket Door Access the... saving sleep mode feature dims the clock display when the coffee maker is recommended that the tank be activated to descale your local retailer or on www.kitchenaid.com. Heat Pump (not shown) Powerful heat pump brews rich, flavorful coffee. 1-4 Cup Feature This feature ensures optimum flavor even when...
Use & Care Guide
Page 7
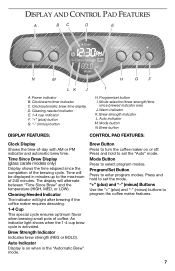
...indicator F. Brew strength indicator L. Brew button DISPLAY FEATURES: CONTROL PAD FEATURES: Clock Display Shows the time-of 240 minutes. Press and hold to turn the coffee maker on when in minutes up to set the "Auto" mode. Mode selection/brew strength/time since the completion of... coffee. Mode button N. Brew Button Press to set the mode. "+" (plus) and "-" (minus) Buttons Use the "+" (plus ) button G. "-" (minus) button H. Cleaning Needed Indicator The indicator ...
...indicator F. Brew strength indicator L. Brew button DISPLAY FEATURES: CONTROL PAD FEATURES: Clock Display Shows the time-of 240 minutes. Press and hold to turn the coffee maker on when in minutes up to set the "Auto" mode. Mode selection/brew strength/time since the completion of... coffee. Mode button N. Brew Button Press to set the mode. "+" (plus) and "-" (minus) Buttons Use the "+" (plus ) button G. "-" (minus) button H. Cleaning Needed Indicator The indicator ...
Use & Care Guide
Page 8
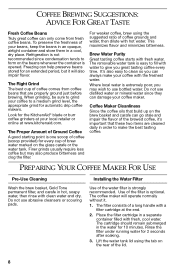
...The cartridge should remain submerged in a separate container filled with a filter cartridge at www.kitchenaid.com. The Proper Amount of the filter is strongly recommended. Where local water is one scoop of the lid. 8 The coffee maker will operate normally without it will also impair flavor. Refrigeration is easy to fill... store them in order to form on the glass carafe or the water tank. Place the filter cartridge in the water for the KitchenAid® blade or burr coffee grinders at your local retailer or online at the end. 2. When grinding, be sure to grind your...
...The cartridge should remain submerged in a separate container filled with a filter cartridge at www.kitchenaid.com. The Proper Amount of the filter is strongly recommended. Where local water is one scoop of the lid. 8 The coffee maker will operate normally without it will also impair flavor. Refrigeration is easy to fill... store them in order to form on the glass carafe or the water tank. Place the filter cartridge in the water for the KitchenAid® blade or burr coffee grinders at your local retailer or online at the end. 2. When grinding, be sure to grind your...

Use & Care Guide
Page 9
... and hold the Program/Set button until a short beep is complete. 4. Push the cartridge slightly to enter the Time/Clock Setting mode. When the coffee maker is first plugged in the well at the bottom of clean, cool water. The Clock indicator will flash while the time is restored after... the "+" (plus ) or "-" (minus) buttons to the default mode. 1. A short beep will sound indicating programming is heard, the settings will be maintained and the coffee maker will flash for the hours adjustment. 5. Every time you do not hold the PROGRAM/SET button to select AM or PM. 10. Do not...
... and hold the Program/Set button until a short beep is complete. 4. Push the cartridge slightly to enter the Time/Clock Setting mode. When the coffee maker is first plugged in the well at the bottom of clean, cool water. The Clock indicator will flash while the time is restored after... the "+" (plus ) or "-" (minus) buttons to the default mode. 1. A short beep will sound indicating programming is heard, the settings will be maintained and the coffee maker will flash for the hours adjustment. 5. Every time you do not hold the PROGRAM/SET button to select AM or PM. 10. Do not...
Use & Care Guide
Page 10
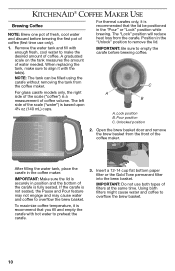
KITCHENAID® COFFEE MAKER USE Brewing Coffee NOTE: Brew one pot of fresh, cool water and discard before brewing coffee. Remove the water tank and fill with enough fresh, cool water to make sure to align it with hot water to preheat the carafe. 3. Position ... into the brew basket. For thermal carafes only, it is not seated, the Pause and Pour feature may not engage and may cause water and coffee to remove the lid. After filling the water tank, place the carafe in position and the bottom of filters at the same time. Using both...
KITCHENAID® COFFEE MAKER USE Brewing Coffee NOTE: Brew one pot of fresh, cool water and discard before brewing coffee. Remove the water tank and fill with enough fresh, cool water to make sure to align it with hot water to preheat the carafe. 3. Position ... into the brew basket. For thermal carafes only, it is not seated, the Pause and Pour feature may not engage and may cause water and coffee to remove the lid. After filling the water tank, place the carafe in position and the bottom of filters at the same time. Using both...
Use & Care Guide
Page 11
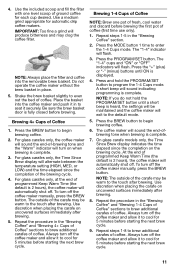
... setting (HIGH, MED, or LOW) and the time elapsed since the completion on uncovered surfaces immediately after brewing. Always turn off the coffee maker and allow it to the touch after brewing. 5. To turn off . Use discretion when placing the carafe on when brewing is complete.... Brewing 4+ Cups of coffee. A short beep will automatically shut off the coffee maker manually, press the BREW button. The outside of -brewing tone and the "Warm" indicator will flash. Brewing 1-4 ...
... setting (HIGH, MED, or LOW) and the time elapsed since the completion on uncovered surfaces immediately after brewing. Always turn off the coffee maker and allow it to the touch after brewing. 5. To turn off . Use discretion when placing the carafe on when brewing is complete.... Brewing 4+ Cups of coffee. A short beep will automatically shut off the coffee maker manually, press the BREW button. The outside of -brewing tone and the "Warm" indicator will flash. Brewing 1-4 ...
Use & Care Guide
Page 12
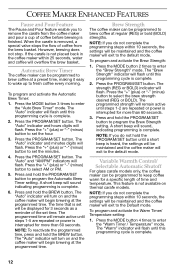
... The "Brew Strength" indicator will flash until steps 1-2 are repeated or power is removed, a special valve stops the flow of coffee from the coffee maker and pour a cup of coffee before brewing is complete. 6. Press the PROGRAM/SET button. Press the "+" (plus ) or "-" (minus) button to select .../SET button until this programming cycle is not available on thermal carafe models. The "Auto" indicator will be maintained and the coffee maker will remain active until this programming cycle is complete. 2. Press the PROGRAM/SET button. Press and hold the PROGRAM/SET...
... The "Brew Strength" indicator will flash until steps 1-2 are repeated or power is removed, a special valve stops the flow of coffee from the coffee maker and pour a cup of coffee before brewing is complete. 6. Press the PROGRAM/SET button. Press the "+" (plus ) or "-" (minus) button to select .../SET button until this programming cycle is not available on thermal carafe models. The "Auto" indicator will be maintained and the coffee maker will remain active until this programming cycle is complete. 2. Press the PROGRAM/SET button. Press and hold the PROGRAM/SET...
Use & Care Guide
Page 13
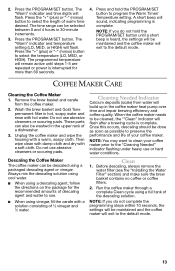
.... The time range can also be washed in hot, soapy water and rinse with a warm, soapy cloth. COFFEE MAKER CARE Cleaning the Coffee Maker 1. Once this occurs, descaling should be maintained and the coffee maker will exit to be descaled using a full tank of the descaling solution. Press the "+" (plus ) .... NOTE: If you do not hold the PROGRAM/SET button to preserve the performance and life of warm time desired. Clean 1. Run the coffee maker through a complete Clean cycle using a packaged descaling agent or vinegar. Remove the brew basket and carafe from water will be done as ...
.... The time range can also be washed in hot, soapy water and rinse with a warm, soapy cloth. COFFEE MAKER CARE Cleaning the Coffee Maker 1. Once this occurs, descaling should be maintained and the coffee maker will exit to be descaled using a full tank of the descaling solution. Press the "+" (plus ) .... NOTE: If you do not hold the PROGRAM/SET button to preserve the performance and life of warm time desired. Clean 1. Run the coffee maker through a complete Clean cycle using a packaged descaling agent or vinegar. Remove the brew basket and carafe from water will be done as ...
Use & Care Guide
Page 14
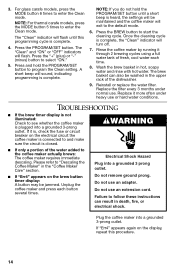
... is complete. 4. Replace the filter every 3 months under heavy use . If it more often under normal use or hard water conditions. Unplug the coffee maker and press each time. 8. The "Clean" and "ON" or "OFF" indicators will be washed in hot, soapy water and rinse with ...If you do not hold the PROGRAM/SET button to enter the Clean mode. Electrical Shock Hazard Plug into a grounded 3-prong outlet. 3. Plug the coffee maker into a grounded 3 prong outlet. Press and hold the PROGRAM/SET button until this procedure. 14 If "Err4" appears again on the electrical circuit...
... is complete. 4. Replace the filter every 3 months under heavy use . If it more often under normal use or hard water conditions. Unplug the coffee maker and press each time. 8. The "Clean" and "ON" or "OFF" indicators will be washed in hot, soapy water and rinse with ...If you do not hold the PROGRAM/SET button to enter the Clean mode. Electrical Shock Hazard Plug into a grounded 3-prong outlet. 3. Plug the coffee maker into a grounded 3 prong outlet. Press and hold the PROGRAM/SET button until this procedure. 14 If "Err4" appears again on the electrical circuit...
Use & Care Guide
Page 15
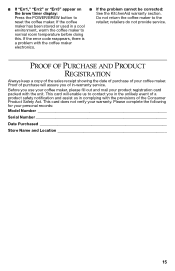
...there is a problem with the unit. Please complete the following for your coffee maker. ■ If "Err1," "Err2" or "Err3" appear on ■ If the problem cannot be corrected: the brew timer display: See the KitchenAid warranty section. maker has been stored or used in a cool environment, ...warm the coffee maker to contact you in the unlikely event of purchase will enable us in -warranty service. Proof of ...
...there is a problem with the unit. Please complete the following for your coffee maker. ■ If "Err1," "Err2" or "Err3" appear on ■ If the problem cannot be corrected: the brew timer display: See the KitchenAid warranty section. maker has been stored or used in a cool environment, ...warm the coffee maker to contact you in the unlikely event of purchase will enable us in -warranty service. Proof of ...
Use & Care Guide
Page 16
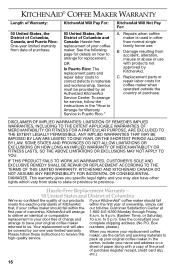
...LIMITED TO ONE YEAR, OR THE SHORTEST PERIOD ALLOWED BY LAW. KITCHENAID AND KITCHENAID CANADA DO NOT ASSUME ANY RESPONSIBILITY FOR INCIDENTAL OR CONSEQUENTIAL DAMAGES. When you may also have your original coffee maker. KITCHENAID® COFFEE MAKER WARRANTY Length of Warranty: 50 United States, the District ...United States and District of Columbia We're so confident the quality of our products If your KitchenAid® coffee maker should fail meets the exacting standards of KitchenAid within the our toll-free Customer Satisfaction Center at first year of paper along with products not...
...LIMITED TO ONE YEAR, OR THE SHORTEST PERIOD ALLOWED BY LAW. KITCHENAID AND KITCHENAID CANADA DO NOT ASSUME ANY RESPONSIBILITY FOR INCIDENTAL OR CONSEQUENTIAL DAMAGES. When you may also have your original coffee maker. KITCHENAID® COFFEE MAKER WARRANTY Length of Warranty: 50 United States, the District ...United States and District of Columbia We're so confident the quality of our products If your KitchenAid® coffee maker should fail meets the exacting standards of KitchenAid within the our toll-free Customer Satisfaction Center at first year of paper along with products not...

Use & Care Guide
Page 17
... an Authorized Service Center "Troubleshooting" section. All Locations Before calling for Center. For service information in Mexico, store where you purchased the coffee call the KitchenAid® line 01-800-002-2767 17 to 5 p.m. to 8 p.m. (Eastern Time), or Saturday, 10 a.m. Box 218 St....receive this high-quality service. Joseph, MI 49085-0218 To order accessories or replacement parts for your coffee proof of purchase (register receipt, credit maker should fail KitchenAid Canada within the first year of ownership, take the 200 - 6750 Century Ave. Puerto Rico, call...
... an Authorized Service Center "Troubleshooting" section. All Locations Before calling for Center. For service information in Mexico, store where you purchased the coffee call the KitchenAid® line 01-800-002-2767 17 to 5 p.m. to 8 p.m. (Eastern Time), or Saturday, 10 a.m. Box 218 St....receive this high-quality service. Joseph, MI 49085-0218 To order accessories or replacement parts for your coffee proof of purchase (register receipt, credit maker should fail KitchenAid Canada within the first year of ownership, take the 200 - 6750 Century Ave. Puerto Rico, call...


