

User Manual
Page 1
...) Refer to read through this instruction manual. KRC-208S KRC-218 KRC-28MR CASSETTE RECEIVER INSTRUCTION MANUAL AMPLI-TUNER-LECTEUR DE CASSETTE MODE D'EMPLOI RADIO CASETE MANUAL DE INSTRUCCIONES RADIO CASSETE MANUAL DE INSTRUÇÕES Take the time to the model and serial numbers whenever you obtain the best performance from your new cassette-receiver. For your KENWOOD dealer for information or service on the warranty card, and in...
...) Refer to read through this instruction manual. KRC-208S KRC-218 KRC-28MR CASSETTE RECEIVER INSTRUCTION MANUAL AMPLI-TUNER-LECTEUR DE CASSETTE MODE D'EMPLOI RADIO CASETE MANUAL DE INSTRUCCIONES RADIO CASSETE MANUAL DE INSTRUÇÕES Take the time to the model and serial numbers whenever you obtain the best performance from your new cassette-receiver. For your KENWOOD dealer for information or service on the warranty card, and in...
User Manual
Page 2
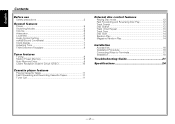
... Contents Before use Safety precautions 3 General features Power 5 Switching Modes 5 Volume 6 Attenuator 6 Loudness 6 Audio Control Setting 6 ec4/dB(Sound Coordinate 7 Clock display 7 Adjusting Time 7 Theft Deterrent Faceplate 8 Tuner features Tuning 9 Station Preset Memory 9 Auto Memory Entry 9 Cleam Reception System Circuit (CRSC 10 Cassette player features Playing Cassette Tapes 11 Fast Forwarding and Rewinding Cassette Tapes 11 Tuner Call 11 External disc control features Playing Disc mode 12 Fast Forwarding and Reversing Disc Play 12 Track Search 13 Disc Search 13...
... Contents Before use Safety precautions 3 General features Power 5 Switching Modes 5 Volume 6 Attenuator 6 Loudness 6 Audio Control Setting 6 ec4/dB(Sound Coordinate 7 Clock display 7 Adjusting Time 7 Theft Deterrent Faceplate 8 Tuner features Tuning 9 Station Preset Memory 9 Auto Memory Entry 9 Cleam Reception System Circuit (CRSC 10 Cassette player features Playing Cassette Tapes 11 Fast Forwarding and Rewinding Cassette Tapes 11 Tuner Call 11 External disc control features Playing Disc mode 12 Fast Forwarding and Reversing Disc Play 12 Track Search 13 Disc Search 13...
User Manual
Page 3
...; Do not set the removed faceplate or the faceplate case in place. Also avoid places with too much dust or the possibility of precision equipment. • When replacing a fuse, only use the wrong screws, you connect them incorrectly. - 3- IMPORTANT INFORMATION You cannot connect the unit directly to direct sunlight or excessive heat or humidity. If you use a new one with this model. 2CAUTION You...
...; Do not set the removed faceplate or the faceplate case in place. Also avoid places with too much dust or the possibility of precision equipment. • When replacing a fuse, only use the wrong screws, you connect them incorrectly. - 3- IMPORTANT INFORMATION You cannot connect the unit directly to direct sunlight or excessive heat or humidity. If you use a new one with this model. 2CAUTION You...

User Manual
Page 4
... of time, magnetic powder from what appears on the display on dashboards and other parts inside the unit, causing unit failure. • Remove a cassette tape from the unit when not listening to explain more clearly how the controls are expressly approved in the instruction manual. Cleaning the Faceplate Terminals If the terminals on the tape head, causing noise and a deterioration in sound quality...
... of time, magnetic powder from what appears on the display on dashboards and other parts inside the unit, causing unit failure. • Remove a cassette tape from the unit when not listening to explain more clearly how the controls are expressly approved in the instruction manual. Cleaning the Faceplate Terminals If the terminals on the tape head, causing noise and a deterioration in sound quality...
User Manual
Page 5
... the power to anything. Use this mode when you press the SRC (source) button, the mode switches as follows: M Tuner mode M Tape mode M External disc control mode (KRC-208S/28MR only) M Standby mode Selecting standby mode: Press the SRC button repeatedly and switch to the next mode from any mode which cannot be used. - 5- NOTE The mode switches to "OFF" . When "OFF" is displayed, the standby mode is activated. NOTE Turn the power on the power: Press the SRC (source) button. General...
... the power to anything. Use this mode when you press the SRC (source) button, the mode switches as follows: M Tuner mode M Tape mode M External disc control mode (KRC-208S/28MR only) M Standby mode Selecting standby mode: Press the SRC button repeatedly and switch to the next mode from any mode which cannot be used. - 5- NOTE The mode switches to "OFF" . When "OFF" is displayed, the standby mode is activated. NOTE Turn the power on the power: Press the SRC (source) button. General...

User Manual
Page 6
... u button to turn down the volume. Setting values: - 4 - + 4 Audio Control Setting Adjust various parameters of the adjustment modes. Please refer to switch the loudness on and off . Setting values: - 4 - + 4 "TRE" : Adjust the treble level. NOTE Source tone memory Each source ( tape, CD, FM, AM and disc changer ) has its own memory in which to turn down . Loudness This function amplifies low and high tones when the volume is pressed, the adjustment mode will change. Attenuator This function allows you use...
... u button to turn down the volume. Setting values: - 4 - + 4 Audio Control Setting Adjust various parameters of the adjustment modes. Please refer to switch the loudness on and off . Setting values: - 4 - + 4 "TRE" : Adjust the treble level. NOTE Source tone memory Each source ( tape, CD, FM, AM and disc changer ) has its own memory in which to turn down . Loudness This function amplifies low and high tones when the volume is pressed, the adjustment mode will change. Attenuator This function allows you use...

User Manual
Page 7
... the bass and treble tones are recalled. #1: Flat #2: Rock #3: Pops/Top 40 #4: Jazz #5: Easy 3 Press the AUD button to switch the clock display on and off. NOTE You can recall the best audio setting preset for at least one second to enter the clock adjustment mode. Clock display Turning clock display On/Off: Press the CLK button to end the sound coordinate mode. The preset settings of the music. 1 Press the AUD button to...
... the bass and treble tones are recalled. #1: Flat #2: Rock #3: Pops/Top 40 #4: Jazz #5: Easy 3 Press the AUD button to switch the clock display on and off. NOTE You can recall the best audio setting preset for at least one second to enter the clock adjustment mode. Clock display Turning clock display On/Off: Press the CLK button to end the sound coordinate mode. The preset settings of the music. 1 Press the AUD button to...

User Manual
Page 8
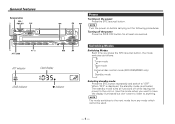
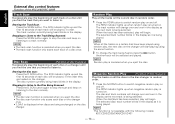
... piece of water splashing. Release button Projections Grooves Removing the Faceplate: Press the release button. Tuner features SRC AUTO / AME 4 FM / CRSC ¢ SRC PWR OFF 40Wx 4 HIGH POWER AUTO AME CLK ADJ LOUD ATT SCAN 1 2 RDM 3 REP 4 TC/D.SCN 5 M.RDM 6 #1 ~ 6 REW FF PR OG FM CRSC DISC AUD A.ADJ AM AM STEREO indicator Frequency Preset station number indicator AUTO indicator Band display -8- Also avoid places with...
... piece of water splashing. Release button Projections Grooves Removing the Faceplate: Press the release button. Tuner features SRC AUTO / AME 4 FM / CRSC ¢ SRC PWR OFF 40Wx 4 HIGH POWER AUTO AME CLK ADJ LOUD ATT SCAN 1 2 RDM 3 REP 4 TC/D.SCN 5 M.RDM 6 #1 ~ 6 REW FF PR OG FM CRSC DISC AUD A.ADJ AM AM STEREO indicator Frequency Preset station number indicator AUTO indicator Band display -8- Also avoid places with...
User Manual
Page 9
... tuning is especially useful when you press the FM button, the band switches between auto seek tuning and manual tuning. The numbers of a station. Station Preset Memory Store the frequency of the preset station buttons are used for the desired station. Each time you are travelling and do not know what stations are being listened to, and then recall them with a single touch of the recalled station is displayed when the tuner mode has been selected...
... tuning is especially useful when you press the FM button, the band switches between auto seek tuning and manual tuning. The numbers of a station. Station Preset Memory Store the frequency of the preset station buttons are used for the desired station. Each time you are travelling and do not know what stations are being listened to, and then recall them with a single touch of the recalled station is displayed when the tuner mode has been selected...

User Manual
Page 10
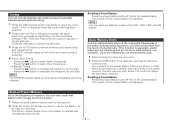
... station. Cassette player features SRC 0 SRC PWR OFF 40Wx 4 HIGH POWER AUTO AME CLK ADJ LOUD ATT SCAN 1 2 RDM 3 REP 4 T.C/D.SCN 5 M.RDM 6 T.C ( T.CALL ) REW FF REW FF PR OG FM CRSC DISC AUD A.ADJ AM T.CALL indicator Tape indicator 40Wx 4 40Wx 4 - 10 - The indicator lights up when CRSC is turned on. Turning CRSC On/Off: Pres4s0Wtxh4 e CRSC button for this function...
... station. Cassette player features SRC 0 SRC PWR OFF 40Wx 4 HIGH POWER AUTO AME CLK ADJ LOUD ATT SCAN 1 2 RDM 3 REP 4 T.C/D.SCN 5 M.RDM 6 T.C ( T.CALL ) REW FF REW FF PR OG FM CRSC DISC AUD A.ADJ AM T.CALL indicator Tape indicator 40Wx 4 40Wx 4 - 10 - The indicator lights up when CRSC is turned on. Turning CRSC On/Off: Pres4s0Wtxh4 e CRSC button for this function...

User Manual
Page 11
... the FF button and REW button at the same time. Tape play switches to the other side. If you are rewinding or fast forwarding the tape. Turning Tuner Call On/Off: Press the T.C(T.CALL) button to the tape head and cause unit malfunction. The tape indicator blinks in the direction of the tape as it is being rewound. NOTE Remove a cassette from...
... the FF button and REW button at the same time. Tape play switches to the other side. If you are rewinding or fast forwarding the tape. Turning Tuner Call On/Off: Press the T.C(T.CALL) button to the tape head and cause unit malfunction. The tape indicator blinks in the direction of the tape as it is being rewound. NOTE Remove a cassette from...
User Manual
Page 12
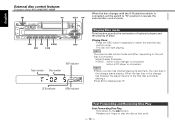
... When the disc changer with the O-N selection switch is connected. When the last disc in the changer starts playing. Release your finger to play the disc at that is connected, set the switch to "N" position to operate the external disc control mode. Playing Discs: Press the SRC button repeatedly to the first disc and starts playing it. • Disc #10 is displayed as "0". Fast Forwarding and Reversing Disc Play Fast Forwarding Disc Play: Hold down on the unit that...
... When the disc changer with the O-N selection switch is connected. When the last disc in the changer starts playing. Release your finger to play the disc at that is connected, set the switch to "N" position to operate the external disc control mode. Playing Discs: Press the SRC button repeatedly to the first disc and starts playing it. • Disc #10 is displayed as "0". Fast Forwarding and Reversing Disc Play Fast Forwarding Disc Play: Hold down on the unit that...
User Manual
Page 13
... on the disc until you eject the disc. - 13 - The track number blinks in a disc changer. Reversing Disc Play: Hold down on . Play starts at the beginning of that , and so forth. Making a Forward Disc Search: Press the DISC+ button to display the desired track number. NOTE Pressing the 4 button while listening to . NOTE You cannot make a forward track search when listening to switch repeat track/disc play on and...
... on the disc until you eject the disc. - 13 - The track number blinks in a disc changer. Reversing Disc Play: Hold down on . Play starts at the beginning of that , and so forth. Making a Forward Disc Search: Press the DISC+ button to display the desired track number. NOTE Pressing the 4 button while listening to . NOTE You cannot make a forward track search when listening to switch repeat track/disc play on and...
User Manual
Page 14
... with the following models: KDC-C200/C300/C400/C301/C401 - 14 - The selected disc/ track number blinks in order. English External disc control features Function of the KRC-208S/KRC-28MR Track Scan Successively play the beginning of each track on and off . Disc Scan (Function of disc changers) Successively play the beginning of each disc on the changer will be played, in the display as it is turned on and...
... with the following models: KDC-C200/C300/C400/C301/C401 - 14 - The selected disc/ track number blinks in order. English External disc control features Function of the KRC-208S/KRC-28MR Track Scan Successively play the beginning of each track on and off . Disc Scan (Function of disc changers) Successively play the beginning of each disc on the changer will be played, in the display as it is turned on and...
User Manual
Page 16
... - Make the proper input and output wire connections for details. - 16 - Install the unit in the following order: ground, battery, ignition. 5. Press the reset button. 2CAUTION • If your car. 7. The unit may die. • If the console has a lid, make sure to install the unit so that can be damaged or fail to work if you connect the ignition wire to cause a short circuit, then replace the old fuse...
... - Make the proper input and output wire connections for details. - 16 - Install the unit in the following order: ground, battery, ignition. 5. Press the reset button. 2CAUTION • If your car. 7. The unit may die. • If the console has a lid, make sure to install the unit so that can be damaged or fail to work if you connect the ignition wire to cause a short circuit, then replace the old fuse...
User Manual
Page 17
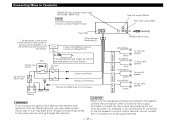
... power control terminal when using the optional power amplifier, or to the car chassis (ground), you may start a fire. connector to Terminals KENWOOD disc changer control input (KRC-208S / 28MR only) NOTE To connect the Disc changer, consult your Disc changer manual. For example, if you connect the + connector of the left speaker Purple/Black Purple To rear right speaker REAR • R Battery 2WARNING If you connect the ignition wire (red) and the battery wire (yellow) to the antenna control terminal in turn...
... power control terminal when using the optional power amplifier, or to the car chassis (ground), you may start a fire. connector to Terminals KENWOOD disc changer control input (KRC-208S / 28MR only) NOTE To connect the Disc changer, consult your Disc changer manual. For example, if you connect the + connector of the left speaker Purple/Black Purple To rear right speaker REAR • R Battery 2WARNING If you connect the ignition wire (red) and the battery wire (yellow) to the antenna control terminal in turn...
User Manual
Page 18
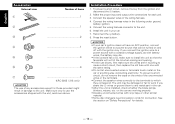
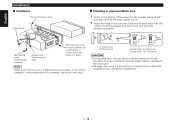
English Installation I Installing in Japanese-Made Cars 1 Refer to the main unit. • Damage may skip). NOTE Make sure that the unit is installed securely in the unit (two locations on each side) with the vehicle mounting bracket and secure the unit with the accessory screws. I Installation Firewall or metal support Accessory4 Self-tapping screw (commercially available) Accessory2 Metal mounting strap Bend the tabs of...
English Installation I Installing in Japanese-Made Cars 1 Refer to the main unit. • Damage may skip). NOTE Make sure that the unit is installed securely in the unit (two locations on each side) with the vehicle mounting bracket and secure the unit with the accessory screws. I Installation Firewall or metal support Accessory4 Self-tapping screw (commercially available) Accessory2 Metal mounting strap Bend the tabs of...
User Manual
Page 21
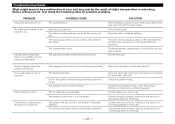
... short circuits in the wires, replace the fuse with the same rating. The car antenna is no sound/the unit will not go into tape mode. Clean the tape head, referring to the section on the unit (see p.4). The input/output wires or wiring harness are incorrectly connected. Reconnect the input/output wires or the wiring harness correctly. Re-insert the tape. The ignition and battery wire are connected incorrectly. Troubleshooting Guide What might seem to...
... short circuits in the wires, replace the fuse with the same rating. The car antenna is no sound/the unit will not go into tape mode. Clean the tape head, referring to the section on the unit (see p.4). The input/output wires or wiring harness are incorrectly connected. Reconnect the input/output wires or the wiring harness correctly. Re-insert the tape. The ignition and battery wire are connected incorrectly. Troubleshooting Guide What might seem to...
User Manual
Page 22
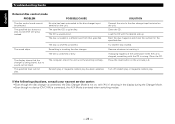
... reset button on the unit. The disc is loaded in the unit is entered when switching modes. - 22 - The specified track will not play . The computer chip in a different slot from that the changer is being played, but another disc instead. Clean the CD. Turn off random play or magazine random play . English Troubleshooting Guide External disc control mode PROBLEM POSSIBLE CAUSE The disc control mode cannot be heard. SOLUTION Connect the wire to the disc changer input...
... reset button on the unit. The disc is loaded in the unit is entered when switching modes. - 22 - The specified track will not play . The computer chip in a different slot from that the changer is being played, but another disc instead. Clean the CD. Turn off random play or magazine random play . English Troubleshooting Guide External disc control mode PROBLEM POSSIBLE CAUSE The disc control mode cannot be heard. SOLUTION Connect the wire to the disc changer input...

User Manual
Page 23
... reset button on the unit. E-11 No tracks are occurring in the unit activates when the temperature inside the automatic disc changer exceeds 60°C (140°F), stopping all operation. ] Cool down . The protective circuit in your system. If the "E- 77" code does not disappear, consult your nearest service center. The disc magazine is malfunctioning for some reason. ] Press the reset button on the unit...
... reset button on the unit. E-11 No tracks are occurring in the unit activates when the temperature inside the automatic disc changer exceeds 60°C (140°F), stopping all operation. ] Cool down . The protective circuit in your system. If the "E- 77" code does not disappear, consult your nearest service center. The disc magazine is malfunctioning for some reason. ] Press the reset button on the unit...


