Instruction Manual
Page 3
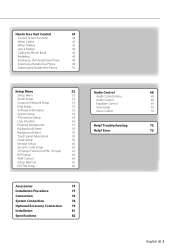
... the Hands-Free Phone 50 Setup Menu 52 Audio Control 68 Setup Menu 52 Audio Control menu 68 Audio Setup 52 Audio Control 68 Crossover Network Setup 53 Equalizer Control 69 iPod Setup 53 Tone setup 70 Software Information 53 Zone Control 70 System Setup 54 AV Interface Setup 54 User ...Clock Setup 59 Monitor Setup 60 Security Code Setup 62 TV Setup (Function of PAL TV type) 63 RDS Setup 64 AMP Control 64 Setup Memory 65 EXT SW Setup 66 Accessories 74 Installation Procedure 75 Connection 76 System Connection 78 Optional Accessory Connection 79...
... the Hands-Free Phone 50 Setup Menu 52 Audio Control 68 Setup Menu 52 Audio Control menu 68 Audio Setup 52 Audio Control 68 Crossover Network Setup 53 Equalizer Control 69 iPod Setup 53 Tone setup 70 Software Information 53 Zone Control 70 System Setup 54 AV Interface Setup 54 User ...Clock Setup 59 Monitor Setup 60 Security Code Setup 62 TV Setup (Function of PAL TV type) 63 RDS Setup 64 AMP Control 64 Setup Memory 65 EXT SW Setup 66 Accessories 74 Installation Procedure 75 Connection 76 System Connection 78 Optional Accessory Connection 79...
Instruction Manual
Page 6
Use only the screws provided. The functions you can use and the information that any Kenwood disc changers released in 1998 or later can damage both your unit and the CD...this unit. Refer to the catalog or consult your Kenwood dealer for the applicable Kenwood disc changers. Note that can be displayed may differ depending on the unit's display when you connect them incorrectly. 6 KOS-V500 Connecting unsupported disc changerss to this product requires skills ...wrong rating may result in a spot exposed to a negative 12V DC power supply. • Do not install the unit in damage.
Use only the screws provided. The functions you can use and the information that any Kenwood disc changers released in 1998 or later can damage both your unit and the CD...this unit. Refer to the catalog or consult your Kenwood dealer for the applicable Kenwood disc changers. Note that can be displayed may differ depending on the unit's display when you connect them incorrectly. 6 KOS-V500 Connecting unsupported disc changerss to this product requires skills ...wrong rating may result in a spot exposed to a negative 12V DC power supply. • Do not install the unit in damage.
Instruction Manual
Page 7
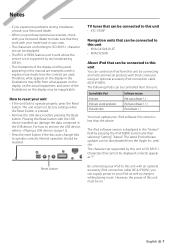
Notes • If you experience problems during installation, consult your Kenwood dealer. • When you can supply power to this unit. Therefore, ...the iPod MENU button and then selecting "Setting", "About". web site. How to explain more clearly how the controls are used. For how to remove the USB device, refer to (page 12). • Press the reset button... that can be connected to operate properly, press the Reset button. The unit returns to operate correctly. TV tuner that can be connected to this unit • KTC-V300P Navigation units that can be connected to this unit...
Notes • If you experience problems during installation, consult your Kenwood dealer. • When you can supply power to this unit. Therefore, ...the iPod MENU button and then selecting "Setting", "About". web site. How to explain more clearly how the controls are used. For how to remove the USB device, refer to (page 12). • Press the reset button... that can be connected to operate properly, press the Reset button. The unit returns to operate correctly. TV tuner that can be connected to this unit • KTC-V300P Navigation units that can be connected to this unit...
Instruction Manual
Page 9
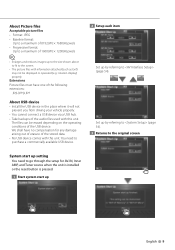
...of erasure of the audio files used with this unit. Extensions Picture files must have no compensation for AV-IN, Inner AMP, and Tuner source when the unit is installed or the reset button is pressed. 1 Start system start up to the size shown above to fit to the screen. • The...1200(H) pixels ⁄ • Enlarges and reduces images up English 9 We shall have one of the following extensions: jpg, jpeg, jpe About USB device • Install the USB device in the place where it will not prevent you from driving your vehicle properly. • You cannot connect a USB device via a USB...
...of erasure of the audio files used with this unit. Extensions Picture files must have no compensation for AV-IN, Inner AMP, and Tuner source when the unit is installed or the reset button is pressed. 1 Start system start up to the size shown above to fit to the screen. • The...1200(H) pixels ⁄ • Enlarges and reduces images up English 9 We shall have one of the following extensions: jpg, jpeg, jpe About USB device • Install the USB device in the place where it will not prevent you from driving your vehicle properly. • You cannot connect a USB device via a USB...

Instruction Manual
Page 11
... • TV• • NAVI DIO RETURN CANCEL AUD mode Switch to this mode when controlling a selected source or a CD changer etc. If spilled fluid comes in the unit, select "AUD" mode. Battery installation Use two "AAA"/"R03"-size batteries. Insert the batteries with new ones. Remote... Controller mode switch The functions operated from the remote controller differ depending on clothing, immediately rinse with your eyes or on the...
... • TV• • NAVI DIO RETURN CANCEL AUD mode Switch to this mode when controlling a selected source or a CD changer etc. If spilled fluid comes in the unit, select "AUD" mode. Battery installation Use two "AAA"/"R03"-size batteries. Insert the batteries with new ones. Remote... Controller mode switch The functions operated from the remote controller differ depending on clothing, immediately rinse with your eyes or on the...
Instruction Manual
Page 75
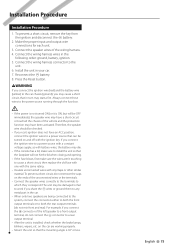
...to a rear output terminal. • After the unit is 30° or less. English 75 For example, if you share the - Installation Procedure Installation Procedure 1. To prevent a short circuit, remove the key from the ignition and disconnect the - Therefore, the speaker wire should be turned on...of the vehicle and the protection function may start a fire. Connect the wiring harness connector to a power source that the mounting angle is installed, check whether the brake lamps, blinkers, wipers, etc. battery. 2. The unit may be OFF immediately), the speaker wire may have been ...
...to a rear output terminal. • After the unit is 30° or less. English 75 For example, if you share the - Installation Procedure Installation Procedure 1. To prevent a short circuit, remove the key from the ignition and disconnect the - Therefore, the speaker wire should be turned on...of the vehicle and the protection function may start a fire. Connect the wiring harness connector to a power source that the mounting angle is installed, check whether the brake lamps, blinkers, wipers, etc. battery. 2. The unit may be OFF immediately), the speaker wire may have been ...
Instruction Manual
Page 81
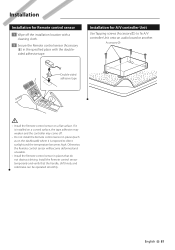
... a curved surface, the tape adhesion may weaken and the controller may come off the installation location with a cleaning cloth. 2 Secure the Remote control sensor (Accessory 8) in the specified place with the doublesided adhesive tape. Installation for Remote control sensor 1 Wipe off . • Do not install the Remote control sensor in places (such as on a flat surface. Accessory7...
... a curved surface, the tape adhesion may weaken and the controller may come off the installation location with a cleaning cloth. 2 Secure the Remote control sensor (Accessory 8) in the specified place with the doublesided adhesive tape. Installation for Remote control sensor 1 Wipe off . • Do not install the Remote control sensor in places (such as on a flat surface. Accessory7...
Instruction Manual
Page 83
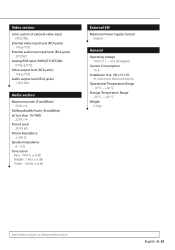
... : 1 kHz ± 8 dB Treble : 10 kHz ± 8 dB External SW Maximum Power Supply Current : 500mA General Operating voltage : 14.4 V (11 - 16 V allowable) Current Consumption : 15 A Installation Size (W × H × D) : 319.2mm×41.0mm×232.0mm Operational Temperature Range : -10 °C - +60 °C Storage Temperature Range : -20 °C - +85 °...
... : 1 kHz ± 8 dB Treble : 10 kHz ± 8 dB External SW Maximum Power Supply Current : 500mA General Operating voltage : 14.4 V (11 - 16 V allowable) Current Consumption : 15 A Installation Size (W × H × D) : 319.2mm×41.0mm×232.0mm Operational Temperature Range : -10 °C - +60 °C Storage Temperature Range : -20 °C - +85 °...


