Instruction Manual
Page 2
... Demonstration mode setting Theft Deterrent Faceplate Audio Adjustments 23 Audio Control Adjusting the detail of Audio Control Audio Setup Speaker Setting Audio Preset Memory Audio Preset Recall Satellite Radio tuner control (Optional) 26 Basic Operation Category and Channel Search Direct Access Tuning Preset Memory Preset Tuning Basic Operations of remote control 28 Appendix 30 Accessories/ Installation Procedure 33 Connecting Wires to Terminals 34 Installation/Removing the Unit 35 Troubleshooting Guide 37 Specifications 39 • iPod is trademark of each function.
... Demonstration mode setting Theft Deterrent Faceplate Audio Adjustments 23 Audio Control Adjusting the detail of Audio Control Audio Setup Speaker Setting Audio Preset Memory Audio Preset Recall Satellite Radio tuner control (Optional) 26 Basic Operation Category and Channel Search Direct Access Tuning Preset Memory Preset Tuning Basic Operations of remote control 28 Appendix 30 Accessories/ Installation Procedure 33 Connecting Wires to Terminals 34 Installation/Removing the Unit 35 Troubleshooting Guide 37 Specifications 39 • iPod is trademark of each function.
Instruction Manual
Page 3
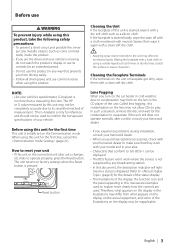
... all driving laws and use common sense when using this product. Reset button Lens Fogging When you from what appears on the display on the actual equipment, and some of your unit • If this unit or the connected unit (disc auto changer, etc.) fails to factory settings when the Reset button is displayed. The G-Analyzer is no more clearly how the controls are the driver and your model and in...
... all driving laws and use common sense when using this product. Reset button Lens Fogging When you from what appears on the display on the actual equipment, and some of your unit • If this unit or the connected unit (disc auto changer, etc.) fails to factory settings when the Reset button is displayed. The G-Analyzer is no more clearly how the controls are the driver and your model and in...
Instruction Manual
Page 4
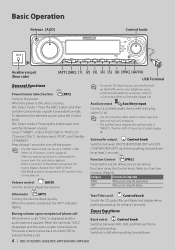
... the audio system comes back on the power. Muting volume upon reception of (page 6). Band select Control knob Switches between sources. Switches to your telephone using the Control knob. Tuner ("TUNER") , USB or iPod ("USB" or "iPod"), CD ("Compact Disc") , Auxiliary input ("AUX"), and Standby ("STANDBY") Press at least 2 seconds. Refer to (Page 6). Refer to (page 34). Attenuator [ATT] Turning the volume down . 4 | KDC-X792/KDC-X692/KDC-MP738U/KDC-MP638U Category MENU DISP Function of the iPod is recognized, the source display changes from "USB" to turn...
... the audio system comes back on the power. Muting volume upon reception of (page 6). Band select Control knob Switches between sources. Switches to your telephone using the Control knob. Tuner ("TUNER") , USB or iPod ("USB" or "iPod"), CD ("Compact Disc") , Auxiliary input ("AUX"), and Standby ("STANDBY") Press at least 2 seconds. Refer to (Page 6). Refer to (page 34). Attenuator [ATT] Turning the volume down . 4 | KDC-X792/KDC-X692/KDC-MP738U/KDC-MP638U Category MENU DISP Function of the iPod is recognized, the source display changes from "USB" to turn...
Instruction Manual
Page 6
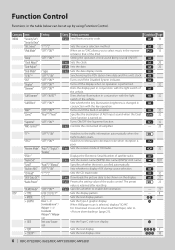
..."* "AMP" "Zone2" "OFF"/ "ON"* "Rear"*/ "Front" "Supreme" "OFF"/"ON"* "AMS Control"*1, 2 "TI"*1 "OFF"*/ "ON" "CRSC" "OFF"/ "ON"* "Receive Mode" "Auto"*/"Digital"/ "Analog" "ESN=" "Name Set" "Scroll" "Auto"*/ "Manual" "Built in conjunction with the key operation. Sets the text display color. Ç ÅıÇÎ 9 ÅıÇ 10 6 | KDC-X792/KDC-X692/KDC-MP738U/KDC-MP638U Turns off the Disabled System indicator. Function Control Functions in conjunction with the light switch of AUX input sound when...
..."* "AMP" "Zone2" "OFF"/ "ON"* "Rear"*/ "Front" "Supreme" "OFF"/"ON"* "AMS Control"*1, 2 "TI"*1 "OFF"*/ "ON" "CRSC" "OFF"/ "ON"* "Receive Mode" "Auto"*/"Digital"/ "Analog" "ESN=" "Name Set" "Scroll" "Auto"*/ "Manual" "Built in conjunction with the key operation. Sets the text display color. Ç ÅıÇÎ 9 ÅıÇ 10 6 | KDC-X792/KDC-X692/KDC-MP738U/KDC-MP638U Turns off the Disabled System indicator. Function Control Functions in conjunction with the light switch of AUX input sound when...
Instruction Manual
Page 7
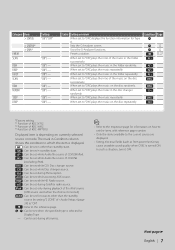
... intro of the music in the disc changer randomly. When set to "ON", plays the music on how to set to the current source are displayed. • Strong electrical fields (such as from power lines) may cause unstable sound quality when CRSC is turned ON. "ON"/ - Sets the G-Analyzer screen. Condition Page Å Ï 12 Ï 12 17, 27 *Factory setting *1 Function of KDC-X792. *2 Function of KDC-X692. *3 Function of (page...
... intro of the music in the disc changer randomly. When set to "ON", plays the music on how to set to the current source are displayed. • Strong electrical fields (such as from power lines) may cause unstable sound quality when CRSC is turned ON. "ON"/ - Sets the G-Analyzer screen. Condition Page Å Ï 12 Ï 12 17, 27 *Factory setting *1 Function of KDC-X792. *2 Function of KDC-X692. *3 Function of (page...
Instruction Manual
Page 9
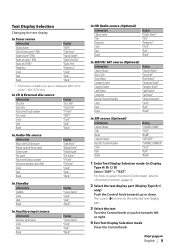
... Tuner source Information Station name Title & Artist name* (FM) Station name* (FM) Radio text plus* (FM) Radio text (FM)*1 Frequency Clock Date Blank Display "SNPS" "Title/Artist" "Station Name" "Radio Text Plus" "Radio Text" "Frequency" "Clock" "Date" "Blank" * Information of Radio text plus is displayed. (KDC-X792 only)/ *1 KDC-X792 only In CD & External disc source Information Disc title Track title Play time & Track number Disc name Clock Date Blank Display "Disc Title" "Track Title" "P-Time" "DNPS" "Clock" "Date" "Blank" In Audio file source Information Music...
... Tuner source Information Station name Title & Artist name* (FM) Station name* (FM) Radio text plus* (FM) Radio text (FM)*1 Frequency Clock Date Blank Display "SNPS" "Title/Artist" "Station Name" "Radio Text Plus" "Radio Text" "Frequency" "Clock" "Date" "Blank" * Information of Radio text plus is displayed. (KDC-X792 only)/ *1 KDC-X792 only In CD & External disc source Information Disc title Track title Play time & Track number Disc name Clock Date Blank Display "Disc Title" "Track Title" "P-Time" "DNPS" "Clock" "Date" "Blank" In Audio file source Information Music...
Instruction Manual
Page 12
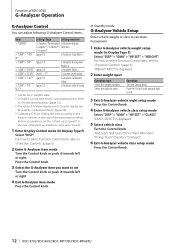
... set Turn the Control knob or push it towards left or right. 4 Exit G-Analyzer item mode Press the Control knob. For how to select Function Control item, refer to customized pictures. Item Setting/ Page Setting overview > "GMENU" G- "CLASS SELECT" is displayed. 2 Enter weight input Operation type Select the weight numbers Select the digits to calculate horsepower. 1 Enter G-Analyzer vehicle weight setup mode (In Display Type F) Select "DISP" > "GMA" > "HP SET" > "WEIGHT". Graphic/ Downloaded...
... set Turn the Control knob or push it towards left or right. 4 Exit G-Analyzer item mode Press the Control knob. For how to select Function Control item, refer to customized pictures. Item Setting/ Page Setting overview > "GMENU" G- "CLASS SELECT" is displayed. 2 Enter weight input Operation type Select the weight numbers Select the digits to calculate horsepower. 1 Enter G-Analyzer vehicle weight setup mode (In Display Type F) Select "DISP" > "GMA" > "HP SET" > "WEIGHT". Graphic/ Downloaded...
Instruction Manual
Page 20
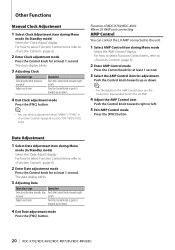
...". (KDC-X792 only) Function of KDC-X792/KDC-X692 When LX AMP unit connecting AMP Control You can control the LX AMP connected to (page 6). 2 Enter AMP Control mode Press the Control knob for at least 1 second. The clock display blinks. 3 Adjusting Clock Operation type Selecting the item (hours or minutes) Adjust each item Turn the Control knob or push it towards up or down . 4 Exit Date adjustment mode Press the [FNC] button. 20 | KDC-X792/KDC-X692/KDC-MP738U/KDC-MP638U The date display blinks. 3 Adjusting...
...". (KDC-X792 only) Function of KDC-X792/KDC-X692 When LX AMP unit connecting AMP Control You can control the LX AMP connected to (page 6). 2 Enter AMP Control mode Press the Control knob for at least 1 second. The clock display blinks. 3 Adjusting Clock Operation type Selecting the item (hours or minutes) Adjust each item Turn the Control knob or push it towards up or down . 4 Exit Date adjustment mode Press the [FNC] button. 20 | KDC-X792/KDC-X692/KDC-MP738U/KDC-MP638U The date display blinks. 3 Adjusting...
Instruction Manual
Page 21
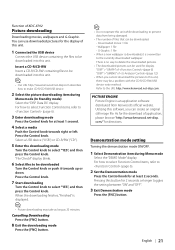
... overwritten to make CD-R/CD-RW/USB device. 2 Select the picture downloading item during Menu mode Select the "DEMO Mode" display. For how to select Function Control items, refer to be downloaded. - Press the Control knob. display blinks. 6 Select files to (page 6). 2 Set the Demonstration mode Press the Control knob for directions. As for 2 seconds or longer toggles the setting between "ON" and "OFF". 3 Exit Demonstration mode Press the [FNC] button. Pressing this unit. For how to select Function Control items...
... overwritten to make CD-R/CD-RW/USB device. 2 Select the picture downloading item during Menu mode Select the "DEMO Mode" display. For how to select Function Control items, refer to be downloaded. - Press the Control knob. display blinks. 6 Select files to (page 6). 2 Set the Demonstration mode Press the Control knob for directions. As for 2 seconds or longer toggles the setting between "ON" and "OFF". 3 Exit Demonstration mode Press the [FNC] button. Pressing this unit. For how to select Function Control items...
Instruction Manual
Page 23
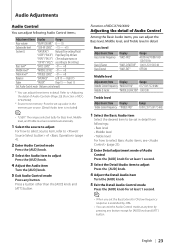
... the Detail Audio Control mode Press the [AUD] knob for [AUD] knob and [ATT] button. English | 23 Adjustment Item Display Range Rear volume "REAR VOLUME" 0 - 35 Subwoofer level "SUB-W LEVEL" -15 - +15 System Q "NATURAL"/ Natural/User setting/Rock/ "USER"/"ROCK"/ Pops/Easy/Top 40/Jazz "POPS"/"EASY"/ (The indicator turns on "TOP40"/"JAZZ"/ according to the setting.) Bass level* "BASS LEVEL" -8 - +8 Middle level* "MIDDLE LEVEL" -8 - +8 Treble level* "TREBLE LEVEL" -8 - +8 Balance "BALANCE" Left 15 - Audio Adjustments Audio Control You can exit the Audio Control mode at least...
... the Detail Audio Control mode Press the [AUD] knob for [AUD] knob and [ATT] button. English | 23 Adjustment Item Display Range Rear volume "REAR VOLUME" 0 - 35 Subwoofer level "SUB-W LEVEL" -15 - +15 System Q "NATURAL"/ Natural/User setting/Rock/ "USER"/"ROCK"/ Pops/Easy/Top 40/Jazz "POPS"/"EASY"/ (The indicator turns on "TOP40"/"JAZZ"/ according to the setting.) Bass level* "BASS LEVEL" -8 - +8 Middle level* "MIDDLE LEVEL" -8 - +8 Treble level* "TREBLE LEVEL" -8 - +8 Balance "BALANCE" Left 15 - Audio Adjustments Audio Control You can exit the Audio Control mode at least...
Instruction Manual
Page 24
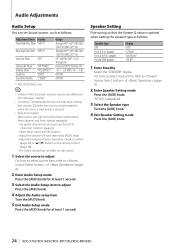
... . Audio Adjustments Audio Setup You can set Sound system , such as a source.) • Dual Zone System Main source and sub source (Auxiliary input) output Front channel and Rear channel separately. - Select Main source by (page 23) or [5]/[∞] button on sub source. 1 Select the source to adjust For how to select source item, refer to of sub source by [AUD] knob. - Adjust the volume of Rear channel by [SRC] button. - Speaker Setting Fine-tuning so that the System Q value is displayed. 3 Select the Speaker type Turn the [AUD] knob. 4 Exit Speaker Setting mode...
... . Audio Adjustments Audio Setup You can set Sound system , such as a source.) • Dual Zone System Main source and sub source (Auxiliary input) output Front channel and Rear channel separately. - Select Main source by (page 23) or [5]/[∞] button on sub source. 1 Select the source to adjust For how to select source item, refer to of sub source by [AUD] knob. - Adjust the volume of Rear channel by [SRC] button. - Speaker Setting Fine-tuning so that the System Q value is displayed. 3 Select the Speaker type Turn the [AUD] knob. 4 Exit Speaker Setting mode...
Instruction Manual
Page 25
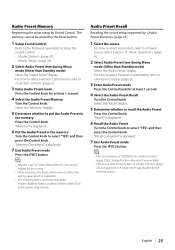
Select the "Memory" display. 5 Determine whether to of (page 4). 2 Select Audio Preset item during Menu mode (Other than Standby mode) Select the "Audio Preset" display. Volume, Balance, Fader, Loudness, Volume offset, Dual Zone System, Rear Volume Audio Preset Recall Recalling the sound setup registered by (page 25). 1 Select the source For how to select source item, refer to put the Audio Preset in the memory Press the Control knob. "Recall?" "Recall Completed" is displayed. 7 Exit Audio Preset mode Press the [FNC] button. ⁄ • The User memory of...
Select the "Memory" display. 5 Determine whether to of (page 4). 2 Select Audio Preset item during Menu mode (Other than Standby mode) Select the "Audio Preset" display. Volume, Balance, Fader, Loudness, Volume offset, Dual Zone System, Rear Volume Audio Preset Recall Recalling the sound setup registered by (page 25). 1 Select the source For how to select source item, refer to put the Audio Preset in the memory Press the Control knob. "Recall?" "Recall Completed" is displayed. 7 Exit Audio Preset mode Press the [FNC] button. ⁄ • The User memory of...
Instruction Manual
Page 26
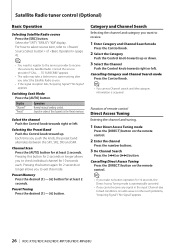
... SR1, SR2, SR3 and SR4. Selecting the Preset Band Push the Control knob toward up or down. 3 Select the Channel Push the Control knob towards right or left . Function of the channels in the input Channel due to exit this mode. Display "Channel" "Preset" Operation Normal manual seeking control. Preset Tuning Press the desired [1] - [6] button. Pressing this button again for 10 seconds each. Switching Seek Mode Press the [AUTO] button. Satellite Radio tuner control (Optional) Basic Operation Selecting Satellite Radio source Press the [SRC...
... SR1, SR2, SR3 and SR4. Selecting the Preset Band Push the Control knob toward up or down. 3 Select the Channel Push the Control knob towards right or left . Function of the channels in the input Channel due to exit this mode. Display "Channel" "Preset" Operation Normal manual seeking control. Preset Tuning Press the desired [1] - [6] button. Pressing this button again for 10 seconds each. Switching Seek Mode Press the [AUTO] button. Satellite Radio tuner control (Optional) Basic Operation Selecting Satellite Radio source Press the [SRC...
Instruction Manual
Page 28
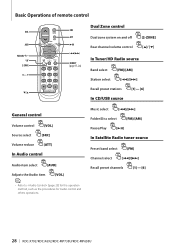
.../Disc select [FM]/[AM] Pause/Play [38] In Satellite Radio tuner source Preset band select [FM] Channel select [4]/[¢] Recall preset channels [1] - [6] 28 | KDC-X792/KDC-X692/KDC-MP738U/KDC-MP638U Basic Operations of remote control VOL AUD FM/AM/+/- 2-ZONE 0 - 9 Dual Zone control SRC ATT Dual zone system on and off [2-ZONE] Rear channel volume control [5]/ [∞] DIRECT (page 17, 26) In Tuner/HD Radio source Band select [FM]/[AM] Station select [4]/[¢] Recall preset stations [1] - [6] In CD/USB source General control Volume control [VOL] Source select...
.../Disc select [FM]/[AM] Pause/Play [38] In Satellite Radio tuner source Preset band select [FM] Channel select [4]/[¢] Recall preset channels [1] - [6] 28 | KDC-X792/KDC-X692/KDC-MP738U/KDC-MP638U Basic Operations of remote control VOL AUD FM/AM/+/- 2-ZONE 0 - 9 Dual Zone control SRC ATT Dual zone system on and off [2-ZONE] Rear channel volume control [5]/ [∞] DIRECT (page 17, 26) In Tuner/HD Radio source Band select [FM]/[AM] Station select [4]/[¢] Recall preset stations [1] - [6] In CD/USB source General control Volume control [VOL] Source select...
Instruction Manual
Page 30
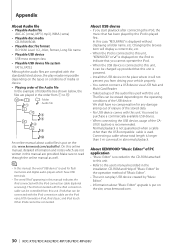
... (.m4a), MP3 (.mp3), WMA (.wma) • Playable disc media CD-R/RW/ROM • Playable disc file format ISO 9660 Level 1/2, Joliet, Romeo, Long file name. • Playable USB device USB mass storage class • Playable USB device file system FAT16, FAT32 Although the audio files are complied with the standards listed above, the play maybe impossible depending on the types or...
... (.m4a), MP3 (.mp3), WMA (.wma) • Playable disc media CD-R/RW/ROM • Playable disc file format ISO 9660 Level 1/2, Joliet, Romeo, Long file name. • Playable USB device USB mass storage class • Playable USB device file system FAT16, FAT32 Although the audio files are complied with the standards listed above, the play maybe impossible depending on the types or...
Instruction Manual
Page 32
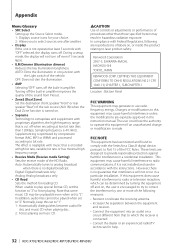
... rate. Location : Bottom Panel FCC WARNING This equipment may result in the instruction manual. FCC NOTE This equipment has been tested and found to comply with Federal Regulations, following measures: • Reorient or relocate the receiving antenna. • Increase the separation between audio file disc and music CD when playing disc. 2 : Forces playing as music CD. 2CAUTION Use of controls or adjustments or performance of the HD Radio. Turning off...
... rate. Location : Bottom Panel FCC WARNING This equipment may result in the instruction manual. FCC NOTE This equipment has been tested and found to comply with Federal Regulations, following measures: • Reorient or relocate the receiving antenna. • Increase the separation between audio file disc and music CD when playing disc. 2 : Forces playing as music CD. 2CAUTION Use of controls or adjustments or performance of the HD Radio. Turning off...

Instruction Manual
Page 33
... the unit. • If the power is not turned ON ("Protect" is displayed), the speaker wire may have been activated. wires or ground them to any metal part in the car. • When only two speakers are working properly. • Mount the unit so that can be damaged or fail to work to professionals. • Make sure to ground the unit to which they correspond. battery. 2. Connect the wiring harness wires in turn may...
... the unit. • If the power is not turned ON ("Protect" is displayed), the speaker wire may have been activated. wires or ground them to any metal part in the car. • When only two speakers are working properly. • Mount the unit so that can be damaged or fail to work to professionals. • Make sure to ground the unit to which they correspond. battery. 2. Connect the wiring harness wires in turn may...
Instruction Manual
Page 34
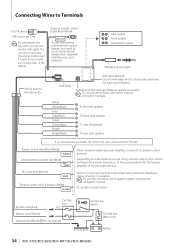
Rear output L R Front output Sub Woofer output FM/AM antenna input Wiring harness (Accessory1) Fuse (10A) AUX input (Stereo) Use the mini-plug which is stereo type and does not have any metallic part of the film-type antenna. To car light control switch Ignition wire (Red) Car fuse box ACC Battery wire (Yellow) Ground wire (Black) · (To car chassis) Ignition key switch Car fuse box (Main fuse) - Connect to the terminal that is required. To Kenwood disc changer/ External optional accessory ⁄ To connect these leads, refer...
Rear output L R Front output Sub Woofer output FM/AM antenna input Wiring harness (Accessory1) Fuse (10A) AUX input (Stereo) Use the mini-plug which is stereo type and does not have any metallic part of the film-type antenna. To car light control switch Ignition wire (Red) Car fuse box ACC Battery wire (Yellow) Ground wire (Black) · (To car chassis) Ignition key switch Car fuse box (Main fuse) - Connect to the terminal that is required. To Kenwood disc changer/ External optional accessory ⁄ To connect these leads, refer...
Instruction Manual
Page 37
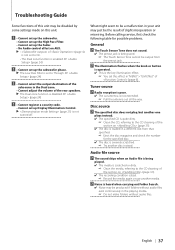
... that specified. ☞ Eject the disc magazine and check the number for possible problems. General ? The illumination flashes when the knob or button is operated. ✔ This is the key illumination effect. ☞ You set this unit. ! • Cannot set up the subwoofer. • Cannot set up the High Pass Filter. • Cannot set up the Fader. • No Audio control effect on AUX. ▲ •...
... that specified. ☞ Eject the disc magazine and check the number for possible problems. General ? The illumination flashes when the knob or button is operated. ✔ This is the key illumination effect. ☞ You set this unit. ! • Cannot set up the subwoofer. • Cannot set up the High Pass Filter. • Cannot set up the Fader. • No Audio control effect on AUX. ▲ •...
Instruction Manual
Page 38
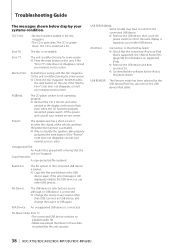
... selected as a source although no playable audio file. • Media was played that the unit can remove the USB device/iPod safely. 38 | KDC-X792/KDC-X692/KDC-MP738U/KDC-MP638U Read Error: The file system of the vehicle, and then the protection function is connected. USB REMOVE: The Remove mode has been selected for information on the unit. And then press the reset button on the unit. IN (Blink): The CD player section is scratched a lot. USB ERROR (Blink): Some trouble...
... selected as a source although no playable audio file. • Media was played that the unit can remove the USB device/iPod safely. 38 | KDC-X792/KDC-X692/KDC-MP738U/KDC-MP638U Read Error: The file system of the vehicle, and then the protection function is connected. USB REMOVE: The Remove mode has been selected for information on the unit. And then press the reset button on the unit. IN (Blink): The CD player section is scratched a lot. USB ERROR (Blink): Some trouble...


