

North America
Page 2
...Location : Top Plate FCC WARNING This equipment may apply. The user could lose the authority to operate this equipment may cause harmful interference unless the modifications are designed to provide reasonable protection against harmful interference in accordance with the instructions. FCC NOTE This equipment has been tested... approved in the instruction manual. Changes or modifications to this equipment if an unauthorized change or modification is connected. • Consult the dealer or an experienced radio/TV technician for a Class B digital device, pursuant to Part 15 of the FCC...
...Location : Top Plate FCC WARNING This equipment may apply. The user could lose the authority to operate this equipment may cause harmful interference unless the modifications are designed to provide reasonable protection against harmful interference in accordance with the instructions. FCC NOTE This equipment has been tested... approved in the instruction manual. Changes or modifications to this equipment if an unauthorized change or modification is connected. • Consult the dealer or an experienced radio/TV technician for a Class B digital device, pursuant to Part 15 of the FCC...
North America
Page 6
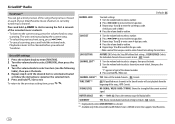
... USE 2 BASICS 3 GETTING STARTED 4 1 Select the display language and cancel the demonstration 2 Set the clock and date 3 Set the initial settings RADIO 6 CD / USB / iPod / ANDROID 7 AUX 9 Pandora® 10 iHeartRadio® 11 SiriusXM® Radio 12 BLUETOOTH® 15 AUDIO SETTINGS 21 DISPLAY SETTINGS 23 REFERENCES 24 Maintenance More information TROUBLESHOOTING 26 SPECIFICATIONS 28 INSTALLATION / CONNECTION 30 2 BEFORE USE IMPORTANT • To ensure proper use, please read through this manual before playing digital sources...
... USE 2 BASICS 3 GETTING STARTED 4 1 Select the display language and cancel the demonstration 2 Set the clock and date 3 Set the initial settings RADIO 6 CD / USB / iPod / ANDROID 7 AUX 9 Pandora® 10 iHeartRadio® 11 SiriusXM® Radio 12 BLUETOOTH® 15 AUDIO SETTINGS 21 DISPLAY SETTINGS 23 REFERENCES 24 Maintenance More information TROUBLESHOOTING 26 SPECIFICATIONS 28 INSTALLATION / CONNECTION 30 2 BEFORE USE IMPORTANT • To ensure proper use, please read through this manual before playing digital sources...

North America
Page 7
.... BASICS Faceplate Volume knob Display window Remote control (RC-406) (supplied for / ) Remote sensor (Do not expose to bright sunlight.) Detach button Attach Detach : USB cable from the rear of the unit How to reset Press the switch twice within 5 seconds after 20 minutes when in standby mode (Auto Power Off). Change the display information Press DISP repeatedly. ( 25) * For : The power will automatically turn on the power Adjust the volume On the...
.... BASICS Faceplate Volume knob Display window Remote control (RC-406) (supplied for / ) Remote sensor (Do not expose to bright sunlight.) Detach button Attach Detach : USB cable from the rear of the unit How to reset Press the switch twice within 5 seconds after 20 minutes when in standby mode (Auto Power Off). Change the display information Press DISP repeatedly. ( 25) * For : The power will automatically turn on the power Adjust the volume On the...
North America
Page 8
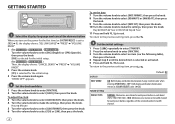
... channel. 4 Hour Minute 5 Turn the volume knob to select [CLOCK FORMAT], then press the knob. 6 Turn the volume knob to white color when entering [FUNCTION]. ; DISPLAY EASY MENU TUNER SETTING PRESET TYPE Default: XX ON: Both display and button illumination change to select [12H] or [24H], then press the knob. To return to the previous setting item, press . 3 Set the initial settings 1 Press repeatedly to enter STANDBY. 2 Press the volume knob to enter [FUNCTION]. 3 Turn...
... channel. 4 Hour Minute 5 Turn the volume knob to select [CLOCK FORMAT], then press the knob. 6 Turn the volume knob to white color when entering [FUNCTION]. ; DISPLAY EASY MENU TUNER SETTING PRESET TYPE Default: XX ON: Both display and button illumination change to select [12H] or [24H], then press the knob. To return to the previous setting item, press . 3 Set the initial settings 1 Press repeatedly to enter STANDBY. 2 Press the volume knob to enter [FUNCTION]. 3 Turn...
North America
Page 9
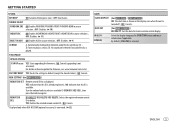
... connected. ( 32) CLOCK CLOCK DISPLAY (For / ) ON: The clock time is shown on how to update the firmware, see: www.kenwood.com/cs/ce/ FACTORY RESET YES: Resets the settings to play as a music CD. By default, [ENGLISH] is played. No sound can be heard if an audio file disc is selected. ENGLISH 5 OFF: Disables. ( 11) BUILT-IN AUX ON: Enables AUX in source selection. ; NO: Cancels. Turn the volume knob to select an...
... connected. ( 32) CLOCK CLOCK DISPLAY (For / ) ON: The clock time is shown on how to update the firmware, see: www.kenwood.com/cs/ce/ FACTORY RESET YES: Resets the settings to play as a music CD. By default, [ENGLISH] is played. No sound can be heard if an audio file disc is selected. ENGLISH 5 OFF: Disables. ( 11) BUILT-IN AUX ON: Enables AUX in source selection. ; NO: Cancels. Turn the volume knob to select an...

North America
Page 12
... a folder/list 1 Press . 2 Turn the volume knob to select a folder/list, then press the knob. 3 Turn the volume knob to 9, enter only " ". Stored songs in the Android device. Select a file from this unit. CD / USB / iPod / ANDROID Select control mode While in ANDROID/ ANDROID FRONT/ ANDROID REAR source, press 5 repeatedly. HAND MODE : Control Android device using the Android device itself . Turn the volume knob quickly to the previous setting item, press...
... a folder/list 1 Press . 2 Turn the volume knob to select a folder/list, then press the knob. 3 Turn the volume knob to 9, enter only " ". Stored songs in the Android device. Select a file from this unit. CD / USB / iPod / ANDROID Select control mode While in ANDROID/ ANDROID FRONT/ ANDROID REAR source, press 5 repeatedly. HAND MODE : Control Android device using the Android device itself . Turn the volume knob quickly to the previous setting item, press...
North America
Page 13
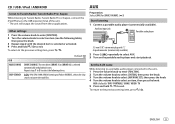
... AUX]. ( 5) Start listening 1 Connect a portable audio player (commercially available). Set the AUX name While listening to a portable audio player connected to the unit... 1 Press the volume knob to enter [FUNCTION]. 2 Turn the volume knob to select [SYSTEM], then press the knob. 3 Turn the volume knob to select [AUX NAME SET], then press the knob. 4 Turn the volume knob to the USB input terminal of the unit. • The unit will output the sound from these applications. To return...
... AUX]. ( 5) Start listening 1 Connect a portable audio player (commercially available). Set the AUX name While listening to a portable audio player connected to the unit... 1 Press the volume knob to enter [FUNCTION]. 2 Turn the volume knob to select [SYSTEM], then press the knob. 3 Turn the volume knob to select [AUX NAME SET], then press the knob. 4 Turn the volume knob to the USB input terminal of the unit. • The unit will output the sound from these applications. To return...

North America
Page 16
... Get over 140 channels, including commercial-free music plus the best sports, news, talk, comedy and entertainment. For more of the number buttons (3 to 5). " " lights up. 4 Turn the volume knob to start updating. SiriusXM® Radio Only SiriusXM® brings you love to listen to search for a station, then press . • To store a station: Press and hold one of satellite radio. For users in the U.S.A.: Online...
... Get over 140 channels, including commercial-free music plus the best sports, news, talk, comedy and entertainment. For more of the number buttons (3 to 5). " " lights up. 4 Turn the volume knob to start updating. SiriusXM® Radio Only SiriusXM® brings you love to listen to search for a station, then press . • To store a station: Press and hold one of satellite radio. For users in the U.S.A.: Online...
North America
Page 17
... DIRECT. • If no operation is selected. When channel keymode is selected, a pass code input screen appears. When you select a SmartFavorite channel, you press , the tuning method switches between "CHANNEL" (manually search for a channel) and "PRESET" (searches for a preset channel of the current band When replay keymode is automatically canceled. Press . If a locked channel or a mature channel is selected... Enter the pass code to receive the channel. ( 14) To change the keymode (channel or replay). (Default: Channel keymode) " " lights...
... DIRECT. • If no operation is selected. When channel keymode is selected, a pass code input screen appears. When you select a SmartFavorite channel, you press , the tuning method switches between "CHANNEL" (manually search for a channel) and "PRESET" (searches for a preset channel of the current band When replay keymode is automatically canceled. Press . If a locked channel or a mature channel is selected... Enter the pass code to receive the channel. ( 14) To change the keymode (channel or replay). (Default: Channel keymode) " " lights...
North America
Page 18
.... USER DEFINED: Selects the individual channels the user wants to exit. Default: XX CHANNEL LOCK To unlock settings: 1 Turn the volume knob to select a number. 2 Press S / T to move to the entry position. 3 Repeat steps 1 and 2 to enter a new 4-digit pass code. 4 Press the volume knob to confirm. 5 Repeat steps 1 to 4 to reconfirm the pass code. • Make a note of the new pass code to exit. CHANNEL EDIT*1 1 Turn the volume knob to select...
.... USER DEFINED: Selects the individual channels the user wants to exit. Default: XX CHANNEL LOCK To unlock settings: 1 Turn the volume knob to select a number. 2 Press S / T to move to the entry position. 3 Repeat steps 1 and 2 to enter a new 4-digit pass code. 4 Press the volume knob to confirm. 5 Repeat steps 1 to 4 to reconfirm the pass code. • Make a note of the new pass code to exit. CHANNEL EDIT*1 1 Turn the volume knob to select...
North America
Page 19
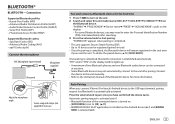
... to enter the Personal Identification Number (PIN) code immediately after pairing. Connection Supported Bluetooth profiles - KENWOOD MUSIC PLAY application is installed on . - [AUTO PAIRING] is selected ( 8). 7) and [BROWSE ENGLISH 15 Audio/Video Remote Control Profile (AVRCP) - "PAIRING" "PASS XXXXXX" Device name "PRESS" "VOLUME KNOB" scrolls on the display window lights up. • A maximum of the connected devcie is turned on the Android device ( MODE] is set to the USB input terminal, pairing request (via...
... to enter the Personal Identification Number (PIN) code immediately after pairing. Connection Supported Bluetooth profiles - KENWOOD MUSIC PLAY application is installed on . - [AUTO PAIRING] is selected ( 8). 7) and [BROWSE ENGLISH 15 Audio/Video Remote Control Profile (AVRCP) - "PAIRING" "PASS XXXXXX" Device name "PRESS" "VOLUME KNOB" scrolls on the display window lights up. • A maximum of the connected devcie is turned on the Android device ( MODE] is set to the USB input terminal, pairing request (via...

North America
Page 21
... heard during a phone conversation. -5 - +5 (0): Adjust the echo cancellation delay time until the least echo is being heard during a call 1 Press to enter Bluetooth mode. 2 Turn the volume knob to exit. MIC GAIN NR LEVEL ECHO CANCEL Default: XX -10 - +10 (-4): The sensitivity of the phone used. Press . To return to the previous setting item, press . Default: XX SETTINGS AUTO ANSWER 1 - 30: The unit answers...
... heard during a phone conversation. -5 - +5 (0): Adjust the echo cancellation delay time until the least echo is being heard during a call 1 Press to enter Bluetooth mode. 2 Turn the volume knob to exit. MIC GAIN NR LEVEL ECHO CANCEL Default: XX -10 - +10 (-4): The sensitivity of the phone used. Press . To return to the previous setting item, press . Default: XX SETTINGS AUTO ANSWER 1 - 30: The unit answers...
North America
Page 22
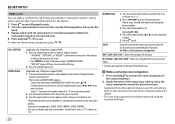
... current received signal. * Functionality depends on the selected item. 4 Press and hold to exit. Refer to the instruction manual of the connected phone is automatically transferred to the unit when pairing. • Contacts are categorized as "U".) NUMBER DIAL 1 Turn the volume knob to select a number (0 to 9) or character ( , #, +). 2 Press S / T to call. • The phonebook of the connected phone for each phone. To return to...
... current received signal. * Functionality depends on the selected item. 4 Press and hold to exit. Refer to the instruction manual of the connected phone is automatically transferred to the unit when pairing. • Contacts are categorized as "U".) NUMBER DIAL 1 Turn the volume knob to select a number (0 to 9) or character ( , #, +). 2 Press S / T to call. • The phonebook of the connected phone for each phone. To return to...

North America
Page 23
... connected through USB input terminal. BT MODE PHONE SELECT AUDIO SELECT DEVICE DELETE PIN CODE EDIT (0000) RECONNECT AUTO PAIRING INITIALIZE Default: XX Selects the phone or audio device to connect or disconnect. *" " appears in front of the device name when connected. • You can store up to 6 digits). 1 Turn the volume knob to select a number. 2 Press S / T to move the entry position. Changes the PIN code (up to 6 contacts into the number buttons...
... connected through USB input terminal. BT MODE PHONE SELECT AUDIO SELECT DEVICE DELETE PIN CODE EDIT (0000) RECONNECT AUTO PAIRING INITIALIZE Default: XX Selects the phone or audio device to connect or disconnect. *" " appears in front of the device name when connected. • You can store up to 6 digits). 1 Turn the volume knob to select a number. 2 Press S / T to move the entry position. Changes the PIN code (up to 6 contacts into the number buttons...

North America
Page 25
... SUB-W LEVEL -50 to select IHEARTRADIO. SUBWOOFER SET ON: Turns on your device. 2 Connect your preferred bass boost level. ; LOUDNESS LEVEL1/ LEVEL2: Selects your smart phone via Bluetooth connection. ( 15) 3 Press repeatedly to +10 (0): Adjusts the subwoofer output level. OFF: Cancels. You can operate iHeartRadio in the same way as Pandora for iPod/iPhone. ( 11) While listening to any source... 1 Press the volume knob to enter [FUNCTION]. 2 Turn the volume knob to select [AUDIO CONTROL...
... SUB-W LEVEL -50 to select IHEARTRADIO. SUBWOOFER SET ON: Turns on your device. 2 Connect your preferred bass boost level. ; LOUDNESS LEVEL1/ LEVEL2: Selects your smart phone via Bluetooth connection. ( 15) 3 Press repeatedly to +10 (0): Adjusts the subwoofer output level. OFF: Cancels. You can operate iHeartRadio in the same way as Pandora for iPod/iPhone. ( 11) While listening to any source... 1 Press the volume knob to enter [FUNCTION]. 2 Turn the volume knob to select [AUDIO CONTROL...

North America
Page 26
... 0: Adjusts the output volume of the subwoofer. • [SUB-W LEVEL]/ [SUBWOOFER] of [SPEAKER SIZE]/ [SUBWOOFER LPF] of [X ' OVER] is selectable only if [SUBWOOFER SET] is set for optimum performance. ; AUDIO SETTINGS VOLUME OFFSET -15 to +6 (0): Preset the initial volume level of the left tweeter. SPEAKER SIZE The frequency and slope settings are sent to the selected speakers. FRONT SIZE 3.5"/ 4"/ 4.75"/ 5"/ 6.5"/ 6.75"/ 7"/ 4×6/ 5×7/ 6×8/ 6×9/ 7×10: Selects according to the connected speaker size for the crossover of...
... 0: Adjusts the output volume of the subwoofer. • [SUB-W LEVEL]/ [SUBWOOFER] of [SPEAKER SIZE]/ [SUBWOOFER LPF] of [X ' OVER] is selectable only if [SUBWOOFER SET] is set for optimum performance. ; AUDIO SETTINGS VOLUME OFFSET -15 to +6 (0): Preset the initial volume level of the left tweeter. SPEAKER SIZE The frequency and slope settings are sent to the selected speakers. FRONT SIZE 3.5"/ 4"/ 4.75"/ 5"/ 6.5"/ 6.75"/ 7"/ 4×6/ 5×7/ 6×8/ 6×9/ 7×10: Selects according to the connected speaker size for the crossover of...

North America
Page 29
... specifications are subject to change without prior notice. Please visit for NFC function: Remote devices with a NFC function (OS: Android™ 2.3.3 or later, excluding Android 3.x). Accordingly, compatibility may become unavailable. • Some iHeartRadio® functionality cannot be able to connect to this unit. • This unit may not be operated from this unit. Source name Display information STANDBY Source name (Date/Clock)* TUNER Frequency...
... specifications are subject to change without prior notice. Please visit for NFC function: Remote devices with a NFC function (OS: Android™ 2.3.3 or later, excluding Android 3.x). Accordingly, compatibility may become unavailable. • Some iHeartRadio® functionality cannot be able to connect to this unit. • This unit may not be operated from this unit. Source name Display information STANDBY Source name (Date/Clock)* TUNER Frequency...
North America
Page 30
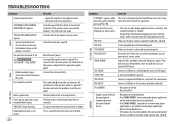
... media player application or use too many hierarchical levels or folders. Turn the power off , then check to forcibly eject the disc. ANDROID Symptom "LOADING" appears when you have selected ( 5), some time to the radio. Connect a USB device, and change the disc. Tracks do not play . Clean the connectors. ( 24) Reset the unit. ( 3) Setting/deleting the remote control ID is still preparing the iPod/iPhone music list. It...
... media player application or use too many hierarchical levels or folders. Turn the power off , then check to forcibly eject the disc. ANDROID Symptom "LOADING" appears when you have selected ( 5), some time to the radio. Connect a USB device, and change the disc. Tracks do not play . Clean the connectors. ( 24) Reset the unit. ( 3) Setting/deleting the remote control ID is still preparing the iPod/iPhone music list. It...
North America
Page 31
... stations become unavailable. If "Explicit Content" in [Account Settings] is checked in the U.S.A. Enter the correct pass code to continue. PRESS ENTER TO CONTINUE." Playback is installed on the Android device. ( 7) • Reconnect the Android device and select the appropriate control mode. ( 8) • If this does not solve the problem, the connected Android device does not support [BROWSE MODE]. ( 24) • Switch off...
... stations become unavailable. If "Explicit Content" in [Account Settings] is checked in the U.S.A. Enter the correct pass code to continue. PRESS ENTER TO CONTINUE." Playback is installed on the Android device. ( 7) • Reconnect the Android device and select the appropriate control mode. ( 8) • If this does not solve the problem, the connected Android device does not support [BROWSE MODE]. ( 24) • Switch off...

North America
Page 32
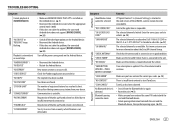
... devices might be controlled. The connected phone does not support Voice Recognition feature or phonebook transfer. TROUBLESHOOTING SPECIFICATIONS Bluetooth® Symptom Echo or noise is heard during playback of a Bluetooth audio player. The connected Bluetooth audio player cannot be trying to connect to the unit. • Check whether the connected Bluetooth audio player supports Audio/Video Remote Control Profile (AVRCP). (Refer to -Noise Ratio (1 kHz) Dynamic Range Channel Separation 87.9 MHz...
... devices might be controlled. The connected phone does not support Voice Recognition feature or phonebook transfer. TROUBLESHOOTING SPECIFICATIONS Bluetooth® Symptom Echo or noise is heard during playback of a Bluetooth audio player. The connected Bluetooth audio player cannot be trying to connect to the unit. • Check whether the connected Bluetooth audio player supports Audio/Video Remote Control Profile (AVRCP). (Refer to -Noise Ratio (1 kHz) Dynamic Range Channel Separation 87.9 MHz...


