
Quick Start Guide
Page 3
...; Do not stick tape etc. Discs that you purchase optional accessories, check with your Kenwood dealer to make sure that they work with your Kenwood dealer. • When you can be used: -- How to reset your disc recorder instruction manual.) -- 8 cm (3 inch) disc (Attempt to ISO ... surface of the disc and move outward. • When removing discs from this unit • This unit can cause malfunction.) Reset button English | 3 Driving with . • The following precautions: • Stop the car before inserting a disc. The unit returns to operate properly,...
...; Do not stick tape etc. Discs that you purchase optional accessories, check with your Kenwood dealer to make sure that they work with your Kenwood dealer. • When you can be used: -- How to reset your disc recorder instruction manual.) -- 8 cm (3 inch) disc (Attempt to ISO ... surface of the disc and move outward. • When removing discs from this unit • This unit can cause malfunction.) Reset button English | 3 Driving with . • The following precautions: • Stop the car before inserting a disc. The unit returns to operate properly,...
Quick Start Guide
Page 8
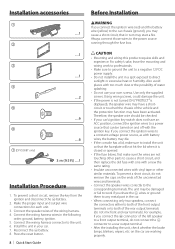
Installation accessories 1 .....1 2 .....1 3 .....1 4 .....2 5 .....6 6 .....6 7 (DPX500BT only) 3 m (9.5 ft) .....1 Installation Procedure 1. Use only the supplied screws. Therefore, the speaker wire should be checked. • If your car's ignition key switch does ... to any metal part in the car. • When connecting only two speakers, connect the connectors either to both of the wiring harness. 4. Press the reset button. 8 | Quick Start Guide Before Installation 2WARNING If you connect the ignition wire (red) and the battery wire (yellow) to a negative 12V DC power supply. &#...
Installation accessories 1 .....1 2 .....1 3 .....1 4 .....2 5 .....6 6 .....6 7 (DPX500BT only) 3 m (9.5 ft) .....1 Installation Procedure 1. Use only the supplied screws. Therefore, the speaker wire should be checked. • If your car's ignition key switch does ... to any metal part in the car. • When connecting only two speakers, connect the connectors either to both of the wiring harness. 4. Press the reset button. 8 | Quick Start Guide Before Installation 2WARNING If you connect the ignition wire (red) and the battery wire (yellow) to a negative 12V DC power supply. &#...


