Owner's Manual (pdf)
Page 1
... unit, in the spaces designated on the product. For your Kenwood dealer for information or service on the warranty card, and in the space provided below. Model DNX7140/DNX7000EX/DDX714/DDX7034BT Serial number US Residents Only Register Online Register your new GPS Navigation System/DVD Receiver. Refer to read through this instruction manual. GPS NAVIGATION SYSTEM DNX7140 DNX7000EX MONITOR WITH DVD RECEIVER DDX714 DDX7034BT INSTRUCTION MANUAL Take the time to the model and serial numbers...
... unit, in the spaces designated on the product. For your Kenwood dealer for information or service on the warranty card, and in the space provided below. Model DNX7140/DNX7000EX/DDX714/DDX7034BT Serial number US Residents Only Register Online Register your new GPS Navigation System/DVD Receiver. Refer to read through this instruction manual. GPS NAVIGATION SYSTEM DNX7140 DNX7000EX MONITOR WITH DVD RECEIVER DDX714 DDX7034BT INSTRUCTION MANUAL Take the time to the model and serial numbers...
Owner's Manual (pdf)
Page 2
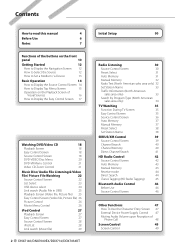
... Control Screen 35 Source Control Screen 36 Auto Memory 37 Manual Memory 37 Preset Select 38 Set Station Name 38 SIRIUS/XM Control 39 Source Control Screen 39 Channel Search 40 Channel Memory 40 Direct Channel Search 41 HD Radio Control 42 Source Control Screen 42 Auto Memory 43 Manual Memory 43 Receive mode 44 Direct Search 44 iTunes Tagging (HD Radio Tagging) 45 Bluetooth Audio Control 46 Before Use 46 Source Control Screen 46 Other Functions 47 How To Use the Character Entry Screen 47 External Device Power Supply Control 47 Muting Audio Volume...
... Control Screen 35 Source Control Screen 36 Auto Memory 37 Manual Memory 37 Preset Select 38 Set Station Name 38 SIRIUS/XM Control 39 Source Control Screen 39 Channel Search 40 Channel Memory 40 Direct Channel Search 41 HD Radio Control 42 Source Control Screen 42 Auto Memory 43 Manual Memory 43 Receive mode 44 Direct Search 44 iTunes Tagging (HD Radio Tagging) 45 Bluetooth Audio Control 46 Before Use 46 Source Control Screen 46 Other Functions 47 How To Use the Character Entry Screen 47 External Device Power Supply Control 47 Muting Audio Volume...

Owner's Manual (pdf)
Page 3
... 56 Phone Number Preset 57 SMS (Short Message Service) 57 Audio Control 59 Audio Control Menu 59 Audio Control 59 Equalizer Control 60 Graphic Equalizer Setup 60 Zone Control 61 Space Enhancer 61 Position 62 Remote Controller 84 Battery installation 84 Remote Controller mode switch 84 Common operations (AUD mode) 85 DVD/VCD (DVD mode) 86 Music Disc/Audio file/Video file/ Picture file (AUD mode) 87 Radio (AUD mode) 88 NAVI (NAVI mode) 88 TV (TV mode) 89 Status bar Indicator items 91 DVD Language Codes 92 Help? Troubleshooting 93 Help? Error 94...
... 56 Phone Number Preset 57 SMS (Short Message Service) 57 Audio Control 59 Audio Control Menu 59 Audio Control 59 Equalizer Control 60 Graphic Equalizer Setup 60 Zone Control 61 Space Enhancer 61 Position 62 Remote Controller 84 Battery installation 84 Remote Controller mode switch 84 Common operations (AUD mode) 85 DVD/VCD (DVD mode) 86 Music Disc/Audio file/Video file/ Picture file (AUD mode) 87 Radio (AUD mode) 88 NAVI (NAVI mode) 88 TV (TV mode) 89 Status bar Indicator items 91 DVD Language Codes 92 Help? Troubleshooting 93 Help? Error 94...
Owner's Manual (pdf)
Page 5
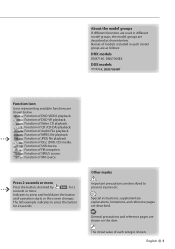
... to press and hold down the button until operation starts or the screen changes. Other marks Important precautions are described. English 5 Press 2 seconds or more . oCD : Function of Video CD playback. : Function of CD (CD-DA) playback. : Function of Audio File playback. : Function of MPEG file playback. : Function of JPEG file playback. : Function of Disc (DVD, CD) media. : Function of USB device. : Function of XM source. XM : Function of FM reception. General precautions...
... to press and hold down the button until operation starts or the screen changes. Other marks Important precautions are described. English 5 Press 2 seconds or more . oCD : Function of Video CD playback. : Function of CD (CD-DA) playback. : Function of Audio File playback. : Function of MPEG file playback. : Function of JPEG file playback. : Function of Disc (DVD, CD) media. : Function of USB device. : Function of XM source. XM : Function of FM reception. General precautions...
Owner's Manual (pdf)
Page 6
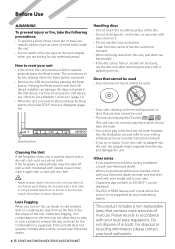
... pressing the Reset button, the Initial SETUP screen is displayed. (page 90) Reset button Cleaning the Unit If the faceplate of this unit, pull them out horizontally. • If the disc center hole or outside rim has burrs, use a disc with tape stuck on the unit's display when you are driving for the condensation to play. Other notes • If you experience problems during installation, consult your Kenwood dealer...
... pressing the Reset button, the Initial SETUP screen is displayed. (page 90) Reset button Cleaning the Unit If the faceplate of this unit, pull them out horizontally. • If the disc center hole or outside rim has burrs, use a disc with tape stuck on the unit's display when you are driving for the condensation to play. Other notes • If you experience problems during installation, consult your Kenwood dealer...
Owner's Manual (pdf)
Page 8
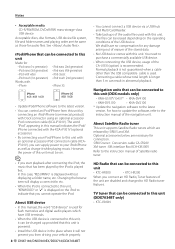
... * Update the navigation software to the instruction manual of Satellite radio tuner. You need to HD Radio tuner features. Connecting a cable whose total length is longer than the USB compatible cable is used for any damage arising out of erasure of the CA-U1EX (option) is displayed without displaying a folder name, etc. About Satellite Radio tuner This unit supports Satellite Radio tuners which have no compensation for flash memories and digital audio players which are disabled and changed...
... * Update the navigation software to the instruction manual of Satellite radio tuner. You need to HD Radio tuner features. Connecting a cable whose total length is longer than the USB compatible cable is used for any damage arising out of erasure of the CA-U1EX (option) is displayed without displaying a folder name, etc. About Satellite Radio tuner This unit supports Satellite Radio tuners which have no compensation for flash memories and digital audio players which are disabled and changed...
Owner's Manual (pdf)
Page 10
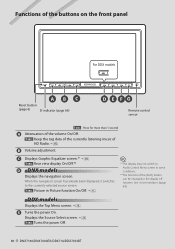
Picture in Picture function On/Off. ! ⁄ *1 The display may not switch to Audio Control Menu screen in some conditions. *2 The function of HD Radio. DDX models Displays the Top Menu screen. % E Turns the power On. C Displays Graphic Equalizer screen.*1 P 1 sec. See (page 64). Displays the Source Select screen. @ 1 sec. t B Volume adjustment. Rear view display On/Off.*2 D DNX models Displays the navigation screen. Turns the power Off. 10 DNX7140/DNX7000EX/DDX714/DDX7034BT Keep the tag data of the currently listening music of the [AUD] button can be changed to the...
Picture in Picture function On/Off. ! ⁄ *1 The display may not switch to Audio Control Menu screen in some conditions. *2 The function of HD Radio. DDX models Displays the Top Menu screen. % E Turns the power On. C Displays Graphic Equalizer screen.*1 P 1 sec. See (page 64). Displays the Source Select screen. @ 1 sec. t B Volume adjustment. Rear view display On/Off.*2 D DNX models Displays the navigation screen. Turns the power Off. 10 DNX7140/DNX7000EX/DDX714/DDX7034BT Keep the tag data of the currently listening music of the [AUD] button can be changed to the...
Owner's Manual (pdf)
Page 12
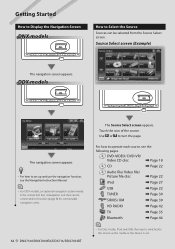
... connectable navigation units. 12 DNX7140/DNX7000EX/DDX714/DDX7034BT The Source Select screen appears. DVD-VIDEO/ DVD-VR/ Video CD disc \ Page 18 CD \ Page 22 Audio file/ Video file/ Picture file disc \ Page 22 iPod \ Page 27 USB \ Page 22 TUNER \ Page 30 SIRIUS/ XM \ Page 39 HD RADIO \ Page 42 TV \ Page 35 Bluetooth \ Page 46 ⁄ • For Disc media, iPod, and USB, the input is set up and use the navigation function, see the Navigation Instruction Manual. ⁄ • For DDX models, an optional navigation system needs...
... connectable navigation units. 12 DNX7140/DNX7000EX/DDX714/DDX7034BT The Source Select screen appears. DVD-VIDEO/ DVD-VR/ Video CD disc \ Page 18 CD \ Page 22 Audio file/ Video file/ Picture file disc \ Page 22 iPod \ Page 27 USB \ Page 22 TUNER \ Page 30 SIRIUS/ XM \ Page 39 HD RADIO \ Page 42 TV \ Page 35 Bluetooth \ Page 46 ⁄ • For Disc media, iPod, and USB, the input is set up and use the navigation function, see the Navigation Instruction Manual. ⁄ • For DDX models, an optional navigation system needs...
Owner's Manual (pdf)
Page 28
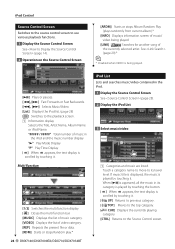
... music/ video being played. iPod Control Source Control Screen Switches to the source control screen to use various playback functions. 1 Display the Source Control Screen See (page 14). 2 Operation on the Source Control Screen 1 [38] Plays or pauses. [1], [¡] Fast Forwards or Fast Backwards. [4], [¢] Selects Music/Video. [List] Displays the iPod list. (page 28) [ ] Switches to the playback screen. 1 Information display Selects the Title, Artist Name, Album Name or iPod Name Total number of music in the iPod and the music number display "3" Play Mode Display "P" Play Time Display...
... music/ video being played. iPod Control Source Control Screen Switches to the source control screen to use various playback functions. 1 Display the Source Control Screen See (page 14). 2 Operation on the Source Control Screen 1 [38] Plays or pauses. [1], [¡] Fast Forwards or Fast Backwards. [4], [¢] Selects Music/Video. [List] Displays the iPod list. (page 28) [ ] Switches to the playback screen. 1 Information display Selects the Title, Artist Name, Album Name or iPod Name Total number of music in the iPod and the music number display "3" Play Mode Display "P" Play Time Display...
Owner's Manual (pdf)
Page 30
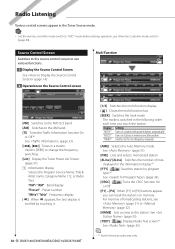
.../DDX714/DDX7034BT [1/3] Switches the multi function display. [ ] Closes the multi function bar. [SEEK] Switches the Seek mode. Tunes in stations in the Tuner Source mode. • Set the remote controller mode switch to "AUD" mode before starting operation, see (page 31) or (page 32). [NAME] Sets a name to [P6] buttons appear, you touch the button. Use the [SEEK] to the next frequency manually. [AME] Selects the Auto Memory mode. See (page 33). [TEXT] FM Displays Radio Text screen.*1 See (page...
.../DDX714/DDX7034BT [1/3] Switches the multi function display. [ ] Closes the multi function bar. [SEEK] Switches the Seek mode. Tunes in stations in the Tuner Source mode. • Set the remote controller mode switch to "AUD" mode before starting operation, see (page 31) or (page 32). [NAME] Sets a name to [P6] buttons appear, you touch the button. Use the [SEEK] to the next frequency manually. [AME] Selects the Auto Memory mode. See (page 33). [TEXT] FM Displays Radio Text screen.*1 See (page...
Owner's Manual (pdf)
Page 63
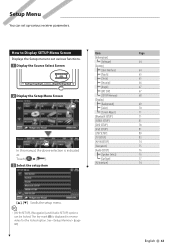
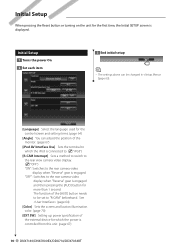
...-IN SETUP], [Navigation] and [Audio SETUP] options can set various functions. [Information] [Software] 64 1 Display the Source Select Screen [System] [User Interface] 64 [Touch] 65 SRC [Clock] 65 [Security] 66 [Angle] 67 [EXT SW] 67 2 Display the Setup Menu Screen [SETUP Memory] 68 [Display] [Background] 69 [Color] 70 [Screen Adjust] 71 [Bluetooth SETUP] 71 [SIRIUS SETUP] 81 [DVD SETUP] 78 [iPod SETUP] 81 [USB SETUP] 80 [TV SETUP] 83 [AV-IN SETUP] 74 [Navigation] 75 In this manual, the above selection is displayed in reverse video for the locked...
...-IN SETUP], [Navigation] and [Audio SETUP] options can set various functions. [Information] [Software] 64 1 Display the Source Select Screen [System] [User Interface] 64 [Touch] 65 SRC [Clock] 65 [Security] 66 [Angle] 67 [EXT SW] 67 2 Display the Setup Menu Screen [SETUP Memory] 68 [Display] [Background] 69 [Color] 70 [Screen Adjust] 71 [Bluetooth SETUP] 71 [SIRIUS SETUP] 81 [DVD SETUP] 78 [iPod SETUP] 81 [USB SETUP] 80 [TV SETUP] 83 [AV-IN SETUP] 74 [Navigation] 75 In this manual, the above selection is displayed in reverse video for the locked...
Owner's Manual (pdf)
Page 64
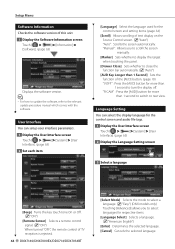
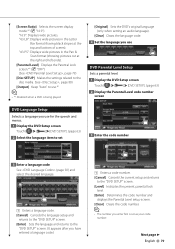
... to update the software, refer to rear view. User Interface You can select the display language for the control screen and audio file tags. 1 Display the User Interface screen Touch System] > [User Interface]. (page 63) 2 Display the Language Setting screen 3 Select a language [Beep] Turns the key touch tone On or Off. ( "ON") [Remote Sensor] Selects a remote control signal. ( "ON") When turned "OFF", the remote control of TV reception is rejected. 64 DNX7140/DNX7000EX/DDX714/DDX7034BT [Select Mode] Selects the mode to...
... to update the software, refer to rear view. User Interface You can select the display language for the control screen and audio file tags. 1 Display the User Interface screen Touch System] > [User Interface]. (page 63) 2 Display the Language Setting screen 3 Select a language [Beep] Turns the key touch tone On or Off. ( "ON") [Remote Sensor] Selects a remote control signal. ( "ON") When turned "OFF", the remote control of TV reception is rejected. 64 DNX7140/DNX7000EX/DDX714/DDX7034BT [Select Mode] Selects the mode to...
Owner's Manual (pdf)
Page 74
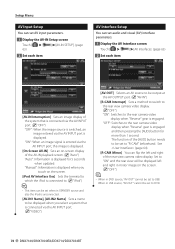
... be displayed when you touch on -screen display of the AV-IN playback screen. ( "Auto") "Auto": Information is displayed for more than 1 second. The function of the [AUD] button needs to be set to the rear camera video display when "Reverse" gear is displayed. "OFF": Switches to "R-CAM" beforehand. "Manual": Information is displayed when you select a system that is connected via the AV INPUT port. ( "OFF") "OFF": When the image source is switched, an image entered via the AV INPUT port...
... be displayed when you touch on -screen display of the AV-IN playback screen. ( "Auto") "Auto": Information is displayed for more than 1 second. The function of the [AUD] button needs to be set to the rear camera video display when "Reverse" gear is displayed. "OFF": Switches to "R-CAM" beforehand. "Manual": Information is displayed when you select a system that is connected via the AV INPUT port. ( "OFF") "OFF": When the image source is switched, an image entered via the AV INPUT port...
Owner's Manual (pdf)
Page 76
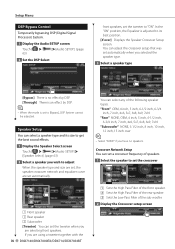
... mode is set to adjust When the speaker type and size are set, the speaker crossover network and equalizer curve are set automatically. 1 2 3 1 Front speaker 2 Rear speaker 3 Subwoofer [Tweeter] You can set the tweeter when you are selecting front speakers. Speaker Setup You can set a crossover frequency of speakers. 1 Select the speaker to "ON". Setup Menu DSP Bypass Control Temporarily bypassing DSP (Digital Signal Processor) System. 1 Display the Audio SETUP screen Touch [ ] > [ 63) ] > [Audio SETUP]. (page 2 Set the DSP Select front speakers, set the tweeter to set...
... mode is set to adjust When the speaker type and size are set, the speaker crossover network and equalizer curve are set automatically. 1 2 3 1 Front speaker 2 Rear speaker 3 Subwoofer [Tweeter] You can set the tweeter when you are selecting front speakers. Speaker Setup You can set a crossover frequency of speakers. 1 Select the speaker to "ON". Setup Menu DSP Bypass Control Temporarily bypassing DSP (Digital Signal Processor) System. 1 Display the Audio SETUP screen Touch [ ] > [ 63) ] > [Audio SETUP]. (page 2 Set the DSP Select front speakers, set the tweeter to set...
Owner's Manual (pdf)
Page 79
...": Displays wide pictures in the Letter Box format (having black stripes at the right and left ends). [Parental Level] Displays the Parental Lock screen.*1 ( "OFF") (See , page 79) [Disc SETUP] Makes the settings related to the disc media. (See , page 80) [Output] Keep "Auto" to use.*1 ⁄ • * Disabled when a DVD is being played. [Original] Sets the DVD's original language (only when setting an audio language). [Clear] Clears the language code. 4 Set...
...": Displays wide pictures in the Letter Box format (having black stripes at the right and left ends). [Parental Level] Displays the Parental Lock screen.*1 ( "OFF") (See , page 79) [Disc SETUP] Makes the settings related to the disc media. (See , page 80) [Output] Keep "Auto" to use.*1 ⁄ • * Disabled when a DVD is being played. [Original] Sets the DVD's original language (only when setting an audio language). [Clear] Clears the language code. 4 Set...
Owner's Manual (pdf)
Page 82
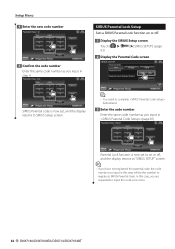
... the number to register as SIRIUS Parental Code. Parental Lock function is now set , and the display returns to SIRIUS Setup screen. ⁄ • You need to input the code once more. 82 DNX7140/DNX7000EX/DDX714/DDX7034BT Setup Menu 4 Enter the new code number 5 Confirm the code number Enter the same code number as you input in (page 81). SIRIUS Parental Lock Setup Sets a SIRIUS Parental Lock function on or off . 1 Display the SIRIUS Setup screen Touch [ ] > [ 63) ] > [SIRIUS SETUP]. (page 2 Display the Parental Code screen SIRIUS Parental code is now set to...
... the number to register as SIRIUS Parental Code. Parental Lock function is now set , and the display returns to SIRIUS Setup screen. ⁄ • You need to input the code once more. 82 DNX7140/DNX7000EX/DDX714/DDX7034BT Setup Menu 4 Enter the new code number 5 Confirm the code number Enter the same code number as you input in (page 81). SIRIUS Parental Lock Setup Sets a SIRIUS Parental Lock function on or off . 1 Display the SIRIUS Setup screen Touch [ ] > [ 63) ] > [SIRIUS SETUP]. (page 2 Display the Parental Code screen SIRIUS Parental code is now set to...
Owner's Manual (pdf)
Page 90
... SW] Setting up power specification of the monitor. (page 67) [iPod AV Interface Use] Sets the terminal to the rear camera video display when "Reverse" gear is controlled from this unit. (page 67) 90 DNX7140/DNX7000EX/DDX714/DDX7034BT The function of the [AUD] button needs to be changed in (page 63). [Language] Select the language used for the control screen and setting items. (page 64) [Angle] You can adjust the position of the external device for...
... SW] Setting up power specification of the monitor. (page 67) [iPod AV Interface Use] Sets the terminal to the rear camera video display when "Reverse" gear is controlled from this unit. (page 67) 90 DNX7140/DNX7000EX/DDX714/DDX7034BT The function of the [AUD] button needs to be changed in (page 63). [Language] Select the language used for the control screen and setting items. (page 64) [Angle] You can adjust the position of the external device for...
Owner's Manual (pdf)
Page 93
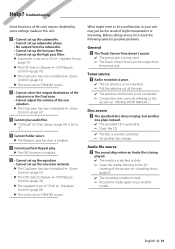
...; The Random play . ▲ The PBC function is enabled. ! • Cannot set up the equalizer. • Cannot set up the high pass filter. ▲ Subwoofer is not set to "iPod". ☞ (page 60) ▲ The unit is severely scratched. ☞ Try another media. Before calling service, first check the following table for possible problems. General ? Audio file source ? Disc source ? Help? Cannot play , but another one plays instead. ✔...
...; The Random play . ▲ The PBC function is enabled. ! • Cannot set up the equalizer. • Cannot set up the high pass filter. ▲ Subwoofer is not set to "iPod". ☞ (page 60) ▲ The unit is severely scratched. ☞ Try another media. Before calling service, first check the following table for possible problems. General ? Audio file source ? Disc source ? Help? Cannot play , but another one plays instead. ✔...
Owner's Manual (pdf)
Page 94
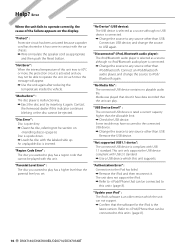
...Change the source to operate the unit. "USB Device Error!!" : The connected USB device is compliant with the labeled side up. "Disconnected" (iPod, Bluetooth audio player): The iPod/Bluetooth audio player is an older version which this unit. "Update your iPod" : The iPod's software is selected as appropriate and then push the Reset button. Help? "Region Code Error" : The disc you may have data recorded that the software for the iPod is inserted. Remove the USB device. This unit only supports the USB device compliant with this unit supports. "Mecha Error" : The disc...
...Change the source to operate the unit. "USB Device Error!!" : The connected USB device is compliant with the labeled side up. "Disconnected" (iPod, Bluetooth audio player): The iPod/Bluetooth audio player is an older version which this unit. "Update your iPod" : The iPod's software is selected as appropriate and then push the Reset button. Help? "Region Code Error" : The disc you may have data recorded that the software for the iPod is inserted. Remove the USB device. This unit only supports the USB device compliant with this unit supports. "Mecha Error" : The disc...
Installation Manual (pdf)
Page 2
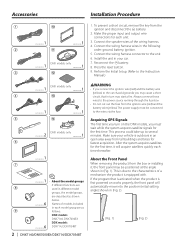
.... 2) DNX models only 7. Make sure your car. If the program that in an open area away from the ignition wire (red) and the battery wire (yellow). order: ground, battery, ignition. 5. Connect the wiring harness connector to several minutes. This is first powered on works properly, the front panel will acquire satellites quickly each unit. ..........1 ..........1 3. Make the proper input and output wire connections for fastest acquisition. Perform the Initial Setup. (Refer to the Instruction Manual.) DNX models only...
.... 2) DNX models only 7. Make sure your car. If the program that in an open area away from the ignition wire (red) and the battery wire (yellow). order: ground, battery, ignition. 5. Connect the wiring harness connector to several minutes. This is first powered on works properly, the front panel will acquire satellites quickly each unit. ..........1 ..........1 3. Make the proper input and output wire connections for fastest acquisition. Perform the Initial Setup. (Refer to the Instruction Manual.) DNX models only...


