Installation Instructions
Page 1
... followed. 8533591B iMPORTANT SAFETY iNSTRUCTiONS When discarding or storing your appliance. 29" (73.7 CM) GAS DRYER INSTALLATION INSTRUCTIONS INSTRUCCIONES DE INSTALACION PARA LA SECADORA A GAS DE 29" (73.7 CM) TableofContents DRYER SAFETY 1 INSTALLATION INSTRUCTIONS 4 Tools and Parts 4 Location Requirements 4 Electrical Requirements 5 Gas Supply Requirements 6 Venting Requirements 7 Plan Vent System 8 Install Vent System 9 Install Leveling Legs 9 Level...
... followed. 8533591B iMPORTANT SAFETY iNSTRUCTiONS When discarding or storing your appliance. 29" (73.7 CM) GAS DRYER INSTALLATION INSTRUCTIONS INSTRUCCIONES DE INSTALACION PARA LA SECADORA A GAS DE 29" (73.7 CM) TableofContents DRYER SAFETY 1 INSTALLATION INSTRUCTIONS 4 Tools and Parts 4 Location Requirements 4 Electrical Requirements 5 Gas Supply Requirements 6 Venting Requirements 7 Plan Vent System 8 Install Vent System 9 Install Leveling Legs 9 Level...
Installation Instructions
Page 3
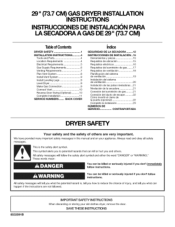
...and have been previously cleaned in, washed in, soaked in, or spotted with controls. [] Do not repair or replace any part of the dryer or attempt any servicing unless specifically recommended in this Use and Care Guide or in published user-repair instructions that could ignite ... for grounding instructions. Close supervision of children is necessary when the dryer is moving. [] Do not install or store the dryer where it shall be a T-handle type. [] A flexible gas connector, when used near children. [] Before the dryer is removed from service or discarded, remove the door to the drying...
...and have been previously cleaned in, washed in, soaked in, or spotted with controls. [] Do not repair or replace any part of the dryer or attempt any servicing unless specifically recommended in this Use and Care Guide or in published user-repair instructions that could ignite ... for grounding instructions. Close supervision of children is necessary when the dryer is moving. [] Do not install or store the dryer where it shall be a T-handle type. [] A flexible gas connector, when used near children. [] Before the dryer is removed from service or discarded, remove the door to the drying...
Installation Instructions
Page 4
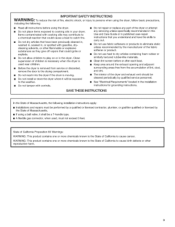
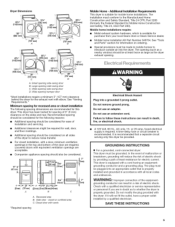
.... See "Venting Requirements." • A grounded electrical outlet located within 2 ft (610 mm) of either side of 200 Ibs (90.7 kg). The combined weight of 1" (25 mm) under entire dryer. (If slope is not level. A level floor with a maximum slope of...dryer is greater than 1" [25 mm], install Extended Dryer Feet Kit, Part Number 279810.) Clothes may not tumble properly and dryers with gas supplier, check existing gas supply, electrical supply and venting, and read "Electrical Requirements," "Gas Supply Requirements" and "Venting Requirements" before starting installation. A gas dryer...
.... See "Venting Requirements." • A grounded electrical outlet located within 2 ft (610 mm) of either side of 200 Ibs (90.7 kg). The combined weight of 1" (25 mm) under entire dryer. (If slope is not level. A level floor with a maximum slope of...dryer is greater than 1" [25 mm], install Extended Dryer Feet Kit, Part Number 279810.) Clothes may not tumble properly and dryers with gas supplier, check existing gas supply, electrical supply and venting, and read "Electrical Requirements," "Gas Supply Requirements" and "Venting Requirements" before starting installation. A gas dryer...
Installation Instructions
Page 5
...are acceptable. • Companion appliance spacing should be made in the top and bottom of the dryer to the Manufactured Home Construction and Safety Standard, Title 24 CFR, Part 3280 (formerly the Federal Standard for wall, door, and floor moldings. • Additional spacing ...from your local Sears store or Sears Service dealer. • Mobile home Installation Kit Part Number 346764. Large opening hamper door *Most installations require a minimum 5" (127 mm) clearance behind the dryer for the exhaust vent with equivalent ventilation openings are recommended for spacing of 0" (0...
...are acceptable. • Companion appliance spacing should be made in the top and bottom of the dryer to the Manufactured Home Construction and Safety Standard, Title 24 CFR, Part 3280 (formerly the Federal Standard for wall, door, and floor moldings. • Additional spacing ...from your local Sears store or Sears Service dealer. • Mobile home Installation Kit Part Number 346764. Large opening hamper door *Most installations require a minimum 5" (127 mm) clearance behind the dryer for the exhaust vent with equivalent ventilation openings are recommended for spacing of 0" (0...
Installation Instructions
Page 8
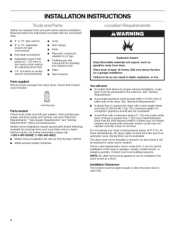
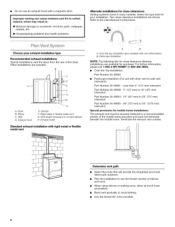
... Two close clearances Venting systems come in : [] Moisture damage to wall vent mismatch): Part Number 26-49901 - I[Ihh__G A. Elbow C. Waft D. Vent length necessary to the manufacturer's instructions. Dryer B. Terminate the exhaust vent outside. / Determine vent path • Select the route... that will provide the straightest and most direct path outdoors. • Plan the installation to use with dryer vent to woodwork, furniture, paint, wallpaper, carpets, etc. [] Housecleaning problems and health problems. Alternate installations for your exhaust ...
... Two close clearances Venting systems come in : [] Moisture damage to wall vent mismatch): Part Number 26-49901 - I[Ihh__G A. Elbow C. Waft D. Vent length necessary to the manufacturer's instructions. Dryer B. Terminate the exhaust vent outside. / Determine vent path • Select the route... that will provide the straightest and most direct path outdoors. • Plan the installation to use with dryer vent to woodwork, furniture, paint, wallpaper, carpets, etc. [] Housecleaning problems and health problems. Alternate installations for your exhaust ...

Installation Instructions
Page 10
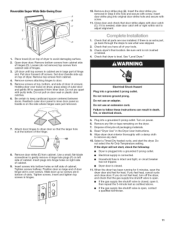
...You can change your door swing from cabinet side of door hinge slot is parallel to exhaust outlet in the flexible gas line. 4. Reversible Large Side-Swing Door A /' B C A. 3/8" flexible gas connector B. 3/8" dryer pipe C. 3/8" to 3/8" pipe elbow D. 3/8" pipe-to existing vent, make sure the vent is secured to adjust... Your connection may be used to connect the dryer to a left side of cabinet. Open valve 4. Tighten screws. Close door and check that vent is clean. Open dryer door. Slide door up so screws are in large part of hinge slot. Loosen (do not remove)...
...You can change your door swing from cabinet side of door hinge slot is parallel to exhaust outlet in the flexible gas line. 4. Reversible Large Side-Swing Door A /' B C A. 3/8" flexible gas connector B. 3/8" dryer pipe C. 3/8" to 3/8" pipe elbow D. 3/8" pipe-to existing vent, make sure the vent is secured to adjust... Your connection may be used to connect the dryer to a left side of cabinet. Open valve 4. Tighten screws. Close door and check that vent is clean. Open dryer door. Slide door up so screws are in large part of hinge slot. Loosen (do not remove)...
Installation Instructions
Page 11
... of your tools. 3. Insert and tighten top screws in death, fire, or electrical shock. 5. Check dryer's final location. Turn on door seal or plastic door catches. 6. Read "Dryer Use" in large part of hinge slot. Insert screws into a grounded 3 prong outlet. • Electrical supply is connected. &#...that the larger hole is an extra part, go back through the steps to separate it , then repeat the 5-minute test as outlined above. • If the gas supply line shutoff valve is closed , open , contact a qualified technician. 11 See "Level Dryer." Remove top screws from cabinet. ...
... of your tools. 3. Insert and tighten top screws in death, fire, or electrical shock. 5. Check dryer's final location. Turn on door seal or plastic door catches. 6. Read "Dryer Use" in large part of hinge slot. Insert screws into a grounded 3 prong outlet. • Electrical supply is connected. &#...that the larger hole is an extra part, go back through the steps to separate it , then repeat the 5-minute test as outlined above. • If the gas supply line shutoff valve is closed , open , contact a qualified technician. 11 See "Level Dryer." Remove top screws from cabinet. ...

Installation Instructions
Page 24
...professional installation of home appliances and items like vacuums, lawn equipment, and electronics, call anytime for the location of carry-in your nearest Sears Parts & Repair Service Center 1-800-488-1222 (U.S.A.) 1-800-469-4663 (Canada) www.sears.com www.sears.ca To purchase a protection agreement on... and Canada) www.sears.com www.sears.ca Our Home For repair of your home - Impreso en EE.UU. For the replacement parts, accessories and owner's manuals that you need to do-it ! Your Home For troubleshooting, product manuals and expert advice: managemyiife www.managemylife...
...professional installation of home appliances and items like vacuums, lawn equipment, and electronics, call anytime for the location of carry-in your nearest Sears Parts & Repair Service Center 1-800-488-1222 (U.S.A.) 1-800-469-4663 (Canada) www.sears.com www.sears.ca To purchase a protection agreement on... and Canada) www.sears.com www.sears.ca Our Home For repair of your home - Impreso en EE.UU. For the replacement parts, accessories and owner's manuals that you need to do-it ! Your Home For troubleshooting, product manuals and expert advice: managemyiife www.managemylife...
Installation Manual
Page 5
... also have other than its intended purpose. 6. This warranty gives you specific legal rights, and you . A service technician to filters, belts, light bulbs, 2. Disclaimer of parts or systems resulting from the date of this product if it is ever used in the United States or Canada. Sears, Roebuck and Co., Roffman...
... also have other than its intended purpose. 6. This warranty gives you specific legal rights, and you . A service technician to filters, belts, light bulbs, 2. Disclaimer of parts or systems resulting from the date of this product if it is ever used in the United States or Canada. Sears, Roebuck and Co., Roffman...
