Installation Instructions
Page 1
... symbol. This symbol alerts you to reduce the chance of others . 29" (73.7 CM) GAS DRYER INSTALLATION INSTRUCTIONS INSTRUCCIONES DE INSTALACION PARA LA SECADORA A GAS DE 29" (73.7 CM) TableofContents DRYER SAFETY 1 INSTALLATION INSTRUCTIONS 4 Tools and Parts 4 Location Requirements 4 Electrical Requirements 5 Gas Supply Requirements 6 Venting Requirements 7 Plan Vent System 8 Install Vent System 9 Install Leveling Legs 9 Level...
... symbol. This symbol alerts you to reduce the chance of others . 29" (73.7 CM) GAS DRYER INSTALLATION INSTRUCTIONS INSTRUCCIONES DE INSTALACION PARA LA SECADORA A GAS DE 29" (73.7 CM) TableofContents DRYER SAFETY 1 INSTALLATION INSTRUCTIONS 4 Tools and Parts 4 Location Requirements 4 Electrical Requirements 5 Gas Supply Requirements 6 Venting Requirements 7 Plan Vent System 8 Install Vent System 9 Install Leveling Legs 9 Level...
Installation Instructions
Page 3
... and have been previously cleaned in, washed in, soaked in, or spotted with controls. [] Do not repair or replace any part of the dryer or attempt any servicing unless specifically recommended in this Use and Care Guide or in published user-repair instructions that could cause a ...[] Clean lint screen before using a ball valve, it shall be a T-handle type. [] A flexible gas connector, when used near children. [] Before the dryer is moving. [] Do not install or store the dryer where it will be exposed to the weather. [] Do not tamper with gasoline, drycleaning solvents, or other ...
... and have been previously cleaned in, washed in, soaked in, or spotted with controls. [] Do not repair or replace any part of the dryer or attempt any servicing unless specifically recommended in this Use and Care Guide or in published user-repair instructions that could cause a ...[] Clean lint screen before using a ball valve, it shall be a T-handle type. [] A flexible gas connector, when used near children. [] Before the dryer is moving. [] Do not install or store the dryer where it will be exposed to the weather. [] Do not tamper with gasoline, drycleaning solvents, or other ...
Installation Instructions
Page 4
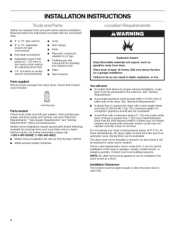
.... Check that all parts were included. 4 leveling legs Parts needed: Check local codes and with automatic sensor cycles may not tumble properly and dryers with gas supplier, check existing gas supply, electrical supply and venting, and read "Electrical Requirements," "Gas Supply Requirements" and ..., Failure to LP gas Caulking gun and compound (for installing new exhaust vent) • Pliers • Tape measure Parts supplied: Remove parts package from your local building inspector. See "Venting Requirements." • A grounded electrical outlet located within 2 ft (610 mm) of...
.... Check that all parts were included. 4 leveling legs Parts needed: Check local codes and with automatic sensor cycles may not tumble properly and dryers with gas supplier, check existing gas supply, electrical supply and venting, and read "Electrical Requirements," "Gas Supply Requirements" and ..., Failure to LP gas Caulking gun and compound (for installing new exhaust vent) • Pliers • Tape measure Parts supplied: Remove parts package from your local building inspector. See "Venting Requirements." • A grounded electrical outlet located within 2 ft (610 mm) of...
Installation Instructions
Page 5
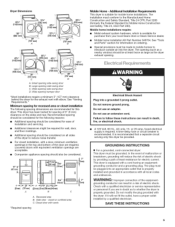
...tested for information on the sides and rear. The opening (such as the dryer exhaust opening. (705r"m},__\ _ (705mr") (737r"m) C (737mr"} D A. See "Tools and Parts" section for spacing of the dryer to reduce noise transfer. For closet installation, with elbow. Small opening side-...installations require a minimum 5" (127 mm) clearance behind the dryer for the exhaust vent with a door, minimum ventilation openings in mobile homes to the Manufactured Home Construction and Safety Standard, Title 24 CFR, Part 3280 (formerly the Federal Standard for wall, door, and floor...
...tested for information on the sides and rear. The opening (such as the dryer exhaust opening. (705r"m},__\ _ (705mr") (737r"m) C (737mr"} D A. See "Tools and Parts" section for spacing of the dryer to reduce noise transfer. For closet installation, with elbow. Small opening side-...installations require a minimum 5" (127 mm) clearance behind the dryer for the exhaust vent with a door, minimum ventilation openings in mobile homes to the Manufactured Home Construction and Safety Standard, Title 24 CFR, Part 3280 (formerly the Federal Standard for wall, door, and floor...
Installation Instructions
Page 8
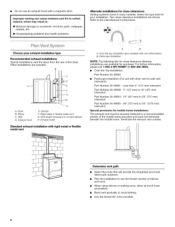
... or flexible metal vent G. Over-the-top installation (also available with rigid metal or flexible metal vent " i. • .L A B A. Dryer B. Exhaust hood E. Exhaust outlet Standard exhaust installation with one offset elbow B. Periscope instaflation NOTE: The following kits for purchase. Refer to connect elbows...instructions. For further information please call 1-800-4-MY-HOME ® (1-800-469-4663). • Over-the-Top installation: Part Number 26-49900 Periscope Installation (For use the fewest number of the mobile home structure and must be securely fastened to a ...
... or flexible metal vent G. Over-the-top installation (also available with rigid metal or flexible metal vent " i. • .L A B A. Dryer B. Exhaust hood E. Exhaust outlet Standard exhaust installation with one offset elbow B. Periscope instaflation NOTE: The following kits for purchase. Refer to connect elbows...instructions. For further information please call 1-800-4-MY-HOME ® (1-800-469-4663). • Over-the-Top installation: Part Number 26-49900 Periscope Installation (For use the fewest number of the mobile home structure and must be securely fastened to a ...

Installation Instructions
Page 10
...desired. Insert plugs into bottom holes on top of dryer to the existing gas line. Avoid crushing or kinking vent. 3. Check that there are no kinks in large part of cabinet. 5. Close door and check that vent is over dryer exhaust outlet and inside exhaust hood. Your connection may... be used to connect the dryer to avoid damaging surface. 2. ...
...desired. Insert plugs into bottom holes on top of dryer to the existing gas line. Avoid crushing or kinking vent. 3. Check that there are no kinks in large part of cabinet. 5. Close door and check that vent is over dryer exhaust outlet and inside exhaust hood. Your connection may... be used to connect the dryer to avoid damaging surface. 2. ...
Installation Instructions
Page 11
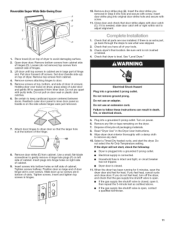
... hole and secure with putty knife. Pull door forward off the dryer, and check that all parts are now installed. Do not pull on power. 6. Tighten screws halfway. Slide door up ) on dryer, grasp sides of your tools. 3. Check dryer's final location. Be sure vent is level. Do not remove... holes on left side of hinges. 3. Do not use an adapter. If the dryer will not start the dryer. If you have all packaging materials. 8. Remove door strike (E) from cabinet. 4. Check that the gas supply line shutoff valve is on top of hinges (D). Do not select the Air ...
... hole and secure with putty knife. Pull door forward off the dryer, and check that all parts are now installed. Do not pull on power. 6. Tighten screws halfway. Slide door up ) on dryer, grasp sides of your tools. 3. Check dryer's final location. Be sure vent is level. Do not remove... holes on left side of hinges. 3. Do not use an adapter. If the dryer will not start the dryer. If you have all packaging materials. 8. Remove door strike (E) from cabinet. 4. Check that the gas supply line shutoff valve is on top of hinges (D). Do not select the Air ...


