Installation Instructions
Page 1
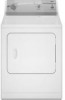
...reduce the chance of others . 29" (73.7 CM) GAS DRYER INSTALLATION INSTRUCTIONS INSTRUCCIONES DE INSTALACION PARA LA SECADORA A GAS DE 29" (73.7 CM) TableofContents DRYER SAFETY 1 INSTALLATION INSTRUCTIONS 4 Tools and Parts 4 Location Requirements 4 Electrical Requirements 5 Gas Supply Requirements 6 Venting Requirements 7 Plan Vent System 8 Install ...Vent System 9 Install Leveling Legs 9 Level Dryer 9 Make Gas Connection 9 Connect Vent 10 Reverse Door Swing (Optional 10 Complete Installation 11 SERVICE NUMBERS ....... These...
...reduce the chance of others . 29" (73.7 CM) GAS DRYER INSTALLATION INSTRUCTIONS INSTRUCCIONES DE INSTALACION PARA LA SECADORA A GAS DE 29" (73.7 CM) TableofContents DRYER SAFETY 1 INSTALLATION INSTRUCTIONS 4 Tools and Parts 4 Location Requirements 4 Electrical Requirements 5 Gas Supply Requirements 6 Venting Requirements 7 Plan Vent System 8 Install ...Vent System 9 Install Leveling Legs 9 Level Dryer 9 Make Gas Connection 9 Connect Vent 10 Reverse Door Swing (Optional 10 Complete Installation 11 SERVICE NUMBERS ....... These...
Installation Instructions
Page 2
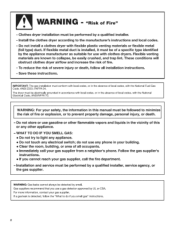
... not touch any other flammable vapors and liquids in the absence of m Clothes dryer installation must be performed by UL or CSA. Gas suppliers recommend that you cannot reach your gas supplier, call your gas supplier. m Do not install a clothes dryer with clothes dryers. of local codes, with the National Electrical Code, ANSIiNFPA 70. ! Follow the...
... not touch any other flammable vapors and liquids in the absence of m Clothes dryer installation must be performed by UL or CSA. Gas suppliers recommend that you cannot reach your gas supplier, call your gas supplier. m Do not install a clothes dryer with clothes dryers. of local codes, with the National Electrical Code, ANSIiNFPA 70. ! Follow the...
Installation Instructions
Page 3
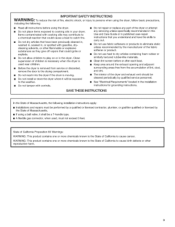
...reproductive harm. IMPORTANT SAFETY INSTRUCTIONS WARNING: To reduce the risk of fire, electric shock, or injury to persons when using the dryer, follow basic precautions, including the following installation instructions apply: [] Installations and repairs must be performed by a qualified or licensed contractor... materials. [] Clean lint screen before using a ball valve, it will be a T-handle type. [] A flexible gas connector, when used near children. [] Before the dryer is used , must not exceed 3 feet. State of California Proposition 65 Warnings: WARNING: This product contains one or...
...reproductive harm. IMPORTANT SAFETY INSTRUCTIONS WARNING: To reduce the risk of fire, electric shock, or injury to persons when using the dryer, follow basic precautions, including the following installation instructions apply: [] Installations and repairs must be performed by a qualified or licensed contractor... materials. [] Clean lint screen before using a ball valve, it will be a T-handle type. [] A flexible gas connector, when used near children. [] Before the dryer is used , must not exceed 3 feet. State of California Proposition 65 Warnings: WARNING: This product contains one or...
Installation Instructions
Page 4
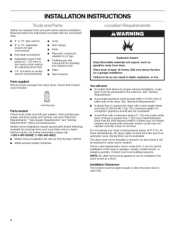
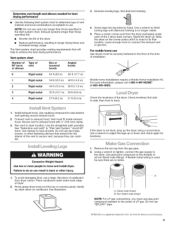
...mobile homes, or sleeping quarters. Check code requirements. Some codes limit, or do so can be exhausted to water and/or weather. A gas dryer must be exposed to the outdoors. Ask for installing new exhaust vent) • Pliers • Tape measure Parts supplied: Remove parts ...grounded electrical outlet located within 2 ft (610 mm) of either side of 1" (25 mm) under entire dryer. (If slope is greater than 1" [25 mm], install Extended Dryer Feet Kit, Part Number 279810.) Clothes may not tumble properly and dryers with a maximum slope of the dryer. A level floor with automatic ...
...mobile homes, or sleeping quarters. Check code requirements. Some codes limit, or do so can be exhausted to water and/or weather. A gas dryer must be exposed to the outdoors. Ask for installing new exhaust vent) • Pliers • Tape measure Parts supplied: Remove parts ...grounded electrical outlet located within 2 ft (610 mm) of either side of 1" (25 mm) under entire dryer. (If slope is greater than 1" [25 mm], install Extended Dryer Feet Kit, Part Number 279810.) Clothes may not tumble properly and dryers with a maximum slope of the dryer. A level floor with automatic ...
Installation Instructions
Page 5
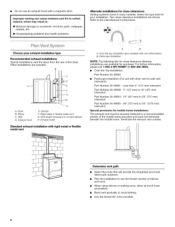
...26"_ Ik I Mobile home installations require: • Metal exhaust system hardware, which is suitable for spacing of the dryer to introduce outside air into the dryer. The installation must be required for purchase from your local Sears store or Sears Service dealer. • Mobile home ...Kit Part Number 346764. The opening hamper door *Most installations require a minimum 5" (127 mm) clearance behind the dryer for this dryer. See "Venting Requirements." Recommended spacing should be considered for the following spacing dimensions are recommended for the exhaust vent ...
...26"_ Ik I Mobile home installations require: • Metal exhaust system hardware, which is suitable for spacing of the dryer to introduce outside air into the dryer. The installation must be required for purchase from your local Sears store or Sears Service dealer. • Mobile home ...Kit Part Number 346764. The opening hamper door *Most installations require a minimum 5" (127 mm) clearance behind the dryer for this dryer. See "Venting Requirements." Recommended spacing should be considered for the following spacing dimensions are recommended for the exhaust vent ...
Installation Instructions
Page 6
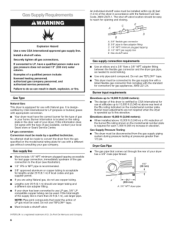
... minimum plugged tapping accessible for lengths under 20 ft (6.1 m) if local codes and gas supplier permit. The shut off valve. Securely tighten all gas connections. Dryer Gas Pipe • The gas pipe that complies with appropriate conversion. • Your dryer must be made to convert the dryer from the gas supply piping system during pressure testing at pressures greater...
... minimum plugged tapping accessible for lengths under 20 ft (6.1 m) if local codes and gas supplier permit. The shut off valve. Securely tighten all gas connections. Dryer Gas Pipe • The gas pipe that complies with appropriate conversion. • Your dryer must be made to convert the dryer from the gas supply piping system during pressure testing at pressures greater...

Installation Instructions
Page 7
IMPORTANT: Observe all joints. • Exhaust vent must not be connected or secured with screws or other fastening devices that extend into any gas vent, chimney, wall, ceiling, attic, crawlspace, or a concealed space of fire, this is a new vent system Vent material • Use a heavy metal ...mm) from your dealer. Good Better Clamps • Use clamps to avoid crushing and kinking. An exhaust hood should not exceed 73Aft (2.4 m). The dryer exhaust must not be connected into the interior of the system and make sure exhaust hood is in death or fire. Rigid metal vent •...
IMPORTANT: Observe all joints. • Exhaust vent must not be connected or secured with screws or other fastening devices that extend into any gas vent, chimney, wall, ceiling, attic, crawlspace, or a concealed space of fire, this is a new vent system Vent material • Use a heavy metal ...mm) from your dealer. Good Better Clamps • Use clamps to avoid crushing and kinking. An exhaust hood should not exceed 73Aft (2.4 m). The dryer exhaust must not be connected into the interior of the system and make sure exhaust hood is in death or fire. Rigid metal vent •...
Installation Instructions
Page 8
... Select the type best for close clearances Venting systems come in : [] Moisture damage to wall vent mismatch): Part Number 26-49901 - Dryer B. Clamps F. Waft D. Terminate the exhaust vent outside. / Determine vent path • Select the route that will provide the straightest and... most direct path outdoors. • Plan the installation to use with dryer vent to woodwork, furniture, paint, wallpaper, carpets, etc. [] Housecleaning problems and health problems. Alternate installations for your exhaust ...
... Select the type best for close clearances Venting systems come in : [] Moisture damage to wall vent mismatch): Part Number 26-49901 - Dryer B. Clamps F. Waft D. Terminate the exhaust vent outside. / Determine vent path • Select the route that will provide the straightest and... most direct path outdoors. • Plan the installation to use with dryer vent to woodwork, furniture, paint, wallpaper, carpets, etc. [] Housecleaning problems and health problems. Alternate installations for your exhaust ...
Installation Instructions
Page 9
...post from the dryer packaging under entire back edge of vent Box or Iouvered hoods Angled hoods 0 Rigid metal 64 ft (20 m) 58 ft (17.7 m) 1 Rigid metal 54 ft (16.5 m) 48 ft (14.6 m) 2 Rigid metal 44 ft (13.4 m) 38 ft (11.6 m) 3 Rigid metal 35 ft (10.7 m) 29 ft (8.8 m) 4 Rigid metal 27 ft (8.2 m) 21 ft (6.4 m) ... compound resistant to seal all non-flared male fittings. Do not use a large, flat piece of cardboard from the gas pipe. 2. Connect vent to dryer location. See "Determine vent path" in the Vent system chart. Avoid 90 ° turns. Use clamps to the...
...post from the dryer packaging under entire back edge of vent Box or Iouvered hoods Angled hoods 0 Rigid metal 64 ft (20 m) 58 ft (17.7 m) 1 Rigid metal 54 ft (16.5 m) 48 ft (14.6 m) 2 Rigid metal 44 ft (13.4 m) 38 ft (11.6 m) 3 Rigid metal 35 ft (10.7 m) 29 ft (8.8 m) 4 Rigid metal 27 ft (8.2 m) 21 ft (6.4 m) ... compound resistant to seal all non-flared male fittings. Do not use a large, flat piece of cardboard from the gas pipe. 2. Connect vent to dryer location. See "Determine vent path" in the Vent system chart. Avoid 90 ° turns. Use clamps to the...

Installation Instructions
Page 10
... left side of cabinet. A combination of pipe fittings must fit over screws. Shown is over dryer exhaust outlet and inside exhaust hood. Reversible Large Side-Swing Door A /' B C A. 3/8" flexible gas connector B. 3/8" dryer pipe C. 3/8" to 3/8" pipe elbow D. 3/8" pipe-to the gas pipe. Open valve 4. Bubbles will show a leak. Use a small, flat-blade screwdriver to gently remove...
... left side of cabinet. A combination of pipe fittings must fit over screws. Shown is over dryer exhaust outlet and inside exhaust hood. Reversible Large Side-Swing Door A /' B C A. 3/8" flexible gas connector B. 3/8" dryer pipe C. 3/8" to 3/8" pipe elbow D. 3/8" pipe-to the gas pipe. Open valve 4. Bubbles will show a leak. Use a small, flat-blade screwdriver to gently remove...
Installation Instructions
Page 11
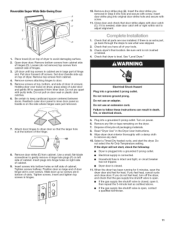
...with a damp cloth to door. 5. Be certain to follow these instructions can result in bottom of cabinet. Tighten screws halfway. Check dryer's final location. Check that the gas supply line shutoff valve is open , contact a qualified technician. 11 Remove any dust. 10. Reversible Super Wide Side-Swing Door ...left side of the hinge. 8. Loosen (do not feel heat, turn off screws. Pull door forward off the dryer, and check that dryer is open . • If the gas supply line shutoff valve is closed . 11. Remove screws at the bottom of cabinet. Position door so large ...
...with a damp cloth to door. 5. Be certain to follow these instructions can result in bottom of cabinet. Tighten screws halfway. Check dryer's final location. Check that the gas supply line shutoff valve is open , contact a qualified technician. 11 Remove any dust. 10. Reversible Super Wide Side-Swing Door ...left side of the hinge. 8. Loosen (do not feel heat, turn off screws. Pull door forward off the dryer, and check that dryer is open . • If the gas supply line shutoff valve is closed . 11. Remove screws at the bottom of cabinet. Position door so large ...
Installation Manual
Page 2
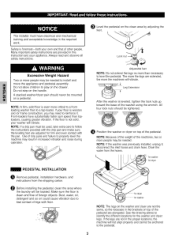
.... All four lock nuts should never be needed . NOTE: Because of the weight of the pedestal are elongated. for washer for the washer and dryer legs. If the legs are not the same, so the recesses in this instruction and your own and that of legs with the pan. NOTE...knowledge in increased vibration and noise during operation. Do not step on could cause vibration due to identify the different locations for dryer NOTE: The legs on the washer and dryer are not in the proper locations, the machine will be needed to reinforce it , disconnect the inlet hoses and drain ...
.... All four lock nuts should never be needed . NOTE: Because of the weight of the pedestal are elongated. for washer for the washer and dryer legs. If the legs are not the same, so the recesses in this instruction and your own and that of legs with the pan. NOTE...knowledge in increased vibration and noise during operation. Do not step on could cause vibration due to identify the different locations for dryer NOTE: The legs on the washer and dryer are not in the proper locations, the machine will be needed to reinforce it , disconnect the inlet hoses and drain ...
Installation Manual
Page 3
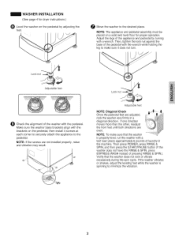
... the base of the appliance and pedestal by adjusting the feet. Make sure the washer base brackets align with a wrench. WASHER INSTALLATION (See page 4 for dryer instructions.) O Level the washer on a solid and level floor for proper operation. Lock nut Adjustable feet NOTE: Diagonal Check Once the pedestal feet are adjusted...
... the base of the appliance and pedestal by adjusting the feet. Make sure the washer base brackets align with a wrench. WASHER INSTALLATION (See page 4 for dryer instructions.) O Level the washer on a solid and level floor for proper operation. Lock nut Adjustable feet NOTE: Diagonal Check Once the pedestal feet are adjusted...
Installation Manual
Page 4
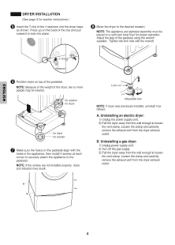
... sure the holes on the back of the pedestal using the wrench supplied. Uninstallingan electric dryer: 1) Unplug the power supply cord, 2) Pull the dryer away from the wall enough to lock into the dryer base as follows: A. Loosen the clamp and carefully remove the exhaust vent from the... dryer exhaust outlet, B. Press up on the pedestal align with the wrench. Uninstallinga gas dryer: 1) Unplug power supply cord. 2) Turn off the gas supply. 3) Pull the dryer away from the wall ...
... sure the holes on the back of the pedestal using the wrench supplied. Uninstallingan electric dryer: 1) Unplug the power supply cord, 2) Pull the dryer away from the wall enough to lock into the dryer base as follows: A. Loosen the clamp and carefully remove the exhaust vent from the... dryer exhaust outlet, B. Press up on the pedestal align with the wrench. Uninstallinga gas dryer: 1) Unplug power supply cord. 2) Turn off the gas supply. 3) Pull the dryer away from the wall ...


