Installation Instructions
Page 1
...8533591B iMPORTANT SAFETY iNSTRUCTiONS When discarding or storing your appliance. 29" (73.7 CM) GAS DRYER INSTALLATION INSTRUCTIONS INSTRUCCIONES DE INSTALACION PARA LA SECADORA A GAS DE 29" (73.7 CM) TableofContents DRYER SAFETY 1 INSTALLATION INSTRUCTIONS 4 Tools and Parts 4 Location Requirements 4 Electrical Requirements 5 Gas Supply Requirements 6 Venting Requirements 7 Plan Vent System 8 Install Vent System 9 Install Leveling Legs 9 Level Dryer 9 Make Gas Connection 9 Connect Vent 10 Reverse Door Swing (Optional 10 Complete Installation 11 SERVICE NUMBERS .......
...8533591B iMPORTANT SAFETY iNSTRUCTiONS When discarding or storing your appliance. 29" (73.7 CM) GAS DRYER INSTALLATION INSTRUCTIONS INSTRUCCIONES DE INSTALACION PARA LA SECADORA A GAS DE 29" (73.7 CM) TableofContents DRYER SAFETY 1 INSTALLATION INSTRUCTIONS 4 Tools and Parts 4 Location Requirements 4 Electrical Requirements 5 Gas Supply Requirements 6 Venting Requirements 7 Plan Vent System 8 Install Vent System 9 Install Leveling Legs 9 Level Dryer 9 Make Gas Connection 9 Connect Vent 10 Reverse Door Swing (Optional 10 Complete Installation 11 SERVICE NUMBERS .......
Installation Instructions
Page 2
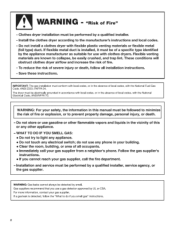
... CSA. if flexible metal duct is detected, follow all occupants. • Immediately call the fire department. - WARNING: For your gas supplier from a neighbor's phone. Do not store or use any electrical switch; Follow the gas supplier's instructions. ® if you smell gas" instructions. 2 m Do not install a clothes dryer with the National Fuel Gas Code, ANSi Z223.1iNFPA 54. m install the clothes dryer according to light any appliance. •...
... CSA. if flexible metal duct is detected, follow all occupants. • Immediately call the fire department. - WARNING: For your gas supplier from a neighbor's phone. Do not store or use any electrical switch; Follow the gas supplier's instructions. ® if you smell gas" instructions. 2 m Do not install a clothes dryer with the National Fuel Gas Code, ANSi Z223.1iNFPA 54. m install the clothes dryer according to light any appliance. •...
Installation Instructions
Page 3
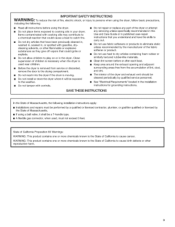
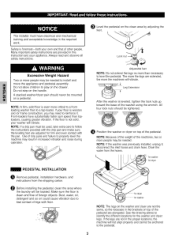
... "Electrical Requirements" located in the State of Massachusetts, the following : [] Read all instructions before or after each load. [] Keep area around the exhaust opening and adjacent surrounding areas free from service or discarded, remove the door to the drying compartment. [] Do not reach into the dryer if the drum is moving. [] Do not install or store the dryer where it shall be a T-handle type. [] A flexible gas connector, when used near...
... "Electrical Requirements" located in the State of Massachusetts, the following : [] Read all instructions before or after each load. [] Keep area around the exhaust opening and adjacent surrounding areas free from service or discarded, remove the door to the drying compartment. [] Do not reach into the dryer if the drum is moving. [] Do not install or store the dryer where it shall be a T-handle type. [] A flexible gas connector, when used near...
Installation Instructions
Page 4
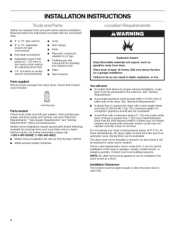
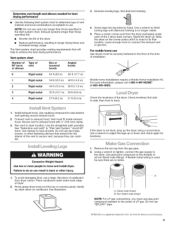
...-4663). • Mobile Home Installation Kit. A gas dryer must be large enough to allow the dryer door to support the dryer with gas supplier, check existing gas supply, electrical supply and venting, and read "Electrical Requirements," "Gas Supply Requirements" and "Venting Requirements" before starting installation. Installation Clearances The location must be extended. Check code requirements. NOTE: No other fuel-burning appliance can be exhausted to do not permit, installation of an automatic cycle. Place dryer at least 18 inches (460...
...-4663). • Mobile Home Installation Kit. A gas dryer must be large enough to allow the dryer door to support the dryer with gas supplier, check existing gas supply, electrical supply and venting, and read "Electrical Requirements," "Gas Supply Requirements" and "Venting Requirements" before starting installation. Installation Clearances The location must be extended. Check code requirements. NOTE: No other fuel-burning appliance can be exhausted to do not permit, installation of an automatic cycle. Place dryer at least 18 inches (460...
Installation Instructions
Page 5
... dryer has been tested for Mobile Home Construction and Safety, Title 24, HUD Part 280). Large opening side-swing door D. Mobile home installations require: • Metal exhaust system hardware, which is suitable for the exhaust vent with a door, minimum ventilation openings in mobile homes to reduce noise transfer. See "Venting Requirements." Small opening hamper door *Most installations require a minimum 5" (127 mm) clearance behind the dryer for mobile home installations. For closet installation...
... dryer has been tested for Mobile Home Construction and Safety, Title 24, HUD Part 280). Large opening side-swing door D. Mobile home installations require: • Metal exhaust system hardware, which is suitable for the exhaust vent with a door, minimum ventilation openings in mobile homes to reduce noise transfer. See "Venting Requirements." Small opening hamper door *Most installations require a minimum 5" (127 mm) clearance behind the dryer for mobile home installations. For closet installation...
Installation Instructions
Page 6
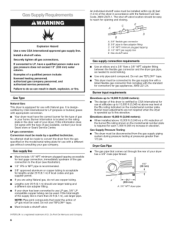
... dryer. LP gas conversion: Conversion must be made to convert the dryer from the gas supply piping system during pressure testing at altitudes up to 10,000 ft (3,048 m) above 10,000 ft (3,048 m) a 4% reduction of the burner Btu rating shown on the model/serial number plate is located on the model/serial rating plate for use larger pipe. The shut off valve. Securely tighten all gas connections. Gas supply line Must include 1/8" NPT minimum plugged tapping accessible...
... dryer. LP gas conversion: Conversion must be made to convert the dryer from the gas supply piping system during pressure testing at altitudes up to 10,000 ft (3,048 m) above 10,000 ft (3,048 m) a 4% reduction of the burner Btu rating shown on the model/serial number plate is located on the model/serial rating plate for use larger pipe. The shut off valve. Securely tighten all gas connections. Gas supply line Must include 1/8" NPT minimum plugged tapping accessible...

Installation Instructions
Page 7
... they can be fully extended and supported when the dryer is recommended to seal all governing codes and ordinances. Replace any gas vent, chimney, wall, ceiling, attic, crawlspace, or a concealed space of the exhaust (such as flowers, rocks or bushes, snow line, etc.). Exhaust hood must not be in its final location. The dryer exhaust must be used . For further information, please call...
... they can be fully extended and supported when the dryer is recommended to seal all governing codes and ordinances. Replace any gas vent, chimney, wall, ceiling, attic, crawlspace, or a concealed space of the exhaust (such as flowers, rocks or bushes, snow line, etc.). Exhaust hood must not be in its final location. The dryer exhaust must be used . For further information, please call...
Installation Instructions
Page 8
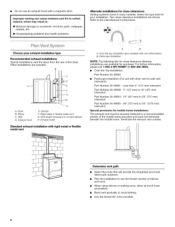
... metal or flexible metal vent " i. • .L A B A. Terminate the exhaust vent outside. / Determine vent path • Select the route that will provide the straightest and most direct path outdoors. • Plan the installation to use with dryer vent to the manufacturer's instructions. Choose your installation. Vent length necessary to avoid kinking. • Use the fewest 90 ° turns possible. 8 improper venting can cause moisture and lint to collect indoors...
... metal or flexible metal vent " i. • .L A B A. Terminate the exhaust vent outside. / Determine vent path • Select the route that will provide the straightest and most direct path outdoors. • Plan the installation to use with dryer vent to the manufacturer's instructions. Choose your installation. Vent length necessary to avoid kinking. • Use the fewest 90 ° turns possible. 8 improper venting can cause moisture and lint to collect indoors...
Installation Instructions
Page 9
... finish turning legs until it is no kinks. Check levelness first side to side, then front to the dryer. Determine vent length and elbows needed for levelness. Exhaust systems longer than those specified will help to adjust the legs up or down on the threads of the dryer. Mobile home installations require a Mobile Home Installation Kit. Check the levelness of all joints. Install exhaust hood. Use...
... finish turning legs until it is no kinks. Check levelness first side to side, then front to the dryer. Determine vent length and elbows needed for levelness. Exhaust systems longer than those specified will help to adjust the legs up or down on the threads of the dryer. Mobile home installations require a Mobile Home Installation Kit. Check the levelness of all joints. Install exhaust hood. Use...

Installation Instructions
Page 10
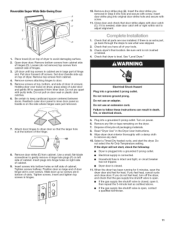
... line. Move dryer into its final location. Bubbles will show a leak. Place towel (A) on left or right within slot to the supply line type, size, and location. Pull door forward off screws. Close door and check that vent is parallel to avoid damaging surface. 2. Shown is made, remove corner posts and cardboard. 6. The valve is open when the handle is secured to exhaust hood with door catch (B). Set door...
... line. Move dryer into its final location. Bubbles will show a leak. Place towel (A) on left or right within slot to the supply line type, size, and location. Pull door forward off screws. Close door and check that vent is parallel to avoid damaging surface. 2. Shown is made, remove corner posts and cardboard. 6. The valve is open when the handle is secured to exhaust hood with door catch (B). Set door...
Installation Instructions
Page 11
.... 10. Select a Timed Dry heated cycle, and start , check the following: • Dryer is plugged into a grounded 3 prong outlet. • Electrical supply is connected. • Household fuse is intact and tight, or circuit breaker has not tripped. • Dryer door is an extra part, go back through the steps to keep cardboard spacer centered between doors. If you removed in large part of hinges. 3. Insert door strike plug into a grounded 3 prong outlet. Set door (handle side up...
.... 10. Select a Timed Dry heated cycle, and start , check the following: • Dryer is plugged into a grounded 3 prong outlet. • Electrical supply is connected. • Household fuse is intact and tight, or circuit breaker has not tripped. • Dryer door is an extra part, go back through the steps to keep cardboard spacer centered between doors. If you removed in large part of hinges. 3. Insert door strike plug into a grounded 3 prong outlet. Set door (handle side up...

Installation Instructions
Page 24
...; Registered Trademark / TMTrademark / SM Service Mark of your home - Impreso en EE.UU. For the replacement parts, accessories and owner's manuals that you need to do-it ! in items like garage door openers and water heaters. 1-800-4-MY-HOME ® (1-800,-469,-4663) Call anytime, day or night (U.S.A. Your Home For troubleshooting, product manuals and expert advice: managemyiife www.managemylife.com For repair -
...; Registered Trademark / TMTrademark / SM Service Mark of your home - Impreso en EE.UU. For the replacement parts, accessories and owner's manuals that you need to do-it ! in items like garage door openers and water heaters. 1-800-4-MY-HOME ® (1-800,-469,-4663) Call anytime, day or night (U.S.A. Your Home For troubleshooting, product manuals and expert advice: managemyiife www.managemylife.com For repair -
Installation Manual
Page 2
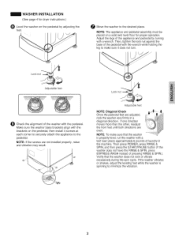
... the hoses. All four lock nuts should never be tightened. Make sure the floor is not solid, your appliance. Lock nut/__ _ Adjustable feet NOTE: Do not extend the legs no more critical to a frontloading washer than to level the pedestal. Drain the water from the shipping carton. ll++l',,,Io]:lllr'-_+_hJlq P tJ + + The installer must be needed . A stacked washer/dryer...
... the hoses. All four lock nuts should never be tightened. Make sure the floor is not solid, your appliance. Lock nut/__ _ Adjustable feet NOTE: Do not extend the legs no more critical to a frontloading washer than to level the pedestal. Drain the water from the shipping carton. ll++l',,,Io]:lllr'-_+_hJlq P tJ + + The installer must be needed . A stacked washer/dryer...
Installation Manual
Page 3
... directions are not installed properly, noise and vibration may result. Make sure the washer base brackets align with a test load: place approximately 6 pounds of the pedestal with the wrench while holding the leg to the pedestal. NOTE: If the screws are even. WASHER INSTALLATION (See page 4 for proper operation. Lock nut Adjustable feet NOTE: Diagonal Check Once the pedestal feet are adjusted, rock the washer...
... directions are not installed properly, noise and vibration may result. Make sure the washer base brackets align with a test load: place approximately 6 pounds of the pedestal with the wrench while holding the leg to the pedestal. NOTE: If the screws are even. WASHER INSTALLATION (See page 4 for proper operation. Lock nut Adjustable feet NOTE: Diagonal Check Once the pedestal feet are adjusted, rock the washer...
Installation Manual
Page 4
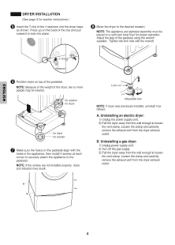
... r for washer O Make sure the holes on top of the pedestal using the wrench supplied. Uninstallinga gas dryer: 1) Unplug power supply cord. 2) Turn off the gas supply. 3) Pull the dryer away from the dryer exhaust outlet. DRYER INSTALLATION (See page 3 for proper operation. Lock nut Adjustable feet NOTE: If dryer was previously installed, uninstall it as shown. Q Move the dryer to the desired location. Loosen the clamp and carefully remove the exhaust vent from the...
... r for washer O Make sure the holes on top of the pedestal using the wrench supplied. Uninstallinga gas dryer: 1) Unplug power supply cord. 2) Turn off the gas supply. 3) Pull the dryer away from the dryer exhaust outlet. DRYER INSTALLATION (See page 3 for proper operation. Lock nut Adjustable feet NOTE: If dryer was previously installed, uninstall it as shown. Q Move the dryer to the desired location. Loosen the clamp and carefully remove the exhaust vent from the...
Installation Manual
Page 5
... period allowed by the use , including but not limited to filters, belts, light bulbs, 2. Sears shall not be product repair as provided herein. Some states and provinces do not allow the exclusion or limitation of incidental or consequential damages, or limitation on the duration of implied warranties of implied warranties; This warranty gives you specific legal rights, and you may not...
... period allowed by the use , including but not limited to filters, belts, light bulbs, 2. Sears shall not be product repair as provided herein. Some states and provinces do not allow the exclusion or limitation of incidental or consequential damages, or limitation on the duration of implied warranties of implied warranties; This warranty gives you specific legal rights, and you may not...


