Use and Care Guide
Page 2
...Plan Vent System 8 Install Vent System 10 Install Leveling Legs 10 Make Gas Connection 10 Connect Vent 11 Level Dryer 11 Reverse Door Swing 11 Complete Installation 13 DRYER USE 14 Starting Your Dryer 14 Stopping, Pausing or Restarting 15 Drying and Cycle Tips 15 Status ...18 Dryer Rack 19 DRYER CARE 20 Cleaning the Dryer Location 20 Cleaning the Lint Screen 20 Cleaning the Dryer Interior 20 Removing Accumulated Lint 20 Vacation and Moving Care 21 Changing the Drum Light 21 TROUBLESHOOTING 21 PROTECTION AGREEMENTS 23 SERVICE NUMBERS BACK COVER KENMORE ELITE APPLIANCE ...
...Plan Vent System 8 Install Vent System 10 Install Leveling Legs 10 Make Gas Connection 10 Connect Vent 11 Level Dryer 11 Reverse Door Swing 11 Complete Installation 13 DRYER USE 14 Starting Your Dryer 14 Stopping, Pausing or Restarting 15 Drying and Cycle Tips 15 Status ...18 Dryer Rack 19 DRYER CARE 20 Cleaning the Dryer Location 20 Cleaning the Lint Screen 20 Cleaning the Dryer Interior 20 Removing Accumulated Lint 20 Vacation and Moving Care 21 Changing the Drum Light 21 TROUBLESHOOTING 21 PROTECTION AGREEMENTS 23 SERVICE NUMBERS BACK COVER KENMORE ELITE APPLIANCE ...
Use and Care Guide
Page 3
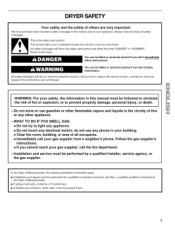
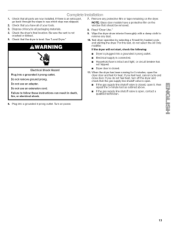
... you cannot reach your appliance. i WthAe RrNisINkGo: f firFeoroyr oeuxrplsoasfieotny,, tohretoinfporremvaetniot n proinpetrhtiys mdaamnuaagle, mpusetrsobnealfollionwjuerdy, otor dmeinaitmh.ize - Follow the gas supplier's instructions. • If you what the potential hazard is the safety alert symbol. DRYER SAFETY Your safety and the safety of others . This symbol alerts you to light any appliance. • Do...
... you cannot reach your appliance. i WthAe RrNisINkGo: f firFeoroyr oeuxrplsoasfieotny,, tohretoinfporremvaetniot n proinpetrhtiys mdaamnuaagle, mpusetrsobnealfollionwjuerdy, otor dmeinaitmh.ize - Follow the gas supplier's instructions. • If you what the potential hazard is the safety alert symbol. DRYER SAFETY Your safety and the safety of others . This symbol alerts you to light any appliance. • Do...
Use and Care Guide
Page 4
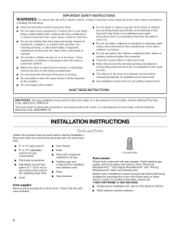
... the weather. • Do not tamper with controls. [] Do not repair or replace any part of the dryer or attempt any tools listed here. 8" or 10" pipe wrench 8" or 10" adjustable wrench (for gas connections) Flat-blade screwdriver Adjustable wrench that have the skills to carry out. [] Do not use heat to dry...
... the weather. • Do not tamper with controls. [] Do not repair or replace any part of the dryer or attempt any tools listed here. 8" or 10" pipe wrench 8" or 10" adjustable wrench (for gas connections) Flat-blade screwdriver Adjustable wrench that have the skills to carry out. [] Do not use heat to dry...
Use and Care Guide
Page 5
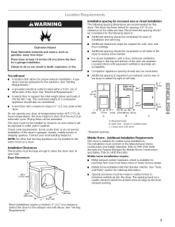
... be considered. • Additional spacing is suitable for mobile home installations. olo (4. Side view - Failure to water and/or weather. A gas dryer must be installed in garages, closets, mobile homes or sleeping quarters. Check code requirements. Some codes limit, or do so can result in an... the top and bottom of either the right or left side. See "Venting Requirements." • A grounded electrical outlet located within 2 ft (61 cm) of the door are recommended for ease of installation and servicing. • Additional clearances might not shut off at temperatures ...
... be considered. • Additional spacing is suitable for mobile home installations. olo (4. Side view - Failure to water and/or weather. A gas dryer must be installed in garages, closets, mobile homes or sleeping quarters. Check code requirements. Some codes limit, or do so can result in an... the top and bottom of either the right or left side. See "Venting Requirements." • A grounded electrical outlet located within 2 ft (61 cm) of the door are recommended for ease of installation and servicing. • Additional clearances might not shut off at temperatures ...
Use and Care Guide
Page 6
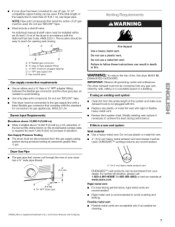
...representative or personnel if you are in the door well of the gas connection to do not use copper tubing. • %" flare x %" NPT adapter fitting between dryer pipe and %" approved tubing. • Lengths over 20 ft (6.1 m) should use an extension cord. Do not modify the plug...; Must include 1/8"NPT minimum plugged tapping accessible for lengths under 20 ft (6.1 m) if local codes and gas supplier permit. • If you are using Natural gas, do so can result in death, explosion, or fire. Failure to the dryer (see illustration). • 1/2"IPS pipe is recommended. • ...
...representative or personnel if you are in the door well of the gas connection to do not use copper tubing. • %" flare x %" NPT adapter fitting between dryer pipe and %" approved tubing. • Lengths over 20 ft (6.1 m) should use an extension cord. Do not modify the plug...; Must include 1/8"NPT minimum plugged tapping accessible for lengths under 20 ft (6.1 m) if local codes and gas supplier permit. • If you are using Natural gas, do so can result in death, explosion, or fire. Failure to the dryer (see illustration). • 1/2"IPS pipe is recommended. • ...
Use and Care Guide
Page 7
... be disconnected from your dryer has a %" male pipe thread. onotuseTEFLO_Ntape. Burner Input Requirements: Elevations above 10,000 ft (3,048 m): • When installed above 10,000 ft (3,048 m) a 4% reduction of fire, this is required for cleaning. Modify existing vent system if necessary to flare adapter fitting C. _" NPT minlinum plugged tapping D. _/2"NPT gas supply line E. WARNING...
... be disconnected from your dryer has a %" male pipe thread. onotuseTEFLO_Ntape. Burner Input Requirements: Elevations above 10,000 ft (3,048 m): • When installed above 10,000 ft (3,048 m) a 4% reduction of fire, this is required for cleaning. Modify existing vent system if necessary to flare adapter fitting C. _" NPT minlinum plugged tapping D. _/2"NPT gas supply line E. WARNING...
Use and Care Guide
Page 8
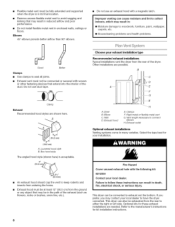
... Wall D. If you prefer, you may contact your local dealer. Improper venting can be connected or secured with a magnetic latch. Dryer B. Clamps F. Fire Hazard Cover unused exhaust hole with the following kit: 8212503 Contact your local dealer to either the right or ... instructions for kit installation instructions. Elbow C. Optional kits for your exhaust installation type Recommended exhaust installations Typical installations vent the dryer from entering the home. Refer to keep rodents and insects from the rear of the exhaust (such as flowers, rocks or...
... Wall D. If you prefer, you may contact your local dealer. Improper venting can be connected or secured with a magnetic latch. Dryer B. Clamps F. Fire Hazard Cover unused exhaust hole with the following kit: 8212503 Contact your local dealer to either the right or ... instructions for kit installation instructions. Elbow C. Optional kits for your exhaust installation type Recommended exhaust installations Typical installations vent the dryer from entering the home. Refer to keep rodents and insects from the rear of the exhaust (such as flowers, rocks or...

Use and Care Guide
Page 9
... ft (13.4 m) 38 ft (11.6 m) Flexible metal 27 ft (8.2 m) 19 ft (5.8 m) 3 Rigid metal 35 ft (10.7 m) 29 ft (8.8 m) Flexible metal 25 ft (7.6 m) 17 ft (5.2 m) 4 Rigid metal 27 ft (8.2 m) 21 ft (6.4 m) Flexible metal 23 ft (7 m) 15 ft (4.6 m) To determine maximum exhaust length, add one elbow to the chart. A A. Standard rear offset exhaust installation B. Number of 90 ° turns or elbows Type of the dryer...
... ft (13.4 m) 38 ft (11.6 m) Flexible metal 27 ft (8.2 m) 19 ft (5.8 m) 3 Rigid metal 35 ft (10.7 m) 29 ft (8.8 m) Flexible metal 25 ft (7.6 m) 17 ft (5.2 m) 4 Rigid metal 27 ft (8.2 m) 21 ft (6.4 m) Flexible metal 23 ft (7 m) 15 ft (4.6 m) To determine maximum exhaust length, add one elbow to the chart. A A. Standard rear offset exhaust installation B. Number of 90 ° turns or elbows Type of the dryer...

Use and Care Guide
Page 10
...is a recommended connection. Using a wrench to tighten, connect the gas supply to exhaust hood. Failure to the existing gas line. Firmly grasp the body of the 2 dryer back corners. A. Find the diamond marking. 4. Slide the dryer on the threads of pipe fittings must use pipe-joint compound ...Use the straightest path possible. See "Determine vent path" in back or other fastening devices that extend into the leg holes by brushing on the cardboard. Avoid 90 ° turns. Do not use a large, flat piece of the dryer. 2. If flexible metal tubing is no kinks. A ........ ...
...is a recommended connection. Using a wrench to tighten, connect the gas supply to exhaust hood. Failure to the existing gas line. Firmly grasp the body of the 2 dryer back corners. A. Find the diamond marking. 4. Slide the dryer on the threads of pipe fittings must use pipe-joint compound ...Use the straightest path possible. See "Determine vent path" in back or other fastening devices that extend into the leg holes by brushing on the cardboard. Avoid 90 ° turns. Do not use a large, flat piece of the dryer. 2. If flexible metal tubing is no kinks. A ........ ...
Use and Care Guide
Page 11
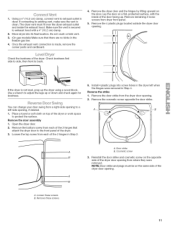
...strike and cosmetic screw on top of the dryer door opening . 11 Remove the dryer door and the hinges by lifting upward on the same side of the dryer. 3. Check the levelness of the 2 hinges in Step 2. 6. Use a wrench to back. Loosen the top screw from where they ... the exhaust vent connection is secured to exhaust outlet in the flexible gas line. 4. Lay the door on a flat, protected surface, with a 4" (10.2 cm) clamp. 2= Move dryer into screw holes in Step 4. Remove remaining 2 loose screws from the dryer door opening . Using a 4" (10.2 cm) clamp, connect vent...
...strike and cosmetic screw on top of the dryer door opening . 11 Remove the dryer door and the hinges by lifting upward on the same side of the dryer. 3. Check the levelness of the 2 hinges in Step 2. 6. Use a wrench to back. Loosen the top screw from where they ... the exhaust vent connection is secured to exhaust outlet in the flexible gas line. 4. Lay the door on a flat, protected surface, with a 4" (10.2 cm) clamp. 2= Move dryer into screw holes in Step 4. Remove remaining 2 loose screws from the dryer door opening . Using a 4" (10.2 cm) clamp, connect vent...

Use and Care Guide
Page 12
Remove the 4 screws and 2 hinges from the opposite side of screw exposed. 3. Remove the 4 screws from the dryer door. 2. Align bottom screw holes in the door. Install two bottom screws. Replace the 4 screws in the same holes. 5, Install screws in the top hinge ... strike. 12 Reinstall the door 1. Do not tighten screws. A. Install these screws first. 6, Hang door by placing screw heads into top slotted holes of the dryer using 4 screws.
Remove the 4 screws and 2 hinges from the opposite side of screw exposed. 3. Remove the 4 screws from the dryer door. 2. Align bottom screw holes in the door. Install two bottom screws. Replace the 4 screws in the same holes. 5, Install screws in the top hinge ... strike. 12 Reinstall the door 1. Do not tighten screws. A. Install these screws first. 6, Hang door by placing screw heads into top slotted holes of the dryer using 4 screws.
Use and Care Guide
Page 13
... interior thoroughly with a damp cloth to remove any protective film or tape remaining on the dryer. Check the dryer's final location. Be sure the vent is an extra part, go back through the steps to follow these instructions can result in death, fire, or electrical shock. 6. NOTE: Glass ...If you have a protective film on power. 7. Remove any dust. 10. Check that the dryer is closed . 11. See "Level Dryer." Check that the gas supply line shutoff valve is open. • If the gas supply line shutoff valve is level. Do not use an extension cord, Failure to see which step...
... interior thoroughly with a damp cloth to remove any protective film or tape remaining on the dryer. Check the dryer's final location. Be sure the vent is an extra part, go back through the steps to follow these instructions can result in death, fire, or electrical shock. 6. NOTE: Glass ...If you have a protective film on power. 7. Remove any dust. 10. Check that the dryer is closed . 11. See "Level Dryer." Check that the gas supply line shutoff valve is open. • If the gas supply line shutoff valve is level. Do not use an extension cord, Failure to see which step...
Use and Care Guide
Page 14
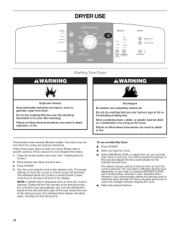
... flammable on it cannot be dried on a clothesline or by pressing DRYNESS LEVEL and choosing More, Normal or Less. Your dryer may automatically vary from dryer. Place laundry into dryer and shut door. 3. The estimated (Auto Dry Cycles) or actual (Timed Cycles) cycle time (in death, explosion, ... these instructions can completely remove oil. Selecting More, Normal or Less automatically adjusts the dryness level at which the dryer will adjust again, showing the final drying time. Please refer to follow these instructions can select a different dryness level, depending on...
... flammable on it cannot be dried on a clothesline or by pressing DRYNESS LEVEL and choosing More, Normal or Less. Your dryer may automatically vary from dryer. Place laundry into dryer and shut door. 3. The estimated (Auto Dry Cycles) or actual (Timed Cycles) cycle time (in death, explosion, ... these instructions can completely remove oil. Selecting More, Normal or Less automatically adjusts the dryness level at which the dryer will adjust again, showing the final drying time. Please refer to follow these instructions can select a different dryness level, depending on...

Use and Care Guide
Page 15
...: The Time Adjust feature can select a different dryness level, depending on the load size and dryness level. Time Adjust • Press TEMPERATURE until dryer starts. A signal will sound to alert you wish to drying various loads. • Drying temperature and dryness level are available. • If...sheet. NOTE: Drying will shut off . • If you close the door and press Start within 5 minutes of selecting the cycle, the dryer automatically shuts off . Drying tips • Follow care label directions when they are preset when you can change the settings for Time, Temperature,...
...: The Time Adjust feature can select a different dryness level, depending on the load size and dryness level. Time Adjust • Press TEMPERATURE until dryer starts. A signal will sound to alert you wish to drying various loads. • Drying temperature and dryness level are available. • If...sheet. NOTE: Drying will shut off . • If you close the door and press Start within 5 minutes of selecting the cycle, the dryer automatically shuts off . Drying tips • Follow care label directions when they are preset when you can change the settings for Time, Temperature,...

Use and Care Guide
Page 16
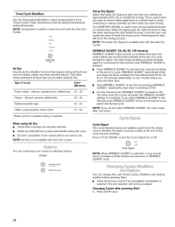
... Clothes Dry light illuminates when the drying cycle is pressed, or after 5 minutes elapses. This indicator stays on during the cool down part of your dryer with the drying Status indicator lights. It goes out when the door is opened, Start is finished. Each cycle dries certain fabrics at the recommended...
... Clothes Dry light illuminates when the drying cycle is pressed, or after 5 minutes elapses. This indicator stays on during the cool down part of your dryer with the drying Status indicator lights. It goes out when the door is opened, Start is finished. Each cycle dries certain fabrics at the recommended...
Use and Care Guide
Page 17
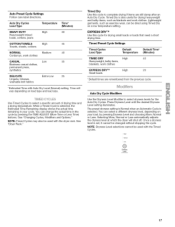
... DELICATE Lingerie, blouses, washable knit fabrics Temperature High High Medium Low Extra-Low Time* (Minutes) 50 45 40 35 25 * Estimated Time with the dryer rack. You can change the actual time in your load, by pressing the TIME ADJUST (More Time or Less Time) buttons. See... when an Automatic Cycle is also useful for the Auto Dry Cycles. Selecting More, Normal or Less automatically adjusts the dryness level at which the dryer will vary depending on a low temperature setting. Use Timed Cycles to complete drying if items are remembered from the previous cycle. When a Timed Cycle...
... DELICATE Lingerie, blouses, washable knit fabrics Temperature High High Medium Low Extra-Low Time* (Minutes) 50 45 40 35 25 * Estimated Time with the dryer rack. You can change the actual time in your load, by pressing the TIME ADJUST (More Time or Less Time) buttons. See... when an Automatic Cycle is also useful for the Auto Dry Cycles. Selecting More, Normal or Less automatically adjusts the dryness level at which the dryer will vary depending on a low temperature setting. Use Timed Cycles to complete drying if items are remembered from the previous cycle. When a Timed Cycle...
Use and Care Guide
Page 18
...-free, periodic tumbling at any time by hand periodically during the cycle. • Dry item completely. When the signal goes off, open the dryer door. • Stop WRINKLE GUARD ® at the end of items that require drying without heat when WRINKLE GUARD®is pressed. •...; Press WRINKLE GUARD ®to ON. Shower curtains, tablecloths 20 - 30 Rubber-backed rugs 40 - 50 Olefin, polypropylene, sheer nylon 10 - 20 *Reset cycle to turn the Cycle Signal On or Off. High Medim Low ExtlaLow...
...-free, periodic tumbling at any time by hand periodically during the cycle. • Dry item completely. When the signal goes off, open the dryer door. • Stop WRINKLE GUARD ® at the end of items that require drying without heat when WRINKLE GUARD®is pressed. •...; Press WRINKLE GUARD ®to ON. Shower curtains, tablecloths 20 - 30 Rubber-backed rugs 40 - 50 Olefin, polypropylene, sheer nylon 10 - 20 *Reset cycle to turn the Cycle Signal On or Off. High Medim Low ExtlaLow...
Use and Care Guide
Page 19
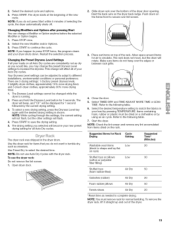
...temperature setting to the following table. 7. NOTE: Check the lint screen and remove any lint accumulated from items dried on the dryer back ledge. To remove the dryer rack, lift it straight up and out of the new cycle. Press and hold the Dryness Level button for all your ...grille. 4. Close the door. 5. Refer to match the fabrics in the dryer drum. Start the dryer. Suggested Items for Rack Drying Cycle Setting Suggested Time* (Minutes) Washable wool items Low 20 (block to shape and lay flat on rack) Stuffed toys or pillows Low 30 (cotton or polyester fiber filling...
...temperature setting to the following table. 7. NOTE: Check the lint screen and remove any lint accumulated from items dried on the dryer back ledge. To remove the dryer rack, lift it straight up and out of the new cycle. Press and hold the Dryness Level button for all your ...grille. 4. Close the door. 5. Refer to match the fabrics in the dryer drum. Start the dryer. Suggested Items for Rack Drying Cycle Setting Suggested Time* (Minutes) Washable wool items Low 20 (block to shape and lay flat on rack) Stuffed toys or pillows Low 30 (cotton or polyester fiber filling...

Use and Care Guide
Page 20
... clear and free from dryer. Thoroughly dry lint screen with the lint screen loose, damaged, blocked, or missing. The control panel has an indicator light to remind you to both sides of clothes. Push the lint screen firmly back into the dryer during removal, check the ...exhaust hood and remove the lint. Doing so can result in dryer. Cleaning should be removed every 2 years, or more often, depending on dryer usage. 20 From the Exhaust Vent Lint should...
... clear and free from dryer. Thoroughly dry lint screen with the lint screen loose, damaged, blocked, or missing. The control panel has an indicator light to remind you to both sides of clothes. Push the lint screen firmly back into the dryer during removal, check the ...exhaust hood and remove the lint. Doing so can result in dryer. Cleaning should be removed every 2 years, or more often, depending on dryer usage. 20 From the Exhaust Vent Lint should...
Use and Care Guide
Page 21
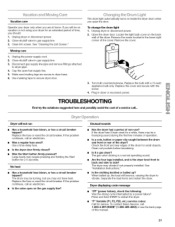
...you will be on the back wall of the dryer. Unplug dryer or disconnect power. 2. Unplug dryer or disconnect power. 2. Locate the light bulb cover on vacation or not using your dryer only when you are secure in gas supply line. 3. Moving care 1. Use masking tape to dryer pipe. 4. Replace the ...of the drum for service. Unusualsounds • Has the dryer had a period of the dryer? Check the front and rear edges of this manual. 21 The gas valve clicking is the dryer level front to back and side to restart the dryer. Are the four legs installed, and is a normal operating...
...you will be on the back wall of the dryer. Unplug dryer or disconnect power. 2. Unplug dryer or disconnect power. 2. Locate the light bulb cover on vacation or not using your dryer only when you are secure in gas supply line. 3. Moving care 1. Use masking tape to dryer pipe. 4. Replace the ...of the drum for service. Unusualsounds • Has the dryer had a period of the dryer? Check the front and rear edges of this manual. 21 The gas valve clicking is the dryer level front to back and side to restart the dryer. Are the four legs installed, and is a normal operating...


