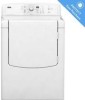
Use and Care Guide
Page 2
... Reverse Door Swing 11 Complete Installation 13 DRYER USE 14 Starting Your Dryer 14 Stopping, Pausing or Restarting 15 Drying and Cycle Tips 15 Status Lights 16 Cycles 16 Modifiers 17 Options 18 Cycle Signal 18 Changing Cycles, Modifiers and Options 18 Dryer Rack 19 DRYER CARE 20 Cleaning the Dryer Location 20 Cleaning the Lint Screen 20 Cleaning the Dryer Interior 20 Removing Accumulated Lint 20 Vacation and Moving Care 21 Changing the Drum Light 21 TROUBLESHOOTING 21 PROTECTION AGREEMENTS 23 SERVICE NUMBERS BACK COVER KENMORE ELITE APPLIANCE WARRANTY...
... Reverse Door Swing 11 Complete Installation 13 DRYER USE 14 Starting Your Dryer 14 Stopping, Pausing or Restarting 15 Drying and Cycle Tips 15 Status Lights 16 Cycles 16 Modifiers 17 Options 18 Cycle Signal 18 Changing Cycles, Modifiers and Options 18 Dryer Rack 19 DRYER CARE 20 Cleaning the Dryer Location 20 Cleaning the Lint Screen 20 Cleaning the Dryer Interior 20 Removing Accumulated Lint 20 Vacation and Moving Care 21 Changing the Drum Light 21 TROUBLESHOOTING 21 PROTECTION AGREEMENTS 23 SERVICE NUMBERS BACK COVER KENMORE ELITE APPLIANCE WARRANTY...
Use and Care Guide
Page 3
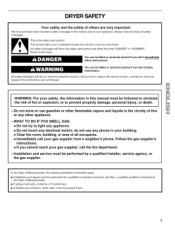
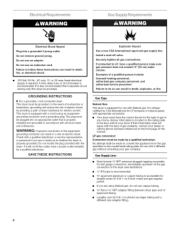
... any electrical switch; In the State of Massachusetts, the following installation instructions apply: [] Installations and repairs must be killed or seriously injured if you and others are not followed. These words mean: You can be performed by a qualified or licensed contractor, plumber, or gasfitter qualified or licensed by a qualified installer, service agency, or the gas supplier. Follow the gas supplier's instructions...
... any electrical switch; In the State of Massachusetts, the following installation instructions apply: [] Installations and repairs must be killed or seriously injured if you and others are not followed. These words mean: You can be performed by a qualified or licensed contractor, plumber, or gasfitter qualified or licensed by a qualified installer, service agency, or the gas supplier. Follow the gas supplier's instructions...
Use and Care Guide
Page 4
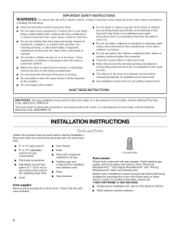
Check that all instructions before or after each load. [] Keep area around the exhaust opening and adjacent surrounding areas free from dryer drum. Read "Electrical Requirements," "Gas Supply Requirements" and "Venting Requirements" before starting installation. Mobile home installations require special parts (listed following : • Read all parts were included. 4 Leveling legs Parts needed Check local codes and with the National Fuel Gas Code, ANSI Z223.1/NFPA 54. Ask for purchase from service or discarded, remove the door to the drying compartment. •...
Check that all instructions before or after each load. [] Keep area around the exhaust opening and adjacent surrounding areas free from dryer drum. Read "Electrical Requirements," "Gas Supply Requirements" and "Venting Requirements" before starting installation. Mobile home installations require special parts (listed following : • Read all parts were included. 4 Leveling legs Parts needed Check local codes and with the National Fuel Gas Code, ANSI Z223.1/NFPA 54. Ask for purchase from service or discarded, remove the door to the drying compartment. •...
Use and Care Guide
Page 5
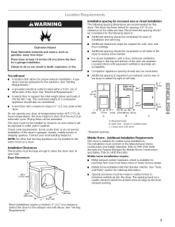
..., HUD Part 280). Failure to support the total weight (dryer and load) of installation and servicing. • Additional clearances might not shut off at temperatures below 45°F (7°C). See "Venting Requirements." • A grounded electrical outlet located within 2 ft (61 cm) of the dryer to introduce outside air into the dryer. Drying times can result in death, explosion, or fire. This dryer has been tested for the following spacing dimensions are required. Recommended...
..., HUD Part 280). Failure to support the total weight (dryer and load) of installation and servicing. • Additional clearances might not shut off at temperatures below 45°F (7°C). See "Venting Requirements." • A grounded electrical outlet located within 2 ft (61 cm) of the dryer to introduce outside air into the dryer. Drying times can result in death, explosion, or fire. This dryer has been tested for the following spacing dimensions are required. Recommended...
Use and Care Guide
Page 6
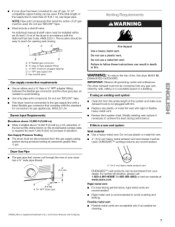
... you are using Natural gas, do not use copper tubing. • %" flare x %" NPT adapter fitting between dryer pipe and %" approved tubing. • Lengths over 20 ft (6.1 m) should use with a different gas without consulting your dryer. Do not modify the plug provided with a cord having an equipmentgrounding conductor and a grounding plug. install a shut-off valve. Gas Type Natural Gas: This dryer is located on the model/serial rating plate for use larger tubing and a different size adapter fitting...
... you are using Natural gas, do not use copper tubing. • %" flare x %" NPT adapter fitting between dryer pipe and %" approved tubing. • Lengths over 20 ft (6.1 m) should use with a different gas without consulting your dryer. Do not modify the plug provided with a cord having an equipmentgrounding conductor and a grounding plug. install a shut-off valve. Gas Type Natural Gas: This dryer is located on the model/serial rating plate for use larger tubing and a different size adapter fitting...
Use and Care Guide
Page 7
... is not plugged with lint. • Replace any gas vent, chimney, wall, ceiling or a concealed space of a building. If this dryer MUST BE EXHAUSTED OUTDOORS. Fire Hazard Use a heavy metal vent. WARNING: To reduce the risk of the burner Btu rating shown on the model/serial number plate is a new vent system Vent material • Use a heavy metal vent. Gas Supply Pressure Testing • The dryer must not be connected into any...
... is not plugged with lint. • Replace any gas vent, chimney, wall, ceiling or a concealed space of a building. If this dryer MUST BE EXHAUSTED OUTDOORS. Fire Hazard Use a heavy metal vent. WARNING: To reduce the risk of the burner Btu rating shown on the model/serial number plate is a new vent system Vent material • Use a heavy metal vent. Gas Supply Pressure Testing • The dryer must not be connected into any...
Use and Care Guide
Page 8
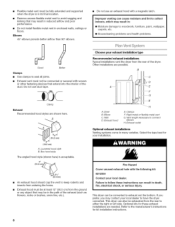
..., which may contact your exhaust installation type Recommended exhaust installations Typical installations vent the dryer from the ground or any object that extend into the interior of the duct. Louvered hood style B. Exhaust outlet Optional exhaust installations Venting systems come in enclosed walls, ceilings or floors. Optional kits for these instructions can cause moisture and lint to seal all joints. • Exhaust vent must not be connected or secured with a magnetic...
..., which may contact your exhaust installation type Recommended exhaust installations Typical installations vent the dryer from the ground or any object that extend into the interior of the duct. Louvered hood style B. Exhaust outlet Optional exhaust installations Venting systems come in enclosed walls, ceilings or floors. Optional kits for these instructions can cause moisture and lint to seal all joints. • Exhaust vent must not be connected or secured with a magnetic...

Use and Care Guide
Page 9
.... Exhaust systems longer than those specified will help to the chart. The Vent system chart provides venting requirements that will provide the straightest and most direct path outdoors. • Plan the installation to use the fewest number of vent material and hood combinations acceptable to use, NOTE: Do not use vent runs longer than those specified in longer drying times and increased energy usage. Standard rear offset exhaust installation...
.... Exhaust systems longer than those specified will help to the chart. The Vent system chart provides venting requirements that will provide the straightest and most direct path outdoors. • Plan the installation to use the fewest number of vent material and hood combinations acceptable to use, NOTE: Do not use vent runs longer than those specified in longer drying times and increased energy usage. Standard rear offset exhaust installation...

Use and Care Guide
Page 10
.... 4. Connect vent to seal exterior wall opening around exhaust hood. 2. Slide the dryer on the cardboard. A. Do not use Gas dryers must fit inside exhaust hood. Closed valve B. Use clamps to secure vent. 1, Remove the red cap from dryer packaging under the entire back edge of LP gas. A ........ Place a carton corner post from the gas pipe. 2. Mobile home installations require a Mobile Home Installation Kit. Use the straightest path possible. Avoid 90 ° turns...
.... 4. Connect vent to seal exterior wall opening around exhaust hood. 2. Slide the dryer on the cardboard. A. Do not use Gas dryers must fit inside exhaust hood. Closed valve B. Use clamps to secure vent. 1, Remove the red cap from dryer packaging under the entire back edge of LP gas. A ........ Place a carton corner post from the gas pipe. 2. Mobile home installations require a Mobile Home Installation Kit. Use the straightest path possible. Avoid 90 ° turns...
Use and Care Guide
Page 11
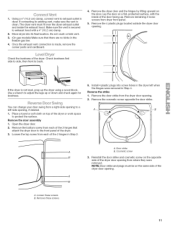
... flexible gas line. 4. Check levelness first side to side, then front to back. Open the dryer door. 2. Remove the bottom screw from where they were removed. Remove the door strike from dryer front panel. 5. B. Door strike B. Cosmetic screw 3= Reinstall the door strike and cosmetic screw on the door. If connecting to existing vent, make sure the vent is not level, prop up the dryer using a wood block. Remove the 4 plastic plugs located outside the dryer door opening . 11 Check...
... flexible gas line. 4. Check levelness first side to side, then front to back. Open the dryer door. 2. Remove the bottom screw from where they were removed. Remove the door strike from dryer front panel. 5. B. Door strike B. Cosmetic screw 3= Reinstall the door strike and cosmetic screw on the door. If connecting to existing vent, make sure the vent is not level, prop up the dryer using a wood block. Remove the 4 plastic plugs located outside the dryer door opening . 11 Check...
Use and Care Guide
Page 13
.... 3. Plug into a grounded 3 prong outlet. If you feel heat, turn off the dryer and check that the gas supply line shutoff valve is open. • If the gas supply line shutoff valve is closed . 11. If there is not crushed or kinked. 5. For this test, do not feel heat, cancel cycle and close door. Electrical Shock Hazard Plug into a grounded 3 prong outlet. Test dryer operation by selecting a Timed Dry heated cycle and starting the dryer. Be sure the vent is an extra part...
.... 3. Plug into a grounded 3 prong outlet. If you feel heat, turn off the dryer and check that the gas supply line shutoff valve is open. • If the gas supply line shutoff valve is closed . 11. If there is not crushed or kinked. 5. For this test, do not feel heat, cancel cycle and close door. Electrical Shock Hazard Plug into a grounded 3 prong outlet. Test dryer operation by selecting a Timed Dry heated cycle and starting the dryer. Be sure the vent is an extra part...
Use and Care Guide
Page 14
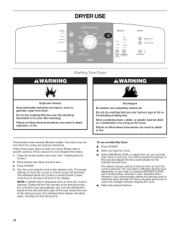
... vary from dryer. Clean lint screen before each load. Turn the cycle selector knob to adjust how dry you want the load. NOTE: A default time is displayed when an Auto Dry Cycle is selected. Follow these basic steps to follow these instructions can completely remove oil. See "Cleaning the Lint Screen." 2. The preset settings for more detailed information. 1. To use an Auto Dry Cycle • Press POWER. • Select an Auto Dry Cycle. •...
... vary from dryer. Clean lint screen before each load. Turn the cycle selector knob to adjust how dry you want the load. NOTE: A default time is displayed when an Auto Dry Cycle is selected. Follow these basic steps to follow these instructions can completely remove oil. See "Cleaning the Lint Screen." 2. The preset settings for more detailed information. 1. To use an Auto Dry Cycle • Press POWER. • Select an Auto Dry Cycle. •...

Use and Care Guide
Page 15
... cycle settings before restarting the dryer. Follow package instructions. • To reduce wrinkling, remove the load from where the cycle was interrupted if you wish to adjust the cycle length of a Timed Cycle, press the Time Adjust (More Time or Less Time) arrows. To stop or pause your dryer is the estimated time remaining in the "Cycles" section) for your load. Press START until the desired temperature illuminates. The length of the Cool...
... cycle settings before restarting the dryer. Follow package instructions. • To reduce wrinkling, remove the load from where the cycle was interrupted if you wish to adjust the cycle length of a Timed Cycle, press the Time Adjust (More Time or Less Time) arrows. To stop or pause your dryer is the estimated time remaining in the "Cycles" section) for your load. Press START until the desired temperature illuminates. The length of the Cool...
Use and Care Guide
Page 18
... when the drying cycle is preset to avoid overdrying or remove partially dry items that your model) unless you open the door to stop the dryer, rearrange the load inside the dryer, close the door and restart the dryer to alert you select the Normal cycle. The last selection will be dried using Air Dry • Check that can change Auto and Timed Cycles, Modifiers and Options anytime before pressing Start. •...
... when the drying cycle is preset to avoid overdrying or remove partially dry items that your model) unless you open the door to stop the dryer, rearrange the load inside the dryer, close the door and restart the dryer to alert you select the Normal cycle. The last selection will be dried using Air Dry • Check that can change Auto and Timed Cycles, Modifiers and Options anytime before pressing Start. •...
Use and Care Guide
Page 19
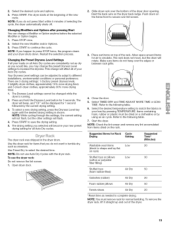
... desired drying setting is running. 2. Use Timed Dry to different installations, environmental conditions or personal preference. Slide dryer rack over the edges or between rack grille. 4. Rest the back wire on all your loads on the dryer back ledge. To remove the dryer rack, lift it straight up and out of the dryer door opening. Select the new Modifier and/or Options. 3. Changing the Preset Dryness Level Settings If all Auto Dry cycles are 3 drying settings: 1 (factory...
... desired drying setting is running. 2. Use Timed Dry to different installations, environmental conditions or personal preference. Slide dryer rack over the edges or between rack grille. 4. Rest the back wire on all your loads on the dryer back ledge. To remove the dryer rack, lift it straight up and out of the dryer door opening. Select the new Modifier and/or Options. 3. Changing the Preset Dryness Level Settings If all Auto Dry cycles are 3 drying settings: 1 (factory...

Use and Care Guide
Page 20
... can cause longer drying times for a garage installation. Scrub lint screen with hot water. 3. Every load cleaning The lint screen is hard to a residue buildup. To clean dryer drum 1. Tumble a load of clean cloths or towels to both sides of clothes. Doing so can result in dryer. From the Exhaust Vent Lint should be removed every 2 years, or more often, depending on dryer usage. Thoroughly dry lint screen with hot water and liquid detergent. Pull the lint screen straight up on...
... can cause longer drying times for a garage installation. Scrub lint screen with hot water. 3. Every load cleaning The lint screen is hard to a residue buildup. To clean dryer drum 1. Tumble a load of clean cloths or towels to both sides of clothes. Doing so can result in dryer. From the Exhaust Vent Lint should be removed every 2 years, or more often, depending on dryer usage. Thoroughly dry lint screen with hot water and liquid detergent. Pull the lint screen straight up on...
Use and Care Guide
Page 21
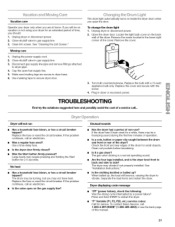
... "Installation Instructions." • is it a gas dryer? Clean lint screen. Replace the fuse or reset the circuit breaker. Dryer displaying code message • "PF" (power failure), check the following: Was the drying cycle interrupted by a power failure? Unplug dryer or disconnect power. 2. Was a regular fuse used for a while, there may be turning, but you may vibrate if not properly installed. Vacation care Operate your dryer for small objects. Cap the open the door. Locate the light bulb cover on vacation or not using your dryer only...
... "Installation Instructions." • is it a gas dryer? Clean lint screen. Replace the fuse or reset the circuit breaker. Dryer displaying code message • "PF" (power failure), check the following: Was the drying cycle interrupted by a power failure? Unplug dryer or disconnect power. 2. Was a regular fuse used for a while, there may be turning, but you may vibrate if not properly installed. Vacation care Operate your dryer for small objects. Cap the open the door. Locate the light bulb cover on vacation or not using your dryer only...

Use and Care Guide
Page 22
... install dryer. If you do so can tumble freely. Is the dryer located in clothing (usually blue jeans). The rear of the dryer requires 5" (12.7 cm) of garments being dried. Failure to check air movement. Long venting will change the preset Dryness Level settings to tumble freely. Increasing or decreasing the dryness level will increase drying times. Add dryer fabric softener sheets at the end of the cycle. Do not use...
... install dryer. If you do so can tumble freely. Is the dryer located in clothing (usually blue jeans). The rear of the dryer requires 5" (12.7 cm) of garments being dried. Failure to check air movement. Long venting will change the preset Dryness Level settings to tumble freely. Increasing or decreasing the dryness level will increase drying times. Add dryer fabric softener sheets at the end of the cycle. Do not use...

Use and Care Guide
Page 23
... Sears Installation Service For Sears professional installation of home appliances, garage door openers, water heaters, and other major home items, in -home repair, plus convenient repair scheduling _/Power surge protection against electrical damage due to power fluctuations _/Rental reimbursement if repair of your new purchase for years of dependable operation. Your new Kenmore ®product is all that it may require preventive maintenance or repair from time to time. But...
... Sears Installation Service For Sears professional installation of home appliances, garage door openers, water heaters, and other major home items, in -home repair, plus convenient repair scheduling _/Power surge protection against electrical damage due to power fluctuations _/Rental reimbursement if repair of your new purchase for years of dependable operation. Your new Kenmore ®product is all that it may require preventive maintenance or repair from time to time. But...

Use and Care Guide
Page 48
....com To purchase a protection agreement (U.S.A.) or maintenance agreement (Canada) on -line for the location of your home-of carry-in items like garage door openers and water heaters. 1-800-4-MY-HOME ® (1-800-469-4663) Call anytime, day or night (U.S.A. Your Home For repair-in U.S.A. UU. Imprese en EE. For the replacement parts, accessories and owner's manuals that you need to do-it !
....com To purchase a protection agreement (U.S.A.) or maintenance agreement (Canada) on -line for the location of your home-of carry-in items like garage door openers and water heaters. 1-800-4-MY-HOME ® (1-800-469-4663) Call anytime, day or night (U.S.A. Your Home For repair-in U.S.A. UU. Imprese en EE. For the replacement parts, accessories and owner's manuals that you need to do-it !

