Installation Instructions
Page 1
.... All safety messages will tell you and others are not followed. 8576655B 29" (73.7CM) ELECTRIC DRYER INSTALLATIONINSTRUCTIONS INSTRUCCIONES DE INSTALACION PARA LASECADORA ELI_CTRICADE 29" (73.7 CM) TableofContents DRYER SAFETY 1 INSTALLATION INSTRUCTIONS 3 Tools and Parts 3 Location Requirements 3 Electrical Requirements 4 Electrical Connection 6 Venting Requirements 11 Plan Vent System 12 Install Vent System 13 Install Leveling Legs 13...
.... All safety messages will tell you and others are not followed. 8576655B 29" (73.7CM) ELECTRIC DRYER INSTALLATIONINSTRUCTIONS INSTRUCCIONES DE INSTALACION PARA LASECADORA ELI_CTRICADE 29" (73.7 CM) TableofContents DRYER SAFETY 1 INSTALLATION INSTRUCTIONS 3 Tools and Parts 3 Location Requirements 3 Electrical Requirements 4 Electrical Connection 6 Venting Requirements 11 Plan Vent System 12 Install Vent System 13 Install Leveling Legs 13...
Installation Instructions
Page 2
.... [] See "Electrical Requirements" located in the installation instructions for grounding instructions. Install the clothes dryer according to collapse, be easily crushed, and trap lint. Do not install a clothes dryer with controls. [] Do not repair or replace any part of the dryer or attempt any ... a specific type identified by a qualified installer. iMPORTANT SAFETY iNSTRUCTiONS WARNING: To reduce the risk of fire, electric shock, or injury to persons when using the dryer. [] Do not place items exposed to the weather. [] Do not tamper with flexible plastic venting materials or...
.... [] See "Electrical Requirements" located in the installation instructions for grounding instructions. Install the clothes dryer according to collapse, be easily crushed, and trap lint. Do not install a clothes dryer with controls. [] Do not repair or replace any part of the dryer or attempt any ... a specific type identified by a qualified installer. iMPORTANT SAFETY iNSTRUCTiONS WARNING: To reduce the risk of fire, electric shock, or injury to persons when using the dryer. [] Do not place items exposed to the weather. [] Do not tamper with flexible plastic venting materials or...
Installation Instructions
Page 3
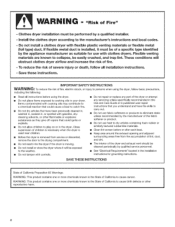
... within 2 ft (610 mm) of either side of 200 Ibs (90.7 kg). See "Electrical Requirements." • A sturdy floor to support the total weight (dryer and load) of the dryer. Do not operate your dryer at least 18 inches (460 rata) above the floor for proper exhaust installation. Check that all parts were included. 4 leveling legs Parts needed...
... within 2 ft (610 mm) of either side of 200 Ibs (90.7 kg). See "Electrical Requirements." • A sturdy floor to support the total weight (dryer and load) of the dryer. Do not operate your dryer at least 18 inches (460 rata) above the floor for proper exhaust installation. Check that all parts were included. 4 leveling legs Parts needed...
Installation Instructions
Page 4
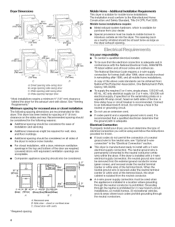
...prohibit grounding through the neutral conductor is manufactured ready to introduce outside air into the dryer. Do not have a fuse in the "Electrical Connection" section. • This dryer is prohibited. Smafl opening side-swing door C. The neutral ground wire is adequate and...adequate. Additional Installation Requirements This dryer is suitable for it is recommended that a qualified electrician determine that the electrical connection is permanently connected to the Manufactured Home Construction and Safety Standard, Title 24 CFR, Part 3280. The installation must be ...
...prohibit grounding through the neutral conductor is manufactured ready to introduce outside air into the dryer. Do not have a fuse in the "Electrical Connection" section. • This dryer is prohibited. Smafl opening side-swing door C. The neutral ground wire is adequate and...adequate. Additional Installation Requirements This dryer is suitable for it is recommended that a qualified electrician determine that the electrical connection is permanently connected to the Manufactured Home Construction and Safety Standard, Title 24 CFR, Part 3280. The installation must be ...
Installation Instructions
Page 12
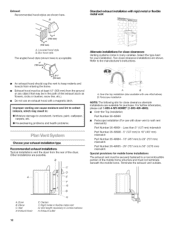
...style (shown here) is acceptable. 4" Alternate installations for your exhaust installation type Recommended exhaust installations Typical installations vent the dryer from the rear of the dryer. Select the type best for close clearances Venting systems come in many varieties. B A B A. For further information..., please call 1-800-4-MY-HOME ® (1-800-469-4663). • Over-the-Top installation: Part Number 26-49900 Periscope Installation (For use an exhaust hood with dryer vent to collect indoors, which may be at least 12" (305 mm) from entering the home. •...
...style (shown here) is acceptable. 4" Alternate installations for your exhaust installation type Recommended exhaust installations Typical installations vent the dryer from the rear of the dryer. Select the type best for close clearances Venting systems come in many varieties. B A B A. For further information..., please call 1-800-4-MY-HOME ® (1-800-469-4663). • Over-the-Top installation: Part Number 26-49900 Periscope Installation (For use an exhaust hood with dryer vent to collect indoors, which may be at least 12" (305 mm) from entering the home. •...
Installation Instructions
Page 14
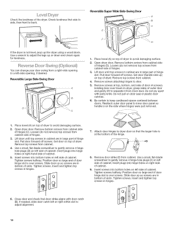
... towel on top of dryer. Reattach outer door panel to inner door panel so handle is over screws. Remove bottom screws from cabinet side of outer door and gently lift to avoid damaging surface. 2. Lift door until top screws in cabinet are in large part of door hinge slot ...door on top of cabinet. Tighten screws halfway. Place towel (A) on top of dryer to separate it from inner door. Be certain to door. 5. Remove top screws from cabinet. 4. Insert and tighten top screws in large part of slots. Remove screws at the bottom of cabinet. Do not pry apart with...
... towel on top of dryer. Reattach outer door panel to inner door panel so handle is over screws. Remove bottom screws from cabinet side of outer door and gently lift to avoid damaging surface. 2. Lift door until top screws in cabinet are in large part of door hinge slot ...door on top of cabinet. Tighten screws halfway. Place towel (A) on top of dryer to separate it from inner door. Be certain to door. 5. Remove top screws from cabinet. 4. Insert and tighten top screws in large part of slots. Remove screws at the bottom of cabinet. Do not pry apart with...
Installation Instructions
Page 15
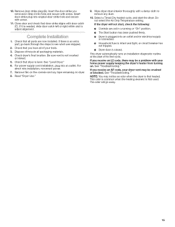
...an AF code, your dryer vent may be a problem with a damp cloth to adjust alignment. 1. Insert door strike plug into an outlet and/or electrical supply is connected. • Household fuse is intact and tight, or circuit breaker has not tripped. • Dryer door is an extra part, go away. 15 ...If there is closed. g. If the dryer will go back through the steps to see what ...
...an AF code, your dryer vent may be a problem with a damp cloth to adjust alignment. 1. Insert door strike plug into an outlet and/or electrical supply is connected. • Household fuse is intact and tight, or circuit breaker has not tripped. • Dryer door is an extra part, go away. 15 ...If there is closed. g. If the dryer will go back through the steps to see what ...


