Installation Instructions
Page 1
... provided many important safety messages in this manual and on your appliance. 29" (73.7CM) ELECTRIC DRYER INSTALLATIONINSTRUCTIONS INSTRUCCIONES DE INSTALACION PARA LASECADORA ELI_CTRICADE 29" (73.7 CM) TableofContents DRYER SAFETY 1 INSTALLATION INSTRUCTIONS 3 Tools and Parts 3 Location Requirements 3 Electrical Requirements 4 Electrical Connection 6 Venting Requirements 11 Plan Vent System 12 Install Vent System 13 Install Leveling Legs...
... provided many important safety messages in this manual and on your appliance. 29" (73.7CM) ELECTRIC DRYER INSTALLATIONINSTRUCTIONS INSTRUCCIONES DE INSTALACION PARA LASECADORA ELI_CTRICADE 29" (73.7 CM) TableofContents DRYER SAFETY 1 INSTALLATION INSTRUCTIONS 3 Tools and Parts 3 Location Requirements 3 Electrical Requirements 4 Electrical Connection 6 Venting Requirements 11 Plan Vent System 12 Install Vent System 13 Install Leveling Legs...
Installation Instructions
Page 2
... to eliminate static unless recommended by qualified service personnel. [] See "Electrical Requirements" located in your dryer. if flexible metal duct is moving. [] Do not install or store the dryer where it must be easily crushed, and trap lint. m To reduce the risk of severe injury... cleaning solvents, or other reproductive harm. 2 iMPORTANT SAFETY iNSTRUCTiONS WARNING: To reduce the risk of fire, electric shock, or injury to persons when using the dryer, follow all instructions before or after each load. [] Keep area around the exhaust opening and adjacent surrounding areas...
... to eliminate static unless recommended by qualified service personnel. [] See "Electrical Requirements" located in your dryer. if flexible metal duct is moving. [] Do not install or store the dryer where it must be easily crushed, and trap lint. m To reduce the risk of severe injury... cleaning solvents, or other reproductive harm. 2 iMPORTANT SAFETY iNSTRUCTiONS WARNING: To reduce the risk of fire, electric shock, or injury to persons when using the dryer, follow all instructions before or after each load. [] Keep area around the exhaust opening and adjacent surrounding areas...
Installation Instructions
Page 3
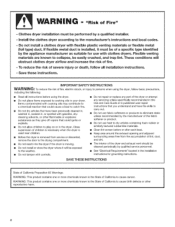
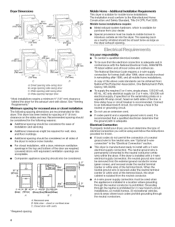
... and models with any tools listed here. Place dryer at the end of a companion appliance should also be extended. See "Electrical Requirements." • A sturdy floor to support the total weight (dryer and load) of the dryer. At lower temperatures, the dryer might not shut off at least 18 inches (...." • A separate 30-amp circuit. • If you are using a power supply cord, a grounded electrical outlet located within 2 ft (610 mm) of either side of 200 Ibs (90.7 kg). The dryer must be exposed to open fully. Failure to 1" (25 mm) or hex-head socket wrench (for adjusting...
... and models with any tools listed here. Place dryer at the end of a companion appliance should also be extended. See "Electrical Requirements." • A sturdy floor to support the total weight (dryer and load) of the dryer. At lower temperatures, the dryer might not shut off at least 18 inches (...." • A separate 30-amp circuit. • If you are using a power supply cord, a grounded electrical outlet located within 2 ft (610 mm) of either side of 200 Ibs (90.7 kg). The dryer must be exposed to open fully. Failure to 1" (25 mm) or hex-head socket wrench (for adjusting...
Installation Instructions
Page 4
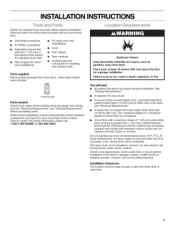
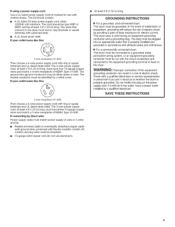
...to the neutral wire, see "Optional 3-wire connection" in conformance with equivalent ventilation openings are required. Electrical Connection To properly install your dryer, you must determine the type of electrical connection you will be considered. (310cm)2 .__ 3u* (76ram) -f # 24in_. *- (... grounding through the neutral conductor is adequate and in the "Electrical Connection" section. • This dryer is prohibited for it is recommended that a qualified electrician determine that the electrical connection is prohibited. Mobile home installations require: • Metal...
...to the neutral wire, see "Optional 3-wire connection" in conformance with equivalent ventilation openings are required. Electrical Connection To properly install your dryer, you must determine the type of electrical connection you will be considered. (310cm)2 .__ 3u* (76ram) -f # 24in_. *- (... grounding through the neutral conductor is adequate and in the "Electrical Connection" section. • This dryer is prohibited for it is recommended that a qualified electrician determine that the electrical connection is prohibited. Mobile home installations require: • Metal...
Installation Instructions
Page 5
... cord with the circuit conductors and connected to the dryer must be at least 4 ft (1.22 m) long. Do not modify the plug on the dryer. GROUNDING INSTRUCTIONS [] For a grounded, cord-connected dryer: This dryer must have four 10-gauge copper wires and match a 4-wire receptacle of electric shock. grounding conductor can result in accordance with all...
... cord with the circuit conductors and connected to the dryer must be at least 4 ft (1.22 m) long. Do not modify the plug on the dryer. GROUNDING INSTRUCTIONS [] For a grounded, cord-connected dryer: This dryer must have four 10-gauge copper wires and match a 4-wire receptacle of electric shock. grounding conductor can result in accordance with all...
Installation Instructions
Page 6
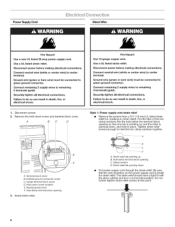
... the terminal block opening so that the wire insulation on strain relief). The strain relief should have a tight fit with the dryer cabinet and be connected to green ground connector= Connect remaining 2 supply wires to green ground connector. Ground wire (green or bare...-down screw and terminal block cover. Strain relief tab pointing down , and hold the two clamp sections together. Disconnect power before making electrical connections. Neutral ground wire F. Do not further tighten strain relief screws at this point. 6 Use a UL listed strain relief. Strain...
... the terminal block opening so that the wire insulation on strain relief). The strain relief should have a tight fit with the dryer cabinet and be connected to green ground connector= Connect remaining 2 supply wires to green ground connector. Ground wire (green or bare...-down screw and terminal block cover. Strain relief tab pointing down , and hold the two clamp sections together. Disconnect power before making electrical connections. Neutral ground wire F. Do not further tighten strain relief screws at this point. 6 Use a UL listed strain relief. Strain...
Installation Instructions
Page 7
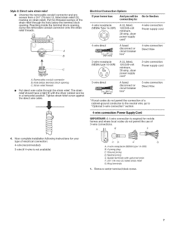
...strain relief should have a tight fit with upturned ends F. 3/4" (19 mm) UL listed strain relief G. Electrical Connection Options If your type of 3-wire connections. Spade terminals with the dryer cabinet and be connecting to: Go to Section 4-wire receptacle (NEMA Type 14-30R) (_) A UL ...wire connection: circuit breaker dboisx*connect or Direct Wire 3-wire receptacle (NEMA type 10-30R) (_ A UL listed, 120/240-volt 30-amp, dryer mpoinwimerumsu, pply cord* 3-wire direct (89 mm_ A fused disconnect or cboirxc*uit breaker 3-wire connection: Power supply cord 3-wire connection: Direct ...
...strain relief should have a tight fit with upturned ends F. 3/4" (19 mm) UL listed strain relief G. Electrical Connection Options If your type of 3-wire connections. Spade terminals with the dryer cabinet and be connecting to: Go to Section 4-wire receptacle (NEMA Type 14-30R) (_) A UL ...wire connection: circuit breaker dboisx*connect or Direct Wire 3-wire receptacle (NEMA type 10-30R) (_ A UL listed, 120/240-volt 30-amp, dryer mpoinwimerumsu, pply cord* 3-wire direct (89 mm_ A fused disconnect or cboirxc*uit breaker 3-wire connection: Power supply cord 3-wire connection: Direct ...

Installation Instructions
Page 8
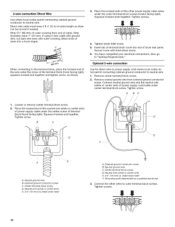
...B. Ground wire (green or bare) of 3-wire connections. Remove neutral ground wire from 3 remaining wires. You have 5 ft (1.52 m) of extra length so dryer can be moved if needed. Cut 11/2"(38 mm) from external ground conductor screw. Neutral wire (white or center wire)...screw - B. Neutral wire (white or center wire) D. 3/4" (19 mm) UL listed strain relief E. Direct wire cable must have completed your electrical connections. Dotted fine shows position of NEUTRAL ground wire before being moved to center terminal block screw. A B -m /////¢ O // 5. Strip...
...B. Ground wire (green or bare) of 3-wire connections. Remove neutral ground wire from 3 remaining wires. You have 5 ft (1.52 m) of extra length so dryer can be moved if needed. Cut 11/2"(38 mm) from external ground conductor screw. Neutral wire (white or center wire)...screw - B. Neutral wire (white or center wire) D. 3/4" (19 mm) UL listed strain relief E. Direct wire cable must have completed your electrical connections. Dotted fine shows position of NEUTRAL ground wire before being moved to center terminal block screw. A B -m /////¢ O // 5. Strip...
Installation Instructions
Page 9
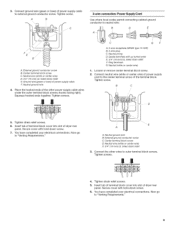
...the other wires to "Venting Requirements." Insert tab of terminal block cover into slot of dryer rear panel. Tighten strain relief screws. 5. You have completed your electrical connections. Squeeze hooked ends together. Tighten screw. Insert tab of terminal block cover into ...slot of dryer rear panel. Tighten screw. Center terminal block screw C. Ground wire (green or bare) of the terminal block. Secure cover with hold -down screw. 7= You have completed your electrical connections. Neutral ground wire B. B C / ...
...the other wires to "Venting Requirements." Insert tab of terminal block cover into slot of dryer rear panel. Tighten strain relief screws. 5. You have completed your electrical connections. Squeeze hooked ends together. Tighten screw. Insert tab of terminal block cover into ...slot of dryer rear panel. Tighten screw. Center terminal block screw C. Ground wire (green or bare) of the terminal block. Secure cover with hold -down screw. 7= You have completed your electrical connections. Neutral ground wire B. B C / ...
Installation Instructions
Page 10
.../2"(89 mm) of outer covering from external ground conductor screw. Tighten strain relief screw. 5. Squeeze hooked end together. Direct wire cable must have completed your electrical connections. Neutral wire (white or center wire) E. 3/4" (19 mm) UL listed strain relief A. Tighten screws. ! 10 A BC 1= Loosen or remove center terminal block screw. 2.... power supply cable wires under the outer terminal block screws (hooks facing right). Insert tab of terminal block cover into a hook shape. You have 5 ft (1.52 m) of dryer rear panel. Remove center terminal block screw. 2.
.../2"(89 mm) of outer covering from external ground conductor screw. Tighten strain relief screw. 5. Squeeze hooked end together. Direct wire cable must have completed your electrical connections. Neutral wire (white or center wire) E. 3/4" (19 mm) UL listed strain relief A. Tighten screws. ! 10 A BC 1= Loosen or remove center terminal block screw. 2.... power supply cable wires under the outer terminal block screws (hooks facing right). Insert tab of terminal block cover into a hook shape. You have 5 ft (1.52 m) of dryer rear panel. Remove center terminal block screw. 2.
Installation Instructions
Page 15
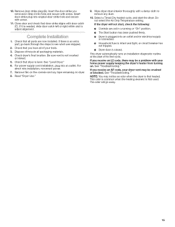
...set in Step 8 into an outlet and/or electrical supply is connected. • Household fuse is intact and tight, or circuit breaker has not tripped. • Dryer door is level. Check that door strike aligns with door catch (C). Check dryer's final location. Be sure vent is first used....wire installation, reconnect power. 7. See "Troubleshooting." Insert door strike plug into an outlet. Select a Timed Dry heated cycle, and start of your dryer vent may be a problem with a damp cloth to adjust alignment. 1. Insert the door strike you receive an L2 code, there may notice an ...
...set in Step 8 into an outlet and/or electrical supply is connected. • Household fuse is intact and tight, or circuit breaker has not tripped. • Dryer door is level. Check that door strike aligns with door catch (C). Check dryer's final location. Be sure vent is first used....wire installation, reconnect power. 7. See "Troubleshooting." Insert door strike plug into an outlet. Select a Timed Dry heated cycle, and start of your dryer vent may be a problem with a damp cloth to adjust alignment. 1. Insert the door strike you receive an L2 code, there may notice an ...

