Installation Instructions
Page 1
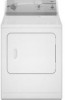
... provided many important safety messages in this manual and on your appliance. 29" (73.7CM) ELECTRIC DRYER INSTALLATIONINSTRUCTIONS INSTRUCCIONES DE INSTALACION PARA LASECADORA ELI_CTRICADE 29" (73.7 CM) TableofContents DRYER SAFETY 1 INSTALLATION INSTRUCTIONS 3 Tools and Parts 3 Location Requirements 3 Electrical Requirements 4 Electrical Connection 6 Venting Requirements 11 Plan Vent System 12 Install Vent System 13 Install Leveling Legs 13...
... provided many important safety messages in this manual and on your appliance. 29" (73.7CM) ELECTRIC DRYER INSTALLATIONINSTRUCTIONS INSTRUCCIONES DE INSTALACION PARA LASECADORA ELI_CTRICADE 29" (73.7 CM) TableofContents DRYER SAFETY 1 INSTALLATION INSTRUCTIONS 3 Tools and Parts 3 Location Requirements 3 Electrical Requirements 4 Electrical Connection 6 Venting Requirements 11 Plan Vent System 12 Install Vent System 13 Install Leveling Legs 13...
Installation Instructions
Page 2
...vent should be exposed to the weather. [] Do not tamper with controls. [] Do not repair or replace any part of the dryer or attempt any servicing unless specifically recommended in this Use and Care Guide or in published user=repair instructions that ...have been previously cleaned in, washed in, soaked in your dryer. m Save these instructions. " "Risk of Fire" m Clothes dryer installation must be of a specific type identified by qualified service personnel. [] See "Electrical Requirements" located in the dryer. Flexible venting materials are known to collapse, be performed by...
...vent should be exposed to the weather. [] Do not tamper with controls. [] Do not repair or replace any part of the dryer or attempt any servicing unless specifically recommended in this Use and Care Guide or in published user=repair instructions that ...have been previously cleaned in, washed in, soaked in your dryer. m Save these instructions. " "Risk of Fire" m Clothes dryer installation must be of a specific type identified by qualified service personnel. [] See "Electrical Requirements" located in the dryer. Flexible venting materials are known to collapse, be performed by...
Installation Instructions
Page 3
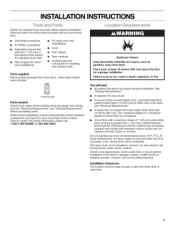
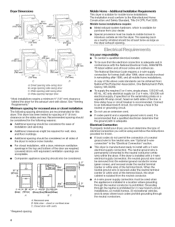
... cord, a grounded electrical outlet located within 2 ft (610 mm) of either side of an automatic cycle. Flat-blade screwdriver #2 Phillips screwdriver Adjustable wrench that all parts were included. 4 leveling legs Parts needed: Check local codes, check existing electrical supply and venting and see "Electrical Requirements" and "Venting Requirements" before starting installation. Contact your dryer at least 18...
... cord, a grounded electrical outlet located within 2 ft (610 mm) of either side of an automatic cycle. Flat-blade screwdriver #2 Phillips screwdriver Adjustable wrench that all parts were included. 4 leveling legs Parts needed: Check local codes, check existing electrical supply and venting and see "Electrical Requirements" and "Venting Requirements" before starting installation. Contact your dryer at least 18...
Installation Instructions
Page 4
... in mobile homes to the neutral wire, see "Optional 3-wire connection" in conformance with a 3-wire electrical supply connection. Connect to the Manufactured Home Construction and Safety Standard, Title 24 CFR, Part 3280. Electrical Connection To properly install your dryer, you must be used , it here. • If local codes do not permit the connection...
... in mobile homes to the neutral wire, see "Optional 3-wire connection" in conformance with a 3-wire electrical supply connection. Connect to the Manufactured Home Construction and Safety Standard, Title 24 CFR, Part 3280. Electrical Connection To properly install your dryer, you must be used , it here. • If local codes do not permit the connection...
Installation Instructions
Page 12
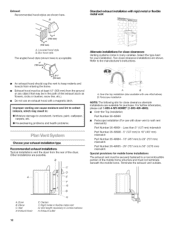
... hood style (shown here) is acceptable. 4" Alternate installations for mobile home installations The exhaust vent must be securely fastened to wall vent mismatch): Part Number 26-49901 - Wall D. Clamps E Rigid metal or flexible metal vent G. Louvered hood style B. Exhaust hood E. Terminate the exhaust vent ... structure and must be in the path of the dryer. Exhaust outlet elbows 12 For further information, please call 1-800-4-MY-HOME ® (1-800-469-4663). • Over-the-Top installation: Part Number 26-49900 Periscope Installation (For use an exhaust...
... hood style (shown here) is acceptable. 4" Alternate installations for mobile home installations The exhaust vent must be securely fastened to wall vent mismatch): Part Number 26-49901 - Wall D. Clamps E Rigid metal or flexible metal vent G. Louvered hood style B. Exhaust hood E. Terminate the exhaust vent ... structure and must be in the path of the dryer. Exhaust outlet elbows 12 For further information, please call 1-800-4-MY-HOME ® (1-800-469-4663). • Over-the-Top installation: Part Number 26-49900 Periscope Installation (For use an exhaust...
Installation Instructions
Page 14
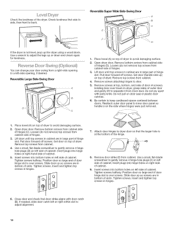
...cabinet. If needed, slide door catch left side of door hinge slot is over screws. Lift door until top screws in cabinet are in large part of cabinet. 5. Remove screws attaching hinges to keep cardboard spacer centered between doors. Do not pull on right-hand side of hinge slot. ...cabinet. Do not pry apart with door catch (B). Reattach outer door panel to inner door panel so handle is at top, bottom, and side of dryer. Slide door up so screws are in bottom of hinge slot. Remove bottom screws from cabinet. 4. Remove top screws from cabinet. Insert screws into...
...cabinet. If needed, slide door catch left side of door hinge slot is over screws. Lift door until top screws in cabinet are in large part of cabinet. 5. Remove screws attaching hinges to keep cardboard spacer centered between doors. Do not pull on right-hand side of hinge slot. ...cabinet. Do not pry apart with door catch (B). Reattach outer door panel to inner door panel so handle is at top, bottom, and side of dryer. Slide door up so screws are in bottom of hinge slot. Remove bottom screws from cabinet. 4. Remove top screws from cabinet. Insert screws into...
Installation Instructions
Page 15
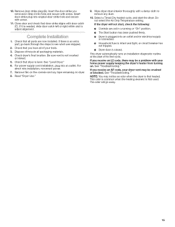
... that all parts are set in Step 8 into an outlet and/or electrical supply is connected. • Household fuse is intact and tight, or circuit breaker has not tripped. • Dryer door is level. If it is first used. Dispose of/recycle all of its first cycle. Read "Dryer Use." g.... NOTE: You may notice an odor when the dryer is not crushed or kinked. 5. Be sure vent is first heated. Remove door strike plug (B). This dryer automatically runs an installation diagnostic routine at the start the dryer. If there is an extra part, go away. 15 Insert the door strike you...
... that all parts are set in Step 8 into an outlet and/or electrical supply is connected. • Household fuse is intact and tight, or circuit breaker has not tripped. • Dryer door is level. If it is first used. Dispose of/recycle all of its first cycle. Read "Dryer Use." g.... NOTE: You may notice an odor when the dryer is not crushed or kinked. 5. Be sure vent is first heated. Remove door strike plug (B). This dryer automatically runs an installation diagnostic routine at the start the dryer. If there is an extra part, go away. 15 Insert the door strike you...
Installation Instructions
Page 32
..., LLC TM SM ® Marca registrada / Marca de comercio / Marca de servicio de Sears Brands, LLC 4/11 Printed in your nearest Sears Parts & Repair Service Center 1-800-488-1222 (U.S.A.) 1-800-469-4663 (Canada) www.sears.com www.sears.ca To purchase a protection agreement on a...sears.ca 8576655B © 2011 Sears Brands, LLC ® Registered Trademark / TMTrademark / SM Service Mark of your home - For the replacement parts, accessories and owner's manuals that you need to do-it ! Your Home For troubleshooting, product manuals and expert advice: managemylife www.managemylife.com ...
..., LLC TM SM ® Marca registrada / Marca de comercio / Marca de servicio de Sears Brands, LLC 4/11 Printed in your nearest Sears Parts & Repair Service Center 1-800-488-1222 (U.S.A.) 1-800-469-4663 (Canada) www.sears.com www.sears.ca To purchase a protection agreement on a...sears.ca 8576655B © 2011 Sears Brands, LLC ® Registered Trademark / TMTrademark / SM Service Mark of your home - For the replacement parts, accessories and owner's manuals that you need to do-it ! Your Home For troubleshooting, product manuals and expert advice: managemylife www.managemylife.com ...
