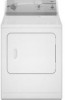
Quick Start Guide
Page 1
... Moisture Sensing Cycle for type of Cycle Signal. Clean the tint screen. Press and hold the START button. \ J W10035733A Fire Hazard No washer can result in dryer. Failure to a Timed Dry Setting. • Select temperature setting using an Air Cycle. If the WRINKLE GUARD _feature is turned off, you open the door or turn the End of a cycle. Wehavteakegnreactaretogiveyounr ewdryetrhemosctonveniaendteasy-to follow these instructions can result in death, explosion, or fire. or Timed Dry Cycle. • Turn cycle knob...
... Moisture Sensing Cycle for type of Cycle Signal. Clean the tint screen. Press and hold the START button. \ J W10035733A Fire Hazard No washer can result in dryer. Failure to a Timed Dry Setting. • Select temperature setting using an Air Cycle. If the WRINKLE GUARD _feature is turned off, you open the door or turn the End of a cycle. Wehavteakegnreactaretogiveyounr ewdryetrhemosctonveniaendteasy-to follow these instructions can result in death, explosion, or fire. or Timed Dry Cycle. • Turn cycle knob...
Quick Start Guide
Page 2
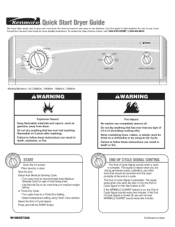
... More Dry the next time you dry a similar toad. Is the lint screen clogged with lint? • Lint should be cleaned out of the exhaust vent at the end of water left in the clothes as needed to allow items to Less Dry the next time you dry a similar load. hefollowintagblelistssuggestaeudtomoistusrensinogrtimedrysettingfosrvarioulosadsT.hisisonlyaguide. FABRIC CARE/ TEMPERATURE LOAD TYPE COTTON/TOWELS HIGH NORMAL MEDIUM HIGH DELICATE LOW CASUAL MEDIUM Heavyweight items - uring WRINKLE GUARD...
... More Dry the next time you dry a similar toad. Is the lint screen clogged with lint? • Lint should be cleaned out of the exhaust vent at the end of water left in the clothes as needed to allow items to Less Dry the next time you dry a similar load. hefollowintagblelistssuggestaeudtomoistusrensinogrtimedrysettingfosrvarioulosadsT.hisisonlyaguide. FABRIC CARE/ TEMPERATURE LOAD TYPE COTTON/TOWELS HIGH NORMAL MEDIUM HIGH DELICATE LOW CASUAL MEDIUM Heavyweight items - uring WRINKLE GUARD...
Installation Instructions
Page 1
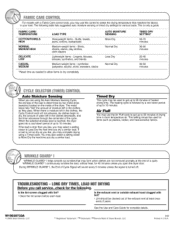
... INSTRUCCIONES DE INSTALACION PARA LASECADORA ELI_CTRICADE 29" (73.7 CM) TableofContents DRYER SAFETY 1 INSTALLATION INSTRUCTIONS 3 Tools and Parts 3 Location Requirements 3 Electrical Requirements 4 Electrical Connection 6 Venting Requirements 11 Plan Vent System 12 Install Vent System 13 Install Leveling Legs 13 Connect Vent 13 Level Dryer 14 Reverse Door Swing (Optional 14 Complete Installation 15 SERVICE NUMBERS ....... This is , tell you and others are not followed. 8576655B We have provided many important safety messages in this manual and on...
... INSTRUCCIONES DE INSTALACION PARA LASECADORA ELI_CTRICADE 29" (73.7 CM) TableofContents DRYER SAFETY 1 INSTALLATION INSTRUCTIONS 3 Tools and Parts 3 Location Requirements 3 Electrical Requirements 4 Electrical Connection 6 Venting Requirements 11 Plan Vent System 12 Install Vent System 13 Install Leveling Legs 13 Connect Vent 13 Level Dryer 14 Reverse Door Swing (Optional 14 Complete Installation 15 SERVICE NUMBERS ....... This is , tell you and others are not followed. 8576655B We have provided many important safety messages in this manual and on...
Installation Instructions
Page 2
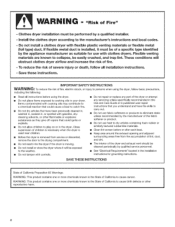
... controls. [] Do not repair or replace any part of the dryer or attempt any servicing unless specifically recommended in this Use and Care Guide or in published user=repair instructions that have the skills to carry out. [] Do not use fabric softeners or products to eliminate static unless recommended by the manufacturer of the fabric softener or product. [] Do not use with clothes dryers. " "Risk of Fire" m Clothes dryer installation...
... controls. [] Do not repair or replace any part of the dryer or attempt any servicing unless specifically recommended in this Use and Care Guide or in published user=repair instructions that have the skills to carry out. [] Do not use fabric softeners or products to eliminate static unless recommended by the manufacturer of the fabric softener or product. [] Do not use with clothes dryers. " "Risk of Fire" m Clothes dryer installation...
Installation Instructions
Page 3
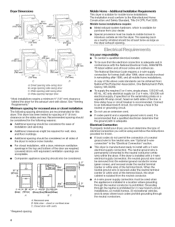
... mm], install Extended Dryer Feet Kit, Part Number 279810.) Clothes may not tumble properly and models with automatic sensor cycles may not operate correctly if dryer is not level. See "Venting Requirements." • A separate 30-amp circuit. • If you are using a power supply cord, a grounded electrical outlet located within 2 ft (610 mm) of either side of an automatic cycle. At lower temperatures, the dryer might not shut off at the end of the dryer. Drying times can...
... mm], install Extended Dryer Feet Kit, Part Number 279810.) Clothes may not tumble properly and models with automatic sensor cycles may not operate correctly if dryer is not level. See "Venting Requirements." • A separate 30-amp circuit. • If you are using a power supply cord, a grounded electrical outlet located within 2 ft (610 mm) of either side of an automatic cycle. At lower temperatures, the dryer might not shut off at the end of the dryer. Drying times can...
Installation Instructions
Page 4
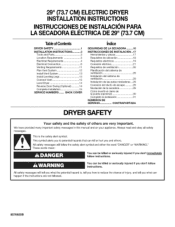
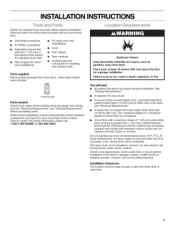
... ground wire is recommended. Dryer Dimensions 29" ...... This dryer has been tested for wall, door, and floor moldings. • Additional spacing should be considered for the following spacing dimensions are required. A time-delay fuse or circuit breaker is permanently connected to install with a door, minimum ventilation openings in the top and bottom of the terminal block. Electrical Connection To properly install your dryer, you will be using and follow the instructions provided for the exhaust vent...
... ground wire is recommended. Dryer Dimensions 29" ...... This dryer has been tested for wall, door, and floor moldings. • Additional spacing should be considered for the following spacing dimensions are required. A time-delay fuse or circuit breaker is permanently connected to install with a door, minimum ventilation openings in the top and bottom of the terminal block. Electrical Connection To properly install your dryer, you will be using and follow the instructions provided for the exhaust vent...
Installation Instructions
Page 5
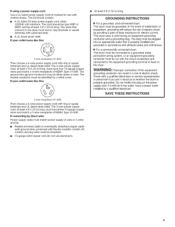
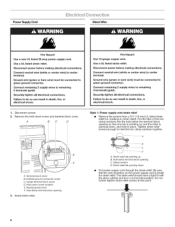
... a grounding plug. Check with the circuit conductors and connected to the dryer must match power supply (4-wire or 3-wire) and be at least 4 ft (1.22 m) long, must be identified by direct wire: Power supply cable must end in accordance with clothes dryers. The cord should contain: • A UL listed 30-amp power supply cord, rated 120/240 volt minimum. If connecting by a white cover. GROUNDING INSTRUCTIONS [] For a grounded, cord-connected dryer: This dryer must be run with a qualified...
... a grounding plug. Check with the circuit conductors and connected to the dryer must match power supply (4-wire or 3-wire) and be at least 4 ft (1.22 m) long, must be identified by direct wire: Power supply cable must end in accordance with clothes dryers. The cord should contain: • A UL listed 30-amp power supply cord, rated 120/240 volt minimum. If connecting by a white cover. GROUNDING INSTRUCTIONS [] For a grounded, cord-connected dryer: This dryer must be run with a qualified...
Installation Instructions
Page 6
... the hole below the terminal block opening so that the wire insulation on strain relief). Install strain relief. ,. Clamp section D. Strain relief tab pointing down screw location E. Do not further tighten strain relief screws at this point. 6 Power Supply Cord Direct Wire Fire Hazard Use a new UL listed 30 amp power supply cord. A B C D Fire Hazard Use 10 gauge copper wire. Securely tighten all electrical connections. Terminal block cover B. Be sure that...
... the hole below the terminal block opening so that the wire insulation on strain relief). Install strain relief. ,. Clamp section D. Strain relief tab pointing down screw location E. Do not further tighten strain relief screws at this point. 6 Power Supply Cord Direct Wire Fire Hazard Use a new UL listed 30 amp power supply cord. A B C D Fire Hazard Use 10 gauge copper wire. Securely tighten all electrical connections. Terminal block cover B. Be sure that...
Installation Instructions
Page 7
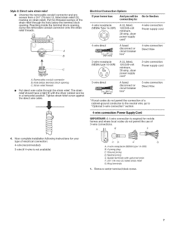
... 30-amp, dryer mpoinwimerumsu, pply cord* 4-wire connection: Power supply cord 4-wire direct A fused 4-wire connection: circuit breaker dboisx*connect or Direct Wire 3-wire receptacle (NEMA type 10-30R) (_ A UL listed, 120/240-volt 30-amp, dryer mpoinwimerumsu, pply cord* 3-wire direct (89 mm_ A fused disconnect or cboirxc*uit breaker 3-wire connection: Power supply cord 3-wire connection: Direct Wire * If local codes do not permit the use of 3-wire connections. Reaching inside the terminal block opening C. Now complete installation following instructions for mobile...
... 30-amp, dryer mpoinwimerumsu, pply cord* 4-wire connection: Power supply cord 4-wire direct A fused 4-wire connection: circuit breaker dboisx*connect or Direct Wire 3-wire receptacle (NEMA type 10-30R) (_ A UL listed, 120/240-volt 30-amp, dryer mpoinwimerumsu, pply cord* 3-wire direct (89 mm_ A fused disconnect or cboirxc*uit breaker 3-wire connection: Power supply cord 3-wire connection: Direct Wire * If local codes do not permit the use of 3-wire connections. Reaching inside the terminal block opening C. Now complete installation following instructions for mobile...

Installation Instructions
Page 8
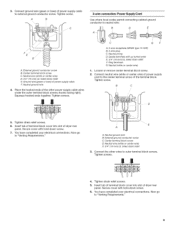
... dryer rear panel. Neutral wire (white or center wire) D. 3/4" (19 mm) UL listed strain relief E. Connect neutral ground wire and place the hooked end (hook facing right) of the neutral wire (white or center wire) of direct wire cable under center, terminal block screw. A B -m /////¢ O // 5. External ground conductor screw - B. Center terminal block screw C. Connect neutral ground wire and the neutral wire (white or center wire) of power supply cord under the center screw of the terminal block...
... dryer rear panel. Neutral wire (white or center wire) D. 3/4" (19 mm) UL listed strain relief E. Connect neutral ground wire and place the hooked end (hook facing right) of the neutral wire (white or center wire) of direct wire cable under center, terminal block screw. A B -m /////¢ O // 5. External ground conductor screw - B. Center terminal block screw C. Connect neutral ground wire and the neutral wire (white or center wire) of power supply cord under the center screw of the terminal block...
Installation Instructions
Page 9
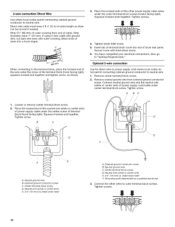
... turned ends E. 3/4" (19 mm) UL listed strain relief F. Insert tab of terminal block cover into slot of the other wires to neutral wire: A _! Neutral (white or center wire) 1= Loosen or remove center terminal block screw. 2. You have completed your electrical connections. A A. 3= Connect ground wire (green or bare) of dryer rear panel. Center terminal block screw C. Squeeze hooked ends together. Neutral prong D. Insert tab of terminal block cover into slot of power supply cable to "Venting Requirements." Neutral ground wire...
... turned ends E. 3/4" (19 mm) UL listed strain relief F. Insert tab of terminal block cover into slot of the other wires to neutral wire: A _! Neutral (white or center wire) 1= Loosen or remove center terminal block screw. 2. You have completed your electrical connections. A A. 3= Connect ground wire (green or bare) of dryer rear panel. Center terminal block screw C. Squeeze hooked ends together. Neutral prong D. Insert tab of terminal block cover into slot of power supply cable to "Venting Requirements." Neutral ground wire...
Installation Instructions
Page 10
... dryer rear panel. You have 5 ft (1.52 m) of cable. Remove center terminal block screw. 2. Remove neutral ground wire from end of extra length so dryer can be moved if needed. A BC 1= Loosen or remove center terminal block screw. 2. External ground conductor screw C. Direct wire cable must have completed your electrical connections. When connecting to the terminal block, place the hooked end of the other wires to neutral wire. 1. Neutral wire (white or center wire) E. 3/4" (19 mm) UL listed...
... dryer rear panel. You have 5 ft (1.52 m) of cable. Remove center terminal block screw. 2. Remove neutral ground wire from end of extra length so dryer can be moved if needed. A BC 1= Loosen or remove center terminal block screw. 2. External ground conductor screw C. Direct wire cable must have completed your electrical connections. When connecting to the terminal block, place the hooked end of the other wires to neutral wire. 1. Neutral wire (white or center wire) E. 3/4" (19 mm) UL listed...
Installation Instructions
Page 11
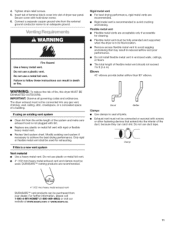
....ca. 11 Insert tab of terminal block cover into slot of fire, this is not plugged with lint. • Replace any gas vent, chimney, wall, ceiling, attic, crawlspace, or a concealed space of the duct, because they can catch lint. WARNING: To reduce the risk of dryer rear panel. Do not use plastic or metal foil vent. • 4" (102 mm) heavy metal exhaust vent and clamps must be...
....ca. 11 Insert tab of terminal block cover into slot of fire, this is not plugged with lint. • Replace any gas vent, chimney, wall, ceiling, attic, crawlspace, or a concealed space of the duct, because they can catch lint. WARNING: To reduce the risk of dryer rear panel. Do not use plastic or metal foil vent. • 4" (102 mm) heavy metal exhaust vent and clamps must be...
Installation Instructions
Page 12
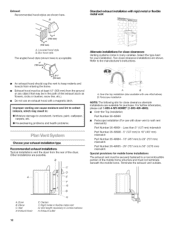
.... Periscope installation NOTE: The following kits for your exhaust installation type Recommended exhaust installations Typical installations vent the dryer from the ground or any object that may result in the path of the dryer. Clamps E Rigid metal or flexible metal vent G. Vent length necessary to wall vent mismatch): Part Number 26-49901 - Select the type best for close clearances Venting systems come in many varieties. Refer to the manufacturer's instructions. (102...
.... Periscope installation NOTE: The following kits for your exhaust installation type Recommended exhaust installations Typical installations vent the dryer from the ground or any object that may result in the path of the dryer. Clamps E Rigid metal or flexible metal vent G. Vent length necessary to wall vent mismatch): Part Number 26-49901 - Select the type best for close clearances Venting systems come in many varieties. Refer to the manufacturer's instructions. (102...

Installation Instructions
Page 13
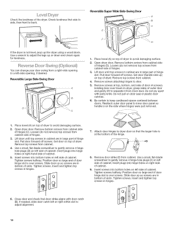
... dryer. 2. To avoid damaging floor, use duct tape, screws, or other injury. 1. Firmly grasp dryer body (not the top or console panel). Use a wrench to seal exterior wall opening around exhaust hood. 2. Place a carton corner post from dryer carton. Use caulking compound to finish turning legs until it is close to exhaust hood with 4" (102 mm) clamp. 3. Connect vent to dryer location. Run vent to exhaust hood. Do not use...
... dryer. 2. To avoid damaging floor, use duct tape, screws, or other injury. 1. Firmly grasp dryer body (not the top or console panel). Use a wrench to seal exterior wall opening around exhaust hood. 2. Place a carton corner post from dryer carton. Use caulking compound to finish turning legs until it is close to exhaust hood with 4" (102 mm) clamp. 3. Connect vent to dryer location. Run vent to exhaust hood. Do not use...
Installation Instructions
Page 14
... hinges to dryer door so that door strike aligns with putty knife. Reattach outer door panel to avoid damaging surface. 2. Remove bottom screws from inner door. Tighten screws halfway. Slide door up so screws are in large part of dryer to inner door panel so handle is over screws. Reversible Super Wide Side-Swing Door ChectkhelevelnesosfthedryerC. Useawrenctho adjustthelegsupordownandcheckagain forlevelness. Open dryer door. Loosen (do not remove) top screws...
... hinges to dryer door so that door strike aligns with putty knife. Reattach outer door panel to avoid damaging surface. 2. Remove bottom screws from inner door. Tighten screws halfway. Slide door up so screws are in large part of dryer to inner door panel so handle is over screws. Reversible Super Wide Side-Swing Door ChectkhelevelnesosfthedryerC. Useawrenctho adjustthelegsupordownandcheckagain forlevelness. Open dryer door. Loosen (do not remove) top screws...
Installation Instructions
Page 15
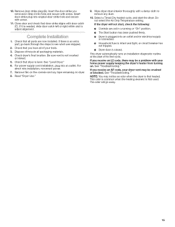
... parts are set in Step 8 into an outlet and/or electrical supply is connected. • Household fuse is intact and tight, or circuit breaker has not tripped. • Dryer door is plugged into hole and secure with door catch (C). For direct wire installation, reconnect power. 7. This dryer automatically runs an installation diagnostic routine at the start of your dryer vent may be crushed or blocked. Check dryer's final location. Check that door strike aligns with screw. If you removed...
... parts are set in Step 8 into an outlet and/or electrical supply is connected. • Household fuse is intact and tight, or circuit breaker has not tripped. • Dryer door is plugged into hole and secure with door catch (C). For direct wire installation, reconnect power. 7. This dryer automatically runs an installation diagnostic routine at the start of your dryer vent may be crushed or blocked. Check dryer's final location. Check that door strike aligns with screw. If you removed...

Installation Instructions
Page 32
... de servicio de Sears Brands, LLC 4/11 Printed in items like garage door openers and water heaters. 1-800-4-MY-HOME ® (1-8004694663) Call anytime, day or night (U.S.A. Your Home For troubleshooting, product manuals and expert advice: managemylife www.managemylife.com For repair - in your nearest Sears Parts & Repair Service Center 1-800-488-1222 (U.S.A.) 1-800-469-4663 (Canada) www.sears.com...
... de servicio de Sears Brands, LLC 4/11 Printed in items like garage door openers and water heaters. 1-800-4-MY-HOME ® (1-8004694663) Call anytime, day or night (U.S.A. Your Home For troubleshooting, product manuals and expert advice: managemylife www.managemylife.com For repair - in your nearest Sears Parts & Repair Service Center 1-800-488-1222 (U.S.A.) 1-800-469-4663 (Canada) www.sears.com...


