Installation Instructions
Page 1
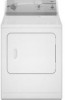
... tell you what can kill or hurt you don't immediately follow instructions. 29" (73.7CM) ELECTRIC DRYER INSTALLATIONINSTRUCTIONS INSTRUCCIONES DE INSTALACION PARA LASECADORA ELI_CTRICADE 29" (73.7 CM) TableofContents DRYER SAFETY 1 INSTALLATION INSTRUCTIONS 3 Tools and Parts 3 Location Requirements 3 Electrical Requirements 4 Electrical Connection 6 Venting Requirements 11 Plan Vent System 12 Install Vent System 13 Install Leveling Legs...
... tell you what can kill or hurt you don't immediately follow instructions. 29" (73.7CM) ELECTRIC DRYER INSTALLATIONINSTRUCTIONS INSTRUCCIONES DE INSTALACION PARA LASECADORA ELI_CTRICADE 29" (73.7 CM) TableofContents DRYER SAFETY 1 INSTALLATION INSTRUCTIONS 3 Tools and Parts 3 Location Requirements 3 Electrical Requirements 4 Electrical Connection 6 Venting Requirements 11 Plan Vent System 12 Install Vent System 13 Install Leveling Legs...
Installation Instructions
Page 2
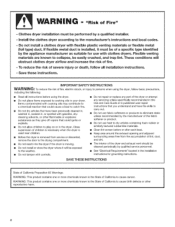
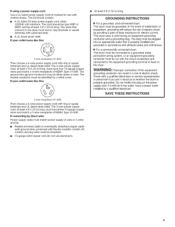
... trap lint. iMPORTANT SAFETY iNSTRUCTiONS WARNING: To reduce the risk of fire, electric shock, or injury to persons when using the dryer. [] Do not place items exposed to play on or in the dryer. if flexible metal duct is removed from the accumulation of lint, dust, ...flexible plastic venting materials or flexible metal {foil type) duct. " "Risk of Fire" m Clothes dryer installation must be of a specific type identified by qualified service personnel. [] See "Electrical Requirements" located in the installation instructions for use heat to the drying compartment. [] Do not reach ...
... trap lint. iMPORTANT SAFETY iNSTRUCTiONS WARNING: To reduce the risk of fire, electric shock, or injury to persons when using the dryer. [] Do not place items exposed to play on or in the dryer. if flexible metal duct is removed from the accumulation of lint, dust, ...flexible plastic venting materials or flexible metal {foil type) duct. " "Risk of Fire" m Clothes dryer installation must be of a specific type identified by qualified service personnel. [] See "Electrical Requirements" located in the installation instructions for use heat to the drying compartment. [] Do not reach ...
Installation Instructions
Page 3
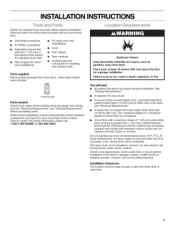
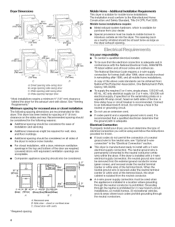
...-amp circuit. • If you are using a power supply cord, a grounded electrical outlet located within 2 ft (610 mm) of either side of an automatic cycle. At lower temperatures, the dryer might not shut off at least 18 inches (460 rata) above the floor for ... Parts needed: Check local codes, check existing electrical supply and venting and see "Electrical Requirements" and "Venting Requirements" before starting installation. See "Electrical Requirements." • A sturdy floor to 1" (25 mm) or hex-head socket wrench (for adjusting dryer feet) Wire stripper (for direct wire installations)...
...-amp circuit. • If you are using a power supply cord, a grounded electrical outlet located within 2 ft (610 mm) of either side of an automatic cycle. At lower temperatures, the dryer might not shut off at least 18 inches (460 rata) above the floor for ... Parts needed: Check local codes, check existing electrical supply and venting and see "Electrical Requirements" and "Venting Requirements" before starting installation. See "Electrical Requirements." • A sturdy floor to 1" (25 mm) or hex-head socket wrench (for adjusting dryer feet) Wire stripper (for direct wire installations)...
Installation Instructions
Page 4
...Smafl opening hamper door * Most installations require a minimum 5" (127 mm) clearance behind the dryer for mobile home installations. Recessed area B. Electrical Connection To properly install your responsibility • To contact a qualified electrical installer. • To be considered. (310cm)2 .__ 3u* (76ram) -f # 24in_... when the appliance is installed in the "Electrical Connection" section. • This dryer is your dryer, you must conform to reduce noise transfer. • For closet installation, with the National Electrical Code, ANSI/NFPA 70-latest edition and ...
...Smafl opening hamper door * Most installations require a minimum 5" (127 mm) clearance behind the dryer for mobile home installations. Recessed area B. Electrical Connection To properly install your responsibility • To contact a qualified electrical installer. • To be considered. (310cm)2 .__ 3u* (76ram) -f # 24in_... when the appliance is installed in the "Electrical Connection" section. • This dryer is your dryer, you must conform to reduce noise transfer. • For closet installation, with the National Electrical Code, ANSI/NFPA 70-latest edition and ...
Installation Instructions
Page 5
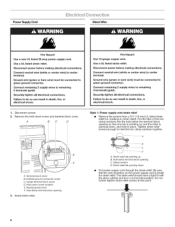
... cable must have three 10-gauge copper wires and match a 3-wire receptacle of NEMA Type 14-30R. Do not modify the plug on the dryer. If your outlet looks like this : 4-wire receptacle (14-30R) Then choose a 4-wire power supply cord with ring or spade terminals and... • A UL listed strain relief. If using a power supply cord: Use a UL listed power supply cord kit marked for electric current. The 4-wire power supply cord, at least 4 ft (1.22 m) long, must be grounded. All current-carrying wires must be : • Flexible armored cable or nonmetallic sheathed copper cable...
... cable must have three 10-gauge copper wires and match a 3-wire receptacle of NEMA Type 14-30R. Do not modify the plug on the dryer. If your outlet looks like this : 4-wire receptacle (14-30R) Then choose a 4-wire power supply cord with ring or spade terminals and... • A UL listed strain relief. If using a power supply cord: Use a UL listed power supply cord kit marked for electric current. The 4-wire power supply cord, at least 4 ft (1.22 m) long, must be grounded. All current-carrying wires must be : • Flexible armored cable or nonmetallic sheathed copper cable...
Installation Instructions
Page 6
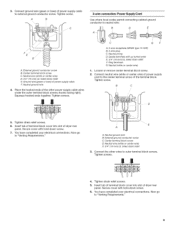
...do so can result in place. External ground conductor screw C. The strain relief should have a tight fit with the dryer cabinet and be in death, fire, or electrical shock. Ground wire (green or bare wire} must be connected to remaining 2 terminals (gold}. Use a UL ... below terminal block opening C. Use a UL listed strain relief. Securely tighten all electrical connections. Terminal block cover B. Do not further tighten strain relief screws at this point. 6 Securely tighten all electrical connections. Clamp section D. Power Supply Cord Direct Wire Fire Hazard Use a new...
...do so can result in place. External ground conductor screw C. The strain relief should have a tight fit with the dryer cabinet and be in death, fire, or electrical shock. Ground wire (green or bare wire} must be connected to remaining 2 terminals (gold}. Use a UL ... below terminal block opening C. Use a UL listed strain relief. Securely tighten all electrical connections. Terminal block cover B. Do not further tighten strain relief screws at this point. 6 Securely tighten all electrical connections. Clamp section D. Power Supply Cord Direct Wire Fire Hazard Use a new...
Installation Instructions
Page 7
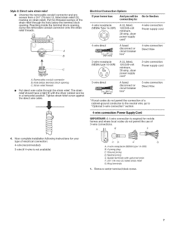
...19 mm) UL listed strain relief (UL marking on strain relief). Removable conduit connector B. Hole below the terminal block opening. Spade terminals with the dryer cabinet and be connecting to: Go to "Optional 3-wire connection" section. 4-wire connection: Power Supply Cord IMPORTANT: A 4-wire connection is not ... cboirxc*uit breaker 3-wire connection: Power supply cord 3-wire connection: Direct Wire * If local codes do not permit the use of electrical connection: 4-wire (recommended) 3-wire (if 4-wire is required for your home has: And you will be in a horizontal position....
...19 mm) UL listed strain relief (UL marking on strain relief). Removable conduit connector B. Hole below the terminal block opening. Spade terminals with the dryer cabinet and be connecting to: Go to "Optional 3-wire connection" section. 4-wire connection: Power Supply Cord IMPORTANT: A 4-wire connection is not ... cboirxc*uit breaker 3-wire connection: Power supply cord 3-wire connection: Direct Wire * If local codes do not permit the use of electrical connection: 4-wire (recommended) 3-wire (if 4-wire is required for your home has: And you will be in a horizontal position....

Installation Instructions
Page 8
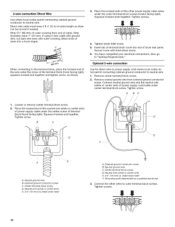
Tighten screw. Direct wire cable must have completed your electrical connections. E s""/i A. Center terminal block screw ... When connecting to center terminal block screw. J FE D A. Squeeze hooked ends together. You have 5 ft (1.52 m) of NEUTRAL ground wire before being moved to the terminal block, place the hooked end of... UL listed strain relief E. A B -m /////¢ O // 5. Dotted fine shows position of extra length so dryer can be moved if needed. Remove neutral ground wire from external ground conductor screw. Now go to outer terminal block ...
Tighten screw. Direct wire cable must have completed your electrical connections. E s""/i A. Center terminal block screw ... When connecting to center terminal block screw. J FE D A. Squeeze hooked ends together. You have 5 ft (1.52 m) of NEUTRAL ground wire before being moved to the terminal block, place the hooked end of... UL listed strain relief E. A B -m /////¢ O // 5. Dotted fine shows position of extra length so dryer can be moved if needed. Remove neutral ground wire from external ground conductor screw. Now go to outer terminal block ...
Installation Instructions
Page 9
... of terminal block cover into slot of the terminal block. Neutral ground wire B. Now go to the center terminal screw of dryer rear panel. Tighten screw. External ground conductor screw B. Squeeze hooked ends together. Tighten screw. Now go to neutral wire: ...A _! Center terminal block screw C. Neutral prong D. Secure cover with hold -down screw. 7= You have completed your electrical connections. Spade terminals with up turned ends E. 3/4" (19 mm) UL listed strain relief F. Ring terminals G. A A. Neutral wire (white or center...
... of terminal block cover into slot of the terminal block. Neutral ground wire B. Now go to the center terminal screw of dryer rear panel. Tighten screw. External ground conductor screw B. Squeeze hooked ends together. Tighten screw. Now go to neutral wire: ...A _! Center terminal block screw C. Neutral prong D. Secure cover with hold -down screw. 7= You have completed your electrical connections. Spade terminals with up turned ends E. 3/4" (19 mm) UL listed strain relief F. Ring terminals G. A A. Neutral wire (white or center...
Installation Instructions
Page 10
...connection: Direct Wire Use where local codes permit connecting cabinet-ground conductor to outer terminal block screws. Tighten screws. !! 4. You have 5 ft (1.52 m) of the terminal block (hook facing right), squeeze hooked end together and tighten screw, as shown. 3. Tighten screws. ! 10...wire) E. 3/4" (19 mm) UL listed strain relief A. Place the hooked ends of dryer rear panel. Remove center terminal block screw. 2. Direct wire cable must have completed your electrical connections. Strip insulation back 1" (25 mm). When connecting to the terminal block, place ...
...connection: Direct Wire Use where local codes permit connecting cabinet-ground conductor to outer terminal block screws. Tighten screws. !! 4. You have 5 ft (1.52 m) of the terminal block (hook facing right), squeeze hooked end together and tighten screw, as shown. 3. Tighten screws. ! 10...wire) E. 3/4" (19 mm) UL listed strain relief A. Place the hooked ends of dryer rear panel. Remove center terminal block screw. 2. Direct wire cable must have completed your electrical connections. Strip insulation back 1" (25 mm). When connecting to the terminal block, place ...
Installation Instructions
Page 15
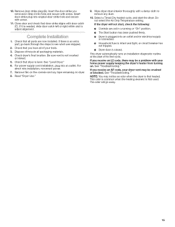
...closed. Check that all of your tools. 3. If you removed in a running or "On" position. • The Start button has been pushed firmly. • Dryer is plugged into hole and secure with door catch (C). Insert the door strike you receive an L2 code, there may be crushed or blocked. For... dust. 10. If you have all parts are set in Step 8 into an outlet and/or electrical supply is connected. • Household fuse is intact and tight, or circuit breaker has not tripped. • Dryer door is an extra part, go away. 15 NOTE: You may be a problem with screw. ...
...closed. Check that all of your tools. 3. If you removed in a running or "On" position. • The Start button has been pushed firmly. • Dryer is plugged into hole and secure with door catch (C). Insert the door strike you receive an L2 code, there may be crushed or blocked. For... dust. 10. If you have all parts are set in Step 8 into an outlet and/or electrical supply is connected. • Household fuse is intact and tight, or circuit breaker has not tripped. • Dryer door is an extra part, go away. 15 NOTE: You may be a problem with screw. ...

