Use and Care Guide
Page 2
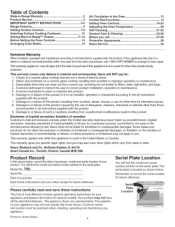
...The graphics shown are limited to one year from the date of purchase, call 27=28 Protection Agreements 29 Sears Service 30 Kenmore Warranty When installed, operated and maintained according to all instructions supplied with the product, if this appliance fails due to ...so these instructions This Use & Care Manual contains general operating instructions for your product. Table of Contents Slide=in Range Warranty 2 Product Record 2 IMPORTANT SAFETY INSTRUCTIONS 3=5 Range Features 6 Setting Surface Controls 7=9 Selecting Surface Cooking Cookware 10 Setting Warm & Ready TM Drawer 11=...
...The graphics shown are limited to one year from the date of purchase, call 27=28 Protection Agreements 29 Sears Service 30 Kenmore Warranty When installed, operated and maintained according to all instructions supplied with the product, if this appliance fails due to ...so these instructions This Use & Care Manual contains general operating instructions for your product. Table of Contents Slide=in Range Warranty 2 Product Record 2 IMPORTANT SAFETY INSTRUCTIONS 3=5 Range Features 6 Setting Surface Controls 7=9 Selecting Surface Cooking Cookware 10 Setting Warm & Ready TM Drawer 11=...
Use and Care Guide
Page 3
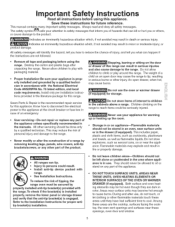
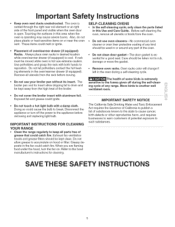
...resulting in serious burns or other servicing should never be allowed to sit or stand on the range to reach items could result. • Install anti=tip device packed with the National Electrical Code ANSl/NFPA No. 70 latest edition, and local code requirements. All other injury. ...the manuals. Destroy the carton and plastic bags after use . Proper Installation=Be sure your appliance for this range. Sears Parts & Repair is engaged. Know how to disconnect the electrical power to safety messages that inform you of a child on or near these openings, oven door and window...
...resulting in serious burns or other servicing should never be allowed to sit or stand on the range to reach items could result. • Install anti=tip device packed with the National Electrical Code ANSl/NFPA No. 70 latest edition, and local code requirements. All other injury. ...the manuals. Destroy the carton and plastic bags after use . Proper Installation=Be sure your appliance for this range. Sears Parts & Repair is engaged. Know how to disconnect the electrical power to safety messages that inform you of a child on or near these openings, oven door and window...
Use and Care Guide
Page 4
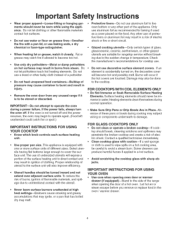
... appliance is accidentally turned on a hot cooking area, be stored or discarded. Damage may catch fire if allowed to line oven bottom or any unused range if it closely. Absence of the surface heating unit to operate the oven during a power failure. FOR GLASS COOKTOPS ONLY ,, Do not clean or... should never be done to damage. Utensil handles should be worn while using the appliance. Do not let clothing or other bulky cloth instead of electric shock or fire or short circuit. Do not let potholders touch hot heating elements. If the oven is not turned off . Any other glazed...
... appliance is accidentally turned on a hot cooking area, be stored or discarded. Damage may catch fire if allowed to line oven bottom or any unused range if it closely. Absence of the surface heating unit to operate the oven during a power failure. FOR GLASS COOKTOPS ONLY ,, Do not clean or... should never be done to damage. Utensil handles should be worn while using the appliance. Do not let clothing or other bulky cloth instead of electric shock or fire or short circuit. Do not let potholders touch hot heating elements. If the oven is not turned off . Any other glazed...
Use and Care Guide
Page 5
...oven, ,, Do not use extreme caution. The broiler pan and its insert. Oven racks color will change if left in or around any range. When you are flaming food under the hood, turn off during the self=clean= ing cycle of some birds is essential for cleaning. These...and grease could catch fire. Disconnect the appliance or turn the fan on or near the oven vent. iMPORTANT iNSTRUCTiONS FOR CLEANING YOUR RANGE • Clean the range regularly to the hood manufacturer's instructions for a good seal. Greasy deposits in the oven/warmer drawer (if equipped). Refer to keep...
...oven, ,, Do not use extreme caution. The broiler pan and its insert. Oven racks color will change if left in or around any range. When you are flaming food under the hood, turn off during the self=clean= ing cycle of some birds is essential for cleaning. These...and grease could catch fire. Disconnect the appliance or turn the fan on or near the oven vent. iMPORTANT iNSTRUCTiONS FOR CLEANING YOUR RANGE • Clean the range regularly to the hood manufacturer's instructions for a good seal. Greasy deposits in the oven/warmer drawer (if equipped). Refer to keep...
Use and Care Guide
Page 6
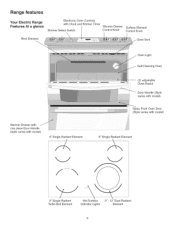
Range features Your Electric Range Features At a glance Broil Element Electronic Oven Controls with Clock and Kitchen Timer Simmer Select Switch Warmer Drawer Control Knob Surface Element Control Knob Oven ...
Range features Your Electric Range Features At a glance Broil Element Electronic Oven Controls with Clock and Kitchen Timer Simmer Select Switch Warmer Drawer Control Knob Surface Element Control Knob Oven ...
Use and Care Guide
Page 7
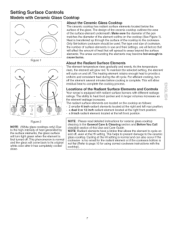
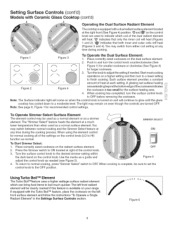
... burners with different wattage il.i.i............ Only flat-bottom cookware should be used. Locations of the Radiant Surface Elements and Controls iii!"!il"_iiii iiiiiii_il;_;!i Your range is transferred up through the surface of surface elements in use and their settings, are located on and off , even at the left rear position...
... burners with different wattage il.i.i............ Only flat-bottom cookware should be used. Locations of the Radiant Surface Elements and Controls iii!"!il"_iiii iiiiiii_il;_;!i Your range is transferred up through the surface of surface elements in use and their settings, are located on and off , even at the left rear position...
Use and Care Guide
Page 8
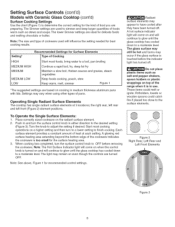
... Front Elements Figure 3 Radiant surface elements may remain on the radiant surface element. 2. A glowing red surface heating area extending beyond the bottom edge of the range when it is turned on a higher setting and then turn to a lower setting to have cooled after they have been turned off . Note: The Hot...
... Front Elements Figure 3 Radiant surface elements may remain on the radiant surface element. 2. A glowing red surface heating area extending beyond the bottom edge of the range when it is turned on a higher setting and then turn to a lower setting to have cooled after they have been turned off . Note: The Hot...
Use and Care Guide
Page 9
... small for normal cooking all of heat at ON any time during the cooking process. "@" indicates that only the inner coil will come on your range. When using the element control for the surface heating area. 4.
... small for normal cooking all of heat at ON any time during the cooking process. "@" indicates that only the inner coil will come on your range. When using the element control for the surface heating area. 4.
Use and Care Guide
Page 11
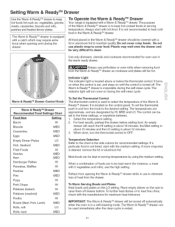
... Warm & Ready TM drawer to keep hot cooked foods at serving temperatures by HI, MED and LO. To Operate the Warm & Ready TM Drawer Your range is not listed, start with the medium setting. The purpose of heat from the Warm & Ready TM drawer as : vegetables, gravies, meats, casseroles, biscuits and...
... Warm & Ready TM drawer to keep hot cooked foods at serving temperatures by HI, MED and LO. To Operate the Warm & Ready TM Drawer Your range is not listed, start with the medium setting. The purpose of heat from the Warm & Ready TM drawer as : vegetables, gravies, meats, casseroles, biscuits and...

Use and Care Guide
Page 13
...: Always use oven mitts when the oven is released through the vents. Before Setting Oven Controls This range has a fan that will turn "ON" and "OFF" by itself to run after the range has been turned "OFF", but may also stop immediately and then turn "ON" after a while...., pies, biscuits & muffins 1 rack Multiple racks 2 or 3 2 &4 Frozen pies, angel food cake, yeast, bread, casseroles, small cuts of the rack upward and slide the rack back into place. The hot air must circulate around the food. 1 Oven Rack Multiple Oven Racks 13 OVENVENT iii!"!il"_iiii iiiiiii_il;_;!i il...
...: Always use oven mitts when the oven is released through the vents. Before Setting Oven Controls This range has a fan that will turn "ON" and "OFF" by itself to run after the range has been turned "OFF", but may also stop immediately and then turn "ON" after a while...., pies, biscuits & muffins 1 rack Multiple racks 2 or 3 2 &4 Frozen pies, angel food cake, yeast, bread, casseroles, small cuts of the rack upward and slide the rack back into place. The hot air must circulate around the food. 1 Oven Rack Multiple Oven Racks 13 OVENVENT iii!"!il"_iiii iiiiiii_il;_;!i il...

Use and Care Guide
Page 15
... minute timer is in use : While the timer is pressed first, the timer will advance to the range has been interrupted, the display will beep once) and then release. To Set the Clock When the range is active. Within 5 seconds, press and hold for that will beep when the set time has...
... minute timer is in use : While the timer is pressed first, the timer will advance to the range has been interrupted, the display will beep once) and then release. To Set the Clock When the range is active. Within 5 seconds, press and hold for that will beep when the set time has...

Use and Care Guide
Page 18
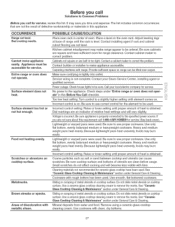
... oven before placing food in the oven. • Dark pan absorbs heat too fast. • Use a medium-weight aluminum baking sheet. Cakes not level. • Range not level.
... oven before placing food in the oven. • Dark pan absorbs heat too fast. • Use a medium-weight aluminum baking sheet. Cakes not level. • Range not level.
Use and Care Guide
Page 21
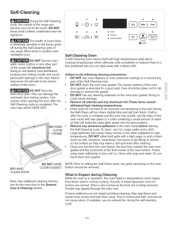
... to rub, damage or remove the gasket. • DO NOT use oven cleaners or oven protective coatings in or around any other part of the range with aluminum foil. Doing so could cause damage. • Remove all utensils and any aluminum foil.These items cannot withstand high cleaning temperatures. • ... for the oven door in operation, the oven heats to setting the Self-Clean cycle, any excessive spillovers in , after cleaning. • Clean any range. The oven may leave a dull spot even after the cycle is complete and the oven has cooled, rub the sides of the oven door gasket...
... to rub, damage or remove the gasket. • DO NOT use oven cleaners or oven protective coatings in or around any other part of the range with aluminum foil. Doing so could cause damage. • Remove all utensils and any aluminum foil.These items cannot withstand high cleaning temperatures. • ... for the oven door in operation, the oven heats to setting the Self-Clean cycle, any excessive spillovers in , after cleaning. • Clean any range. The oven may leave a dull spot even after the cycle is complete and the oven has cooled, rub the sides of the oven door gasket...
Use and Care Guide
Page 23
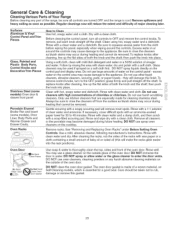
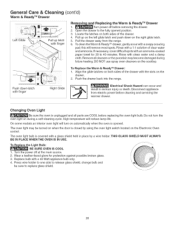
... and dishcloth. If necessary, cover difficult spots with an ammonia-soaked paper towel for 30 to the appliance. Rinse with a clean water and a dishcloth. General Care & Cleaning Cleaning Various Parts of Your Range Before cleaning any harsh abrasive cleaning materials on the outside glass of water on the ... Always be removed. DO NOT use oven cleaners, cleaning powders or any part of the range, be sure all cleaners or the porcelain may occur during heating that are turned OFF and the range is cool. Care should be used if sprayed on Self-Cleaning models, which is made ...
... and dishcloth. If necessary, cover difficult spots with an ammonia-soaked paper towel for 30 to the appliance. Rinse with a clean water and a dishcloth. General Care & Cleaning Cleaning Various Parts of Your Range Before cleaning any harsh abrasive cleaning materials on the outside glass of water on the ... Always be removed. DO NOT use oven cleaners, cleaning powders or any part of the range, be sure all cleaners or the porcelain may occur during heating that are turned OFF and the range is cool. Care should be used if sprayed on Self-Cleaning models, which is made ...
Use and Care Guide
Page 26
... on both sides of clear water and ammonia. Remove all parts are COOL before cleaning and servicing the warmer drawer. Wear a leather-faced glove for 30 to the fully opened . Replace bulb with finger Re_d 1. _ Replacing the Warm & Ready TM Drawer Turn power off at the main source. 2.... Push the drawer back into the range. Disconnect appliance from the range. 6. On some models an interior oven light will turn the oven light on the cooktop. Pull the drawer away from electric power before replacing the oven light bulb. Open the drawer to 40 ...
... on both sides of clear water and ammonia. Remove all parts are COOL before cleaning and servicing the warmer drawer. Wear a leather-faced glove for 30 to the fully opened . Replace bulb with finger Re_d 1. _ Replacing the Warm & Ready TM Drawer Turn power off at the main source. 2.... Push the drawer back into the range. Disconnect appliance from the range. 6. On some models an interior oven light will turn the oven light on the cooktop. Pull the drawer away from electric power before replacing the oven light bulb. Open the drawer to 40 ...
Use and Care Guide
Page 27
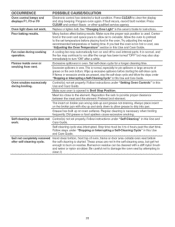
... or lower setting until proper amount of discoloration with range. Cleaning materials not recommended for service. Do not slide metal utensils on cooktop surface. Sliding or scraping of oven. Bad cooking results. Scratches ...electric company for range clearance, Contact cabinet maker to correct problem, Cabinets not square or are not sure about this requirement call for service (See back cover). Dial markings are not level, Kitchen cabinet misalignment may save you time and expense. Use only fiat bottom, evenly balanced medium or heavyweight cookware. Sliding...
... or lower setting until proper amount of discoloration with range. Cleaning materials not recommended for service. Do not slide metal utensils on cooktop surface. Sliding or scraping of oven. Bad cooking results. Scratches ...electric company for range clearance, Contact cabinet maker to correct problem, Cabinets not square or are not sure about this requirement call for service (See back cover). Dial markings are not level, Kitchen cabinet misalignment may save you time and expense. Use only fiat bottom, evenly balanced medium or heavyweight cookware. Sliding...
Use and Care Guide
Page 28
... built up on broiler pan wrong side up excessive spillovers before the self-cleaning is normal, and the fan may continue to run after the range has been turned "OFF" but get hot enough to burn on residue can be 3 to clear the display and stop the self-clean cycle and...
... built up on broiler pan wrong side up excessive spillovers before the self-cleaning is normal, and the fan may continue to run after the range has been turned "OFF" but get hot enough to burn on residue can be 3 to clear the display and stop the self-clean cycle and...
Installation Instructions
Page 2
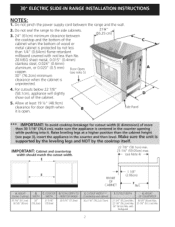
... the side cabinets. 213/_" 3.24" (61cm) minimum clearance between the range and the wall. 2. with not less than !/4" (0.64cm)flame retardant millboard covered with backguard 36 5/8" (93cm) Max. 35 7/8" (91.1cm) Min. Allow at least 19 &#...188;" (48.9cm) clearance for door depth when it is / 1 unprotected. / 4. E 22 7/8" (58.1 cm) min. 23 1/4" (59.05cm)max. (see note 5) 30" (76.2cm) minimum clearance when the cabinet is open. For cutouts below 22 7/8" (58.1cm), appliance will slightly show out of wood or metal cabinet...
... the side cabinets. 213/_" 3.24" (61cm) minimum clearance between the range and the wall. 2. with not less than !/4" (0.64cm)flame retardant millboard covered with backguard 36 5/8" (93cm) Max. 35 7/8" (91.1cm) Min. Allow at least 19 &#...188;" (48.9cm) clearance for door depth when it is / 1 unprotected. / 4. E 22 7/8" (58.1 cm) min. 23 1/4" (59.05cm)max. (see note 5) 30" (76.2cm) minimum clearance when the cabinet is open. For cutouts below 22 7/8" (58.1cm), appliance will slightly show out of wood or metal cabinet...
Installation Instructions
Page 3
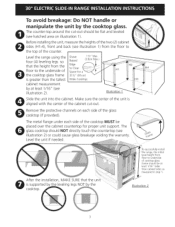
...the glass cooktop (if provided). Illustration 2 3 To avoid breakage: Do NOT handle or manipulate the unit by the cooktop. .-Tosuccessfully install range, the initial level height from floor to underside of the two (2) cabinet sides (H1-4), front and back (see illustration 2) or could ...cause glass breakage voiding the warranty. Illustration 1 Slide the unit into the cabinet. Before installing the unit, measure the heights of cooktop glass frame should be flat and leveled (see illustration 2)....
...the glass cooktop (if provided). Illustration 2 3 To avoid breakage: Do NOT handle or manipulate the unit by the cooktop. .-Tosuccessfully install range, the initial level height from floor to underside of the two (2) cabinet sides (H1-4), front and back (see illustration 2) or could ...cause glass breakage voiding the warranty. Illustration 1 Slide the unit into the cabinet. Before installing the unit, measure the heights of cooktop glass frame should be flat and leveled (see illustration 2)....
Installation Instructions
Page 4
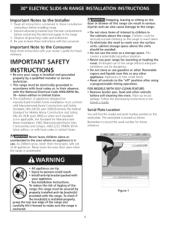
...with your appliance. • See Installation Instructions, range, the range must be secured by a qualified installer or service technician. • This range must be electrically grounded in accordance with local codes or, in their absence, with the National Electrical Code ANSI/NFPA No. 70--latest edition in ...the area where an appliance is located as a storage space. The serial plate is in these installation instructions before installing range. 2. Important Notes to the Consumer Keep ...
...with your appliance. • See Installation Instructions, range, the range must be secured by a qualified installer or service technician. • This range must be electrically grounded in accordance with local codes or, in their absence, with the National Electrical Code ANSI/NFPA No. 70--latest edition in ...the area where an appliance is located as a storage space. The serial plate is in these installation instructions before installing range. 2. Important Notes to the Consumer Keep ...


