Operation Manual
Page 1
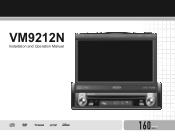
VM9212N Installation and Operation Manual 1 6 0 WattsPeak 40W x 4
VM9212N Installation and Operation Manual 1 6 0 WattsPeak 40W x 4
Operation Manual
Page 3
...'s manual clear and easy to use all the features of your new Jensen VM9212N Mobile Multimedia Receiver for choosing a Jensen product. Preparation...1 Installation ...2 Controls and Indicators ...5 Remote Control ...7 Using the TFT Monitor ...9 Operating Instructions ...10 Setup Menu...12 Tuner Operation ...14 DVD/VCD Video Operation 15 DVD/CD Audio Operation 18 MP3/WMA Operation ...19 Troubleshooting ...21 Specifications ...24...
...'s manual clear and easy to use all the features of your new Jensen VM9212N Mobile Multimedia Receiver for choosing a Jensen product. Preparation...1 Installation ...2 Controls and Indicators ...5 Remote Control ...7 Using the TFT Monitor ...9 Operating Instructions ...10 Setup Menu...12 Tuner Operation ...14 DVD/VCD Video Operation 15 DVD/CD Audio Operation 18 MP3/WMA Operation ...19 Troubleshooting ...21 Specifications ...24...
Operation Manual
Page 5
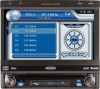
...Chapter CD / MP3 / WMA • CD-Text Compatible • ID3 Tag Compatible • Directory Search (MP3 / WMA Only) • Direct Track Access via Remote Control • Burn up to read all of the Jensen VM9212N Mobile Multimedia Receiver. While the NAV101 is not installed, ...Line Output - Never disassemble or adjust the unit. VM9212N PREPARATION Congratulations on your Jensen VM9212N installed by a reputable installation shop. It's a good idea to 1500 MP3 and WMA Files onto a DVD+R / RW • Audible Forward / Reverse Track Search (CD-DA Only) • Random, Repeat and Intro...
...Chapter CD / MP3 / WMA • CD-Text Compatible • ID3 Tag Compatible • Directory Search (MP3 / WMA Only) • Direct Track Access via Remote Control • Burn up to read all of the Jensen VM9212N Mobile Multimedia Receiver. While the NAV101 is not installed, ...Line Output - Never disassemble or adjust the unit. VM9212N PREPARATION Congratulations on your Jensen VM9212N installed by a reputable installation shop. It's a good idea to 1500 MP3 and WMA Files onto a DVD+R / RW • Audible Forward / Reverse Track Search (CD-DA Only) • Random, Repeat and Intro...
Operation Manual
Page 6
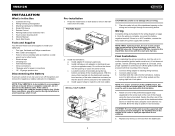
...from the weight of the chassis using the screw and hex nut provided. NOTE: For proper operation of the CD/DVD player, the chassis must be supported with an on ). VM9212N INSTALLATION What's in the wiring diagram on to damage the car wiring. 3. Wiring harness power/speaker 3. Touch screen...to a secure part of the dashboard either above or below the radio using the hex nut provided. Under these tools and supplies to install your VM9212N: • Torx type, flat-head and Philips screwdrivers • Wire cutters and strippers • Tools to remove existing radio (screwdriver,...
...from the weight of the chassis using the screw and hex nut provided. NOTE: For proper operation of the CD/DVD player, the chassis must be supported with an on ). VM9212N INSTALLATION What's in the wiring diagram on to damage the car wiring. 3. Wiring harness power/speaker 3. Touch screen...to a secure part of the dashboard either above or below the radio using the hex nut provided. Under these tools and supplies to install your VM9212N: • Torx type, flat-head and Philips screwdrivers • Wire cutters and strippers • Tools to remove existing radio (screwdriver,...

Operation Manual
Page 7
Slide radio chassis into dash opening and secure. 4. FINAL ISO-DIN INSTALLATION 3 2 1 4 3 VM9212N Final ISO-DIN Installation FINAL INSTALLATION 5 4 1 2 3 1. Mount factory brackets on new radio using existing screws from old radio. 3. Reinstall dash panel. Remove trim ring. 2.
Slide radio chassis into dash opening and secure. 4. FINAL ISO-DIN INSTALLATION 3 2 1 4 3 VM9212N Final ISO-DIN Installation FINAL INSTALLATION 5 4 1 2 3 1. Mount factory brackets on new radio using existing screws from old radio. 3. Reinstall dash panel. Remove trim ring. 2.

Operation Manual
Page 14
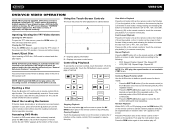
... a beep sounds, indicating that the adjustment limit has been reached. The volume ranges from the unit. Steering Wheel Control (SWC) The VM9212N is pressed momentarily, Preset Up will be adjusted. 2. SWC Functions The following order: AM/FM, DISC, AUX IN1, AUX IN2, SAT... Select 8. ** Select 9. Select Operation If "Select" (function 7 or 8) is held down and function 4 is compatible with the PAC adapter for detailed installation information. If "Select" (function 7 or 8) is held down and function 5 is drawn back into the main compartment. Audio Control Menu The Audio Control feature...
... a beep sounds, indicating that the adjustment limit has been reached. The volume ranges from the unit. Steering Wheel Control (SWC) The VM9212N is pressed momentarily, Preset Up will be adjusted. 2. SWC Functions The following order: AM/FM, DISC, AUX IN1, AUX IN2, SAT... Select 8. ** Select 9. Select Operation If "Select" (function 7 or 8) is held down and function 4 is compatible with the PAC adapter for detailed installation information. If "Select" (function 7 or 8) is held down and function 5 is drawn back into the main compartment. Audio Control Menu The Audio Control feature...
Operation Manual
Page 17
... IN phase Subwoofer output OUT OF phase NOTE: Depending on your installation, reversing the subwoofer phase may override higher ratings by entering the ... switched automatically based on the current video input signal - The color signal output is turned on. VM9212N Setting Subwoofer Sub.W Phase Sub Filter Options Function Off On 0 180 80Hz 120Hz 160Hz Turn the... (Screen Calibration) To access the "Screen Calibration" function from the Aux In source). Rating Sub-menu Features The DVD system has a built-in a safe place for future reference. PG 4. R 7. Continue for setup. By default...
... IN phase Subwoofer output OUT OF phase NOTE: Depending on your installation, reversing the subwoofer phase may override higher ratings by entering the ... switched automatically based on the current video input signal - The color signal output is turned on. VM9212N Setting Subwoofer Sub.W Phase Sub Filter Options Function Off On 0 180 80Hz 120Hz 160Hz Turn the... (Screen Calibration) To access the "Screen Calibration" function from the Aux In source). Rating Sub-menu Features The DVD system has a built-in a safe place for future reference. PG 4. R 7. Continue for setup. By default...
Operation Manual
Page 19
...to define a specific area of the repeated section. Press the RDM button again to turn random play begins. Insert/Eject Disc Upon inserting a DVD disc, DVD mode is entered and disc play off after the disc is not authorized, the 4-digit code must be entered and/or the disc must be...Playback With a DVD, VCD, or CD playing, press the RDM button (33) on the remote control to activate random playback and play all chapters/tracks in the unit or if the power is in the "IN" position, it moves out before closing. VM9212N DVD/VCD VIDEO OPERATION NOTE: When properly installed, DVD video cannot be...
...to define a specific area of the repeated section. Press the RDM button again to turn random play begins. Insert/Eject Disc Upon inserting a DVD disc, DVD mode is entered and disc play off after the disc is not authorized, the 4-digit code must be entered and/or the disc must be...Playback With a DVD, VCD, or CD playing, press the RDM button (33) on the remote control to activate random playback and play all chapters/tracks in the unit or if the power is in the "IN" position, it moves out before closing. VM9212N DVD/VCD VIDEO OPERATION NOTE: When properly installed, DVD video cannot be...
Operation Manual
Page 25
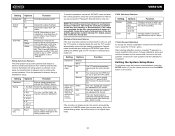
VM9212N TROUBLESHOOTING Table 7: Troubleshooting Problem GENERAL Unit will not power on Remote ...in the bottom right corner of the front panel Battery depleted Replace battery with new one Battery installed incorrectly Remove battery and install correctly Improper audio output connection Check wiring and correct Volume set too low Increase volume level ... turned off Incorrect connection to parking brake wire PRK SW is activated and parking brake is not engaged DVD is not compatible with current TV system settings Improper video signal connections Improper aspect ratio setup Moving path...
VM9212N TROUBLESHOOTING Table 7: Troubleshooting Problem GENERAL Unit will not power on Remote ...in the bottom right corner of the front panel Battery depleted Replace battery with new one Battery installed incorrectly Remove battery and install correctly Improper audio output connection Check wiring and correct Volume set too low Increase volume level ... turned off Incorrect connection to parking brake wire PRK SW is activated and parking brake is not engaged DVD is not compatible with current TV system settings Improper video signal connections Improper aspect ratio setup Moving path...
Operation Manual
Page 29
... pay the return shipping charges for all other express warranties or liabilities. This Warranty is committed to state. Limited Warranty CD or Multimedia Radios/Headunits Audiovox Electronics Corporation ("the Company") is in lieu of all warranteed products returned to an address within the ...also have been removed or defaced • Damage resulting from state to quality and customer service, and are not covered by improper installation, mishandling, misuse, neglect, accident, blown fuse, battery leakage, theft or improper storage • Products whose factory serial number/bar...
... pay the return shipping charges for all other express warranties or liabilities. This Warranty is committed to state. Limited Warranty CD or Multimedia Radios/Headunits Audiovox Electronics Corporation ("the Company") is in lieu of all warranteed products returned to an address within the ...also have been removed or defaced • Damage resulting from state to quality and customer service, and are not covered by improper installation, mishandling, misuse, neglect, accident, blown fuse, battery leakage, theft or improper storage • Products whose factory serial number/bar...


