Operation Manual
Page 3
...'ll learn how to follow. CONTENTS Thank you for maximum enjoyment. We hope you will find the instructions in this owner's manual clear and easy to use all the features of your new Jensen VM9212N Mobile Multimedia Receiver for choosing a Jensen product. Preparation...1 Installation ...2 Controls and Indicators ...5 Remote Control ...7 Using the TFT Monitor ...9 Operating Instructions ...10 Setup Menu...12 Tuner Operation ...14 DVD/VCD Video Operation 15 DVD/CD Audio Operation 18 MP3/WMA Operation ...19 Troubleshooting ...21 Specifications ...24 VM9212N i
...'ll learn how to follow. CONTENTS Thank you for maximum enjoyment. We hope you will find the instructions in this owner's manual clear and easy to use all the features of your new Jensen VM9212N Mobile Multimedia Receiver for choosing a Jensen product. Preparation...1 Installation ...2 Controls and Indicators ...5 Remote Control ...7 Using the TFT Monitor ...9 Operating Instructions ...10 Setup Menu...12 Tuner Operation ...14 DVD/VCD Video Operation 15 DVD/CD Audio Operation 18 MP3/WMA Operation ...19 Troubleshooting ...21 Specifications ...24 VM9212N i
Operation Manual
Page 5
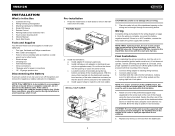
... Previous Chapter CD / MP3 / WMA • CD-Text Compatible • ID3 Tag Compatible • Directory Search (MP3 / WMA Only) • Direct Track Access via Remote Control • Burn up to keep the chip sets operating at nominal temperatures General • 44-Key Infrared Remote Control • Two Composite Video Outputs for Additional Screens • Two Audio / Video Auxiliary Inputs for rear view video camera) never use irregular discs. WARNING! Never use the video display function while driving the...
... Previous Chapter CD / MP3 / WMA • CD-Text Compatible • ID3 Tag Compatible • Directory Search (MP3 / WMA Only) • Direct Track Access via Remote Control • Burn up to keep the chip sets operating at nominal temperatures General • 44-Key Infrared Remote Control • Two Composite Video Outputs for Additional Screens • Two Audio / Video Auxiliary Inputs for rear view video camera) never use irregular discs. WARNING! Never use the video display function while driving the...
Operation Manual
Page 6
... a car equipped with final mounting of the perforated strap to use only the supplied screws). Remote Control 6. Install adapter if necessary (optional). Install support strap to the power supply with the main wire harness. If there is corrected. NOTE: For proper operation of the perforated support strap (supplied) to remove the halfsleeve from the dashboard. 2 Pre-installation 1. d. Connect antenna lead. 3. NOTE: If the VM9212N is achieved, turn off the ignition switch...
... a car equipped with final mounting of the perforated strap to use only the supplied screws). Remote Control 6. Install adapter if necessary (optional). Install support strap to the power supply with the main wire harness. If there is corrected. NOTE: For proper operation of the perforated support strap (supplied) to remove the halfsleeve from the dashboard. 2 Pre-installation 1. d. Connect antenna lead. 3. NOTE: If the VM9212N is achieved, turn off the ignition switch...

Operation Manual
Page 7
Reinstall dash panel. Final ISO-DIN Installation FINAL INSTALLATION 5 4 1 2 3 1. Mount factory brackets on new radio using existing screws from old radio. 3. Slide radio chassis into dash opening and secure. 4. FINAL ISO-DIN INSTALLATION 3 2 1 4 3 VM9212N Remove trim ring. 2.
Reinstall dash panel. Final ISO-DIN Installation FINAL INSTALLATION 5 4 1 2 3 1. Mount factory brackets on new radio using existing screws from old radio. 3. Slide radio chassis into dash opening and secure. 4. FINAL ISO-DIN INSTALLATION 3 2 1 4 3 VM9212N Remove trim ring. 2.
Operation Manual
Page 8
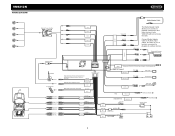
..., Sold Separately) NAV101 Input VIDEO OUT 1 YELLOW Rear Video 1 Auto antenna control (connect to a location convenient for plugging in auxiliary devices. VIDEO OUT 2 YELLOW CAMERA YELLOW Rear Video 2 Rear View Video Camera PINK PRK SW RED ACC GREEN/WHITE REVERSE + ACC YELLOW BATT BATTERY + FUSE (15A) BLACK GND BATTERY Ground PARKING BRAKE REVERSE + Ignition Switch Battery 4 GREY + FRONT R GREY/BLACK - GREEN + REAR L GREEN/BLACK - VM9212N WIRING DIAGRAM Car Media Adapter Cable External Power Amplifier Antenna Jack Antenna Car Phone FRONT L+ FRONT LFRONT...
..., Sold Separately) NAV101 Input VIDEO OUT 1 YELLOW Rear Video 1 Auto antenna control (connect to a location convenient for plugging in auxiliary devices. VIDEO OUT 2 YELLOW CAMERA YELLOW Rear Video 2 Rear View Video Camera PINK PRK SW RED ACC GREEN/WHITE REVERSE + ACC YELLOW BATT BATTERY + FUSE (15A) BLACK GND BATTERY Ground PARKING BRAKE REVERSE + Ignition Switch Battery 4 GREY + FRONT R GREY/BLACK - GREEN + REAR L GREEN/BLACK - VM9212N WIRING DIAGRAM Car Media Adapter Cable External Power Amplifier Antenna Jack Antenna Car Phone FRONT L+ FRONT LFRONT...

Operation Manual
Page 9
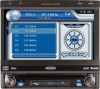
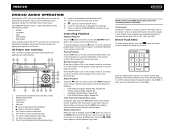
... volume level. 4 3 VM9212N NOTE: The VM9212N features Softmute, which will allow the volume to move the TFT monitor into viewing position. CONTROLS AND INDICATORS Button Operation 1. Press again to enter and/ or confirm audio settings. 6. The TFT screen must be open for the selected option. Press the AUDIO button (5) to increase or decrease gradually when the MUTE function is flashing. With the monitor closed, press AS/PS to make adjustments...
... volume level. 4 3 VM9212N NOTE: The VM9212N features Softmute, which will allow the volume to move the TFT monitor into viewing position. CONTROLS AND INDICATORS Button Operation 1. Press again to enter and/ or confirm audio settings. 6. The TFT screen must be open for the selected option. Press the AUDIO button (5) to increase or decrease gradually when the MUTE function is flashing. With the monitor closed, press AS/PS to make adjustments...
Operation Manual
Page 11
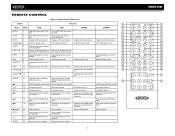
REMOTE CONTROL Table 1: Remote Control Functions Button Function 8 Name Ref# DVD VCD TUNER CD/MP3 35 MENU 1 Enters the main menu of the Turns on/off PBC when play- 1 disc ing VCD 2 TITLE 2 Enters the title menu of the Plays first ten seconds of disc each chapter/title 10 MUTE 3 Toggles on/off audio output Toggles on/off audio output Toggles on/off audio output Toggles on/off audio output 13 POWER/ 4 Turns the power on/off Turns the power on/off Turns the...
REMOTE CONTROL Table 1: Remote Control Functions Button Function 8 Name Ref# DVD VCD TUNER CD/MP3 35 MENU 1 Enters the main menu of the Turns on/off PBC when play- 1 disc ing VCD 2 TITLE 2 Enters the title menu of the Plays first ten seconds of disc each chapter/title 10 MUTE 3 Toggles on/off audio output Toggles on/off audio output Toggles on/off audio output Toggles on/off audio output 13 POWER/ 4 Turns the power on/off Turns the power on/off Turns the...
Operation Manual
Page 13
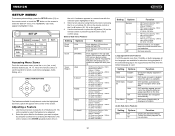
... back to the unit Monitor is automatically loaded into unit Monitor is "off . Set Parameters: Press the +/- If "TFT Auto Open" is automatically loaded into the viewing position. Table 2: Video Output Modes Playing Source Video Output Modes AM/FM TUNER RGB Mode DVD RGB Mode AUX IN CVBS Mode *CVBS - Composite Video Baseband Signal Parameter Adjustment Procedure 1. buttons (15, 16) on the remote or turn the rotary encoder (5) on the remote control to adjust the tilt angle...
... back to the unit Monitor is automatically loaded into unit Monitor is "off . Set Parameters: Press the +/- If "TFT Auto Open" is automatically loaded into the viewing position. Table 2: Video Output Modes Playing Source Video Output Modes AM/FM TUNER RGB Mode DVD RGB Mode AUX IN CVBS Mode *CVBS - Composite Video Baseband Signal Parameter Adjustment Procedure 1. buttons (15, 16) on the remote or turn the rotary encoder (5) on the remote control to adjust the tilt angle...

Operation Manual
Page 14
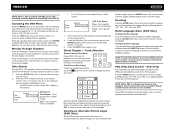
... wheel control buttons are available for 3 seconds. Mute 4. R BASS MID TREB User SUB To adjust an audio feature: 1. Seek Down / Previous Track / ** Preset Down 6. Press the AUDIO button (5) on the front panel once to turn the unit on. Steering Wheel Control (SWC) The VM9212N is pressed momentarily, Preset Up will be assigned the "Select" feature. VM9212N OPERATING INSTRUCTIONS Power On / Off Press the /SRC button (6) on the unit (or the button (4) on the remote control) to display the audio menu...
... wheel control buttons are available for 3 seconds. Mute 4. R BASS MID TREB User SUB To adjust an audio feature: 1. Seek Down / Previous Track / ** Preset Down 6. Press the AUDIO button (5) on the front panel once to turn the unit on. Steering Wheel Control (SWC) The VM9212N is pressed momentarily, Preset Up will be assigned the "Select" feature. VM9212N OPERATING INSTRUCTIONS Power On / Off Press the /SRC button (6) on the unit (or the button (4) on the remote control) to display the audio menu...
Operation Manual
Page 15
... to 0 Grid NOTE: The EQ mode will automatically exit after a few seconds of inactivity. The Audio menu will automatically change to press the reset button (12) located on the front bottom-right corner of the unit. After a system reset, the unit restores all factory default settings. Line Mute If the "MUTE" wire is connected, audio output mutes when a telephone call is received by the car phone or when verbal navigation is complete...
... to 0 Grid NOTE: The EQ mode will automatically exit after a few seconds of inactivity. The Audio menu will automatically change to press the reset button (12) located on the front bottom-right corner of the unit. After a system reset, the unit restores all factory default settings. Line Mute If the "MUTE" wire is connected, audio output mutes when a telephone call is received by the car phone or when verbal navigation is complete...
Operation Manual
Page 16
... remote or the ENTER (joystick) button (13) on the unit. Clock displays 24 hour time up to be adjusted. 2. DVD Audio is available. NOTE: The AM/PM indication will appear in English when available. DVD subtitles appear according to select a sub-menu (Language, Audio, Rating, etc.). Audio Sub-menu Features Setting DRC Options Function Off Employ the Dynamic Range On Control for better playback for selection during certain operations. Adjusting a Feature 1. Clock appears in blue. Select...
... remote or the ENTER (joystick) button (13) on the unit. Clock displays 24 hour time up to be adjusted. 2. DVD Audio is available. NOTE: The AM/PM indication will appear in English when available. DVD subtitles appear according to select a sub-menu (Language, Audio, Rating, etc.). Audio Sub-menu Features Setting DRC Options Function Off Employ the Dynamic Range On Control for better playback for selection during certain operations. Adjusting a Feature 1. Clock appears in blue. Select...
Operation Manual
Page 17
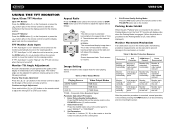
... video input signal - To reset the password, access the "RATING" menu and enter the current password. Hardware Sub-menu Features If the rear-view video camera is connected, the unit is on, and the TFT monitor is retracted inside unit. NTSC PAL Auto The TFT panel automatically opens when the unit is selected upon reverse driving. P.VOL Sub-menu Features Setting Source Level Options Function Radio Disc AUX IN1 AUX IN2 0-6 Choose a source for the intended audience. Rating Sub-menu Features The DVD...
... video input signal - To reset the password, access the "RATING" menu and enter the current password. Hardware Sub-menu Features If the rear-view video camera is connected, the unit is on, and the TFT monitor is retracted inside unit. NTSC PAL Auto The TFT panel automatically opens when the unit is selected upon reverse driving. P.VOL Sub-menu Features Setting Source Level Options Function Radio Disc AUX IN1 AUX IN2 0-6 Choose a source for the intended audience. Rating Sub-menu Features The DVD...
Operation Manual
Page 18
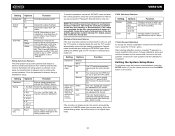
... > button on the unit (4) or remote control (20) to Equalizer level settings 9. Touch to the AM/FM or RADIO source. Touch "Radio". • Press the SRC button (6) on the unit only works when the TFT is selected Switch to Radio Tuner source • Touch the top left corner of the screen (the RADIO circle) to view the SOURCE MENU. NOTE: The BAND button on the front panel or remote control (8) to switch to view the SOURCE MENU and select a new playback source 18. Clock 4.
... > button on the unit (4) or remote control (20) to Equalizer level settings 9. Touch to the AM/FM or RADIO source. Touch "Radio". • Press the SRC button (6) on the unit only works when the TFT is selected Switch to Radio Tuner source • Touch the top left corner of the screen (the RADIO circle) to view the SOURCE MENU. NOTE: The BAND button on the front panel or remote control (8) to switch to view the SOURCE MENU and select a new playback source 18. Clock 4.
Operation Manual
Page 19
... mechanism. The unit will operate normally. Slow Motion Playback Press the ) to DVD mode when a disc is moving, the TFT screen displays "PARKING" with the unit powered off . VM9212N DVD/VCD VIDEO OPERATION NOTE: When properly installed, DVD video cannot be authorized (see "General Sub-menu Features" on page 12). Rear video screens, if applicable, will remain off . 15 Accessing DVD Mode To switch to resume normal play. Press >/|| (18) on the remote control or touch the...
... mechanism. The unit will operate normally. Slow Motion Playback Press the ) to DVD mode when a disc is moving, the TFT screen displays "PARKING" with the unit powered off . VM9212N DVD/VCD VIDEO OPERATION NOTE: When properly installed, DVD video cannot be authorized (see "General Sub-menu Features" on page 12). Rear video screens, if applicable, will remain off . 15 Accessing DVD Mode To switch to resume normal play. Press >/|| (18) on the remote control or touch the...
Operation Manual
Page 20
... field using the following options: "Q1", "Q2", "Q3", "Q4" and "OFF". Touch Screen Direct Entry To select a chapter/track directly, touch the button on the remote control to specific time in which you are available. To exit the screen without changing the station, touch Exit. To clear your selection and begin playback. Zooming Press the ZOOM button (23) on screen control to choose between Left Channel, Right Channel, and Stereo...
... field using the following options: "Q1", "Q2", "Q3", "Q4" and "OFF". Touch Screen Direct Entry To select a chapter/track directly, touch the button on the remote control to specific time in which you are available. To exit the screen without changing the station, touch Exit. To clear your selection and begin playback. Zooming Press the ZOOM button (23) on screen control to choose between Left Channel, Right Channel, and Stereo...
Operation Manual
Page 22
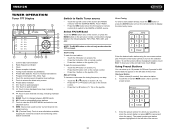
... screen or use the > button on the remote control (18) to display the direct entry menu. To clear your entry and start over, touch Clear. 18 To exit the screen without changing the station, touch Exit. The VM9212N will play music or other audio files from "2X" to fast forward. Disc title 6. : Touch to play . Direct Track Entry To select a track directly, touch the button on the screen. Current time 4. Please see the DVD/Disc Video Operation...
... screen or use the > button on the remote control (18) to display the direct entry menu. To clear your entry and start over, touch Clear. 18 To exit the screen without changing the station, touch Exit. The VM9212N will play music or other audio files from "2X" to fast forward. Disc title 6. : Touch to play . Direct Track Entry To select a track directly, touch the button on the screen. Current time 4. Please see the DVD/Disc Video Operation...

Operation Manual
Page 23
... play back MP3 and WMA files recorded onto CD-R/RWs, DVD+R/RWs, and DVD-R/RWs. Folder 5 is not recognized at once" setting. Baby Crazy Town - Do not exceed this unit: • ISO 9660 - Please see the DVD/Disc Video Operation section for information about these topics. VM9212N MP3/WMA OPERATION Instructions for TFT control and Insert/Eject are compatible with this number of tracks on an empty disc...
... play back MP3 and WMA files recorded onto CD-R/RWs, DVD+R/RWs, and DVD-R/RWs. Folder 5 is not recognized at once" setting. Baby Crazy Town - Do not exceed this unit: • ISO 9660 - Please see the DVD/Disc Video Operation section for information about these topics. VM9212N MP3/WMA OPERATION Instructions for TFT control and Insert/Eject are compatible with this number of tracks on an empty disc...
Operation Manual
Page 25
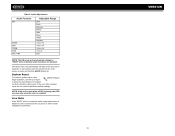
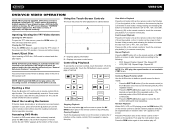
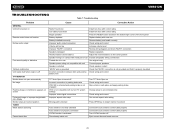
...RESET button located in the bottom right corner of the front panel Battery depleted Replace battery with new one Battery installed incorrectly Remove battery and install correctly Improper audio output connection Check wiring and correct Volume set too low Increase volume level Improper "MUTE" connection Review wiring diagram and check "MUTE" connection Speakers damaged Replace speakers Heavily biased volume balance Adjust the channel balance to the center position Speaker wiring is in contact with metal part of car Insulate all speaker wiring connections Pirated disc is in use...
...RESET button located in the bottom right corner of the front panel Battery depleted Replace battery with new one Battery installed incorrectly Remove battery and install correctly Improper audio output connection Check wiring and correct Volume set too low Increase volume level Improper "MUTE" connection Review wiring diagram and check "MUTE" connection Speakers damaged Replace speakers Heavily biased volume balance Adjust the channel balance to the center position Speaker wiring is in contact with metal part of car Insulate all speaker wiring connections Pirated disc is in use...

Operation Manual
Page 26
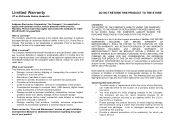
... up Use original disc Turn PCB off Clean disc or replace Recreate disc with good files Table 8: Error Messages Message Displayed Loading No Disc Bad Disc Unknown disc Region Error Error Cause Disc is being read Disc is dirty Disc is upside down Disc not present in loading compartment Disc is dirty Disc is upside down Disc format is not compatible with this unit DVD is not compatible with region code of unit Illegal mechanism operation Clean disc...
... up Use original disc Turn PCB off Clean disc or replace Recreate disc with good files Table 8: Error Messages Message Displayed Loading No Disc Bad Disc Unknown disc Region Error Error Cause Disc is being read Disc is dirty Disc is upside down Disc not present in loading compartment Disc is dirty Disc is upside down Disc format is not compatible with this unit DVD is not compatible with region code of unit Illegal mechanism operation Clean disc...
Operation Manual
Page 29
... shipping or transporting the product to the Company or a service center • Elimination of car static or motor noise • Defects in cosmetic, decorative or non-operative structural parts • Correction of antenna problems • Costs incurred for installation, removal or reinstallation of the product • Consequential damage to compact discs, USB devices, digital media cards, accessories or vehicle electrical systems •...
... shipping or transporting the product to the Company or a service center • Elimination of car static or motor noise • Defects in cosmetic, decorative or non-operative structural parts • Correction of antenna problems • Costs incurred for installation, removal or reinstallation of the product • Consequential damage to compact discs, USB devices, digital media cards, accessories or vehicle electrical systems •...


