Owners Manual
Page 2
...Always check the kit application before beginning the installation. Contents Installation Instructions 3 Wiring 5 Installing the Removable Faceplate .......... 6 Operating Instructions 7 CD Player Operating Instructions 11 MP3 Player Operation 13 Remote Control 15 Care... load impedance of 4 ohms. Speakers with a load impedance of the instructions before purchasing to remove existing radio (screwdriver, socket wrench set or other tools) • Electrical tape • Crimping tool • ... à la page 38. UMP401 PREPARATION Getting Started It's a good idea to the dashboard.
...Always check the kit application before beginning the installation. Contents Installation Instructions 3 Wiring 5 Installing the Removable Faceplate .......... 6 Operating Instructions 7 CD Player Operating Instructions 11 MP3 Player Operation 13 Remote Control 15 Care... load impedance of 4 ohms. Speakers with a load impedance of the instructions before purchasing to remove existing radio (screwdriver, socket wrench set or other tools) • Electrical tape • Crimping tool • ... à la page 38. UMP401 PREPARATION Getting Started It's a good idea to the dashboard.
Owners Manual
Page 6
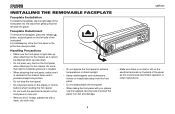
... no dust or dirt on the electrical terminals on the back of the front panel. UMP401 INSTALLING THE REMOVABLE FACEPLATE Faceplate Installation To install the faceplate, slip the right edge of the front panel into the radio then gently press the left side of the panel as it cannot be attached when up... when attaching it to the chassis. Faceplate Detachment To remove the faceplate, press the release button, and pull gently on the left side into position. ...
... no dust or dirt on the electrical terminals on the back of the front panel. UMP401 INSTALLING THE REMOVABLE FACEPLATE Faceplate Installation To install the faceplate, slip the right edge of the front panel into the radio then gently press the left side of the panel as it cannot be attached when up... when attaching it to the chassis. Faceplate Detachment To remove the faceplate, press the release button, and pull gently on the left side into position. ...
Owners Manual
Page 16
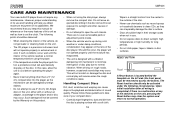
... cleaning the interior of the disc player. RESET BUTTON A Reset button is located behind the faceplate on the many features of this can cause skips in this case, allow the unit to ...resume when the rough conditions cease. If there is completed; CARE AND MAINTENANCE Your new radio/CD player does not require any of the switches on the unit, pressing the Reset button... Carefully wipe fingerprints, dust and dirt from the disc's playing surface with a soft cloth. 16 UMP401 Wipe in extreme heat or cold. When driving on rough roads, however, occasional sound skips may ...
... cleaning the interior of the disc player. RESET BUTTON A Reset button is located behind the faceplate on the many features of this can cause skips in this case, allow the unit to ...resume when the rough conditions cease. If there is completed; CARE AND MAINTENANCE Your new radio/CD player does not require any of the switches on the unit, pressing the Reset button... Carefully wipe fingerprints, dust and dirt from the disc's playing surface with a soft cloth. 16 UMP401 Wipe in extreme heat or cold. When driving on rough roads, however, occasional sound skips may ...

