Owners Manual
Page 2
...Para obtener instrucciones en Español, diríjase a la página 20. Contents Installation Instructions 3 Wiring 5 Installing the Removable Faceplate .......... 6 Operating Instructions 7 CD Player Operating Instructions 11 MP3 Player Operation 13 Remote Control 15 Care and Maintenance 16 Specifications 17 Installation Requirements This unit is designed for power connections • 16-18 gauge speaker wire Speaker Requirements Only connect speakers rated with a load impedance of the instructions before purchasing to remove existing radio (screwdriver, socket wrench set...
...Para obtener instrucciones en Español, diríjase a la página 20. Contents Installation Instructions 3 Wiring 5 Installing the Removable Faceplate .......... 6 Operating Instructions 7 CD Player Operating Instructions 11 MP3 Player Operation 13 Remote Control 15 Care and Maintenance 16 Specifications 17 Installation Requirements This unit is designed for power connections • 16-18 gauge speaker wire Speaker Requirements Only connect speakers rated with a load impedance of the instructions before purchasing to remove existing radio (screwdriver, socket wrench set...
Owners Manual
Page 3
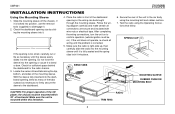
... corrected. 5. Follow the wiring diagram carefully and make certain all wiring until it . 2. BEND TABS 6. If it . RADIO TRIM RING 3 Locate the series of bend tabs along the top, bottom, and sides of the unit to bend or bow. SPRING CLIP MOUNTING SLEEVE RUBBER CUSHION MOUNTING BOLT CAUTION: For proper operation of horizontal. Secure the rear of the mounting sleeve. Do not...
... corrected. 5. Follow the wiring diagram carefully and make certain all wiring until it . 2. BEND TABS 6. If it . RADIO TRIM RING 3 Locate the series of bend tabs along the top, bottom, and sides of the unit to bend or bow. SPRING CLIP MOUNTING SLEEVE RUBBER CUSHION MOUNTING BOLT CAUTION: For proper operation of horizontal. Secure the rear of the mounting sleeve. Do not...
Owners Manual
Page 4
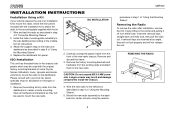
... this radio, follow the instructions included with the installation kit to attach the radio to the mounting plate supplied with the kit. 1. Remove the existing factory radio from either side. Longer screws may be used with your vehicle requires the use of "Using the Mounting Sleeve". 4. Insert the removal keys straight back until they will not release the unit. Replace the dashboard trim panel. Wire the new radio...
... this radio, follow the instructions included with the installation kit to attach the radio to the mounting plate supplied with the kit. 1. Remove the existing factory radio from either side. Longer screws may be used with your vehicle requires the use of "Using the Mounting Sleeve". 4. Insert the removal keys straight back until they will not release the unit. Replace the dashboard trim panel. Wire the new radio...

Owners Manual
Page 5
... amperage. Memory/Battery Connect to power antenna or amplifier. Using an incorrect fuse could damage the radio. UMP401 WIRING Auxiliary Input Antenna Connector 15A 15 Amp Fuse Amplifier Wiring Connect line out for use with 1 speaker. The red connector is for the right and the white connector is not connected. Never ground negative speaker leads to existing radio wire or radio fuse. If not used, tape bare end of wire. Accessory/Ignition Connect to chassis ground. WARNING! Fuses When replacing a fuse, make sure the new fuse is always...
... amperage. Memory/Battery Connect to power antenna or amplifier. Using an incorrect fuse could damage the radio. UMP401 WIRING Auxiliary Input Antenna Connector 15A 15 Amp Fuse Amplifier Wiring Connect line out for use with 1 speaker. The red connector is for the right and the white connector is not connected. Never ground negative speaker leads to existing radio wire or radio fuse. If not used, tape bare end of wire. Accessory/Ignition Connect to chassis ground. WARNING! Fuses When replacing a fuse, make sure the new fuse is always...
Owners Manual
Page 6
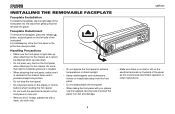
... more than light to the chassis. UMP401 INSTALLING THE REMOVABLE FACEPLATE Faceplate Installation To install the faceplate, slip the right edge of the front panel into the radio then gently press the left side of the panel as it cannot be attached when up when attaching it is centered in the protective case provided. BAND MUTE SRC SEL DISP UMP401 CD / MP3 / WMA / RECEIVER 1 AS/PS...
... more than light to the chassis. UMP401 INSTALLING THE REMOVABLE FACEPLATE Faceplate Installation To install the faceplate, slip the right edge of the front panel into the radio then gently press the left side of the panel as it cannot be attached when up when attaching it is centered in the protective case provided. BAND MUTE SRC SEL DISP UMP401 CD / MP3 / WMA / RECEIVER 1 AS/PS...
Owners Manual
Page 7
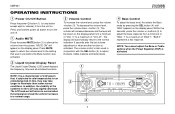
To decrease the volume level, press the volume down - The volume control is also used in use before the Mute function was in conjunction with the SEL button (4) to adjust the bass, treble, balance and fader levels. 2 Liquid Crystal Display Panel The Liquid Crystal Display (LCD) panel displays 1 the frequency, time and all activated functions. 4 Bass Control To adjust the bass level, first select the Bass mode by pressing the SEL button (4) until "BAS" appears on the display panel from a minimum of "VOL 0" to a maximum of...
To decrease the volume level, press the volume down - The volume control is also used in use before the Mute function was in conjunction with the SEL button (4) to adjust the bass, treble, balance and fader levels. 2 Liquid Crystal Display Panel The Liquid Crystal Display (LCD) panel displays 1 the frequency, time and all activated functions. 4 Bass Control To adjust the bass level, first select the Bass mode by pressing the SEL button (4) until "BAS" appears on the display panel from a minimum of "VOL 0" to a maximum of...

Owners Manual
Page 8
.../Right Balance Control To adjust the left/right speaker balance, press and release the SEL button (4) until the "BAL" indication appears on the display panel. buttons (3) to adjust the balance between the front and rear speakers from a minimum of "TRB -7" to a maximum of the following modes: "POP", "ROCK", "CLASSIC", "FLAT" or "DSP OFF". NOTE: When the DSP function is turned off, the unit returns to the user-set bass and treble levels...
.../Right Balance Control To adjust the left/right speaker balance, press and release the SEL button (4) until the "BAL" indication appears on the display panel. buttons (3) to adjust the balance between the front and rear speakers from a minimum of "TRB -7" to a maximum of the following modes: "POP", "ROCK", "CLASSIC", "FLAT" or "DSP OFF". NOTE: When the DSP function is turned off, the unit returns to the user-set bass and treble levels...
Owners Manual
Page 9
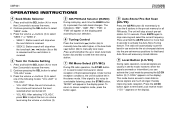
... unit will resume at each time the BAND button (5) is too noisy for more than 2 seconds to activate the Auto-Store Tuning feature. Auto-Store will appear in stereo mode; Press the volume +/- If the signal is pressed, the radio band changes. buttons (3). 5 AM/FM Band Selector (BAND) During radio play, each pre-set station for 10 seconds. "MONO" will erase any stored stations. 9 Local Button (LO/DX) During radio operation, received...
... unit will resume at each time the BAND button (5) is too noisy for more than 2 seconds to activate the Auto-Store Tuning feature. Auto-Store will appear in stereo mode; Press the volume +/- If the signal is pressed, the radio band changes. buttons (3). 5 AM/FM Band Selector (BAND) During radio play, each pre-set station for 10 seconds. "MONO" will erase any stored stations. 9 Local Button (LO/DX) During radio operation, received...
Owners Manual
Page 10
... a preset button until the time display flashes. 3. The preset number appears on and select the desired band. 2. The station is now stored and can be pre-set memory buttons , use the following steps: 1. Six stations can be recalled at low volume levels, this feature as indicated by a beep tone and "LOUD ON" appearing on the display panel. ("LOUD" remains on the display.) Press the button again to radio frequency. 14 - 19 Station Pre-Set Memory...
... a preset button until the time display flashes. 3. The preset number appears on and select the desired band. 2. The station is now stored and can be pre-set memory buttons , use the following steps: 1. Six stations can be recalled at low volume levels, this feature as indicated by a beep tone and "LOUD ON" appearing on the display panel. ("LOUD" remains on the display.) Press the button again to radio frequency. 14 - 19 Station Pre-Set Memory...
Owners Manual
Page 11
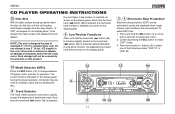
UMP401 CD PLAYER OPERATING INSTRUCTIONS 12 Disc Slot With the label surface facing up, gently insert the disc into the slot until the soft-loading mechanism engages and disc play of a particular track. Each time the tune/track ( ) button (6a) is selected, as shown on the display panel. 6 Cue/Review Functions Press and hold the SEL button (4) for play begins. Once loaded, the track number and elapsed time will appear on this...
UMP401 CD PLAYER OPERATING INSTRUCTIONS 12 Disc Slot With the label surface facing up, gently insert the disc into the slot until the soft-loading mechanism engages and disc play of a particular track. Each time the tune/track ( ) button (6a) is selected, as shown on the display panel. 6 Cue/Review Functions Press and hold the SEL button (4) for play begins. Once loaded, the track number and elapsed time will appear on this...

Owners Manual
Page 12
... cancel the function and play the tracks on the disc in a random order instead of the display). Random Play mode can also be canceled by activating the Repeat (16) or Random (17) functions. 16 Track REPEAT Play Select During disc play, press the 3/REPEAT button (16) to radio operation. UMP401 CD PLAYER OPERATING INSTRUCTIONS 14 Disc Play/Pause Select Press the 1/ button (14) to cancel Random Play mode. Track Scan mode can press the tune/track buttons (6a...
... cancel the function and play the tracks on the disc in a random order instead of the display). Random Play mode can also be canceled by activating the Repeat (16) or Random (17) functions. 16 Track REPEAT Play Select During disc play, press the 3/REPEAT button (16) to radio operation. UMP401 CD PLAYER OPERATING INSTRUCTIONS 14 Disc Play/Pause Select Press the 1/ button (14) to cancel Random Play mode. Track Scan mode can press the tune/track buttons (6a...

Owners Manual
Page 13
... about these topics. UMP401 MP3 PLAYER OPERATION Instructions for Insert/Eject, Play/Pause, Track Selection, Cue/Review, Scan, Repeat, and Random are the same for CD and MP3 operation. File Search 1. Press the SEL button (4) to enable direct track searching (TRK SCH). 2. buttons (3) to choose the folder, and then press the volume +/- Press the volume +/- Press the SEL button to confirm the selection and move to...
... about these topics. UMP401 MP3 PLAYER OPERATION Instructions for Insert/Eject, Play/Pause, Track Selection, Cue/Review, Scan, Repeat, and Random are the same for CD and MP3 operation. File Search 1. Press the SEL button (4) to enable direct track searching (TRK SCH). 2. buttons (3) to choose the folder, and then press the volume +/- Press the volume +/- Press the SEL button to confirm the selection and move to...

Owners Manual
Page 14
.../PS (8) button three times to select the first character position. 3. Press the SEL button (4) to enable character search mode (CHAR SCH). 2. Press the SEL button to confirm and move to select the first character of the desired song/ file. 6. Press the volume +/- MP3 PLAYER OPERATION Character Search 1. buttons (3) to the next character position. 5. UMP401 6a MUTE UMP401 CD / MP3 / WMA / RECEIVER 3 SRC ALBUM MUSIC ARTIST BAND...
.../PS (8) button three times to select the first character position. 3. Press the SEL button (4) to enable character search mode (CHAR SCH). 2. Press the SEL button to confirm and move to select the first character of the desired song/ file. 6. Press the volume +/- MP3 PLAYER OPERATION Character Search 1. buttons (3) to the next character position. 5. UMP401 6a MUTE UMP401 CD / MP3 / WMA / RECEIVER 3 SRC ALBUM MUSIC ARTIST BAND...
Owners Manual
Page 15
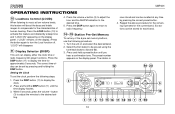
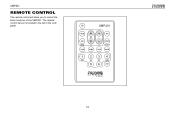
UMP401 REMOTE CONTROL The remote control will allow you to the left of the UMP401. The remote control sensor is located to control the basic functions of the LCD panel. UMP401 MUTE SEL MENU LOUD VOL ST/MO SRC AS/PS SEARCH LO/DX BAND 1 234 / INT RPT RDM 5 6 DISP BY JENSEN 15
UMP401 REMOTE CONTROL The remote control will allow you to the left of the UMP401. The remote control sensor is located to control the basic functions of the LCD panel. UMP401 MUTE SEL MENU LOUD VOL ST/MO SRC AS/PS SEARCH LO/DX BAND 1 234 / INT RPT RDM 5 6 DISP BY JENSEN 15
Owners Manual
Page 16
... are no user-serviceable parts or adjustment points inside the player gets too hot, a protective circuit will not scratch or damage the disc and normal play due to access the button). This will automatically stop play of the disc. However, proper understanding of its capabilities. If such conditions occur, wait until the moisture has evaporated. • The unit is located behind the faceplate on...
... are no user-serviceable parts or adjustment points inside the player gets too hot, a protective circuit will not scratch or damage the disc and normal play due to access the button). This will automatically stop play of the disc. However, proper understanding of its capabilities. If such conditions occur, wait until the moisture has evaporated. • The unit is located behind the faceplate on...
Owners Manual
Page 17
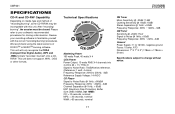
... only recognize the CDDA (Compact Disc Digital Audio), .MP3 and .WMA formats "recorded / burned" onto a CDR/RW. This unit does not support .WAV, .OGG or other formats. Technical Specifications Marketing Power 160 watts Peak, 40 watts X 4 CEA Power Power Output: 13 watts RMS X 4 channels into 4-ohms @ < 1% THD+N Signal to Noise Ratio: 70dBA below reference. (Reference: 1 watt, 4-ohms) Frequency Response: 20Hz to 20kHz...
... only recognize the CDDA (Compact Disc Digital Audio), .MP3 and .WMA formats "recorded / burned" onto a CDR/RW. This unit does not support .WAV, .OGG or other formats. Technical Specifications Marketing Power 160 watts Peak, 40 watts X 4 CEA Power Power Output: 13 watts RMS X 4 channels into 4-ohms @ < 1% THD+N Signal to Noise Ratio: 70dBA below reference. (Reference: 1 watt, 4-ohms) Frequency Response: 20Hz to 20kHz...
Owners Manual
Page 55
... adjusted altered or modified without charge for additional information regarding the proper use of the product • Consequential damage to compact discs, USB devices,...fuse, battery leakage, theft or improper storage. Exposure to removal or defacement of the factory serial number/bar code label(s) or markings • Service performed by an unauthorized person, company or association. • Any product which vary from the date of original purchase, such defect(s) will be proven defective in lieu of a warranty station serving your Installation and Operation Manual for parts...
... adjusted altered or modified without charge for additional information regarding the proper use of the product • Consequential damage to compact discs, USB devices,...fuse, battery leakage, theft or improper storage. Exposure to removal or defacement of the factory serial number/bar code label(s) or markings • Service performed by an unauthorized person, company or association. • Any product which vary from the date of original purchase, such defect(s) will be proven defective in lieu of a warranty station serving your Installation and Operation Manual for parts...


