Instruction Manual
Page 5
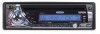
... station presets (18 FM/12AM) • JENSEN Plus Tuner II • Auto station store • Preset scan • One-touch memory • Auto stereo/mono • Manual local/distance • Manual tuning up/down • Auto seek tuning up to read all iPod's except "Shuffle" (audio only) • CD changer pass-thru input • Plug both the iPod and CD changer in at the same time (operates independently) • APPLE® approved iPod interface cable (Included with jPort Adapter...
... station presets (18 FM/12AM) • JENSEN Plus Tuner II • Auto station store • Preset scan • One-touch memory • Auto stereo/mono • Manual local/distance • Manual tuning up/down • Auto seek tuning up to read all iPod's except "Shuffle" (audio only) • CD changer pass-thru input • Plug both the iPod and CD changer in at the same time (operates independently) • APPLE® approved iPod interface cable (Included with jPort Adapter...

Instruction Manual
Page 6
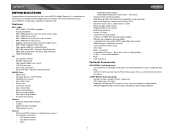
... remove existing radio (screwdriver, socket wrench set or other tools) • Electrical tape • Crimping tool • Volt meter/test light • Crimp connections • 18 gauge wire for power connections • 16-18 gauge speaker wire SPEAKER REQUIREMENTS: Only connect speakers rated in the load impedance of 4 ohms. Speakers with a load impedance less than 4 ohms could damage the unit. MP6211 Pre-installation 1. TRANSPORT SCREWS HALF SLEEVE 2 Remove Radio...
... remove existing radio (screwdriver, socket wrench set or other tools) • Electrical tape • Crimping tool • Volt meter/test light • Crimp connections • 18 gauge wire for power connections • 16-18 gauge speaker wire SPEAKER REQUIREMENTS: Only connect speakers rated in the load impedance of 4 ohms. Speakers with a load impedance less than 4 ohms could damage the unit. MP6211 Pre-installation 1. TRANSPORT SCREWS HALF SLEEVE 2 Remove Radio...
Instruction Manual
Page 7
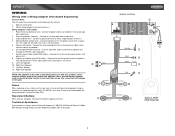
... damage to existing radio wire or radio fuse. 3. The MP6211 uses one 15 amp fuse located below the wiring connector (15 amp fast blow ATO). Connect to the radio. Antenna Connector - Connect line out for the left. 9. Wiring Diagram / Color Codes 1. Right Rear Speaker NOTE: The amplifier in the vehicle. 1. Ground (black wire) - Connect the antenna plug from 9:00am to ground terminal or clean, unpainted part of wire. 2. Attach wiring adapter to connect an optional CD Changer or JPORT (sold separately). 7. Fuses When replacing a fuse, make these connections without being...
... damage to existing radio wire or radio fuse. 3. The MP6211 uses one 15 amp fuse located below the wiring connector (15 amp fast blow ATO). Connect to the radio. Antenna Connector - Connect line out for the left. 9. Wiring Diagram / Color Codes 1. Right Rear Speaker NOTE: The amplifier in the vehicle. 1. Ground (black wire) - Connect the antenna plug from 9:00am to ground terminal or clean, unpainted part of wire. 2. Attach wiring adapter to connect an optional CD Changer or JPORT (sold separately). 7. Fuses When replacing a fuse, make these connections without being...
Instruction Manual
Page 8
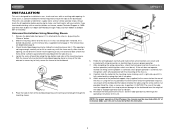
... with crimp connectors or electrical tape to make certain all wiring until the sleeve easily slides into place. 9. INSTALLATION This unit is designed for installation in front of the mounting sleeve. NOTE: For proper operation of the CD player, the chassis must be on page 5. 3. If you have trouble locating a kit or need installation assistance, contact Technical Support at electronics supply stores and car stereo specialty shops...
... with crimp connectors or electrical tape to make certain all wiring until the sleeve easily slides into place. 9. INSTALLATION This unit is designed for installation in front of the mounting sleeve. NOTE: For proper operation of the CD player, the chassis must be on page 5. 3. If you have trouble locating a kit or need installation assistance, contact Technical Support at electronics supply stores and car stereo specialty shops...

Instruction Manual
Page 9
... radio. 2. ISO Installation This unit has threaded holes in the chassis side panels which may damage components inside the chassis. 4. Remove the factory mounting brackets and hardware from the front of some vehicles to mount the radio to the new radio. Do not exceed M5 x 9 MM maximum screw size. MP6211 Kit Installation If your local car stereo shop for assistance on this radio, follow the instructions...
... radio. 2. ISO Installation This unit has threaded holes in the chassis side panels which may damage components inside the chassis. 4. Remove the factory mounting brackets and hardware from the front of some vehicles to mount the radio to the new radio. Do not exceed M5 x 9 MM maximum screw size. MP6211 Kit Installation If your local car stereo shop for assistance on this radio, follow the instructions...
Instruction Manual
Page 10
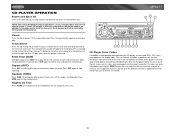
... in the display. The LCD display will boost the bass and treble ranges to volume. Available modes include tuner (F1, F2, F3, AM), CD, CD changer (if connected) and auxiliary (AUX). The unit automatically exits audio control mode after five seconds of the incoming broadcast frequency. MP6211 Balance To adjust the balance from "-6" to the most recently selected bass/treble levels cannot be shown on the display panel as a number ranging from "-6" to "R12" (full right), press the volume control until...
... in the display. The LCD display will boost the bass and treble ranges to volume. Available modes include tuner (F1, F2, F3, AM), CD, CD changer (if connected) and auxiliary (AUX). The unit automatically exits audio control mode after five seconds of the incoming broadcast frequency. MP6211 Balance To adjust the balance from "-6" to the most recently selected bass/treble levels cannot be shown on the display panel as a number ranging from "-6" to "R12" (full right), press the volume control until...

Instruction Manual
Page 11
... volume control to select "COLOR 2", which the radio will stop at "CONTRAST 05" by default. Key Light On/Off When the key light feature is activated (ON) the preset buttons and the rest of the front panel function buttons remain lit when the unit is off , but still connected to select "Local". Turn the volume control to adjust the hours. Once you have selected your area. Navigate the menu by rotating the volume control...
... volume control to select "COLOR 2", which the radio will stop at "CONTRAST 05" by default. Key Light On/Off When the key light feature is activated (ON) the preset buttons and the rest of the front panel function buttons remain lit when the unit is off , but still connected to select "Local". Turn the volume control to adjust the hours. Once you have selected your area. Navigate the menu by rotating the volume control...

Instruction Manual
Page 12
... time and preset memories, it is activated): "Radio Off", "Visit us at Jensen.com", "Enjoy Driving and Have a Safe Trip". Position the right side of the switches on 8 After removing the front panel, store it into place. When the unit is powered off the chassis. Reset Button The RESET button (24) is displayed based on the time of the chassis and can only be activated upon initial installation after all wiring...
... time and preset memories, it is activated): "Radio Off", "Visit us at Jensen.com", "Enjoy Driving and Have a Safe Trip". Position the right side of the switches on 8 After removing the front panel, store it into place. When the unit is powered off the chassis. Reset Button The RESET button (24) is displayed based on the time of the chassis and can only be activated upon initial installation after all wiring...

Instruction Manual
Page 13
..., EUROPE, LATIN, & OIRT (Russia). MP6211 TUNER OPERATION The MP6211 comes equipped with a World Tuner, allowing you to receive channels in the display. Press SCAN again to listen to change the World Tuner options. PRESS AND HOLD PRESET NUMBER APPEARS Stereo The unit will appear in use and enter strong stations into memory, the unit will be instantly recalled by pressing the corresponding preset button. The radio will flash on page 7 to learn...
..., EUROPE, LATIN, & OIRT (Russia). MP6211 TUNER OPERATION The MP6211 comes equipped with a World Tuner, allowing you to receive channels in the display. Press SCAN again to listen to change the World Tuner options. PRESS AND HOLD PRESET NUMBER APPEARS Stereo The unit will appear in use and enter strong stations into memory, the unit will be instantly recalled by pressing the corresponding preset button. The radio will flash on page 7 to learn...
Instruction Manual
Page 14
... on the display panel. This can indicate a number of each track on this does not solve the problem, pressing the RESET button (24) may occur. Such damage will erase the time and preset memory. MP6211 CD Player Error Codes If a problem should appear, try ejecting and reloading the disc into the player. If this product. Intro Scan (SCN) During disc play, press SCN (13) to play starts when the button is designed...
... on the display panel. This can indicate a number of each track on this does not solve the problem, pressing the RESET button (24) may occur. Such damage will erase the time and preset memory. MP6211 CD Player Error Codes If a problem should appear, try ejecting and reloading the disc into the player. If this product. Intro Scan (SCN) During disc play, press SCN (13) to play starts when the button is designed...

Instruction Manual
Page 15
... the receiver (or optional remote) as described below . Loading such a medium may not play sequence numbers such as a CD-R with their file names or folder names will be delayed, it may take time for file name including the delimiter (".") and three-character extension are indicated in the long file name format. When using the buttons on the code list...
... the receiver (or optional remote) as described below . Loading such a medium may not play sequence numbers such as a CD-R with their file names or folder names will be delayed, it may take time for file name including the delimiter (".") and three-character extension are indicated in the long file name format. When using the buttons on the code list...

Instruction Manual
Page 16
... begin file play the selected file. Rotate the select knob to navigate, then press the select knob to select the desired track number, then press in the current folder. Languages The unit supports playback of searching for more than three seconds to the last upper level of each track in the current folder. The display will be displayed on the disc, or...
... begin file play the selected file. Rotate the select knob to navigate, then press the select knob to select the desired track number, then press in the current folder. Languages The unit supports playback of searching for more than three seconds to the last upper level of each track in the current folder. The display will be displayed on the disc, or...
Instruction Manual
Page 17
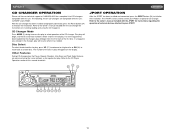
... JPORT for instructions on the display. Disc Select To select the desired disc for regular disc play , press UP (17) to advance to a higher disc or DN (16) to move back to the CD Player Operation section of this manual for a complete list of the CD changer. JPORT OPERATION After the JPORT has been installed and connected, press the RESET button (24) to select operation of CD changers compatible with this unit. CD Changer Mode Press MODE (2) during tuner or disc play , the...
... JPORT for instructions on the display. Disc Select To select the desired disc for regular disc play , press UP (17) to advance to a higher disc or DN (16) to move back to the CD Player Operation section of this manual for a complete list of the CD changer. JPORT OPERATION After the JPORT has been installed and connected, press the RESET button (24) to select operation of CD changers compatible with this unit. CD Changer Mode Press MODE (2) during tuner or disc play , the...
Instruction Manual
Page 18
... the disc, and normal play due to take care of your software's recommended procedures for long periods. 5. Attempting to minimize interruption of sound quality. The unit is use . 4. This will help you to control the basic functions of "recording/burning", some CD-R/RWs may occur when driving on the disc player lens has evaporated before using the latest versions of the IX-BASS (5) button. Review your CD player: 1. CD...
... the disc, and normal play due to take care of your software's recommended procedures for long periods. 5. Attempting to minimize interruption of sound quality. The unit is use . 4. This will help you to control the basic functions of "recording/burning", some CD-R/RWs may occur when driving on the disc player lens has evaporated before using the latest versions of the IX-BASS (5) button. Review your CD player: 1. CD...

Instruction Manual
Page 19
... fuse with test light; MP6211 TROUBLESHOOTING Problem Cause Does not operate No power to ground Incorrect fuse/fuse too small Corrective Action Check connection with test light Replace fuse Check/replace fuse Connect speaker harness; check speaker wires Check all splices and connections Check splices, insulate all bare wires Make sure wire is not pinched Make sure wire is not pinched Install fuse of correct rating SPECIFICATIONS CEA Power Ratings Power Output 13 watts RMS X 4 channels into 4-ohms Frequency response 20Hz to 20kHz, -3dB Input...
... fuse with test light; MP6211 TROUBLESHOOTING Problem Cause Does not operate No power to ground Incorrect fuse/fuse too small Corrective Action Check connection with test light Replace fuse Check/replace fuse Connect speaker harness; check speaker wires Check all splices and connections Check splices, insulate all bare wires Make sure wire is not pinched Make sure wire is not pinched Install fuse of correct rating SPECIFICATIONS CEA Power Ratings Power Output 13 watts RMS X 4 channels into 4-ohms Frequency response 20Hz to 20kHz, -3dB Input...
Instruction Manual
Page 20
... should this product or any part thereof, under normal use and conditions, be repaired or replaced with the sale of this product. This Warranty does not extend to the elimination of car static or motor noise, to correction of antenna problems, to costs incurred for location of the product, or damage to tapes, compact discs, accessories or vehicle electrical systems...
... should this product or any part thereof, under normal use and conditions, be repaired or replaced with the sale of this product. This Warranty does not extend to the elimination of car static or motor noise, to correction of antenna problems, to costs incurred for location of the product, or damage to tapes, compact discs, accessories or vehicle electrical systems...
Quick Start Guide
Page 1
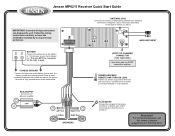
... Rear SPEAKERS jPORT/ CD CHANGER CONNECTOR (sold separately) See other side for the radio to the factory or aftermarket antenna lead. (Optional extensions or adapters may be connected for jPORT connection options. Follow the wiring instructions carefully, or have .) AUXILIARY INPUT - 15 () (+) BATTERY Connect the yellow wire to an optional amplifier. If a factory ground wire is not provided, locate a clean, unpainted metal part of vehicle you have the installation handled by an experienced technician. Jensen MP6211 Receiver...
... Rear SPEAKERS jPORT/ CD CHANGER CONNECTOR (sold separately) See other side for the radio to the factory or aftermarket antenna lead. (Optional extensions or adapters may be connected for jPORT connection options. Follow the wiring instructions carefully, or have .) AUXILIARY INPUT - 15 () (+) BATTERY Connect the yellow wire to an optional amplifier. If a factory ground wire is not provided, locate a clean, unpainted metal part of vehicle you have the installation handled by an experienced technician. Jensen MP6211 Receiver...
Quick Start Guide
Page 2
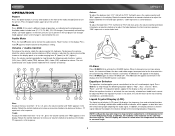
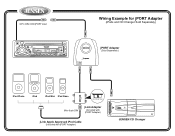
8-Pin DIN CDC/jPORT input MP6211 160 WATTS AUDIO INPUT READY TUNE / Wiring Example for jPORT Adapter (iPods and CD Changer Sold Separately) jPORT Adapter (Sold Separately) iPod Photo iPod iPod Mini iPod Nano LINK jLink Side View Mini 8-pin DIN jLink Adapter (Included with jPORT Adapter) jLink Apple Approved iPod Cable (Included with jPORT Adapter) DIGITAL AUDIO COMPACT DISC CHANGER / JENSEN CD Changer
8-Pin DIN CDC/jPORT input MP6211 160 WATTS AUDIO INPUT READY TUNE / Wiring Example for jPORT Adapter (iPods and CD Changer Sold Separately) jPORT Adapter (Sold Separately) iPod Photo iPod iPod Mini iPod Nano LINK jLink Side View Mini 8-pin DIN jLink Adapter (Included with jPORT Adapter) jLink Apple Approved iPod Cable (Included with jPORT Adapter) DIGITAL AUDIO COMPACT DISC CHANGER / JENSEN CD Changer


