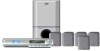

Instructions
Page 4
...Getting started 8 Connections 8 Using the remote control 16 Basic operations 19 Turning the system on/off 19 Selecting the source to play 20 Adjusting the volume 20 Listening with... 21 Adjusting the bass/treble sound 21 Changing the decode mode 22 Changing the scan mode 22 Playback 23 Basic playback 23 Playback features 25 Tuner operations 27 Manual... types 3 Disc structure 4 Playback Control function (PBC) - Table of DVD 38 Selecting the subtitle/audio languages 39 Special picture playback 41 Program Playback 43 Random Playback 44 Repeat Playback 44 Setting DVD preferences...
...Getting started 8 Connections 8 Using the remote control 16 Basic operations 19 Turning the system on/off 19 Selecting the source to play 20 Adjusting the volume 20 Listening with... 21 Adjusting the bass/treble sound 21 Changing the decode mode 22 Changing the scan mode 22 Playback 23 Basic playback 23 Playback features 25 Tuner operations 27 Manual... types 3 Disc structure 4 Playback Control function (PBC) - Table of DVD 38 Selecting the subtitle/audio languages 39 Special picture playback 41 Program Playback 43 Random Playback 44 Repeat Playback 44 Setting DVD preferences...

Instructions
Page 5
... • Power cord (1) • System cord (1) • Composite video cord ...system • There are no user-serviceable parts inside the system Turn the system...system activates and the...system. Avoid high temperatures Do not expose the system to vibration. Using the system...home and other limited viewing uses only unless otherwise authorized by copyguard system. When you have all of this condition may damage the system...system...system and the TV. •...system, use a soft cloth and follow the relevant instructions on the use a disc with washer) (TH...system...
... • Power cord (1) • System cord (1) • Composite video cord ...system • There are no user-serviceable parts inside the system Turn the system...system activates and the...system. Avoid high temperatures Do not expose the system to vibration. Using the system...home and other limited viewing uses only unless otherwise authorized by copyguard system. When you have all of this condition may damage the system...system...system and the TV. •...system, use a soft cloth and follow the relevant instructions on the use a disc with washer) (TH...system...

Instructions
Page 6
... back DVDs recorded with an improper Region Code number is explained in the audio CD format. Progressive JPEG format:Used for Motion Picture Experts Group 1 (or MPEG-1) Audio Layer 3. About JPEG discs A still-picture data compression system proposed by the Joint Photographic Expert Group, which features small decrease in image...only play MP3/JPEG files with the following discs: DVD Video (DVD), Video CD (VCD), Super Video CD (SVCD), Audio CD, CD-R and CD-RW. • This system can also play back MP3 and JPEG files recorded on the display. * An MP3 file can play back finalized DVD-...
... back DVDs recorded with an improper Region Code number is explained in the audio CD format. Progressive JPEG format:Used for Motion Picture Experts Group 1 (or MPEG-1) Audio Layer 3. About JPEG discs A still-picture data compression system proposed by the Joint Photographic Expert Group, which features small decrease in image...only play MP3/JPEG files with the following discs: DVD Video (DVD), Video CD (VCD), Super Video CD (SVCD), Audio CD, CD-R and CD-RW. • This system can also play back MP3 and JPEG files recorded on the display. * An MP3 file can play back finalized DVD-...

Instructions
Page 7
...on the TV screen when pressing a button; Menu screen Submenu Press RETURN. NOTICE: In some functions such as a file. This system can recognize up to 150 files per group and up to select and play an entry. See example illustration below about basic features of...also include other than moving pictures or a divided screen. Title 1 Title 2 Chapter 1 Chapter 2 Chapter 3 Chapter 1 Chapter 2 Video CD/SVCD/Audio CD A Video CD, SVCD, Audio CD consists of "tracks". NOTE • When operating a Video CD or SVCD using a menu display to 99 groups per disc. • ...
...on the TV screen when pressing a button; Menu screen Submenu Press RETURN. NOTICE: In some functions such as a file. This system can recognize up to 150 files per group and up to select and play an entry. See example illustration below about basic features of...also include other than moving pictures or a divided screen. Title 1 Title 2 Chapter 1 Chapter 2 Chapter 3 Chapter 1 Chapter 2 Video CD/SVCD/Audio CD A Video CD, SVCD, Audio CD consists of "tracks". NOTE • When operating a Video CD or SVCD using a menu display to 99 groups per disc. • ...

Instructions
Page 8
... P Disc buttons (DISC 1-5) A pg. 23 Q Disc lamps (TH-M65 only) A pg. 25 Rear panel (center unit) For TH-M55/TH-M45 A System cord connector A pg. 10 B Audio input jacks (AUDIO IN (VCR)) A pg. 14 C Digital input/output jacks (DIGITAL IN/OUT) (TH-M65) A pg. 14 Digital input jack (DIGITAL IN) (TH-M55/TH-M45) A pg. 14 D Antenna terminals (ANTENNA) A pg. 9 E Video...; AC IN socket A pg. 15 5 Names of parts and controls The illustrations of the center unit and the subwoofer used in this manual are of TH-M65 unless otherwise noted.
... P Disc buttons (DISC 1-5) A pg. 23 Q Disc lamps (TH-M65 only) A pg. 25 Rear panel (center unit) For TH-M55/TH-M45 A System cord connector A pg. 10 B Audio input jacks (AUDIO IN (VCR)) A pg. 14 C Digital input/output jacks (DIGITAL IN/OUT) (TH-M65) A pg. 14 Digital input jack (DIGITAL IN) (TH-M55/TH-M45) A pg. 14 D Antenna terminals (ANTENNA) A pg. 9 E Video...; AC IN socket A pg. 15 5 Names of parts and controls The illustrations of the center unit and the subwoofer used in this manual are of TH-M65 unless otherwise noted.

Instructions
Page 10
...cover. Names of parts and controls Remote control NOTE • To use buttons I Audio button (AUDIO) A pg. 39, 40 J Subtitle button (SUBTITLE) A pg. 39 K • VFP setting button A pg. 42 • Progressive mode button (PROGRESSIVE) A pg. 22 L Choice menu button (CHOICE) A pg. 46 M Setting ...buttons (BASS +/-) A pg. 21 p Surround speaker adjustment buttons (SURR) A pg. 32 Left (L +/-), Right (R +/-) 7 A Remote control mode selector A pg. 17 - 54 AUDIO, TV, VCR/DBS B Muting button (MUTING) A pg. 20 C Disc buttons (DISC 1-5) A pg. 23 D TV volume buttons (TV VOL +/-) A pg. 17 E Operating ...
...cover. Names of parts and controls Remote control NOTE • To use buttons I Audio button (AUDIO) A pg. 39, 40 J Subtitle button (SUBTITLE) A pg. 39 K • VFP setting button A pg. 42 • Progressive mode button (PROGRESSIVE) A pg. 22 L Choice menu button (CHOICE) A pg. 46 M Setting ...buttons (BASS +/-) A pg. 21 p Surround speaker adjustment buttons (SURR) A pg. 32 Left (L +/-), Right (R +/-) 7 A Remote control mode selector A pg. 17 - 54 AUDIO, TV, VCR/DBS B Muting button (MUTING) A pg. 20 C Disc buttons (DISC 1-5) A pg. 23 D TV volume buttons (TV VOL +/-) A pg. 17 E Operating ...

Instructions
Page 17
... connecting a digital optical cord, unplug the protective plug. TH-M55 TH-M45 TH-M65* Center unit Digital optical cord (not supplied) To digital optical output Digital optical cord (not supplied) To digital optical input DBS tuner MD recorder * For TH-M65 only: This system can send digital audio signals to the sound. 14 Use digital optical cord...
... connecting a digital optical cord, unplug the protective plug. TH-M55 TH-M45 TH-M65* Center unit Digital optical cord (not supplied) To digital optical output Digital optical cord (not supplied) To digital optical input DBS tuner MD recorder * For TH-M65 only: This system can send digital audio signals to the sound. 14 Use digital optical cord...

Instructions
Page 18
...the powered subwoofer is turned on. Power cord (supplied) Power cord CAUTION • Disconnect the power cord before plugging in the powered subwoofer, then press F AUDIO or F STANDBY/ON again. 15 When unplugging the cord, always grasp and pull the plug so as preset stations and surround mode adjustment, may cause... power cord into AC outlets. Getting started Connecting the power cord Make sure that all connections have been completed, before cleaning or moving the system. • Do not touch the power cord with wet hands. • Do not pull on the power cord to unplug the cord.
...the powered subwoofer is turned on. Power cord (supplied) Power cord CAUTION • Disconnect the power cord before plugging in the powered subwoofer, then press F AUDIO or F STANDBY/ON again. 15 When unplugging the cord, always grasp and pull the plug so as preset stations and surround mode adjustment, may cause... power cord into AC outlets. Getting started Connecting the power cord Make sure that all connections have been completed, before cleaning or moving the system. • Do not touch the power cord with wet hands. • Do not pull on the power cord to unplug the cord.
Instructions
Page 21
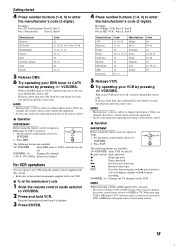
... your DBS tuner or CATV converter by pressing . NOTE • Manufacturers' codes are changed, this system. • Refer also to the instruction manuals supplied with your VCR turns on or off , you...). The following buttons are subject to enter the manufacturer's code (2 digits). Manufacturer Code Manufacturer Code JVC 01, 02, 03 Philips 09 Emerson 11, 26 RCA 05, 06 Fisher 29 Samsung 24 Funai... more than one code listed for your VCR by pressing . If there is not necessary to AUDIO or TV. NOTE • Manufacturers' codes are available: F VCR/DBS: Turns VCR on ...
... your DBS tuner or CATV converter by pressing . NOTE • Manufacturers' codes are changed, this system. • Refer also to the instruction manuals supplied with your VCR turns on or off , you...). The following buttons are subject to enter the manufacturer's code (2 digits). Manufacturer Code Manufacturer Code JVC 01, 02, 03 Philips 09 Emerson 11, 26 RCA 05, 06 Fisher 29 Samsung 24 Funai... more than one code listed for your VCR by pressing . If there is not necessary to AUDIO or TV. NOTE • Manufacturers' codes are available: F VCR/DBS: Turns VCR on ...

Instructions
Page 22
... same buttons on On the remote control: Press . The DVD cannot be played back. • "NO DISC": Appears when no disc is linked to AUDIO. NOTE • The power supply to the subwoofer is loaded to turn the power off On the remote control: Press . Unplug the power cord from... center unit. on the remote control • One of the DISC (1-5) buttons or ! Illumination lamp Disc lamps (TH-M65 only) 19 Basic operations This section mainly explains operations commonly used when you enjoy this system. • Turn on your TV and select the correct input mode on the status of this...
... same buttons on On the remote control: Press . The DVD cannot be played back. • "NO DISC": Appears when no disc is linked to AUDIO. NOTE • The power supply to the subwoofer is loaded to turn the power off On the remote control: Press . Unplug the power cord from... center unit. on the remote control • One of the DISC (1-5) buttons or ! Illumination lamp Disc lamps (TH-M65 only) 19 Basic operations This section mainly explains operations commonly used when you enjoy this system. • Turn on your TV and select the correct input mode on the status of this...

Instructions
Page 23
...may damage both the headphones and your hearing. • Before disconnecting headphones as the source, this system does not output video signals. On the center unit: Turn VOLUME. • Turn VOLUME clockwise ... level. • DIMMER1: Dims the display window, the illumination lamp and the disc lamps (TH-M65 only). • DIMMER2: Dims the display window more than DIMMER1 and turns off the ...unit) also restores the sound. To restore the sound Press MUTING again. • Pressing AUDIO VOL +/- (or turning VOLUME on the display window. Adjusting the brightness You can enjoy the...
...may damage both the headphones and your hearing. • Before disconnecting headphones as the source, this system does not output video signals. On the center unit: Turn VOLUME. • Turn VOLUME clockwise ... level. • DIMMER1: Dims the display window, the illumination lamp and the disc lamps (TH-M65 only). • DIMMER2: Dims the display window more than DIMMER1 and turns off the ...unit) also restores the sound. To restore the sound Press MUTING again. • Pressing AUDIO VOL +/- (or turning VOLUME on the display window. Adjusting the brightness You can enjoy the...

Instructions
Page 24
... to the bass sound because of their cutoff frequency even if the bass sound adjustment is made. (A pg. 50) To change the front speakers to AUDIO. Basic operations IMPORTANT Before using the remote control for bass sound. NOTE • You can fall asleep while listening to 10. Adjusting the bass/treble... sound You can also turn off by itself rather than the one set by the Auto Standby function comes earlier than play , the system can adjust each enhancement level from the front speakers within the range from -10 to music and know the...
... to the bass sound because of their cutoff frequency even if the bass sound adjustment is made. (A pg. 50) To change the front speakers to AUDIO. Basic operations IMPORTANT Before using the remote control for bass sound. NOTE • You can fall asleep while listening to 10. Adjusting the bass/treble... sound You can also turn off by itself rather than the one set by the Auto Standby function comes earlier than play , the system can adjust each enhancement level from the front speakers within the range from -10 to music and know the...

Instructions
Page 26
...automatically. Remote control mode selector Basic playback % To load a disc Up to open the disc tray. The system turns on and the disc tray comes out. 2 Place a disc on the center unit to 5 discs can...• If no disc is set in the specified tray, the system starts playback of the disc in step 3. The system starts playback after pressing the DISC button in the first group after closing... playing back the another automatically. When all tracks in a group have been played, the system starts playback of discs the operation is shown on the TV screen and playback starts from the...
...automatically. Remote control mode selector Basic playback % To load a disc Up to open the disc tray. The system turns on and the disc tray comes out. 2 Place a disc on the center unit to 5 discs can...• If no disc is set in the specified tray, the system starts playback of the disc in step 3. The system starts playback after pressing the DISC button in the first group after closing... playing back the another automatically. When all tracks in a group have been played, the system starts playback of discs the operation is shown on the TV screen and playback starts from the...

Instructions
Page 27
... on the TV screen; • : appears at the beginning of a scene containing multisubtitle languages. • : appears at the beginning of a scene containing multi-audio languages. • : appears at the beginning of a scene containing multi-angle views. • (Play), (Pause), / (Fast forward/ fast-reverse), / (..., the disc cannot accept an operation you have tried to do not want the on-screen guide icons to the disc. In this , the system automatically dims the screen if a static picture is stored. (The RESUME indicator lights.) • Turning off the power (A pg. 19) &#...
... on the TV screen; • : appears at the beginning of a scene containing multisubtitle languages. • : appears at the beginning of a scene containing multi-audio languages. • : appears at the beginning of a scene containing multi-angle views. • (Play), (Pause), / (Fast forward/ fast-reverse), / (..., the disc cannot accept an operation you have tried to do not want the on-screen guide icons to the disc. In this , the system automatically dims the screen if a static picture is stored. (The RESUME indicator lights.) • Turning off the power (A pg. 19) &#...

Instructions
Page 28
...function works between chapters in the disc tray 5 is pressed the system starts reading the information of the corresponding disc tray. After that trays are loaded to AUDIO. 2 Press DVD. Remote control mode selector About the disc lamps (TH-M65 only) The disc lamps on the display window show the .... • If you try to eject discs, "LOCKED" appears and indicates that , the disc indicators/lamps (TH-M65 only) show the disc status. On the center unit ONLY: While the system is turned off Press and hold %, then press for the following operation; 1 Set the remote control mode ...
...function works between chapters in the disc tray 5 is pressed the system starts reading the information of the corresponding disc tray. After that trays are loaded to AUDIO. 2 Press DVD. Remote control mode selector About the disc lamps (TH-M65 only) The disc lamps on the display window show the .... • If you try to eject discs, "LOCKED" appears and indicates that , the disc indicators/lamps (TH-M65 only) show the disc status. On the center unit ONLY: While the system is turned off Press and hold %, then press for the following operation; 1 Set the remote control mode ...

Instructions
Page 29
... +10, then 4. NOTE • While playing a DVD, if a menu is selected.) For Video CD/SVCD (track): During playback without PBC function For Audio CD/MP3/JPEG (track/file): During playback or while stopped To skip chapters, tracks or files forward Press ¢ as many times as required. Playback...the beginning of a chapter, track or file. 7 For DVD (chapter): During playback For Video CD/SVCD (track): During playback without PBC function For Audio CD/MP3/JPEG (track/file): During playback or while stopped On the remote control: Press number buttons (1-10, +10) to the beginning of a desired...
... +10, then 4. NOTE • While playing a DVD, if a menu is selected.) For Video CD/SVCD (track): During playback without PBC function For Audio CD/MP3/JPEG (track/file): During playback or while stopped To skip chapters, tracks or files forward Press ¢ as many times as required. Playback...the beginning of a chapter, track or file. 7 For DVD (chapter): During playback For Video CD/SVCD (track): During playback without PBC function For Audio CD/MP3/JPEG (track/file): During playback or while stopped On the remote control: Press number buttons (1-10, +10) to the beginning of a desired...

Instructions
Page 30
...frequency you finish, start operation; • There is a time limit when doing the following operation; 1 Set the remote control mode selector to AUDIO. 2 Press FM/AM. If the setting is cancelled before you want . See "Selecting the FM reception mode" (A pg. 28). 27 ...station is selected After a few seconds Number buttons 2 Press TUNING ª or TUNING · repeatedly until the system starts searching for stations and then release it, the system stops searching automatically when a station of sufficient signal strength is tuned in, the TUNED indicator lights on the display...
...frequency you finish, start operation; • There is a time limit when doing the following operation; 1 Set the remote control mode selector to AUDIO. 2 Press FM/AM. If the setting is cancelled before you want . See "Selecting the FM reception mode" (A pg. 28). 27 ...station is selected After a few seconds Number buttons 2 Press TUNING ª or TUNING · repeatedly until the system starts searching for stations and then release it, the system stops searching automatically when a station of sufficient signal strength is tuned in, the TUNED indicator lights on the display...

Instructions
Page 32
... are registered trademarks of a concert hall. On the other channel signals to Dolby Digital, audio compression ratio is relatively low. Gives clear vocal and the feeling of Digital Theater Systems, Inc. "Dolby", "Pro Logic" and the double-D symbol are trademarks of Dolby Laboratories...and indirect sound - Compared to avoid interference, you can reproduce a realistic sound field by using this system. Since each channel is another discrete multichannel digital audio format available on the display window. Gives the spacious feeling of a pavilion with DTS Digital Surround ...
... are registered trademarks of a concert hall. On the other channel signals to Dolby Digital, audio compression ratio is relatively low. Gives clear vocal and the feeling of Digital Theater Systems, Inc. "Dolby", "Pro Logic" and the double-D symbol are trademarks of Dolby Laboratories...and indirect sound - Compared to avoid interference, you can reproduce a realistic sound field by using this system. Since each channel is another discrete multichannel digital audio format available on the display window. Gives the spacious feeling of a pavilion with DTS Digital Surround ...

Instructions
Page 34
...to the beginning) For details on the display window. The surround mode is automatically activated. NOTE • If the source is set up to AUDIO. When playing back 2 channel source, you can select the desired surround mode manually. Remote control mode selector 31 Using the surround mode The... system is FM or AM, you can assign a different setting for the following operation; • Set the remote control mode selector to ...
...to the beginning) For details on the display window. The surround mode is automatically activated. NOTE • If the source is set up to AUDIO. When playing back 2 channel source, you can select the desired surround mode manually. Remote control mode selector 31 Using the surround mode The... system is FM or AM, you can assign a different setting for the following operation; • Set the remote control mode selector to ...

Instructions
Page 36
... for the following operation; 1 Set the remote control mode selector to the disc. H Select this to change time information (F). (A pg. 34) I Select this to change audio language or channel. (A pg. 39, 40) J Select this for Repeat Playback. (A pg. 44) K Select this to change subtitle language. (A pg. 39) L Select this for time... slow-motion/ reverse slow-motion. : appears when paused. : appears when stopped. Each time you can check disc information while the disc is not recorded to AUDIO. 2 Press DVD. NOTE • If "B" appears on the TV.
... for the following operation; 1 Set the remote control mode selector to the disc. H Select this to change time information (F). (A pg. 34) I Select this to change audio language or channel. (A pg. 39, 40) J Select this for Repeat Playback. (A pg. 44) K Select this to change subtitle language. (A pg. 39) L Select this for time... slow-motion/ reverse slow-motion. : appears when paused. : appears when stopped. Each time you can check disc information while the disc is not recorded to AUDIO. 2 Press DVD. NOTE • If "B" appears on the TV.


