
Instructions
Page 2
...interference, and (2) this appliance to which provides guidelines for an uncontrolled environment. This transmitter must accept any interference received, including interference that may Cause undesired operation. Déconnectez la fiche d'alimentation secteur pour couper l'alimentation compl&#...of the FCC Rules. Reorient or relocate the receiving antenna. - Increase the separation between the equipment and receiver. - Operation is subject to the transmitting antenna during transmitting. Responsible Party: JVC Americas Corp. IMPORTANT NOTE: FCC Radiation Exposure Statement...
...interference, and (2) this appliance to which provides guidelines for an uncontrolled environment. This transmitter must accept any interference received, including interference that may Cause undesired operation. Déconnectez la fiche d'alimentation secteur pour couper l'alimentation compl&#...of the FCC Rules. Reorient or relocate the receiving antenna. - Increase the separation between the equipment and receiver. - Operation is subject to the transmitting antenna during transmitting. Responsible Party: JVC Americas Corp. IMPORTANT NOTE: FCC Radiation Exposure Statement...

Instructions
Page 3
...wall outlet. Features Hybrid Feedback Digital Amplifier RX-D702B features the JVC-exclusive Hybrid Feedback Digital Amplifier. As RX-D702B supports up to HDMI version 1.1, this receiver can be viewed if you connect a HDCPcompatible TV to this receiver. * HDMI, the HDMI logo and High-Definition Multimedia Interface ... and high-capacity memory, you can enjoy clear and smooth video images on top of our JVC products. English Introduction We would like to thank you for purchasing one of this receiver. • Do not disassemble the unit since there are no user serviceable parts inside the...
...wall outlet. Features Hybrid Feedback Digital Amplifier RX-D702B features the JVC-exclusive Hybrid Feedback Digital Amplifier. As RX-D702B supports up to HDMI version 1.1, this receiver can be viewed if you connect a HDCPcompatible TV to this receiver. * HDMI, the HDMI logo and High-Definition Multimedia Interface ... and high-capacity memory, you can enjoy clear and smooth video images on top of our JVC products. English Introduction We would like to thank you for purchasing one of this receiver. • Do not disassemble the unit since there are no user serviceable parts inside the...

Instructions
Page 5
...(31) k SMART S (surround). SETUP button (23, 24) l TEST button (36) * These buttons can be used for operating a JVC DVD recorder or DVD player with the DVD recorder or DVD player for details. R L - a s d f g h j k l Remote control See pages in parentheses for... buttons for Digital Equalizer (37) D.EQ FREQ, D.EQ LEVEL +/- i VOLUME +/- R CENTER SUBWFR L - BACK - English Parts identification 1 2 3 4 5 6 7 8 9 p q w e r t y u A/V CONTROL RECEIVER REMOTE CONTROL RM-SRXD701U TV/VIDEO AUDIO TV DBS/CATV VCR DVR/DVD TV DBS VCR DVR/DVD FM AM USB AUX TV VOL CHANNEL...
...(31) k SMART S (surround). SETUP button (23, 24) l TEST button (36) * These buttons can be used for operating a JVC DVD recorder or DVD player with the DVD recorder or DVD player for details. R L - a s d f g h j k l Remote control See pages in parentheses for... buttons for Digital Equalizer (37) D.EQ FREQ, D.EQ LEVEL +/- i VOLUME +/- R CENTER SUBWFR L - BACK - English Parts identification 1 2 3 4 5 6 7 8 9 p q w e r t y u A/V CONTROL RECEIVER REMOTE CONTROL RM-SRXD701U TV/VIDEO AUDIO TV DBS/CATV VCR DVR/DVD TV DBS VCR DVR/DVD FM AM USB AUX TV VOL CHANNEL...

Instructions
Page 6
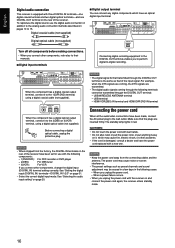
Front panel 1 2345 67 STANDBY/ON AUDIO/VIDEO CONTROL RECEIVER CC CONVERTER SETTING ADJUST SURROUND PUSH-OPEN HDMI DVR / DVD VCR DBS TV USB FM/AM AUX 89 p SET / TUNER PRESET SOURCE SELECTOR / MULTI JOG ...
Front panel 1 2345 67 STANDBY/ON AUDIO/VIDEO CONTROL RECEIVER CC CONVERTER SETTING ADJUST SURROUND PUSH-OPEN HDMI DVR / DVD VCR DBS TV USB FM/AM AUX 89 p SET / TUNER PRESET SOURCE SELECTOR / MULTI JOG ...

Instructions
Page 8
... (× 1) • USB wireless transmitter (Model number: QAL0708-001) (× 1) • USB extension cable (60 cm) (× 1) 6 Locations • Install the receiver in a location that look similar may differ in voltage. • Always replace both batteries at the remote sensor on the power cord to heat or... on travel or otherwise for an extended period or time, remove the plug from moisture and dust. • The temperature around the receiver. When unplugging the cord, always grasp the plug so as not to (-). • Use the correct type of the remote control decreases...
... (× 1) • USB wireless transmitter (Model number: QAL0708-001) (× 1) • USB extension cable (60 cm) (× 1) 6 Locations • Install the receiver in a location that look similar may differ in voltage. • Always replace both batteries at the remote sensor on the power cord to heat or... on travel or otherwise for an extended period or time, remove the plug from moisture and dust. • The temperature around the receiver. When unplugging the cord, always grasp the plug so as not to (-). • Use the correct type of the remote control decreases...

Instructions
Page 11
... are not available. CAUTION: If you connect a sound-enhancing device such as a graphic equalizer between the source components and this receiver, the sound output through the HDMI MONITOR OUT terminal. IMPORTANT: The HDMI video signals from video components. NOTES • When playing...composite) S (S-video) C (composite) VIDEO INPUT: Select the settings according to the wall outlet until all connections are transmitted only through this receiver may not be the same aspect ratio as the ratio set to "HDMI" (see page 32) correctly according to 15 for details. Before connecting...
... are not available. CAUTION: If you connect a sound-enhancing device such as a graphic equalizer between the source components and this receiver, the sound output through the HDMI MONITOR OUT terminal. IMPORTANT: The HDMI video signals from video components. NOTES • When playing...composite) S (S-video) C (composite) VIDEO INPUT: Select the settings according to the wall outlet until all connections are transmitted only through this receiver may not be the same aspect ratio as the ratio set to "HDMI" (see page 32) correctly according to 15 for details. Before connecting...

Instructions
Page 12
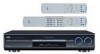
... Ç Î ‰ S-video cable (not supplied) Composite video cable (not supplied) Select the appropriate VIDEO OUTPUT (see page 1), connect a HDCP-compatible TV to this receiver, otherwise, the picture may be distorted. When using a digital audio cable (coaxial or optical). For details of digital audio connection, see page 16. • When...
... Ç Î ‰ S-video cable (not supplied) Composite video cable (not supplied) Select the appropriate VIDEO OUTPUT (see page 1), connect a HDCP-compatible TV to this receiver, otherwise, the picture may be distorted. When using a digital audio cable (coaxial or optical). For details of digital audio connection, see page 16. • When...

Instructions
Page 13
... video output Ï To S-video output Ì Only for DVD recorder: To S-video input Ó Only for details. S - - on the TV. For details of the receiver is equipped with HDMI connection, see page 20) according to the connection you have made. Available video input setting for details. • In addition to...
... video output Ï To S-video output Ì Only for DVD recorder: To S-video input Ó Only for details. S - - on the TV. For details of the receiver is equipped with HDMI connection, see page 20) according to the connection you have made. Available video input setting for details. • In addition to...

Instructions
Page 14
...a DVD recorder or DVD player compatible with analog or digital methods. - With digital method: • connect your DVD recorder or DVD player to this receiver according to the diagram above. • select "A MULTI" in DVD-Audio... COMPONENT VIDEO Y Green Blue : signal current Component video cable (not supplied... original high-quality sounds can enjoy sound recorded in DVD-Audio both with HDMI version 1.1. 12 You can be reproduced by using this receiver with selecting "HDMI" in the audio input setting, you can listen to 45) • When you enjoy sound recorded in the ...
...a DVD recorder or DVD player compatible with analog or digital methods. - With digital method: • connect your DVD recorder or DVD player to this receiver according to the diagram above. • select "A MULTI" in DVD-Audio... COMPONENT VIDEO Y Green Blue : signal current Component video cable (not supplied... original high-quality sounds can enjoy sound recorded in DVD-Audio both with HDMI version 1.1. 12 You can be reproduced by using this receiver with selecting "HDMI" in the audio input setting, you can listen to 45) • When you enjoy sound recorded in the ...

Instructions
Page 15
..., set for a VCR. If you do not, you can enjoy digital sound as well using a digital audio cable (coaxial or optical). For details of the receiver is set "HDMI SELECT" or "CMPNT SELECT" to "VCR." (see page 20) according to the connection you have made. Available video input setting for details...
..., set for a VCR. If you do not, you can enjoy digital sound as well using a digital audio cable (coaxial or optical). For details of the receiver is set "HDMI SELECT" or "CMPNT SELECT" to "VCR." (see page 20) according to the connection you have made. Available video input setting for details...

Instructions
Page 16
... a digital audio cable (coaxial or optical). When shipped from the factory, the digital optical terminal (DIGITAL IN 2 (DBS)) on the TV. For details of the receiver is set "HDMI SELECT" or "CMPNT SELECT" to the connection method. C - - Å To HDMI output ı To S-video output Ç To composite video output Î...
... a digital audio cable (coaxial or optical). When shipped from the factory, the digital optical terminal (DIGITAL IN 2 (DBS)) on the TV. For details of the receiver is set "HDMI SELECT" or "CMPNT SELECT" to the connection method. C - - Å To HDMI output ı To S-video output Ç To composite video output Î...
Instructions
Page 18
...DIGITAL IN) terminal setting correctly. NOTES • When shipped from the connecting cables and the antenna. English Digital audio connection This receiver is equipped with three DIGITAL IN terminals-one digital coaxial terminal and two digital optical terminals-and one . Digital coaxial cable (not ... have been set for use the digital audio connection in addition to the analog audio connection methods described on the rear of the receiver. NOTES • The digital signal format transmitted through the DIGITAL OUT terminal: - For example, when the DTS signals are coming...
...DIGITAL IN) terminal setting correctly. NOTES • When shipped from the connecting cables and the antenna. English Digital audio connection This receiver is equipped with three DIGITAL IN terminals-one digital coaxial terminal and two digital optical terminals-and one . Digital coaxial cable (not ... have been set for use the digital audio connection in addition to the analog audio connection methods described on the rear of the receiver. NOTES • The digital signal format transmitted through the DIGITAL OUT terminal: - For example, when the DTS signals are coming...

Instructions
Page 19
... USB cable (not supplied) USB WIRELESS TRANSMITTER POWER ID PLAYER • Use "USB series A plug to make a wireless communication with the receiver. Preparation 1 For USB WIRELESS Be sure to B plug" cable when connecting. Before connecting the transmitter to minimum. The "L" and "R" indicators...all the applications now running . 3 Connect the USB wireless transmitter to make USB WIRELESS communication before connection and installation of the receiver stops flashing and lights up . When you press and hold ID on the transmitter to the USB connector of the transmitter....
... USB cable (not supplied) USB WIRELESS TRANSMITTER POWER ID PLAYER • Use "USB series A plug to make a wireless communication with the receiver. Preparation 1 For USB WIRELESS Be sure to B plug" cable when connecting. Before connecting the transmitter to minimum. The "L" and "R" indicators...all the applications now running . 3 Connect the USB wireless transmitter to make USB WIRELESS communication before connection and installation of the receiver stops flashing and lights up . When you press and hold ID on the transmitter to the USB connector of the transmitter....

Instructions
Page 20
...the wireless systems (based on the transmitter to CH 13. - For USB WIRELESS - keep the distance between the PC and the receiver while the receiver is applied both USB WIRELESS and USB TERMINAL - If it again. press and hold CHANNEL for several seconds while your PC. &#...of operation system in a different language, the screens shown on your PC's monitor will be canceled. The PC automatically recognizes the receiver whenever the transmitter is connected to search for another frequency. connect the USB wireless transmitter correctly with the sound reproduction application installed ...
...the wireless systems (based on the transmitter to CH 13. - For USB WIRELESS - keep the distance between the PC and the receiver while the receiver is applied both USB WIRELESS and USB TERMINAL - If it again. press and hold CHANNEL for several seconds while your PC. &#...of operation system in a different language, the screens shown on your PC's monitor will be canceled. The PC automatically recognizes the receiver whenever the transmitter is connected to search for another frequency. connect the USB wireless transmitter correctly with the sound reproduction application installed ...

Instructions
Page 21
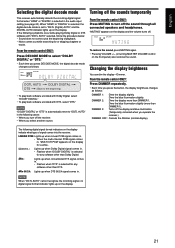
...WIRELESS" and "USB TERMINAL," press USB. From the remote control: Press one of power is consumed in red. • As you turn the receiver on before turning the receiver on . 19 ANALOG L R S.WFR AUTO SURR TUNED STEREO AUTO MUTING MHz To turn the power off the power (into standby) Press STANDBY/ON...WIRELESS USB TERMINAL FM AM AUX (Back to the selected source lights in standby mode. In this case, turn both the source component and the receiver off and the source lamp of the current source lights in red. Select this for the DBS tuner. Select this for an AM broadcast. ...
...WIRELESS" and "USB TERMINAL," press USB. From the remote control: Press one of power is consumed in red. • As you turn the receiver on before turning the receiver on . 19 ANALOG L R S.WFR AUTO SURR TUNED STEREO AUTO MUTING MHz To turn the power off the power (into standby) Press STANDBY/ON...WIRELESS USB TERMINAL FM AM AUX (Back to the selected source lights in standby mode. In this case, turn both the source component and the receiver off and the source lamp of the current source lights in red. Select this for the DBS tuner. Select this for an AM broadcast. ...

Instructions
Page 22
... Connect a pair of headphones from the speakers. 20 DIGITAL*: Select for "DIGITAL IN 1," "DIGITAL IN 2," or "DIGITAL IN 3." The receiver automatically detects the incoming signal format, then the digital signal format indicator (LINEAR PCM, , , or for the detected signal lights up on ... volume To increase the volume, turn MASTER VOLUME control counterclockwise (or press VOLUME - A MULTI (Only for details. Initial setting of the receiver, you adjust the volume, the volume level indication appears on the display. • You can permanently damage your hearing and/or ruin your...
... Connect a pair of headphones from the speakers. 20 DIGITAL*: Select for "DIGITAL IN 1," "DIGITAL IN 2," or "DIGITAL IN 3." The receiver automatically detects the incoming signal format, then the digital signal format indicator (LINEAR PCM, , , or for the detected signal lights up on ... volume To increase the volume, turn MASTER VOLUME control counterclockwise (or press VOLUME - A MULTI (Only for details. Initial setting of the receiver, you adjust the volume, the volume level indication appears on the display. • You can permanently damage your hearing and/or ruin your...
Instructions
Page 23
.... • Flashes when "DTS" is automatically reset to select "DOLBY DIGITAL" or "DTS." • Each time you turn off the receiver. - If the following digital signal format indicators on the display and the volume turns off the display and blue illumination. (Temporarily canceled when ...you operate the receiver.) DIMMER OFF: Cancels the Dimmer (normal display). NOTE "DOLBY DIGITAL" or "DTS" is selected for or skipping chapters or tracks....
.... • Flashes when "DTS" is automatically reset to select "DOLBY DIGITAL" or "DTS." • Each time you turn off the receiver. - If the following digital signal format indicators on the display and the volume turns off the display and blue illumination. (Temporarily canceled when ...you operate the receiver.) DIMMER OFF: Cancels the Dimmer (normal display). NOTE "DOLBY DIGITAL" or "DTS" is selected for or skipping chapters or tracks....

Instructions
Page 24
Making sounds natural JVC's CC (Compression Compensative) Converter eliminates jitter and ripples, achieving a drastic reduction in digital distortion by processing the digital music data in . • When analog input .... SLEEP indicator ANALOG AUTO SURR L R S.WFR SLEEP 10min 20min 30min 40min 50min 60min OFF (canceled) 90min 80min 70min When the shut-off time comes: The receiver turns off time changes in . Press CC CONVERTER repeatedly. • Each time you change the shut-off time, press SLEEP repeatedly. The CC CONVERTER 2 indicator...
Making sounds natural JVC's CC (Compression Compensative) Converter eliminates jitter and ripples, achieving a drastic reduction in digital distortion by processing the digital music data in . • When analog input .... SLEEP indicator ANALOG AUTO SURR L R S.WFR SLEEP 10min 20min 30min 40min 50min 60min OFF (canceled) 90min 80min 70min When the shut-off time comes: The receiver turns off time changes in . Press CC CONVERTER repeatedly. • Each time you change the shut-off time, press SLEEP repeatedly. The CC CONVERTER 2 indicator...

Instructions
Page 25
..., you cannot see the information on the display. • Smart Surround Setup will be done correctly if you or other basic items of the receiver are explained. 1 Take your position where you change your speakers, do the following are automatically calculated by Smart Surround Setup, the speaker distance and... setting process on the TV screen when the video input setting (see page 20) is set to "HDMI." 3 When "CLAP YOUR HANDS." The receiver starts detecting the level of the sound coming through each speaker (except the subwoofer). From pages 23 to 32, how to set speakers and other...
..., you cannot see the information on the display. • Smart Surround Setup will be done correctly if you or other basic items of the receiver are explained. 1 Take your position where you change your speakers, do the following are automatically calculated by Smart Surround Setup, the speaker distance and... setting process on the TV screen when the video input setting (see page 20) is set to "HDMI." 3 When "CLAP YOUR HANDS." The receiver starts detecting the level of the sound coming through each speaker (except the subwoofer). From pages 23 to 32, how to set speakers and other...

Instructions
Page 26
...the following settings after using Smart Surround Setup in succession The setting is partially made by Smart Surround Setup, press SMART S. In this receiver or the speakers. • The speaker distance and output level manually set will be accepted after one after another. • The current...from Smart Surround Setup. To cancel Smart Surround Setup, press EXIT while "SETTING UP" flashes. • No other speakers. SETUP while the receiver is not detected correctly "SETTING UP" appears again after "SETTING UP" stops flashing. The setting values appear. If you change one of ...
...the following settings after using Smart Surround Setup in succession The setting is partially made by Smart Surround Setup, press SMART S. In this receiver or the speakers. • The speaker distance and output level manually set will be accepted after one after another. • The current...from Smart Surround Setup. To cancel Smart Surround Setup, press EXIT while "SETTING UP" flashes. • No other speakers. SETUP while the receiver is not detected correctly "SETTING UP" appears again after "SETTING UP" stops flashing. The setting values appear. If you change one of ...


