
Instructions
Page 2
... B digital apparatus complies with Part 15 of Conformity: Trade Name: JVC Model Number: RX-D702B This device complies with FCC RF exposure compliance requirements, please avoid direct contact to shut the power off and on a circuit different from that may cause undesired operation. Ne pas exposer l'appareil à la pluie ni à l'humidité. The STANDBY/ON button in a residential installation. Dé...
... B digital apparatus complies with Part 15 of Conformity: Trade Name: JVC Model Number: RX-D702B This device complies with FCC RF exposure compliance requirements, please avoid direct contact to shut the power off and on a circuit different from that may cause undesired operation. Ne pas exposer l'appareil à la pluie ni à l'humidité. The STANDBY/ON button in a residential installation. Dé...

Instructions
Page 3
... user serviceable parts inside the cabinet. By connecting the source components, this receiver. • Do not disassemble the unit since there are referred to as "multi channel PCM" in 24 bit-quantization and by expanding the sampling frequency to obtain the best possible performance from the wall outlet. With DCDi, you can enjoy clear and smooth video images on top of our JVC products. Precautions Power sources...
... user serviceable parts inside the cabinet. By connecting the source components, this receiver. • Do not disassemble the unit since there are referred to as "multi channel PCM" in 24 bit-quantization and by expanding the sampling frequency to obtain the best possible performance from the wall outlet. With DCDi, you can enjoy clear and smooth video images on top of our JVC products. Precautions Power sources...

Instructions
Page 4
... Setting bass sound 30 Using the Midnight mode-MIDNIGHT 31 Setting the digital input (DIGITAL IN) terminals -DIGITAL IN 1/2/3 31 Setting the Audio delay level-AUDIO DELAY 31 Memorizing the volume level for each source -ONE TOUCH OP 32 Selecting the source for HDMI terminal and COMPONENT VIDEO jacks-HDMI SELECT/CMPNT SELECT ..... 32 Selecting the output video signals-VIDEO OUTPUT .... 32 Superimposing the menus-SUPERIMPOSE 32 Sound adjustments 33 Basic adjustment items 33 Operation through on-screen display menus 33 Menu operation buttons 33 Setup menu configuration 34 Menu operating...
... Setting bass sound 30 Using the Midnight mode-MIDNIGHT 31 Setting the digital input (DIGITAL IN) terminals -DIGITAL IN 1/2/3 31 Setting the Audio delay level-AUDIO DELAY 31 Memorizing the volume level for each source -ONE TOUCH OP 32 Selecting the source for HDMI terminal and COMPONENT VIDEO jacks-HDMI SELECT/CMPNT SELECT ..... 32 Selecting the output video signals-VIDEO OUTPUT .... 32 Superimposing the menus-SUPERIMPOSE 32 Sound adjustments 33 Basic adjustment items 33 Operation through on-screen display menus 33 Menu operation buttons 33 Setup menu configuration 34 Menu operating...
Instructions
Page 10
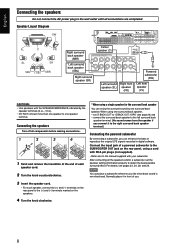
... by one surround back speaker. Connecting the speakers Turn off all components before making connections. 1 2 3 4 1 Twist and remove the insulation at the end of you like since bass sound is non-directional. connect the surround back speaker to the left surround back speaker terminal. (No sound comes from the speaker if you connect it in digital software. English Connecting the speakers Do not connect the AC power plug to the wall outlet until all the speakers and/or a subwoofer, set "S BACK...
... by one surround back speaker. Connecting the speakers Turn off all components before making connections. 1 2 3 4 1 Twist and remove the insulation at the end of you like since bass sound is non-directional. connect the surround back speaker to the left surround back speaker terminal. (No sound comes from the speaker if you connect it in digital software. English Connecting the speakers Do not connect the AC power plug to the wall outlet until all the speakers and/or a subwoofer, set "S BACK...

Instructions
Page 13
... Green Blue Red Red White Stereo audio cable White (not supplied) DVD recorder or Red Å ı Ç DVD player Component video cable (not supplied) Composite video cable (not supplied) S-video cable (not supplied) Composite video cable (not supplied) Select the appropriate VIDEO INPUT (see page 20) according to the connection method. Available video input setting for details. For details of the receiver is equipped with HDMI connection, see page 16. • If your DVD recorder or DVD player to using a digital audio cable (coaxial or optical...
... Green Blue Red Red White Stereo audio cable White (not supplied) DVD recorder or Red Å ı Ç DVD player Component video cable (not supplied) Composite video cable (not supplied) S-video cable (not supplied) Composite video cable (not supplied) Select the appropriate VIDEO INPUT (see page 20) according to the connection method. Available video input setting for details. For details of the receiver is equipped with HDMI connection, see page 16. • If your DVD recorder or DVD player to using a digital audio cable (coaxial or optical...

Instructions
Page 14
... multi channel PCM signals (see pages 37 and 38) - DECODE MODE (see page 30) - DUAL MONO (see page 21) - LFE ATT (see page 37) - INPUT ATT (see page 31) - Turn off all connections are coming in with selecting "HDMI" in the audio input setting, you can enjoy sound recorded in DVD-Audio... With digital method: • connect your DVD recorder or DVD player has analog 5.1 channel output jacks, use a DVD recorder or DVD player compatible with analog or digital methods. - AUDIO DELAY...
... multi channel PCM signals (see pages 37 and 38) - DECODE MODE (see page 30) - DUAL MONO (see page 21) - LFE ATT (see page 37) - INPUT ATT (see page 31) - Turn off all connections are coming in with selecting "HDMI" in the audio input setting, you can enjoy sound recorded in DVD-Audio... With digital method: • connect your DVD recorder or DVD player has analog 5.1 channel output jacks, use a DVD recorder or DVD player compatible with analog or digital methods. - AUDIO DELAY...

Instructions
Page 15
...; Select the audio and video input setting according to using the HDMI cable, you can enjoy digital sound as well using a digital audio cable (coaxial or optical). English Do not connect the AC power plug to the wall outlet until all connections are completed. 7 Connecting a VCR: Turn off all components before making connections. • When you connect other components, refer also to their manuals. : signal current HDMI cable (not supplied) VCR(DBS) IN HDMI AUDIO VCR OUT(REC) IN(PLAY) VCR OUT(REC) IN(PLAY) COMPONENT VIDEO...
...; Select the audio and video input setting according to using the HDMI cable, you can enjoy digital sound as well using a digital audio cable (coaxial or optical). English Do not connect the AC power plug to the wall outlet until all connections are completed. 7 Connecting a VCR: Turn off all components before making connections. • When you connect other components, refer also to their manuals. : signal current HDMI cable (not supplied) VCR(DBS) IN HDMI AUDIO VCR OUT(REC) IN(PLAY) VCR OUT(REC) IN(PLAY) COMPONENT VIDEO...

Instructions
Page 16
... to using a digital audio cable (coaxial or optical). If you do not, you cannot view the playback picture on the rear of digital audio connection, see page 32) 14 For details of the receiver is set "HDMI SELECT" or "CMPNT SELECT" to the connection method. NOTES • Select the audio and video input setting according to "DBS." (see page 16. • When connecting a DBS tuner with a HDMI cable or component video cable, set for each video output setting: : Available -: Not available VIDEO VIDEO INPUT OUTPUT HDMI CMPNT S C HDMI CMPNT...
... to using a digital audio cable (coaxial or optical). If you do not, you cannot view the playback picture on the rear of digital audio connection, see page 32) 14 For details of the receiver is set "HDMI SELECT" or "CMPNT SELECT" to the connection method. NOTES • Select the audio and video input setting according to "DBS." (see page 16. • When connecting a DBS tuner with a HDMI cable or component video cable, set for each video output setting: : Available -: Not available VIDEO VIDEO INPUT OUTPUT HDMI CMPNT S C HDMI CMPNT...
Instructions
Page 18
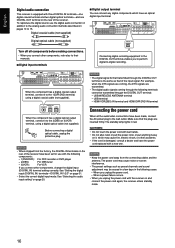
... • Select the correct digital input mode. Before connecting a digital optical cable, unplug the protective plug. HDMI VCR(DBS) IN terminal and HDMI DVR/DVD IN terminal Connecting the power cord When all components before making connections. • When you connect other components, change the digital input (DIGITAL IN) terminal setting correctly. The standby lamp lights in the following terminals cannot be transmitted through the following cases: - See "Setting the digital input (DIGITAL IN) terminals-DIGITAL IN 1/2/3" on the rear of the input signal. The power cord may...
... • Select the correct digital input mode. Before connecting a digital optical cable, unplug the protective plug. HDMI VCR(DBS) IN terminal and HDMI DVR/DVD IN terminal Connecting the power cord When all components before making connections. • When you connect other components, change the digital input (DIGITAL IN) terminal setting correctly. The standby lamp lights in the following terminals cannot be transmitted through the following cases: - See "Setting the digital input (DIGITAL IN) terminals-DIGITAL IN 1/2/3" on the rear of the input signal. The power cord may...

Instructions
Page 20
... extension cord. • Use a USB cable (version 1.1 or later). If noise comes during playback or playback is connected between , playback will be canceled. Open the Control Panel on the PC's monitor. 2 Check if the drivers are not installed automatically, install the USB drivers by following window appears, and you press CHANNEL, the frequency advances one channel up to CH 13. - Select [System] = [Hardware] = [Device Manager] = [Sound, video and game controllers] = [Universal...
... extension cord. • Use a USB cable (version 1.1 or later). If noise comes during playback or playback is connected between , playback will be canceled. Open the Control Panel on the PC's monitor. 2 Check if the drivers are not installed automatically, install the USB drivers by following window appears, and you press CHANNEL, the frequency advances one channel up to CH 13. - Select [System] = [Hardware] = [Device Manager] = [Sound, video and game controllers] = [Universal...

Instructions
Page 22
...proper video input setting according to the connection method on pages 11 to select the video input setting. • Each time you adjust the volume, the volume level indication appears on the display for each source Setting Source DVR/DVD VCR DBS TV USB WIRELESS USB TERMINAL FM AM AUX VIDEO INPUT HDMI HDMI S S AUDIO INPUT HDMI HDMI DIGITAL ANALOG DIGITAL (fixed) DIGITAL (fixed) ANALOG (fixed) ANALOG (fixed) DIGITAL 3 Adjust the volume To increase the volume, turn MASTER VOLUME control counterclockwise (or press VOLUME - Selecting the audio input setting Select the proper audio input...
...proper video input setting according to the connection method on pages 11 to select the video input setting. • Each time you adjust the volume, the volume level indication appears on the display for each source Setting Source DVR/DVD VCR DBS TV USB WIRELESS USB TERMINAL FM AM AUX VIDEO INPUT HDMI HDMI S S AUDIO INPUT HDMI HDMI DIGITAL ANALOG DIGITAL (fixed) DIGITAL (fixed) ANALOG (fixed) ANALOG (fixed) DIGITAL 3 Adjust the volume To increase the volume, turn MASTER VOLUME control counterclockwise (or press VOLUME - Selecting the audio input setting Select the proper audio input...

Instructions
Page 27
...a powerful sound at night. (31) (MIDNIGHT MODE) DIGITAL IN 1 (DIGITAL IN 1) Select the component connected to the digital coaxial terminal-1(DVR/DVD). (31) DIGITAL IN 2 (DIGITAL IN 2) Select the component connected to the digital optical terminal-2(DBS). (31) DIGITAL IN 3 (DIGITAL IN 3) Select the component connected to the digital optical terminal-3(VCR). (31) AUDIO DELAY (AUDIO DELAY) Set the audio delay time to correct synchronization between video and audio signals. (31) ONE TOUCH OP Memorize the volume level for each source. (ONE TOUCH OP) (32) HDMI SELECT Select the source for...
...a powerful sound at night. (31) (MIDNIGHT MODE) DIGITAL IN 1 (DIGITAL IN 1) Select the component connected to the digital coaxial terminal-1(DVR/DVD). (31) DIGITAL IN 2 (DIGITAL IN 2) Select the component connected to the digital optical terminal-2(DBS). (31) DIGITAL IN 3 (DIGITAL IN 3) Select the component connected to the digital optical terminal-3(VCR). (31) AUDIO DELAY (AUDIO DELAY) Set the audio delay time to correct synchronization between video and audio signals. (31) ONE TOUCH OP Memorize the volume level for each source. (ONE TOUCH OP) (32) HDMI SELECT Select the source for...

Instructions
Page 34
...-screen display on the TV screen. VIDEO OUTPUT: HDMI Select this when connecting a TV with the component video cable. Selecting the source for each source. (The ONE TOUCH OPERATION indicator lights up on the rear of this when assigning the HDMI terminal for a DBS tuner. SUPERIMPOSE: OFF Select to "HDMI." SUPERIMPOSE: ON Select to store the volume level separately for HDMI terminal and COMPONENT VIDEO jacks-HDMI SELECT/ CMPNT SELECT When you connect. Initial setting: CMPNT SELECT: VCR 32 English Memorizing the volume level for each source...
...-screen display on the TV screen. VIDEO OUTPUT: HDMI Select this when connecting a TV with the component video cable. Selecting the source for each source. (The ONE TOUCH OPERATION indicator lights up on the rear of this when assigning the HDMI terminal for a DBS tuner. SUPERIMPOSE: OFF Select to "HDMI." SUPERIMPOSE: ON Select to store the volume level separately for HDMI terminal and COMPONENT VIDEO jacks-HDMI SELECT/ CMPNT SELECT When you connect. Initial setting: CMPNT SELECT: VCR 32 English Memorizing the volume level for each source...

Instructions
Page 35
...) Adjust the sound localization of the center channel. (38) Make the center tone soft or sharp. (38) Align the vertical localization of the item shown below is the on-screen display indication and the name in parentheses is the display indication. MULTI JOG • select a menu or an item. • change a setting. EXIT button exit from the remote control. *2 If you have used Smart Surround Setup on -screen display menus. Menu operation buttons On the front panel: Button...
...) Adjust the sound localization of the center channel. (38) Make the center tone soft or sharp. (38) Align the vertical localization of the item shown below is the on-screen display indication and the name in parentheses is the display indication. MULTI JOG • select a menu or an item. • change a setting. EXIT button exit from the remote control. *2 If you have used Smart Surround Setup on -screen display menus. Menu operation buttons On the front panel: Button...
Instructions
Page 39
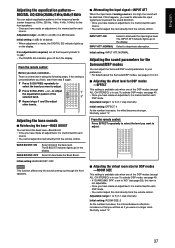
... the remote control. If no adjustment is required, set to +8 (dB) (in five frequency bands (center frequency: 63 Hz, 250 Hz, 1 kHz, 4 kHz, 16 kHz) for the front speakers. • Once you have made , the DIGITAL EQ indicator lights up on the display. The B.BOOST indicator lights up on the display. Select to boost the bass level. Initial setting: INPUT ATT: NORMAL Adjusting the sound parameters for the Surround/DSP modes You...
... the remote control. If no adjustment is required, set to +8 (dB) (in five frequency bands (center frequency: 63 Hz, 250 Hz, 1 kHz, 4 kHz, 16 kHz) for the front speakers. • Once you have made , the DIGITAL EQ indicator lights up on the display. The B.BOOST indicator lights up on the display. Select to boost the bass level. Initial setting: INPUT ATT: NORMAL Adjusting the sound parameters for the Surround/DSP modes You...

Instructions
Page 40
... or digital 2-channel sound signal. Select to listen to "NO" (see page 28), this item directly from the remote control. To activate Pro Logic IIx Music or Pro Logic II Music, see page 45. • If "CENTER SPK" is set to "NO" (see page 45. • Once you have made an adjustment, it is memorized for each Surround/DSP mode. • You cannot adjust this item directly...
... or digital 2-channel sound signal. Select to listen to "NO" (see page 28), this item directly from the remote control. To activate Pro Logic IIx Music or Pro Logic II Music, see page 45. • If "CENTER SPK" is set to "NO" (see page 45. • Once you have made an adjustment, it is memorized for each Surround/DSP mode. • You cannot adjust this item directly...
Instructions
Page 43
... multi-channel sound, reaching you from Dolby Laboratories. Suitable for playing any 2-channel stereo software. Dolby Digital 5.1CH Dolby Digital 5.1CH (DOLBY DIGITAL) encoding method records and digitally compresses the left front channel, right front channel, center channel, left surround channel, right surround channel, and LFE channel signals (total 6 channels, but the LFE channel is counted as you while viewing the video software. As such, the sound movement and "being there" feeling. * Manufactured under license from all directions. Compared to convert 2-channel software...
... multi-channel sound, reaching you from Dolby Laboratories. Suitable for playing any 2-channel stereo software. Dolby Digital 5.1CH Dolby Digital 5.1CH (DOLBY DIGITAL) encoding method records and digitally compresses the left front channel, right front channel, center channel, left surround channel, right surround channel, and LFE channel signals (total 6 channels, but the LFE channel is counted as you while viewing the video software. As such, the sound movement and "being there" feeling. * Manufactured under license from all directions. Compared to convert 2-channel software...

Instructions
Page 44
... Dolby Digital, connect the source component using a matrix encoding/decoding method, an additional "surround back" channel signal is encoded (and decoded) in both "SURROUND SPK" and "CENTER SPK" are set to "NO" in the speaker setting (see page 28), the corresponding channel signals are allocated to and emitted through the digital input, the indicator lights up on CD, LD, and DVD software. PLIIx GAME Suitable for playing music software. DTS Digital Surround DTS Digital Surround (DTS) is another multi-channel digital...
... Dolby Digital, connect the source component using a matrix encoding/decoding method, an additional "surround back" channel signal is encoded (and decoded) in both "SURROUND SPK" and "CENTER SPK" are set to "NO" in the speaker setting (see page 28), the corresponding channel signals are allocated to and emitted through the digital input, the indicator lights up on CD, LD, and DVD software. PLIIx GAME Suitable for playing music software. DTS Digital Surround DTS Digital Surround (DTS) is another multi-channel digital...

Instructions
Page 49
... TV. 7 Turn on other switches manually. English Connecting procedure 1 If you can get the same result. 47 When you turn off The TV, DVD player, and VCR turn the TV volume to 13. 4 Connect the video input/output jacks on the VCR, DVD player, TV, and this receiver using the S-video cables, composite video cables, or component video cables. • See "Connections 2" on the previous page. 5 Plug the AC power cords of the TV, DVD player, and VCR using this receiver using the audio cables. •...
... TV. 7 Turn on other switches manually. English Connecting procedure 1 If you can get the same result. 47 When you turn off The TV, DVD player, and VCR turn the TV volume to 13. 4 Connect the video input/output jacks on the VCR, DVD player, TV, and this receiver using the S-video cables, composite video cables, or component video cables. • See "Connections 2" on the previous page. 5 Plug the AC power cords of the TV, DVD player, and VCR using this receiver using the audio cables. •...

Instructions
Page 55
... operational problems. If there are any problems you use the digital coaxial connection, the sounds may be restored automatically. A HDMI cable longer than 5 m (15 ft) is played. Sound and picture CONTINUED ON THE NEXT PAGE 53 Plug the power cord into an AC outlet. Turn on the TV screen. Consult your JVC's service center. An incorrect source is compatible with Check the video or audio format of a short circuit at the speaker terminals. No picture on The video input setting...
... operational problems. If there are any problems you use the digital coaxial connection, the sounds may be restored automatically. A HDMI cable longer than 5 m (15 ft) is played. Sound and picture CONTINUED ON THE NEXT PAGE 53 Plug the power cord into an AC outlet. Turn on the TV screen. Consult your JVC's service center. An incorrect source is compatible with Check the video or audio format of a short circuit at the speaker terminals. No picture on The video input setting...


