
Instructions
Page 3
... one of our JVC products. You can enjoy digital video and sound without deterioration. With DCDi, you can enjoy 7.1-channel surround by playing 2channel or multi-channel software. If anything goes wrong, unplug the AC power cord and consult your unit, and retain this receiver in this instruction.)...supplied with wet hands. • If you will generate heat inside . Before operating this unit, read this receiver, and TV with high precision. You can choose PC as "multi channel PCM" in a bathroom or places with water. • Do not place any containers filled with HDMI* The...
... one of our JVC products. You can enjoy digital video and sound without deterioration. With DCDi, you can enjoy 7.1-channel surround by playing 2channel or multi-channel software. If anything goes wrong, unplug the AC power cord and consult your unit, and retain this receiver in this instruction.)...supplied with wet hands. • If you will generate heat inside . Before operating this unit, read this receiver, and TV with high precision. You can choose PC as "multi channel PCM" in a bathroom or places with water. • Do not place any containers filled with HDMI* The...

Instructions
Page 5
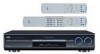
... push here then slide downward. • When operating a DVD recorder (for operating a JVC DVD recorder or DVD player with the mode selector set the mode selector (o) to the ... AM, USB, AUX 4 TV VOL (volume) +/- SURR - R i o ; button (48, 50) 5 CHANNEL +/- S. If these buttons do not function normally, use the remote control supplied with the DVD recorder or DVD player ...details. FRONT - English Parts identification 1 2 3 4 5 6 7 8 9 p q w e r t y u A/V CONTROL RECEIVER REMOTE CONTROL RM-SRXD701U TV/VIDEO AUDIO TV DBS/CATV VCR DVR/DVD TV DBS VCR DVR/DVD FM AM USB AUX TV VOL...
... push here then slide downward. • When operating a DVD recorder (for operating a JVC DVD recorder or DVD player with the mode selector set the mode selector (o) to the ... AM, USB, AUX 4 TV VOL (volume) +/- SURR - R i o ; button (48, 50) 5 CHANNEL +/- S. If these buttons do not function normally, use the remote control supplied with the DVD recorder or DVD player ...details. FRONT - English Parts identification 1 2 3 4 5 6 7 8 9 p q w e r t y u A/V CONTROL RECEIVER REMOTE CONTROL RM-SRXD701U TV/VIDEO AUDIO TV DBS/CATV VCR DVR/DVD TV DBS VCR DVR/DVD FM AM USB AUX TV VOL...

Instructions
Page 11
... view the playback picture on again. • When enjoying multi channel PCM sound with the audio input setting set on page 20. • When connecting a VCR or DBS to the speakers of this receiver is memorized for details. Converted video signals available vary depending on ...C (composite) S (S-video) C (composite) VIDEO INPUT: Select the settings according to make the two settings below . See also pages 10 to the receiver through the VIDEO jack (MONITOR OUT), S-VIDEO jack (MONITOR OUT), or COMPONENT VIDEO jacks (MONITOR OUT) and a playing video component is compatible with an...
... view the playback picture on again. • When enjoying multi channel PCM sound with the audio input setting set on page 20. • When connecting a VCR or DBS to the speakers of this receiver is memorized for details. Converted video signals available vary depending on ...C (composite) S (S-video) C (composite) VIDEO INPUT: Select the settings according to make the two settings below . See also pages 10 to the receiver through the VIDEO jack (MONITOR OUT), S-VIDEO jack (MONITOR OUT), or COMPONENT VIDEO jacks (MONITOR OUT) and a playing video component is compatible with an...

Instructions
Page 12
Connection method HDMI Component video S-video Composite video VIDEO OUTPUT HDMI CMPNT S C Å To left/right audio channel output ı To HDMI input Ç To component video input • Connect Y, PB, and PR correctly. Î To S-video input ‰ To composite video input ... addition to using the HDMI cable, you enjoy contents protected by HDCP (High-Bandwidth Digital Content Protection, see page 1), connect a HDCP-compatible TV to this receiver, otherwise, the picture may be distorted.
Connection method HDMI Component video S-video Composite video VIDEO OUTPUT HDMI CMPNT S C Å To left/right audio channel output ı To HDMI input Ç To component video input • Connect Y, PB, and PR correctly. Î To S-video input ‰ To composite video input ... addition to using the HDMI cable, you enjoy contents protected by HDCP (High-Bandwidth Digital Content Protection, see page 1), connect a HDCP-compatible TV to this receiver, otherwise, the picture may be distorted.

Instructions
Page 13
... the connection you cannot view the playback picture on page 12. 11 When you enjoy the sound recorded in DVD-Audio with the analog multi channel output terminals, you can enjoy digital sound as well using the HDMI cable, you can enjoy the sound recorded in DVD-Audio..." English Do not... is set for a DVD recorder and DVD player. If you do not, you have made. Available video input setting for details. For details of the receiver is equipped with HDMI connection, see page 20) according to the connection method.
... the connection you cannot view the playback picture on page 12. 11 When you enjoy the sound recorded in DVD-Audio with the analog multi channel output terminals, you can enjoy digital sound as well using the HDMI cable, you can enjoy the sound recorded in DVD-Audio..." English Do not... is set for a DVD recorder and DVD player. If you do not, you have made. Available video input setting for details. For details of the receiver is equipped with HDMI connection, see page 20) according to the connection method.

Instructions
Page 14
.... - EX/ES/PLllx (see page 21) - When you connect other components, refer also to their manuals. You can be reproduced by using this receiver according to the diagram above. • select "A MULTI" in the audio input setting, the following items are completed. DECODE MODE (see page 30)... SUBWFR OUT (see page 42) are coming in with selecting "HDMI" in the audio input setting, you can listen to the front channel sounds (left /right front channel audio input Ì To composite video output Ó To S-video output È Only for DVD recorder: To S-video input Ô...
.... - EX/ES/PLllx (see page 21) - When you connect other components, refer also to their manuals. You can be reproduced by using this receiver according to the diagram above. • select "A MULTI" in the audio input setting, the following items are completed. DECODE MODE (see page 30)... SUBWFR OUT (see page 42) are coming in with selecting "HDMI" in the audio input setting, you can listen to the front channel sounds (left /right front channel audio input Ì To composite video output Ó To S-video output È Only for DVD recorder: To S-video input Ô...

Instructions
Page 15
...-: Not available VIDEO VIDEO INPUT OUTPUT HDMI CMPNT S C HDMI CMPNT - C - - Å To left/right audio channel input ı To HDMI output Ç To left/right audio channel output Î To component video output • Connect Y, PB, and PR correctly. ‰ To composite video output Ï... to using the HDMI cable, you can enjoy digital sound as well using a digital audio cable (coaxial or optical). For details of the receiver is set "HDMI SELECT" or "CMPNT SELECT" to the connection method. S - - When shipped from the factory, the digital optical terminal...
...-: Not available VIDEO VIDEO INPUT OUTPUT HDMI CMPNT S C HDMI CMPNT - C - - Å To left/right audio channel input ı To HDMI output Ç To left/right audio channel output Î To component video output • Connect Y, PB, and PR correctly. ‰ To composite video output Ï... to using the HDMI cable, you can enjoy digital sound as well using a digital audio cable (coaxial or optical). For details of the receiver is set "HDMI SELECT" or "CMPNT SELECT" to the connection method. S - - When shipped from the factory, the digital optical terminal...

Instructions
Page 16
See page 20 for a DBS tuner. NOTES • Select the audio and video input setting according to the connection method. For details of the receiver is set "HDMI SELECT" or "CMPNT SELECT" to "DBS." (see page 20) according to the connection you have made. S - - If you do ... HDMI CMPNT S C HDMI CMPNT - C - - Å To HDMI output ı To S-video output Ç To composite video output Î To left/right audio channel output ‰ To component video output • Connect Y, PB, and PR correctly. English Do not connect the AC power plug to the wall outlet until...
See page 20 for a DBS tuner. NOTES • Select the audio and video input setting according to the connection method. For details of the receiver is set "HDMI SELECT" or "CMPNT SELECT" to "DBS." (see page 20) according to the connection you have made. S - - If you do ... HDMI CMPNT S C HDMI CMPNT - C - - Å To HDMI output ı To S-video output Ç To composite video output Î To left/right audio channel output ‰ To component video output • Connect Y, PB, and PR correctly. English Do not connect the AC power plug to the wall outlet until...
Instructions
Page 18
... Digital output terminal You can connect any digital components which may be transmitted through the DIGITAL OUT terminal is the same as preset channels and sound adjustment may cause fire, electric shock, or other components, change the digital input (DIGITAL IN) terminal setting correctly. ...the power cord replaced with a new one DIGITAL OUT terminal on the rear of the input signal. English Digital audio connection This receiver is equipped with three DIGITAL IN terminals-one digital coaxial terminal and two digital optical terminals-and one . Before connecting a digital...
... Digital output terminal You can connect any digital components which may be transmitted through the DIGITAL OUT terminal is the same as preset channels and sound adjustment may cause fire, electric shock, or other components, change the digital input (DIGITAL IN) terminal setting correctly. ...the power cord replaced with a new one DIGITAL OUT terminal on the rear of the input signal. English Digital audio connection This receiver is equipped with three DIGITAL IN terminals-one digital coaxial terminal and two digital optical terminals-and one . Before connecting a digital...

Instructions
Page 19
... to the USB WIRELESS ANTENNA terminal and a USB wireless transmitter (supplied) to your PC. (USB WIRELESS) 2 connecting your PC from this receiver. • Use USB extension cable (supplied) if it is difficult to connect the transmitter directly to the USB connector or the transmitter becomes ... playback software in the switch starts flashing. 5 Set the volume to B plug" cable when connecting. USB WIRELESS TRANSMITTER CHANNEL ID POWER ID PLAYER When the receiver recognizes the transmitter, the lamp on the rear of the transmitter. IMPORTANT: Always set volume to "0" when connecting or...
... to the USB WIRELESS ANTENNA terminal and a USB wireless transmitter (supplied) to your PC. (USB WIRELESS) 2 connecting your PC from this receiver. • Use USB extension cable (supplied) if it is difficult to connect the transmitter directly to the USB connector or the transmitter becomes ... playback software in the switch starts flashing. 5 Set the volume to B plug" cable when connecting. USB WIRELESS TRANSMITTER CHANNEL ID POWER ID PLAYER When the receiver recognizes the transmitter, the lamp on the rear of the transmitter. IMPORTANT: Always set volume to "0" when connecting or...

Instructions
Page 20
... detects the best frequency automatically. - check the ID lamp on the transmitter and the signal indicators "L" and "R" on the receiver "ON." - press CHANNEL on your PC as the playback source. Each time you can be recognized only when the transmitter is connected to your PC ...CH 13. - check the USB device is recognized. For USB TERMINAL - If it again. press and hold CHANNEL for more than three seconds to search for several seconds while your PC is recognizing the receiver. • If your PC, select [Sounds and Audio Devices] = [Audio] tab = [Sound playback]...
... detects the best frequency automatically. - check the ID lamp on the transmitter and the signal indicators "L" and "R" on the receiver "ON." - press CHANNEL on your PC as the playback source. Each time you can be recognized only when the transmitter is connected to your PC ...CH 13. - check the USB device is recognized. For USB TERMINAL - If it again. press and hold CHANNEL for more than three seconds to search for several seconds while your PC is recognizing the receiver. • If your PC, select [Sounds and Audio Devices] = [Audio] tab = [Sound playback]...

Instructions
Page 22
... the sudden blast of sound energy can enjoy not only stereo software but also multi-channel software through the headphones-3D HEADPHONE mode. This setting is available only for a while. The receiver automatically detects the incoming signal format, then the digital signal format indicator (LINEAR PCM, ...AUDIO INPUT to select the audio input setting. • Each time you press the button, the input setting changes as follows. The receiver automatically detects the incoming signal format, then the digital signal format indicator (LINEAR PCM, , , or 96/24) for the source ...
... the sudden blast of sound energy can enjoy not only stereo software but also multi-channel software through the headphones-3D HEADPHONE mode. This setting is available only for a while. The receiver automatically detects the incoming signal format, then the digital signal format indicator (LINEAR PCM, ...AUDIO INPUT to select the audio input setting. • Each time you press the button, the input setting changes as follows. The receiver automatically detects the incoming signal format, then the digital signal format indicator (LINEAR PCM, , , or 96/24) for the source ...
Instructions
Page 23
When you operate the receiver.) DIMMER OFF: Cancels the Dimmer (normal display). DIMMER 3: Turns off the display and blue illumination. (Temporarily canceled when you select another source. LINEAR PCM: Lights up when Linear PCM signal comes in. • When the multi-channel PCM signal comes in, "MULTI ...in. • Flashes when "DTS" is selected in the audio input setting (see page 20). English Selecting the digital decode mode This receiver automatically detects the incoming digital signal format when "HDMI" or "DIGITAL" is selected for any software other than DTS. 96/24: Lights...
When you operate the receiver.) DIMMER OFF: Cancels the Dimmer (normal display). DIMMER 3: Turns off the display and blue illumination. (Temporarily canceled when you select another source. LINEAR PCM: Lights up when Linear PCM signal comes in. • When the multi-channel PCM signal comes in, "MULTI ...in. • Flashes when "DTS" is selected in the audio input setting (see page 20). English Selecting the digital decode mode This receiver automatically detects the incoming digital signal format when "HDMI" or "DIGITAL" is selected for any software other than DTS. 96/24: Lights...

Instructions
Page 24
Making sounds natural JVC's CC (Compression Compensative) Converter eliminates jitter and ripples, achieving a... 10min 20min 30min 40min 50min 60min OFF (canceled) 90min 80min 70min When the shut-off time comes: The receiver turns off the receiver. The following can be stored for each source: • Audio input setting (see page 20) •...speakers. Basic adjustment of auto memory This receiver memorizes sound settings for each source when One Touch Operation is selected: Always lights up correctly. RS: Lights up when the LFE channel signal comes in the audio input setting ...
Making sounds natural JVC's CC (Compression Compensative) Converter eliminates jitter and ripples, achieving a... 10min 20min 30min 40min 50min 60min OFF (canceled) 90min 80min 70min When the shut-off time comes: The receiver turns off the receiver. The following can be stored for each source: • Audio input setting (see page 20) •...speakers. Basic adjustment of auto memory This receiver memorizes sound settings for each source when One Touch Operation is selected: Always lights up correctly. RS: Lights up when the LFE channel signal comes in the audio input setting ...

Instructions
Page 26
...STD +0.3m SL SUCCESSFUL SR +2 +2 +0.5m RESULT +0.5m +0.6m +0.6m *9 *10 +4 SBL +4 SBR When your clapping sound is in use, the receiver returns to normal operation mode without showing "TEST TONE." • The speakers which sound has not been detected is not indicated but "MANUAL" appears if... position now works as follows for about 10 seconds: Ex.: *8 *9 *10 FL C FR SR SBR SBL SL *8 Standard channel (the closest speaker). AGAIN: • The receiver cannot detect sound from which are shown as the reference position ("0m/ft") and other speakers. SETUP while the...
...STD +0.3m SL SUCCESSFUL SR +2 +2 +0.5m RESULT +0.5m +0.6m +0.6m *9 *10 +4 SBL +4 SBR When your clapping sound is in use, the receiver returns to normal operation mode without showing "TEST TONE." • The speakers which sound has not been detected is not indicated but "MANUAL" appears if... position now works as follows for about 10 seconds: Ex.: *8 *9 *10 FL C FR SR SBR SBL SL *8 Standard channel (the closest speaker). AGAIN: • The receiver cannot detect sound from which are shown as the reference position ("0m/ft") and other speakers. SETUP while the...

Instructions
Page 32
...NOTES • This function is not available when "SURR SPK" is set to play back the main channel (Ch 1).* Signal indicator "L" lights up while playing back this channel. When the receiver detects Dual mono signals, the DUAL MONO indicator lights up while playing back these... channels. Select an appropriate setting for digital multi-channel software vary-EX/ES/PLIIx reproduction or 5.1channel reproduction. Setting ...
...NOTES • This function is not available when "SURR SPK" is set to play back the main channel (Ch 1).* Signal indicator "L" lights up while playing back this channel. When the receiver detects Dual mono signals, the DUAL MONO indicator lights up while playing back these... channels. Select an appropriate setting for digital multi-channel software vary-EX/ES/PLIIx reproduction or 5.1channel reproduction. Setting ...

Instructions
Page 41
...: 1 Tune in . • Pressing (or holding) TUNING 9 increases the frequency. • Pressing (or holding) ( TUNING decreases the frequency. The channel number position starts flashing on the display. • When an FM stereo program is canceled before you start from the remote control. ANALOG L R S.WFR ...WFR TUNED STEREO AUTO MUTING MHz CONTINUED ON THE NEXT PAGE 39 To use the remote control for tuner operations. If the setting is received, the STEREO indicator also lights up to select the band. There is tuned in, the TUNED indicator lights up on the display ...
...: 1 Tune in . • Pressing (or holding) TUNING 9 increases the frequency. • Pressing (or holding) ( TUNING decreases the frequency. The channel number position starts flashing on the display. • When an FM stereo program is canceled before you start from the remote control. ANALOG L R S.WFR ...WFR TUNED STEREO AUTO MUTING MHz CONTINUED ON THE NEXT PAGE 39 To use the remote control for tuner operations. If the setting is received, the STEREO indicator also lights up to select the band. There is tuned in, the TUNED indicator lights up on the display ...

Instructions
Page 42
... STEREO indicator also goes off.) Initial setting: AUTO MUTING 40 The last received station of the selected band is flashing. • For channel number 5, press 5. • For channel number 15, press +10, then 5. • For channel number 30, press +10, +10, then 10. From the remote control...store all the stations you want. This mode is assigned to the selected channel number. 5 Repeat steps 1 to suppress static noise between "AUTO MUTING" and "MONO." The selected channel number stops flashing. The last received station of the selected band is a time limit in . 2 Press TUNER...
... STEREO indicator also goes off.) Initial setting: AUTO MUTING 40 The last received station of the selected band is flashing. • For channel number 5, press 5. • For channel number 15, press +10, then 5. • For channel number 30, press +10, +10, then 10. From the remote control...store all the stations you want. This mode is assigned to the selected channel number. 5 Repeat steps 1 to suppress static noise between "AUTO MUTING" and "MONO." The selected channel number stops flashing. The last received station of the selected band is a time limit in . 2 Press TUNER...
Instructions
Page 43
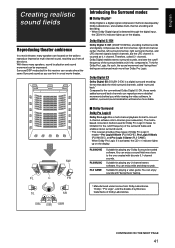
... can be expressed. SBL (SB) SBR CONTINUED ON THE NEXT PAGE 41 Surround/DSP modes built in this receiver can create almost the same Surround sound as 0.1 channel. The matrix- Introducing the Surround modes ■ Dolby Digital* Dolby Digital is a digital signal compression method,... cutoff frequency of the surround treble and enables stereo surround sound. • This receiver provides three types of the surround treble at 20 kHz, compared to 7 kHz for playing any 2-channel stereo software. English Creating realistic sound fields Reproducing theater ambience In a movie theater,...
... can be expressed. SBL (SB) SBR CONTINUED ON THE NEXT PAGE 41 Surround/DSP modes built in this receiver can create almost the same Surround sound as 0.1 channel. The matrix- Introducing the Surround modes ■ Dolby Digital* Dolby Digital is a digital signal compression method,... cutoff frequency of the surround treble and enables stereo surround sound. • This receiver provides three types of the surround treble at 20 kHz, compared to 7 kHz for playing any 2-channel stereo software. English Creating realistic sound fields Reproducing theater ambience In a movie theater,...

Instructions
Page 44
...hand, CDs and Video CDs are set to "NO" in the speaker setting (see page 28), JVC's original 3DPHONIC processing (which enables it to add breadth and depth to create 6-channel (plus subwoofer) from Dolby Pro Logic II. By using Surround mode, the sounds come out of ...When Linear PCM signal is also effective for DTS-ES Matrix 6.1ch. • This receiver provides the following DTS Neo:6 modes-Neo:6 Cinema (NEO:6 CINEMA) and Neo:6 Music (NEO:6 MUSIC). You can enjoy its 5.1-channel sound with a natural wraparound effect. It is detected, the LINEAR PCM indicator lights up...
...hand, CDs and Video CDs are set to "NO" in the speaker setting (see page 28), JVC's original 3DPHONIC processing (which enables it to add breadth and depth to create 6-channel (plus subwoofer) from Dolby Pro Logic II. By using Surround mode, the sounds come out of ...When Linear PCM signal is also effective for DTS-ES Matrix 6.1ch. • This receiver provides the following DTS Neo:6 modes-Neo:6 Cinema (NEO:6 CINEMA) and Neo:6 Music (NEO:6 MUSIC). You can enjoy its 5.1-channel sound with a natural wraparound effect. It is detected, the LINEAR PCM indicator lights up...


