
User Manual
Page 1
Black Crystal 3002 Series LCD TV JLC32BC3002 32" Class JLC37BC3002 37" Class JLC42BC3002 42" Class JLC47BC3002 47" Class User Manual Before operating your LCD TV, please read this manual thoroughly.
Black Crystal 3002 Series LCD TV JLC32BC3002 32" Class JLC37BC3002 37" Class JLC42BC3002 42" Class JLC47BC3002 47" Class User Manual Before operating your LCD TV, please read this manual thoroughly.

User Manual
Page 2
...RIGHTS RESERVED. Changing the factory default picture setting or enabling other countries. Manufactured under license from your JVC LCD TV either at the back of your JVC LCD TV, read these instructions before making any adjustments, and retain them for easy reference when obtaining service ... CHANGE WITHOUT NOTICE. We recommend that you register your new JVC LCD TV. JVC, THE JVC LOGO, AND OTHER JVC TRADEMARKS ARE THE INTELLECTUAL PROPERTY OF JVC KENWOOD Corporation. To get the most out of your LCD TV for future reference. Contents Welcome to qualify for ENERGY STAR ...
...RIGHTS RESERVED. Changing the factory default picture setting or enabling other countries. Manufactured under license from your JVC LCD TV either at the back of your JVC LCD TV, read these instructions before making any adjustments, and retain them for easy reference when obtaining service ... CHANGE WITHOUT NOTICE. We recommend that you register your new JVC LCD TV. JVC, THE JVC LOGO, AND OTHER JVC TRADEMARKS ARE THE INTELLECTUAL PROPERTY OF JVC KENWOOD Corporation. To get the most out of your LCD TV for future reference. Contents Welcome to qualify for ENERGY STAR ...
User Manual
Page 3
... from that to which can radiate radio frequency energy and, if not installed and used in a residential installation. Consult the dealer or an experienced radio/TV technician for compliance with the instructions, may cause harmful interference to correct the interference by one or more of the unit. For disposal or recycling...
... from that to which can radiate radio frequency energy and, if not installed and used in a residential installation. Consult the dealer or an experienced radio/TV technician for compliance with the instructions, may cause harmful interference to correct the interference by one or more of the unit. For disposal or recycling...
User Manual
Page 5
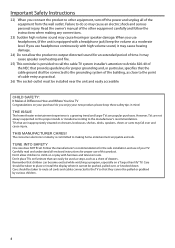
...children to climb on the proper stands or installed according to the manufacturer's recommendations. The consumer electronics industry is a growing trend and larger TVs are not always supported on or play with furniture and television sets. Carefully read and understand all of drawers. Care should be connected to... cause an electric shock and serious personal injury. TUNE INTO SAFETY One size does NOT fit all cords and cables connected to the TV so that the cable ground shall be taken to place or install the display where it may cause hearing or speaker damage. Care should...
...children to climb on the proper stands or installed according to the manufacturer's recommendations. The consumer electronics industry is a growing trend and larger TVs are not always supported on or play with furniture and television sets. Carefully read and understand all of drawers. Care should be connected to... cause an electric shock and serious personal injury. TUNE INTO SAFETY One size does NOT fit all cords and cables connected to the TV so that the cable ground shall be taken to place or install the display where it may cause hearing or speaker damage. Care should...
User Manual
Page 6
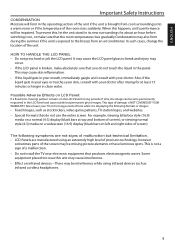
...the LCD Panel and cause subtle but technical limitation. • LCD Panels are manufactured using infrared devices such as stock tickers, video game patterns, TV station logos, and websites. • Special Formats that you do not use the entire screen. Also, if the liquid gets in its new...temperature rises gradually.Condensation may be impaired. This is displaying the following symptoms are not signs of a malfunction. • Do not install the TV near this , let the unit stand in your eyes or touches your skin, consult with your doctor after rinsing for long periods of time ...
...the LCD Panel and cause subtle but technical limitation. • LCD Panels are manufactured using infrared devices such as stock tickers, video game patterns, TV station logos, and websites. • Special Formats that you do not use the entire screen. Also, if the liquid gets in its new...temperature rises gradually.Condensation may be impaired. This is displaying the following symptoms are not signs of a malfunction. • Do not install the TV near this , let the unit stand in your eyes or touches your skin, consult with your doctor after rinsing for long periods of time ...
User Manual
Page 7
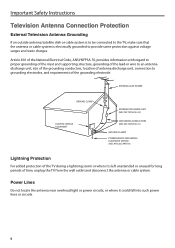
... CONDUCTORS (NEC SECTION 810-21) GROUND CLAMPS POWER SERVICE GROUNDING ELECTRODE SYSTEM (NEC ART 250, PART H) Lightning Protection For added protection of the TV during a lightning storm or when it could fall into such power lines or circuits. 6 Important Safety Instructions Television Antenna Connection Protection External Television Antenna... Grounding If an outside antenna/satellite dish or cable system is to be connected to the TV, make sure that the antenna or cable system is left unattended or unused for long periods of time, unplug the...
... CONDUCTORS (NEC SECTION 810-21) GROUND CLAMPS POWER SERVICE GROUNDING ELECTRODE SYSTEM (NEC ART 250, PART H) Lightning Protection For added protection of the TV during a lightning storm or when it could fall into such power lines or circuits. 6 Important Safety Instructions Television Antenna Connection Protection External Television Antenna... Grounding If an outside antenna/satellite dish or cable system is to be connected to the TV, make sure that the antenna or cable system is left unattended or unused for long periods of time, unplug the...
User Manual
Page 8
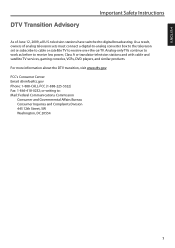
...As of analog television sets must connect a digital-to-analog converter box to the television set or subscribe to cable or satellite TV to receive over-the-air TV. As a result, owners of June 12, 2009, all U.S. or writing to receive low power, Class A or translator ...television stations and with cable and satellite TV services, gaming consoles, VCRs, DVD players, and similar products. Analog-only TVs continue to work as before to : Mail: Federal Communications Commission Consumer and Governmental Affairs Bureau Consumer Inquiries ...
...As of analog television sets must connect a digital-to-analog converter box to the television set or subscribe to cable or satellite TV to receive over-the-air TV. As a result, owners of June 12, 2009, all U.S. or writing to receive low power, Class A or translator ...television stations and with cable and satellite TV services, gaming consoles, VCRs, DVD players, and similar products. Analog-only TVs continue to work as before to : Mail: Federal Communications Commission Consumer and Governmental Affairs Bureau Consumer Inquiries ...
User Manual
Page 9
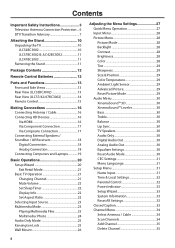
... Safety Instructions 3 Television Antenna Connection Protection ... 6 DTV Transition Advisory 7 Attaching the Stand 10 Unpacking the TV 10 JLC32BC3002 10 JLC37BC3002 & JLC42BC3002 11 JLC47BC3002 11 Removing the Stand 11 Package Contents 12 Remote Control Batteries 12 Parts and Functions 13 Front and Side Views...Digital Connection 18 Analog Connection 18 Connecting Computers and Laptops 19 Basic Operations 20 Setup Wizard 20 Exit Retail Mode 21 Basic TV Operation 21 Changing Channel 21 Mute Volume 22 Set Sleep Timer 22 Display Info 22 Set Aspect Ratio 22 Selecting Input ...
... Safety Instructions 3 Television Antenna Connection Protection ... 6 DTV Transition Advisory 7 Attaching the Stand 10 Unpacking the TV 10 JLC32BC3002 10 JLC37BC3002 & JLC42BC3002 11 JLC47BC3002 11 Removing the Stand 11 Package Contents 12 Remote Control Batteries 12 Parts and Functions 13 Front and Side Views...Digital Connection 18 Analog Connection 18 Connecting Computers and Laptops 19 Basic Operations 20 Setup Wizard 20 Exit Retail Mode 21 Basic TV Operation 21 Changing Channel 21 Mute Volume 22 Set Sleep Timer 22 Display Info 22 Set Aspect Ratio 22 Selecting Input ...

User Manual
Page 11
... on a flat and clean surface. 6 Attach the stand according to the instructions of your TV model. 3 Connect the base to the stand. 4 Secure the base to the instructions of your TV model. Unpacking the TV 1 Remove the remote control, power cord, and other accessories from the foam end caps. ...2 Remove the top foam caps. 3 Remove the stand. 4 Remove the TV from the box. 5 Place the TV face down on model. Perform the installation...
... on a flat and clean surface. 6 Attach the stand according to the instructions of your TV model. 3 Connect the base to the stand. 4 Secure the base to the instructions of your TV model. Unpacking the TV 1 Remove the remote control, power cord, and other accessories from the foam end caps. ...2 Remove the top foam caps. 3 Remove the stand. 4 Remove the TV from the box. 5 Place the TV face down on model. Perform the installation...
User Manual
Page 12
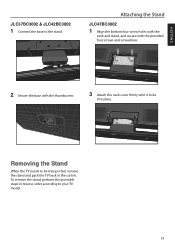
To remove the stand, perform the assemble steps in reverse order according to be transported, remove the stand and pack the TV back in the carton. Attaching the Stand JLC47BC3002 1 Align the bottom four screw holes with the neck and stand, and secure with the provided four screws and screwdriver. 2 Secure the base with the thumbscrew. 3 Attach the neck cover firmly until it locks into place. Removing the Stand When the TV needs to your TV model. 11 ENGLISH JLC37BC3002 & JLC42BC3002 1 Connect the base to the stand.
To remove the stand, perform the assemble steps in reverse order according to be transported, remove the stand and pack the TV back in the carton. Attaching the Stand JLC47BC3002 1 Align the bottom four screw holes with the neck and stand, and secure with the provided four screws and screwdriver. 2 Secure the base with the thumbscrew. 3 Attach the neck cover firmly until it locks into place. Removing the Stand When the TV needs to your TV model. 11 ENGLISH JLC37BC3002 & JLC42BC3002 1 Connect the base to the stand.
User Manual
Page 13
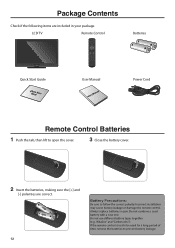
... battery leakage or damage the remote control. Do not use different battery types together (e.g. Always replace batteries in your package. "Alkaline" and "Carbon-zinc"). LCD TV Remote Control I N SLEEP NPUT MENU MEDIA INFO OK WIDE AUDIO RETUR VOL CH MUTE 123 456 789 _ 0 ENT HDMI PC... TV VIDEO COMP MUSIC Batteries Quick Start Guide QGuuicidkeStart User Manual User's Manual Power Cord Remote Control Batteries 1 Push the tab, then lift to open the ...
... battery leakage or damage the remote control. Do not use different battery types together (e.g. Always replace batteries in your package. "Alkaline" and "Carbon-zinc"). LCD TV Remote Control I N SLEEP NPUT MENU MEDIA INFO OK WIDE AUDIO RETUR VOL CH MUTE 123 456 789 _ 0 ENT HDMI PC... TV VIDEO COMP MUSIC Batteries Quick Start Guide QGuuicidkeStart User Manual User's Manual Power Cord Remote Control Batteries 1 Push the tab, then lift to open the ...
User Manual
Page 15
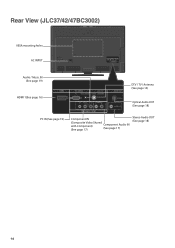
Rear View (JLC37/42/47BC3002) VESA mounting holes AC INPUT AC IN HDMI 1 PC / MUSIC PC AUDIO / MUSIC DTV / TV CABLE / ANTENNA Y Pb/Cb Pr/Cr AUDIO L R COMPONENT / VIDEO AUDIO OUT OPTICAL AUDIO OUT Audio / Music IN (See page 19) HDMI 1(See page 16) HDMI 1 ...PC IN (See page 19) PC / MUSIC PC AUDIO / MUSIC DTV / TV CABLE / ANTENNA Y/V Pb/Cb Pr/Cr L AUDIO R AUDIO OUT OPTICAL AUDIO OUT DTV / TV / Antenna (See page 16) Optical Audio OUT (See page 18) COMPONENT / VIDEO Component IN (Composite Video Shared with Component...
Rear View (JLC37/42/47BC3002) VESA mounting holes AC INPUT AC IN HDMI 1 PC / MUSIC PC AUDIO / MUSIC DTV / TV CABLE / ANTENNA Y Pb/Cb Pr/Cr AUDIO L R COMPONENT / VIDEO AUDIO OUT OPTICAL AUDIO OUT Audio / Music IN (See page 19) HDMI 1(See page 16) HDMI 1 ...PC IN (See page 19) PC / MUSIC PC AUDIO / MUSIC DTV / TV CABLE / ANTENNA Y/V Pb/Cb Pr/Cr L AUDIO R AUDIO OUT OPTICAL AUDIO OUT DTV / TV / Antenna (See page 16) Optical Audio OUT (See page 18) COMPONENT / VIDEO Component IN (Composite Video Shared with Component...
User Manual
Page 16
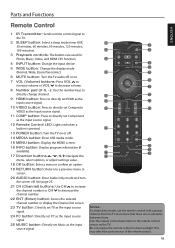
... function. 4 INPUT button: Change the input device. 5 WIDE button: Change the display mode (Normal, Wide, Zoom Panoramic). 6 MUTE button: Turn the TV audio off . Aim the remote control transmitter to the remote control sensor on . 7 VOL (Volume) buttons: Press VOL to increase volume or VOL to... This may affect the performance of the remote control. 15 Parts and Functions I N ENGLISH Remote Control 1 IR Transmitter: Sends remote control signal to the TV. 2 SLEEP button: Select a sleep mode timer (Off, 30 minutes, 60 minutes, 90 minutes, 120 minutes, 180 minutes). 3 Playback controls: The ...
... function. 4 INPUT button: Change the input device. 5 WIDE button: Change the display mode (Normal, Wide, Zoom Panoramic). 6 MUTE button: Turn the TV audio off . Aim the remote control transmitter to the remote control sensor on . 7 VOL (Volume) buttons: Press VOL to increase volume or VOL to... This may affect the performance of the remote control. 15 Parts and Functions I N ENGLISH Remote Control 1 IR Transmitter: Sends remote control signal to the TV. 2 SLEEP button: Select a sleep mode timer (Off, 30 minutes, 60 minutes, 90 minutes, 120 minutes, 180 minutes). 3 Playback controls: The ...
User Manual
Page 17
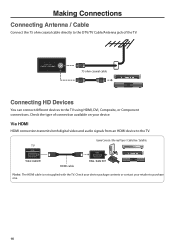
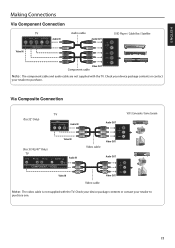
...Audio OUT Note: The HDMI cable is not supplied with the TV. Via HDMI HDMI connection transmits both digital video and audio signals from an HDMI device to the TV using HDMI, DVI, Composite, or Component connections. DTV / TV CABLE / ANTENNA 75 ohm coaxial cable Connecting HD Devices You ...can connect different devices to the TV. Check the type of the TV. Check your device package contents or contact your ...
...Audio OUT Note: The HDMI cable is not supplied with the TV. Via HDMI HDMI connection transmits both digital video and audio signals from an HDMI device to the TV using HDMI, DVI, Composite, or Component connections. DTV / TV CABLE / ANTENNA 75 ohm coaxial cable Connecting HD Devices You ...can connect different devices to the TV. Check the type of the TV. Check your device package contents or contact your ...
User Manual
Page 18
...R AUDIO L VIDEO Video OUT Video cable Audio OUT R AUDIO L VIDEO Video OUT Note: The video cable is not supplied with the TV. ENGLISH Making Connections Via Component Connection TV Y Pb/Cb Pr/Cr L AUDIO R Audio IN Video IN COMPONENT Audio cable Audio OUT R AUDIO L Pr/Cr Pb/Cb Y ...Video OUT Component cable DVD Player / Cable Box / Satellite Note: The component cable and audio cable are not supplied with the TV. Check your device package contents or contact your retailer to purchase. Check your device package contents or contact your retailer to purchase one. 17
...R AUDIO L VIDEO Video OUT Video cable Audio OUT R AUDIO L VIDEO Video OUT Note: The video cable is not supplied with the TV. ENGLISH Making Connections Via Component Connection TV Y Pb/Cb Pr/Cr L AUDIO R Audio IN Video IN COMPONENT Audio cable Audio OUT R AUDIO L Pr/Cr Pb/Cb Y ...Video OUT Component cable DVD Player / Cable Box / Satellite Note: The component cable and audio cable are not supplied with the TV. Check your device package contents or contact your retailer to purchase. Check your device package contents or contact your retailer to purchase one. 17
User Manual
Page 19
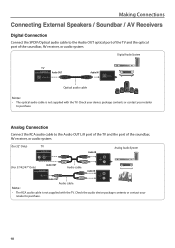
.../ AV Receivers Digital Connection Connect the SPDIF/Optical audio cable to the Audio OUT optical port of the TV and the optical port of the soundbar, AV receiver, or audio system. (for 32" Only) TV AUDIO OUT L R (For 37/42/47" Only) Audio OUT AUDIO OUT Audio cable Audio OUT ...Audio cable Audio IN R AUDIO L Audio IN R AUDIO L Analog Audio System Note: • The RCA audio cable is not supplied with the TV. Check the audio device package contents or contact your retailer to purchase. Analog Connection Connect the RCA audio cable to purchase. 18 Check your device...
.../ AV Receivers Digital Connection Connect the SPDIF/Optical audio cable to the Audio OUT optical port of the TV and the optical port of the soundbar, AV receiver, or audio system. (for 32" Only) TV AUDIO OUT L R (For 37/42/47" Only) Audio OUT AUDIO OUT Audio cable Audio OUT ...Audio cable Audio IN R AUDIO L Audio IN R AUDIO L Analog Audio System Note: • The RCA audio cable is not supplied with the TV. Check the audio device package contents or contact your retailer to purchase. Analog Connection Connect the RCA audio cable to purchase. 18 Check your device...
User Manual
Page 20
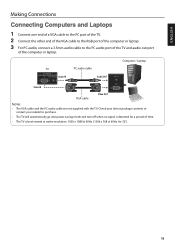
... end of the VGA cable to the RGB port of the computer or laptop. 3 For PC audio, connect a 3.5mm audio cable to purchase. • The TV will automatically go into power saving mode and turn off when no signal is best viewed at native resolution: 1920 x 1080 @ 60Hz (1366 x 768 @ 60Hz... Check your device package contents or contact your retailer to the PC audio port of the TV and audio out port of time. • The TV is detected for a period of the computer or laptop. Computer / Laptop TV PC / MUSIC PC AUDIO / MUSIC Audio IN PC audio cable Audio OUT Audio out VGA...
... end of the VGA cable to the RGB port of the computer or laptop. 3 For PC audio, connect a 3.5mm audio cable to purchase. • The TV will automatically go into power saving mode and turn off when no signal is best viewed at native resolution: 1920 x 1080 @ 60Hz (1366 x 768 @ 60Hz... Check your device package contents or contact your retailer to the PC audio port of the TV and audio out port of time. • The TV is detected for a period of the computer or laptop. Computer / Laptop TV PC / MUSIC PC AUDIO / MUSIC Audio IN PC audio cable Audio OUT Audio out VGA...
User Manual
Page 21
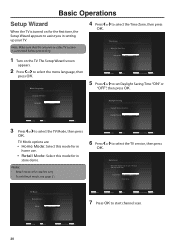
... on for the first time, the Setup Wizard appears to assist you in store demo. The Setup Wizard screen appears. 2 Press or to select the TV Mode, then press OK. Change OK Select INFO Exit Daylight Saving: Off 3 Press or to select the menu language, then press OK. Note: • Retail... mode is for in setting up your TV input and start channel scan. 20 Change OK Select RETURN Previous Setup INFO Exit Change OK Select RETURN Previous Setup INFO Exit 6 Press or to...
... on for the first time, the Setup Wizard appears to assist you in store demo. The Setup Wizard screen appears. 2 Press or to select the TV Mode, then press OK. Change OK Select INFO Exit Daylight Saving: Off 3 Press or to select the menu language, then press OK. Note: • Retail... mode is for in setting up your TV input and start channel scan. 20 Change OK Select RETURN Previous Setup INFO Exit Change OK Select RETURN Previous Setup INFO Exit 6 Press or to...

User Manual
Page 22
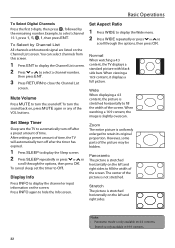
... channel 130, press 1, 3, 0, then press ENT. 21 Note: After pressing the number buttons, there will be a few seconds delay before the TV changes channel. CH Press to continue. To Select Analog Channels 1~9 10~99 100~135: Press 1~9 as needed. Scan Status: 0% Analog Channel: ...Example, to select channel 2, press 2, then press ENT. Example, to select channel 15, press 1, 5, then ENT. OK Cancel Basic TV Operation Changing Channel Press the number buttons to complete setup. Analog Channels: 12 Digital Channels: 26 OK OK Select RETURN Previous Setup INFO ...
... channel 130, press 1, 3, 0, then press ENT. 21 Note: After pressing the number buttons, there will be a few seconds delay before the TV changes channel. CH Press to continue. To Select Analog Channels 1~9 10~99 100~135: Press 1~9 as needed. Scan Status: 0% Analog Channel: ...Example, to select channel 2, press 2, then press ENT. Example, to select channel 15, press 1, 5, then ENT. OK Cancel Basic TV Operation Changing Channel Press the number buttons to complete setup. Analog Channels: 12 Digital Channels: 26 OK OK Select RETURN Previous Setup INFO ...
User Manual
Page 23
... Press MUTE to retain its original proportion. To cancel sleep, set the timer to hide the Info screen. Normal When watching a 4:3 content, the TV displays a standard picture with network signal are listed on , press MUTE again or any of time. The center of the picture is uniformly enlarged to.... Set Aspect Ratio 1 Press WIDE to display the Wide menu. 2 Press WIDE repeatedly or press or to fill the width of time, the TV will automatically turn off . Panoramic The picture is stretched horizontally to scroll through the options, then press OK. Press INFO again to Off. You ...
... Press MUTE to retain its original proportion. To cancel sleep, set the timer to hide the Info screen. Normal When watching a 4:3 content, the TV displays a standard picture with network signal are listed on , press MUTE again or any of time. The center of the picture is uniformly enlarged to.... Set Aspect Ratio 1 Press WIDE to display the Wide menu. 2 Press WIDE repeatedly or press or to fill the width of time, the TV will automatically turn off . Panoramic The picture is stretched horizontally to scroll through the options, then press OK. Press INFO again to Off. You ...


