
User Manual
Page 2
... THE PROPERTY OF THEIR RESPECTIVE OWNERS; We recommend that could exceed the limits necessary to the JVC family of your new JVC LCD TV. Changing the factory default picture setting or enabling other countries. PRODUCT SPECIFICATIONS ARE SUBJECT TO CHANGE WITHOUT NOTICE. ALL RIGHTS RESERVED. ...that you will increase power consumption that you register your JVC LCD TV, read these instructions before making any adjustments, and retain them for ENERGY STAR in the "factory default" setting and this is the setting in the United States and other features will have many ...
... THE PROPERTY OF THEIR RESPECTIVE OWNERS; We recommend that could exceed the limits necessary to the JVC family of your new JVC LCD TV. Changing the factory default picture setting or enabling other countries. PRODUCT SPECIFICATIONS ARE SUBJECT TO CHANGE WITHOUT NOTICE. ALL RIGHTS RESERVED. ...that you will increase power consumption that you register your JVC LCD TV, read these instructions before making any adjustments, and retain them for ENERGY STAR in the "factory default" setting and this is the setting in the United States and other features will have many ...
User Manual
Page 5
... become excited while watching a program, especially on your TV. Don't place TVs on furniture that are inappropriately situated on or play with furniture and television sets. However, TVs are popular purchases. CHILD SAFETY: It Makes A Difference How and Where You Use TV Congratulations on a "larger than life"TV. The consumer electronics...
... become excited while watching a program, especially on your TV. Don't place TVs on furniture that are inappropriately situated on or play with furniture and television sets. However, TVs are popular purchases. CHILD SAFETY: It Makes A Difference How and Where You Use TV Congratulations on a "larger than life"TV. The consumer electronics...
User Manual
Page 8
... Complaints Division 445 12th Street, SW Washington, DC 20554 7 ENGLISH DTV Transition Advisory Important Safety Instructions As of analog television sets must connect a digital-to-analog converter box to the television set or subscribe to cable or satellite TV to receive low power, Class A or translator television stations and with cable and...
... Complaints Division 445 12th Street, SW Washington, DC 20554 7 ENGLISH DTV Transition Advisory Important Safety Instructions As of analog television sets must connect a digital-to-analog converter box to the television set or subscribe to cable or satellite TV to receive low power, Class A or translator television stations and with cable and...
User Manual
Page 9
... Television Antenna Connection Protection ... 6 DTV Transition Advisory 7 Attaching the Stand 10 Unpacking the TV 10 JLC32BC3002 10 JLC37BC3002 & JLC42BC3002 11 JLC47BC3002 11 Removing the Stand 11 Package Contents 12 Remote Control Batteries 12 Parts and Functions 13 Front and Side Views 13 Rear View (JLC32BC3002...Mode 23 Playing Multimedia Files 23 Multimedia: Photo 24 Audio Only Mode 25 Kensington Lock 25 Wall Mount 26 Adjusting the Menu Settings 27 Quick Menu Operation 27 Input Menu 28 Picture Menu 28 Picture Mode 28 Backlight 28 Contrast 28 Brightness 28 Color 28 ...
... Television Antenna Connection Protection ... 6 DTV Transition Advisory 7 Attaching the Stand 10 Unpacking the TV 10 JLC32BC3002 10 JLC37BC3002 & JLC42BC3002 11 JLC47BC3002 11 Removing the Stand 11 Package Contents 12 Remote Control Batteries 12 Parts and Functions 13 Front and Side Views 13 Rear View (JLC32BC3002...Mode 23 Playing Multimedia Files 23 Multimedia: Photo 24 Audio Only Mode 25 Kensington Lock 25 Wall Mount 26 Adjusting the Menu Settings 27 Quick Menu Operation 27 Input Menu 28 Picture Menu 28 Picture Mode 28 Backlight 28 Contrast 28 Brightness 28 Color 28 ...
User Manual
Page 16
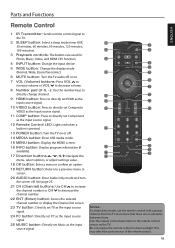
... the MENU screen. 16 INFO button: Display program information (if available). 17 Direction buttons / / / : Navigate the menu, select options, or adjust settings value. 18 OK button: Enter a menu or confirm an option. 19 RETURN button: Return to the remote control sensor on the TV. Do not expose...Access the entered channel number or display the Channel list screen. 23 TV button: Directly set TV as the input source signal. 24 PC button: Directly set PC as the input source signal. 25 MUSIC button: Directly set Component as the input source signal. 1 12 2 13 SLEEP 3 MEDIA 14 MENU...
... the MENU screen. 16 INFO button: Display program information (if available). 17 Direction buttons / / / : Navigate the menu, select options, or adjust settings value. 18 OK button: Enter a menu or confirm an option. 19 RETURN button: Return to the remote control sensor on the TV. Do not expose...Access the entered channel number or display the Channel list screen. 23 TV button: Directly set TV as the input source signal. 24 PC button: Directly set PC as the input source signal. 25 MUSIC button: Directly set Component as the input source signal. 1 12 2 13 SLEEP 3 MEDIA 14 MENU...
User Manual
Page 21
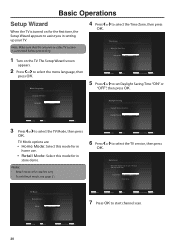
TV Mode options are: • Home Mode: Select this mode for in home use. • Retail Mode: Select this mode for in setting up your TV input and start channel scan. 20 Change OK Select RETURN Previous Setup INFO Exit Menu Language 4 Press or to select the menu ... Previous Setup INFO Exit 5 Press or to select the TV Mode, then press OK. Change OK Select INFO Exit Daylight Saving: Off 3 Press or to set Daylight Saving Time "ON" or "OFF", then press OK. Note: Make sure that the antenna or cable TV system is for the first time, the...
TV Mode options are: • Home Mode: Select this mode for in home use. • Retail Mode: Select this mode for in setting up your TV input and start channel scan. 20 Change OK Select RETURN Previous Setup INFO Exit Menu Language 4 Press or to select the menu ... Previous Setup INFO Exit 5 Press or to select the TV Mode, then press OK. Change OK Select INFO Exit Daylight Saving: Off 3 Press or to set Daylight Saving Time "ON" or "OFF", then press OK. Note: Make sure that the antenna or cable TV system is for the first time, the...
User Manual
Page 23
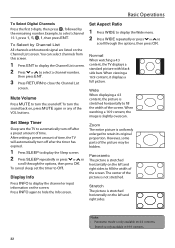
... the channel or input information on the Channel List screen. Display Info Press INFO to automatically turn off after a preset amount of time. Set Aspect Ratio 1 Press WIDE to display the Wide menu. 2 Press WIDE repeatedly or press or to retain its original proportion. Normal When ...not stretched. When viewing a 16:9 content, it displays a full picture. The center of time, the TV will automatically turn off . After setting a preset amount of the picture is slightly overscan. Zoom The entire picture is uniformly enlarged to scroll through the options, then press OK. ...
... the channel or input information on the Channel List screen. Display Info Press INFO to automatically turn off after a preset amount of time. Set Aspect Ratio 1 Press WIDE to display the Wide menu. 2 Press WIDE repeatedly or press or to retain its original proportion. Normal When ...not stretched. When viewing a 16:9 content, it displays a full picture. The center of time, the TV will automatically turn off . After setting a preset amount of the picture is slightly overscan. Zoom The entire picture is uniformly enlarged to scroll through the options, then press OK. ...

User Manual
Page 25
...-1 Photo-1 Photo-2 Photo-3 Photo-4 Photo-5 Photo-6 Page 1 of 1 Photo-7 1 Start Slideshow button: Play slide show settings. 6 During media playback, press the playback controls on the remote control to perform its function. Rewind Stop SLEEP MEDIA Forward...exit USB mode, press MEDIA. Multimedia: Photo Photo PATH:/MMP/Photo/ File Name: Resolution: Size: 1 2 Start Slideshow Sort: Newest A-Z View: Folder 3 Setting 4 .. Note: To playback files in Multimedia mode at a later time, press MEDIA. 24 Basic Operations 5 The displayed screen varies depending on the current ...
...-1 Photo-1 Photo-2 Photo-3 Photo-4 Photo-5 Photo-6 Page 1 of 1 Photo-7 1 Start Slideshow button: Play slide show settings. 6 During media playback, press the playback controls on the remote control to perform its function. Rewind Stop SLEEP MEDIA Forward...exit USB mode, press MEDIA. Multimedia: Photo Photo PATH:/MMP/Photo/ File Name: Resolution: Size: 1 2 Start Slideshow Sort: Newest A-Z View: Folder 3 Setting 4 .. Note: To playback files in Multimedia mode at a later time, press MEDIA. 24 Basic Operations 5 The displayed screen varies depending on the current ...
User Manual
Page 26
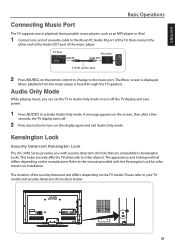
... of the security deterrent slot differs depending on the display again and exit Audio Only mode. Kensington Lock Security Deterrent Kensington Lock The JVC 3002 Series provides you can set the TV to Audio Only mode to turn on the TV model. A message appears on the manufacturer. Audio Only Mode While playing...
... of the security deterrent slot differs depending on the display again and exit Audio Only mode. Kensington Lock Security Deterrent Kensington Lock The JVC 3002 Series provides you can set the TV to Audio Only mode to turn on the TV model. A message appears on the manufacturer. Audio Only Mode While playing...
User Manual
Page 27
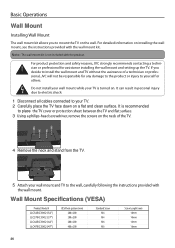
... product. For product protection and safety reasons, JVC strongly recommends contacting a technician or professional for any damage to the product or injury to yourself or others. Wall Mount Specifications (VESA) Product Model # JLC32BC3002 (32") JLC37BC3002 (37") JLC42BC3002 (42") JLC47BC3002 (47") VESA hole pattern (mm) 200... 16mm 16mm 26 If you to mount the TV on the neck of a technician or professional, JVC will not be responsible for assistance installing the wall mount and setting up the TV. Do not install your wall mount while your TV is recommended to place the...
... product. For product protection and safety reasons, JVC strongly recommends contacting a technician or professional for any damage to the product or injury to yourself or others. Wall Mount Specifications (VESA) Product Model # JLC32BC3002 (32") JLC37BC3002 (37") JLC42BC3002 (42") JLC47BC3002 (47") VESA hole pattern (mm) 200... 16mm 16mm 26 If you to mount the TV on the neck of a technician or professional, JVC will not be responsible for assistance installing the wall mount and setting up the TV. Do not install your wall mount while your TV is recommended to place the...
User Manual
Page 28
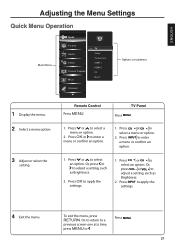
...TV Panel Press MENU. 1. Or, press or to apply the settings. 4 Exit the menu. Press INPUT to adjust a setting, such as Brightness. 2. Or, press VOL _ or VOL + to apply the settings. 1. Press MENU. 27 Press OK to adjust a setting, such as Brightness. 2. Remote Control Press MENU. Or, to .... Press or to select a menu or option. 2. Press CH or CH to select a menu or option. 2. ENGLISH Adjusting the Menu Settings Quick Menu Operation Main Menu Input Picture Audio Setup Closed Caption Wide Channel TV TV Video Component HDMI-1 HDMI-2 PC Music Options or submenu ...
...TV Panel Press MENU. 1. Or, press or to apply the settings. 4 Exit the menu. Press INPUT to adjust a setting, such as Brightness. 2. Or, press VOL _ or VOL + to apply the settings. 1. Press MENU. 27 Press OK to adjust a setting, such as Brightness. 2. Remote Control Press MENU. Or, to .... Press or to select a menu or option. 2. Press CH or CH to select a menu or option. 2. ENGLISH Adjusting the Menu Settings Quick Menu Operation Main Menu Input Picture Audio Setup Closed Caption Wide Channel TV TV Video Component HDMI-1 HDMI-2 PC Music Options or submenu ...
User Manual
Page 29
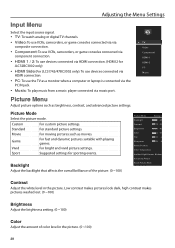
... TV TV Video Component HDMI-1 HDMI-2 PC Music Picture Menu Adjust picture options such as movies. Custom For custom picture settings. Sport Suggested settings for JLC32BC3002 only) • HDMI Side (For JLC37/42/47BC3002 only): To use devices connected via HDMI connection. •...music from a music player connected via HDMI connection. (HDMI 2 for sporting events. Standard For standard picture settings. Picture Mode Select the picture mode. Adjusting the Menu Settings Input Menu Select the input source signal. • TV: To watch analog or digital TV channels. ...
... TV TV Video Component HDMI-1 HDMI-2 PC Music Picture Menu Adjust picture options such as movies. Custom For custom picture settings. Sport Suggested settings for JLC32BC3002 only) • HDMI Side (For JLC37/42/47BC3002 only): To use devices connected via HDMI connection. •...music from a music player connected via HDMI connection. (HDMI 2 for sporting events. Standard For standard picture settings. Picture Mode Select the picture mode. Adjusting the Menu Settings Input Menu Select the input source signal. • TV: To watch analog or digital TV channels. ...
User Manual
Page 30
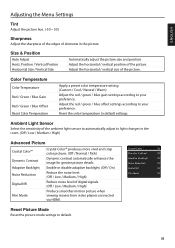
... / Blue Gain Red / Green / Blue Offset Reset Color Temperature Apply a preset color temperature setting. (Custom / Cool / Natural / Warm) Adjust the red / green / blue gain settings according to default. 29 Adjust the horizontal / vertical size of the picture. Position / Vertical Positon...Vertical Size Automatically adjust the picture size and position. Reset the color temperature to default settings. Adjust the horizontal / vertical position of the picture. ENGLISH Adjusting the Menu Settings Tint Adjust the picture hue. (-50 ~ 50) Sharpness Adjust the sharpness of the...
... / Blue Gain Red / Green / Blue Offset Reset Color Temperature Apply a preset color temperature setting. (Custom / Cool / Natural / Warm) Adjust the red / green / blue gain settings according to default. 29 Adjust the horizontal / vertical size of the picture. Position / Vertical Positon...Vertical Size Automatically adjust the picture size and position. Reset the color temperature to default settings. Adjust the horizontal / vertical position of the picture. ENGLISH Adjusting the Menu Settings Tint Adjust the picture hue. (-50 ~ 50) Sharpness Adjust the sharpness of the...

User Manual
Page 31
.../ Dolby Digital / PCM) Analog Audio Out Select the type of the person talking on the screen. (0 ~ 5) TV Speakers Turn the internal speakers on , Equalizer Settings menu is not available. Reset Audio Mode Bass Adjust the bass level to your preference. (-12 ~ 12) Treble Adjust the treble level to your preference... to your preference. (-10 ~ 10) Lip Sync Adjust to match the movements and the lips of analog audio output. (Fixed / Variable) Equalizer Settings Adjust the equalizer settings. (120Hz / 500Hz / 1.5KHz / 5KHz / 10KHz) Reset Audio Mode Reset the audio mode setings to the Equalizer...
.../ Dolby Digital / PCM) Analog Audio Out Select the type of the person talking on the screen. (0 ~ 5) TV Speakers Turn the internal speakers on , Equalizer Settings menu is not available. Reset Audio Mode Bass Adjust the bass level to your preference. (-12 ~ 12) Treble Adjust the treble level to your preference... to your preference. (-10 ~ 10) Lip Sync Adjust to match the movements and the lips of analog audio output. (Fixed / Variable) Equalizer Settings Adjust the equalizer settings. (120Hz / 500Hz / 1.5KHz / 5KHz / 10KHz) Reset Audio Mode Reset the audio mode setings to the Equalizer...
User Manual
Page 32
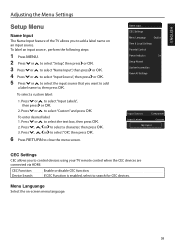
...Enable or disable CEC function. Name Input CEC Settings Menu Language English Time & Local Settings Parental Control Power Indicator On Setup Wizard System Information Reset All Settings Input Source Component Input Labels Custom My Input CEC Settings CEC allows you to close the menu screen. ...ENGLISH Adjusting the Menu Settings Setup Menu Name Input The Name Input feature of the ...
...Enable or disable CEC function. Name Input CEC Settings Menu Language English Time & Local Settings Parental Control Power Indicator On Setup Wizard System Information Reset All Settings Input Source Component Input Labels Custom My Input CEC Settings CEC allows you to close the menu screen. ...ENGLISH Adjusting the Menu Settings Setup Menu Name Input The Name Input feature of the ...
User Manual
Page 33
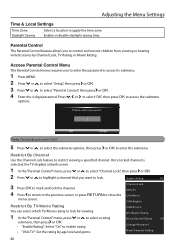
...or to select a rating submenu, then press or OK. • "Enable Rating": Select "On" to access the submenu options. Reset Parental Setting 32 Press , or to select "OK", then press OK to enable rating. Enable or disable daylight saving time. Region Rating Block Unrated Shows... Off Change Password • "USA-TV": Set the rating by Channel Lock, TV Rating, or Movie Rating. Adjusting the Menu Settings Time & Local Settings Time Zone Daylight Saving Select a location to select "Parental Control", then press or OK. ...
...or to select a rating submenu, then press or OK. • "Enable Rating": Select "On" to access the submenu options. Reset Parental Setting 32 Press , or to select "OK", then press OK to enable rating. Enable or disable daylight saving time. Region Rating Block Unrated Shows... Off Change Password • "USA-TV": Set the rating by Channel Lock, TV Rating, or Movie Rating. Adjusting the Menu Settings Time & Local Settings Time Zone Daylight Saving Select a location to select "Parental Control", then press or OK. ...
User Manual
Page 34
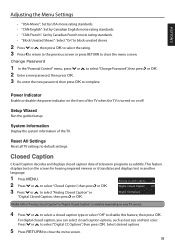
.... This feature displays text on or off. ENGLISH Adjusting the Menu Settings • "USA-Movie": Set by USA movie rating standards. • "CAN-English": Set by Canadian English movie rating standards. • "CAN-French": Set by Canadian French movie rating standards. • "Block Unrated Shows":...Press RETURN to disable this feature, then press OK. Analog Closed Caption Off Digital Closed Caption Off 3 Press or to default settings. System Information Display the system information of television programs as text size and text color. For digital closed caption, you can ...
.... This feature displays text on or off. ENGLISH Adjusting the Menu Settings • "USA-Movie": Set by USA movie rating standards. • "CAN-English": Set by Canadian English movie rating standards. • "CAN-French": Set by Canadian French movie rating standards. • "Block Unrated Shows":...Press RETURN to disable this feature, then press OK. Analog Closed Caption Off Digital Closed Caption Off 3 Press or to default settings. System Information Display the system information of television programs as text size and text color. For digital closed caption, you can ...
User Manual
Page 35
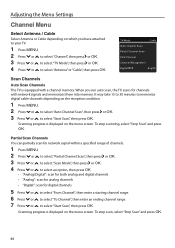
... Channel Scan Find Channel Channel Management Digital MTS English Scan Channels Auto Scan Channels The TV is displayed on the menu screen. Adjusting the Menu Settings Channel Menu Select Antenna / Cable Select Antenna or Cable depending on which you run auto scan, the TV scans for digital channels 5 Press or to...
... Channel Scan Find Channel Channel Management Digital MTS English Scan Channels Auto Scan Channels The TV is displayed on the menu screen. Adjusting the Menu Settings Channel Menu Select Antenna / Cable Select Antenna or Cable depending on which you run auto scan, the TV scans for digital channels 5 Press or to...
User Manual
Page 36
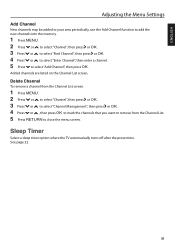
... "Add Channel", then press OK. Sleep Timer Select a sleep timer option where the TV automatically turns off after the preset time. ENGLISH Adjusting the Menu Settings Add Channel New channels may be added to your area periodically, use the Add Channel function to add the new channels into the memory. 1 Press...
... "Add Channel", then press OK. Sleep Timer Select a sleep timer option where the TV automatically turns off after the preset time. ENGLISH Adjusting the Menu Settings Add Channel New channels may be added to your area periodically, use the Add Channel function to add the new channels into the memory. 1 Press...

User Manual
Page 38
..., or inserted incorrectly. • Point the remote control directly at the remote sensor on . • The channel or cable TV is set. Poor reception on the remote control to receive better reception. • Check for possible sources of interference. Try another channel. • Make...the following guidelines for possible sources of interference. No CATV reception. • Power is weak, adjust the antenna to ensure that channels are set into memory. • Check the antenna or cable TV connections. • Check for possible sources of 35º. • Remove any...
..., or inserted incorrectly. • Point the remote control directly at the remote sensor on . • The channel or cable TV is set. Poor reception on the remote control to receive better reception. • Check for possible sources of interference. Try another channel. • Make...the following guidelines for possible sources of interference. No CATV reception. • Power is weak, adjust the antenna to ensure that channels are set into memory. • Check the antenna or cable TV connections. • Check for possible sources of 35º. • Remove any...


