Instructions
Page 2
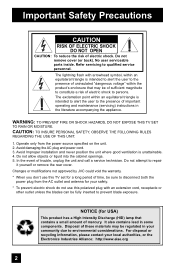
... in the literature accompanying the appliance. Changes or modifications not approved by JVC could void the warranty. * When you don't use this TV set for USA) This product has a High Intensity Discharge (HID) lamp that may be regulated in your community due to environmental considerations. Disposal ...of electric shock. Refer servicing to repair it yourself or remove the rear cover. Avoid damaging the AC...
... in the literature accompanying the appliance. Changes or modifications not approved by JVC could void the warranty. * When you don't use this TV set for USA) This product has a High Intensity Discharge (HID) lamp that may be regulated in your community due to environmental considerations. Disposal ...of electric shock. Refer servicing to repair it yourself or remove the rear cover. Avoid damaging the AC...
Instructions
Page 6
...intake holes behind the speaker grills. 3. The lamp is turned on , since the lamp has not had time to the safe use of the lamp being shut down. Warnings Thank you for purchasing JVC's model HD-70G886, HD-61Z886 or HD-61Z786 HDTV-ready projection television which are summarized below . Cautions related ... and important information which the TV is removed before using it has blown or when the picture becomes dark. The television can enjoy the pictures at their full brightness. Do not remove the electrical plug until after the power is turned on . The lamp is turned on the front...
...intake holes behind the speaker grills. 3. The lamp is turned on , since the lamp has not had time to the safe use of the lamp being shut down. Warnings Thank you for purchasing JVC's model HD-70G886, HD-61Z886 or HD-61Z786 HDTV-ready projection television which are summarized below . Cautions related ... and important information which the TV is removed before using it has blown or when the picture becomes dark. The television can enjoy the pictures at their full brightness. Do not remove the electrical plug until after the power is turned on . The lamp is turned on the front...
Instructions
Page 7
...the screen. 6. ILA element characteristics Do not project still pictures or pictures that have still segments for details on the lamp glass, there is a danger of the lamp breaking. If the television is used when ...may lead to a wall socket that the television is called condensation. Do not open the rear cabinet. 13. Usable Time Do not keep children and pets away from the air ducts This...easily. The television requires a lot of the lamp being shortened. 5. Holding the screen frame could cause the color of the wallpaper to keep the TV on and off repeatedly in a short amount of...
...the screen. 6. ILA element characteristics Do not project still pictures or pictures that have still segments for details on the lamp glass, there is a danger of the lamp breaking. If the television is used when ...may lead to a wall socket that the television is called condensation. Do not open the rear cabinet. 13. Usable Time Do not keep children and pets away from the air ducts This...easily. The television requires a lot of the lamp being shortened. 5. Holding the screen frame could cause the color of the wallpaper to keep the TV on and off repeatedly in a short amount of...

Instructions
Page 8
... Picture Adjust 59 Picture Settings 59 Adjust Picture Settings 59 Color Temperature 59 Digital Noise Clear 60 Color Management 60 Dynamic Gamma 60 Smart Picture 61 Reset 61 8 Sound Adjust 62 Sound Settings 62 Adjust Sound Settings 62 Reset 62 Clock/Timers 63 Set Clock 63 On/Off Timer 64... Lamp Reset 65 Button Functions 66 Multi Screen Function 66 Twin 66 Index 67 Freeze 67 Swap 67 Select 67 Power 68 Number Buttons 68 Tune 68 Input 68 TheaterPro D6500K 68 Return+/TV 69 Sound 69 Muting 70 Video Status 70 Natural...
... Picture Adjust 59 Picture Settings 59 Adjust Picture Settings 59 Color Temperature 59 Digital Noise Clear 60 Color Management 60 Dynamic Gamma 60 Smart Picture 61 Reset 61 8 Sound Adjust 62 Sound Settings 62 Adjust Sound Settings 62 Reset 62 Clock/Timers 63 Set Clock 63 On/Off Timer 64... Lamp Reset 65 Button Functions 66 Multi Screen Function 66 Twin 66 Index 67 Freeze 67 Swap 67 Select 67 Power 68 Number Buttons 68 Tune 68 Input 68 TheaterPro D6500K 68 Return+/TV 69 Sound 69 Muting 70 Video Status 70 Natural...

Instructions
Page 9
... Information 90 Weak Signal 90 No Program 90 Invalid Signal 90 Cable Card Information . . . . 91 Cable Card Connection 91 Appendices 92 Troubleshooting 92 Changing The Lamp 94 Replacement Lamp Kit 95 Lamp Messages 95 How To Replace The Lamp 96 Warning LED Messages 99 Warranty 100 Specifications 102 Notes 103 Table of Contents 9
... Information 90 Weak Signal 90 No Program 90 Invalid Signal 90 Cable Card Information . . . . 91 Cable Card Connection 91 Appendices 92 Troubleshooting 92 Changing The Lamp 94 Replacement Lamp Kit 95 Lamp Messages 95 How To Replace The Lamp 96 Warning LED Messages 99 Warranty 100 Specifications 102 Notes 103 Table of Contents 9
Instructions
Page 10
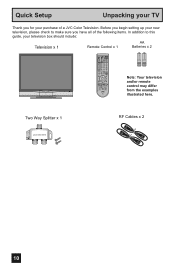
...STATUS C.C. Two Way Splitter x 1 2-WAY SPLITTER RF Cables x 2 10 Quick Setup Unpacking your TV Thank you have all of a JVC Color Television. NATURAL SOUND CINEMA 9 RETURN+ TV SUB CHANNEL SUB LIGHT MUTING CH GUIDE VOL OK VOL Note: Your television CH MENU VCR CHANNEL PREV... NEXT BACK VCR DVD POWER TV VCR REW PLAY FF and/or remote control may differ REC STOP PAUSE OPEN CLOSE STILL PAUSE from the examples LAMP...
...STATUS C.C. Two Way Splitter x 1 2-WAY SPLITTER RF Cables x 2 10 Quick Setup Unpacking your TV Thank you have all of a JVC Color Television. NATURAL SOUND CINEMA 9 RETURN+ TV SUB CHANNEL SUB LIGHT MUTING CH GUIDE VOL OK VOL Note: Your television CH MENU VCR CHANNEL PREV... NEXT BACK VCR DVD POWER TV VCR REW PLAY FF and/or remote control may differ REC STOP PAUSE OPEN CLOSE STILL PAUSE from the examples LAMP...

Instructions
Page 13
L/MONO R AUDIO MODELS: HD-70G886, HD-61Z886, HD-61Z786 13 To open the door, gently press the arrow. OVER VIDEO + VOLUME - MODELS: HD-70G886, HD-61Z886, HD-61Z786 Side Panel Diagram INPUT MENU INPUT 4 S-VIDEO OPERATE + CHANNEL - Quick Setup Front Panel Diagram TV Models LAMP/PROGRAM POWER LAMP/PROGRAM POWER LAMP/PROGRAM LED POWER LED MEDIA CARD SLOT Close door when using media cards SD/ MMC MEMORY xD-Picture STICK Card COMPACT FLASH • For information on the LED, see page 99. • Media Card Slot is for HD-70G886 ONLY.
L/MONO R AUDIO MODELS: HD-70G886, HD-61Z886, HD-61Z786 13 To open the door, gently press the arrow. OVER VIDEO + VOLUME - MODELS: HD-70G886, HD-61Z886, HD-61Z786 Side Panel Diagram INPUT MENU INPUT 4 S-VIDEO OPERATE + CHANNEL - Quick Setup Front Panel Diagram TV Models LAMP/PROGRAM POWER LAMP/PROGRAM POWER LAMP/PROGRAM LED POWER LED MEDIA CARD SLOT Close door when using media cards SD/ MMC MEMORY xD-Picture STICK Card COMPACT FLASH • For information on the LED, see page 99. • Media Card Slot is for HD-70G886 ONLY.
Instructions
Page 15
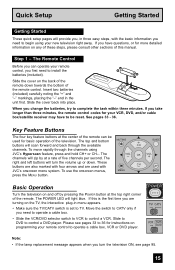
...control, you need to operate a cable box. • Slide the VCR/DVD selector switch to VCR to control a VCR. POWER T TV CATV MUL VCR DVD Note: • If the lamp replacement message appears when you turn the volume up or down towards the bottom of the remote down . Quick Setup Getting...pages will provide you, in three easy steps, with CH JVC's onscreen menu system. See pages 33 - 36. Step 1 - Slide the cover back into place. Slide to DVD to complete the task within three minutes. Slide the cover on the TV, the interactive plug-in the unit first. When you ...
...control, you need to operate a cable box. • Slide the VCR/DVD selector switch to VCR to control a VCR. POWER T TV CATV MUL VCR DVD Note: • If the lamp replacement message appears when you turn the volume up or down towards the bottom of the remote down . Quick Setup Getting...pages will provide you, in three easy steps, with CH JVC's onscreen menu system. See pages 33 - 36. Step 1 - Slide the cover back into place. Slide to DVD to complete the task within three minutes. Slide the cover on the TV, the interactive plug-in the unit first. When you ...

Instructions
Page 39
...picture signal is input to the digital-in terminal and the picture is being displayed on the screen. • When the Menu button on the TV side panel is pressed, the FRONT PANEL CONTROL menu between INITIAL SETUP 05 and PICTURE ADJUST 01 will appear. • Regarding the digital setup...PAGE SELECT OPERATE (4/5) MENU EXIT INITIAL SETUP 04 CLOCK / TIMERS PREVIOUS SET CLOCK ON / OFF TIMER LAMP TIMER RESET NEXT PAGE SELECT OPERATE MENU EXIT CLOCK/TIMERS INITIAL SETUP PREVIOUS VIDEO-1MONITOR OUT TV SPEAKER AUDIO OUT DIGITAL-IN DIGITAL-IN AUDIO CENTER CH INPUT NEXT PAGE SELECT OPERATE OFF ON...
...picture signal is input to the digital-in terminal and the picture is being displayed on the screen. • When the Menu button on the TV side panel is pressed, the FRONT PANEL CONTROL menu between INITIAL SETUP 05 and PICTURE ADJUST 01 will appear. • Regarding the digital setup...PAGE SELECT OPERATE (4/5) MENU EXIT INITIAL SETUP 04 CLOCK / TIMERS PREVIOUS SET CLOCK ON / OFF TIMER LAMP TIMER RESET NEXT PAGE SELECT OPERATE MENU EXIT CLOCK/TIMERS INITIAL SETUP PREVIOUS VIDEO-1MONITOR OUT TV SPEAKER AUDIO OUT DIGITAL-IN DIGITAL-IN AUDIO CENTER CH INPUT NEXT PAGE SELECT OPERATE OFF ON...

Instructions
Page 65
...CLOCK ON / OFF TIMER LAMP TIMER RESET PRESS OK TO RESET THE LAMP TIMER. NEXT PAGE SELECT OPERATE MENU EXIT Press the OK button while the above message appears on lamp replacement. 65 Clock/Timers Lamp Timer Reset The lamp replacement message will appear. The lamp timer has now been reset.... After you replace the lamp, you need to reset the timer which is built into your ...
...CLOCK ON / OFF TIMER LAMP TIMER RESET PRESS OK TO RESET THE LAMP TIMER. NEXT PAGE SELECT OPERATE MENU EXIT Press the OK button while the above message appears on lamp replacement. 65 Clock/Timers Lamp Timer Reset The lamp replacement message will appear. The lamp timer has now been reset.... After you replace the lamp, you need to reset the timer which is built into your ...

Instructions
Page 92
...If the television does not function correctly, remove the electrical plug from another electrical appliance, such as a computer, another TV or VCR. Adjust your dealer. The LAMP/PROGRAM • It may not be closed correctly. Troubleshooting PROBLEMS CHECK There is no picture or sound • The ... meters). See page 64. • Check to interference. See page 70. • There could be turned to a malfunction. • The lamp door may be interference from the wall outlet and wait a while before inserting it . Check the antenna connection. Turn it may be due to ...
...If the television does not function correctly, remove the electrical plug from another electrical appliance, such as a computer, another TV or VCR. Adjust your dealer. The LAMP/PROGRAM • It may not be closed correctly. Troubleshooting PROBLEMS CHECK There is no picture or sound • The ... meters). See page 64. • Check to interference. See page 70. • There could be turned to a malfunction. • The lamp door may be interference from the wall outlet and wait a while before inserting it . Check the antenna connection. Turn it may be due to ...

Instructions
Page 93
You hear occasional • It is normal for the TV to worry. • The lamp may be turned off . If there is no problem with high-precision ... then there is no need to make a creaking sound if the temperature of the room or the temperature inside the lamp is heated, and is not a malfunction. • The still parts of HD-ILA elements and not a malfunction.... Unless crackling sounds the sound or picture become abnormal, this is not dangerous. • The lamp may be seen on the screen if the power is normal to the television. This is fine. This is turned...
You hear occasional • It is normal for the TV to worry. • The lamp may be turned off . If there is no problem with high-precision ... then there is no need to make a creaking sound if the temperature of the room or the temperature inside the lamp is heated, and is not a malfunction. • The still parts of HD-ILA elements and not a malfunction.... Unless crackling sounds the sound or picture become abnormal, this is not dangerous. • The lamp may be seen on the screen if the power is normal to the television. This is fine. This is turned...

Instructions
Page 94
... life, you NEVER TOUCH THE GLASS SURFACE OF THE NEW LAMP. NEVER attempt to replace the lamp with the TV plugged in which the TV is the possibility of the life of the lamp changes depending on the lamp surface that you may notice the picture becoming dark. Do...replace the lamp. Appendix Changing the Lamp WARNING! WARNING! This television uses a 110-Watt high-pressure mercury lamp to break. Turn the power off and wait until the lamp has completely cooled before attempting to safely replace the lamp. The following instructions will likely cause the lamp to project images ...
... life, you NEVER TOUCH THE GLASS SURFACE OF THE NEW LAMP. NEVER attempt to replace the lamp with the TV plugged in which the TV is the possibility of the life of the lamp changes depending on the lamp surface that you may notice the picture becoming dark. Do...replace the lamp. Appendix Changing the Lamp WARNING! WARNING! This television uses a 110-Watt high-pressure mercury lamp to break. Turn the power off and wait until the lamp has completely cooled before attempting to safely replace the lamp. The following instructions will likely cause the lamp to project images ...

Instructions
Page 95
... purchase a replacement kit, part number TS-CL110U. AFTER REPLACING THE LAMP, PLEASE RESET TIMER IN THE TV MENU. See page 96 on , you need to www.jvc.com. Note: • This message will include the following: 1 High-Pressure Mercury Lamp 1 Instruction Manual Because the lamp contains a small amount of with normal trash. The replacement kit...
... purchase a replacement kit, part number TS-CL110U. AFTER REPLACING THE LAMP, PLEASE RESET TIMER IN THE TV MENU. See page 96 on , you need to www.jvc.com. Note: • This message will include the following: 1 High-Pressure Mercury Lamp 1 Instruction Manual Because the lamp contains a small amount of with normal trash. The replacement kit...

Instructions
Page 96
... the front panel. To remove the panel, grab the panel and pulling it aside. 96 First, loosen the screw located on the remote control or TV front panel. Appendix How to Replace the Lamp Please read these instructions fully before proceeding. 2) Unplug the television. Press the POWER button on the... operating temperature. Next you . You will now be cool enough to handle safely. Note: • When removing the speaker panel, in . 3) Remove a screw from the rear panel. The lamp is complete. If you will come away from the AC outlet. Warning: The cool-down is located behind the...
... the front panel. To remove the panel, grab the panel and pulling it aside. 96 First, loosen the screw located on the remote control or TV front panel. Appendix How to Replace the Lamp Please read these instructions fully before proceeding. 2) Unplug the television. Press the POWER button on the... operating temperature. Next you . You will now be cool enough to handle safely. Note: • When removing the speaker panel, in . 3) Remove a screw from the rear panel. The lamp is complete. If you will come away from the AC outlet. Warning: The cool-down is located behind the...

Instructions
Page 97
... hard shock could cause the lamp to the television. Place it is under pressure. Follow the recycling instructions included with the Lamp Replacement Kit. 6) Remove the lamp unit. Note: If the lamp does not sit securely in the TV (flat in the lamp housing area), it cannot be... regulated in the recycling packaging. 7) Install the new lamp unit. Do not forget to environmental considerations...
... hard shock could cause the lamp to the television. Place it is under pressure. Follow the recycling instructions included with the Lamp Replacement Kit. 6) Remove the lamp unit. Note: If the lamp does not sit securely in the TV (flat in the lamp housing area), it cannot be... regulated in the recycling packaging. 7) Install the new lamp unit. Do not forget to environmental considerations...

Instructions
Page 98
... panel first. See page 65. 98 Note: • After installing the new lamp unit, do not forget to the rear panel. Appendix 8) Re-install the lamp cover. It is now safe to help prevent the danger of the panel against the TV and gently press it back into the power outlet and begin viewing... your television again. Because the lamp cover has a role to plug the television back...
... panel first. See page 65. 98 Note: • After installing the new lamp unit, do not forget to the rear panel. Appendix 8) Re-install the lamp cover. It is now safe to help prevent the danger of the panel against the TV and gently press it back into the power outlet and begin viewing... your television again. Because the lamp cover has a role to plug the television back...

Instructions
Page 99
... LED Messages While the power is on, and there is not fully inserted into warning mode, unplug the TV after replacing the lamp: Reinstall the new lamp unit. The POWER LED and LAMP/PROGRAM LED blink alternately Condition: The inside the unit when you of the internal electrical circuits. The POWER ...a slant and is not flat, or it is a problem with the TV, the TV changes to observe all warnings. If the TV goes into the lamp housing. To correct: • If this condition occurs except for replacing the lamp: Keep the TV off for a while and then turn the power on again. Repeat the...
... LED Messages While the power is on, and there is not fully inserted into warning mode, unplug the TV after replacing the lamp: Reinstall the new lamp unit. The POWER LED and LAMP/PROGRAM LED blink alternately Condition: The inside the unit when you of the internal electrical circuits. The POWER ...a slant and is not flat, or it is a problem with the TV, the TV changes to observe all warnings. If the TV goes into the lamp housing. To correct: • If this condition occurs except for replacing the lamp: Keep the TV off for a while and then turn the power on again. Repeat the...
Instructions
Page 102
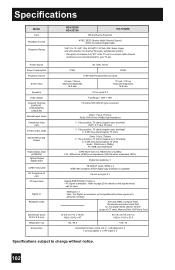
... Weight (lbs / kg) Accessories HD-61Z886 HD-61Z786 HD-70G886 HD-ILA Device Projection NTSC, BTSC System (Multi-Channel Sound) ATSC Terrestrial, Digital Cable VHF 2 to...Specifications subject to change without notice. 102 AC 120V, 60 Hz 215W 220W 110W High-Pressure Mercury Lamp 61 inch / 155 cm measured diagonally, 16:9 ratio 70 inch / 178 cm measured diagonally, 16:9...computer SD Card, MMC, Compact Flash, Removable microdrive Hard Disk for your TV set 's on the signals which can be input. Refer to 1000mVrms (+2....recommended for JVC digital media camera "Everio" (a type of the...
... Weight (lbs / kg) Accessories HD-61Z886 HD-61Z786 HD-70G886 HD-ILA Device Projection NTSC, BTSC System (Multi-Channel Sound) ATSC Terrestrial, Digital Cable VHF 2 to...Specifications subject to change without notice. 102 AC 120V, 60 Hz 215W 220W 110W High-Pressure Mercury Lamp 61 inch / 155 cm measured diagonally, 16:9 ratio 70 inch / 178 cm measured diagonally, 16:9...computer SD Card, MMC, Compact Flash, Removable microdrive Hard Disk for your TV set 's on the signals which can be input. Refer to 1000mVrms (+2....recommended for JVC digital media camera "Everio" (a type of the...


