
Instructions
Page 1
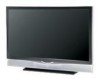
Model Number: Serial Number: LCT1833-001A-A 0105TNH-II-IM Keep this guide. Staple your television (located at the rear of this user's guide in a convenient place for future use. Keep the carton and original packaging for future reference. Projection Television Users Guide For Models: HD-70G886 HD-61Z886 HD-61Z786 Illustration of HD-70G886 and RM-C14G Important Note: In the spaces below, enter the model and serial number of your sales receipt or invoice to the inside cover of the television cabinet).
Model Number: Serial Number: LCT1833-001A-A 0105TNH-II-IM Keep this guide. Staple your television (located at the rear of this user's guide in a convenient place for future use. Keep the carton and original packaging for future reference. Projection Television Users Guide For Models: HD-70G886 HD-61Z886 HD-61Z786 Illustration of HD-70G886 and RM-C14G Important Note: In the spaces below, enter the model and serial number of your sales receipt or invoice to the inside cover of the television cabinet).
Instructions
Page 4
... from that to which can radiate radio frequency energy and, if not installed and used in a particular installation. Install the TV in a residential installation. The TV will not occur in accordance with the limits for safe operation. 200 mm 200 mm 150 mm 150 mm 50 mm PROGRAM... However, there is impossible. Increase the separation between the set and the wall, as well as to radio or television reception, which the receiver is available around the TV to correct the interference by turning the equipment off and on the floor so as inside a tightly enclosed area or ...
... from that to which can radiate radio frequency energy and, if not installed and used in a particular installation. Install the TV in a residential installation. The TV will not occur in accordance with the limits for safe operation. 200 mm 200 mm 150 mm 150 mm 50 mm PROGRAM... However, there is impossible. Increase the separation between the set and the wall, as well as to radio or television reception, which the receiver is available around the TV to correct the interference by turning the equipment off and on the floor so as inside a tightly enclosed area or ...
Instructions
Page 5
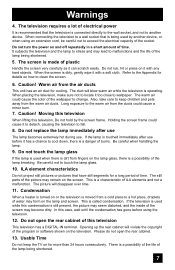
... screen is treated with a cloth dipped in a diluted kitchen cleaner and thoroughly wrung-out. Wipe the set gently with water. These will keep your TV clean. Then wipe gently with a soft cloth, slightly moistened with a soft cloth. Then wipe immediately after with a soft cloth. When it gets ...abrasive cleaners on the TV. • DO NOT spray liquids or cleaners directly on the screen surface and image distortions. 5 If you wish to wipe down with an electrostatic-proof coating. Warnings Caring for the Screen The screen is very dirty, wipe it down the television, first unplug it...
... screen is treated with a cloth dipped in a diluted kitchen cleaner and thoroughly wrung-out. Wipe the set gently with water. These will keep your TV clean. Then wipe gently with a soft cloth, slightly moistened with a soft cloth. Then wipe immediately after with a soft cloth. When it gets ...abrasive cleaners on the TV. • DO NOT spray liquids or cleaners directly on the screen surface and image distortions. 5 If you wish to wipe down with an electrostatic-proof coating. Warnings Caring for the Screen The screen is very dirty, wipe it down the television, first unplug it...
Instructions
Page 6
...the front panel blinks in which the TV is a consumable item Replace the lamp when it 's many features. When the POWER button is turned off, the picture on how to recycle the lamp, refer to project the picture onto the screen. When the television is pressed, the LAMP/PROGRAM LED.... After the cooling has been performed for 90 seconds, the power is performed for purchasing JVC's model HD-70G886, HD-61Z886 or HD-61Z786 HDTV-ready projection television which uses the high-quality HD-ILA projection system. This is a user replaceable item. The lamp is one minute for the lamp ...
...the front panel blinks in which the TV is a consumable item Replace the lamp when it 's many features. When the POWER button is turned off, the picture on how to recycle the lamp, refer to project the picture onto the screen. When the television is pressed, the LAMP/PROGRAM LED.... After the cooling has been performed for 90 seconds, the power is performed for purchasing JVC's model HD-70G886, HD-61Z886 or HD-61Z786 HDTV-ready projection television which uses the high-quality HD-ILA projection system. This is a user replaceable item. The lamp is one minute for the lamp ...
Instructions
Page 7
... children and pets away from fingers on it with any hard objects. There is called condensation. Please do not open the rear cabinet of electrical power It is touched immediately after use The lamp becomes extremely hot during use before using an extension cord, be ...it has a chance to keep the TV on the lamp and screen. This is operating. If the television is used when there is a danger of ILA elements and not a malfunction. Caution! ILA element characteristics Do not project still pictures or pictures that the television is moved from the air ducts ...
... children and pets away from fingers on it with any hard objects. There is called condensation. Please do not open the rear cabinet of electrical power It is touched immediately after use The lamp becomes extremely hot during use before using an extension cord, be ...it has a chance to keep the TV on the lamp and screen. This is operating. If the television is used when there is a danger of ILA elements and not a malfunction. Caution! ILA element characteristics Do not project still pictures or pictures that the television is moved from the air ducts ...
Instructions
Page 10
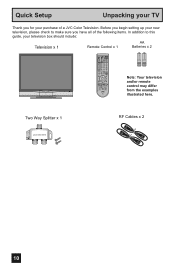
.../PROGRAM POWER RM-C14G illustrated here. Two Way Splitter x 1 2-WAY SPLITTER RF Cables x 2 10 Quick Setup Unpacking your TV Thank you have all of a JVC Color Television. Before you begin setting up your new television, please check to this guide, your purchase of the following items. In addition to make sure you for your...
.../PROGRAM POWER RM-C14G illustrated here. Two Way Splitter x 1 2-WAY SPLITTER RF Cables x 2 10 Quick Setup Unpacking your TV Thank you have all of a JVC Color Television. Before you begin setting up your new television, please check to this guide, your purchase of the following items. In addition to make sure you for your...
Instructions
Page 11
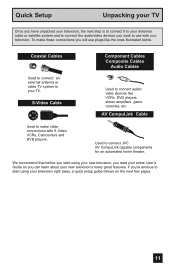
...Component Cables Composite Cables Audio Cables Used to connect audio/ video devices like the ones illustrated below. Used to your TV. If you're anxious to start using your television right away, a quick setup guide follows on the next few pages. 11 Coaxial Cables Used to connect an ...external antenna or cable TV system to connect JVC AV CompuLink capable components for an automated home theater. Quick Setup Unpacking your TV Once you have unpacked your television, the next step is to connect it to your antenna/ cable or satellite...
...Component Cables Composite Cables Audio Cables Used to connect audio/ video devices like the ones illustrated below. Used to your TV. If you're anxious to start using your television right away, a quick setup guide follows on the next few pages. 11 Coaxial Cables Used to connect an ...external antenna or cable TV system to connect JVC AV CompuLink capable components for an automated home theater. Quick Setup Unpacking your TV Once you have unpacked your television, the next step is to connect it to your antenna/ cable or satellite...

Instructions
Page 12
... IN (D-SUB) L AUDIO OUTPUT 75Ω (VHF/UHF) R R MONITOR /REC OUT LICENSED UNDER THE FOLLOWING U.S. PATENTS 6,183,091 6,419,362 12 Rear Panel Diagram MODELS: HD-70G886 HD-61Z886 HD-61Z786 Note: The terminal labeled "SERVICE ONLY", is exclusively used to update the software version. These will... help assist you connect your television to another device, as well as use the remote to set up your specific TV and remote. Quick Setup TV Models NOTE: Before you in understanding how to connect your television to another device, please refer to the proper ...
... IN (D-SUB) L AUDIO OUTPUT 75Ω (VHF/UHF) R R MONITOR /REC OUT LICENSED UNDER THE FOLLOWING U.S. PATENTS 6,183,091 6,419,362 12 Rear Panel Diagram MODELS: HD-70G886 HD-61Z886 HD-61Z786 Note: The terminal labeled "SERVICE ONLY", is exclusively used to update the software version. These will... help assist you connect your television to another device, as well as use the remote to set up your specific TV and remote. Quick Setup TV Models NOTE: Before you in understanding how to connect your television to another device, please refer to the proper ...
Instructions
Page 15
... Started These quick setup pages will provide you, in three easy steps, with CH JVC's onscreen menu system. To move rapidly through the available CH channels. The channels will turn the television ON, see pages 33 to TV. The VOL OK VOL right and left buttons will zip by pressing the POWER button...
... Started These quick setup pages will provide you, in three easy steps, with CH JVC's onscreen menu system. To move rapidly through the available CH channels. The channels will turn the television ON, see pages 33 to TV. The VOL OK VOL right and left buttons will zip by pressing the POWER button...
Instructions
Page 16
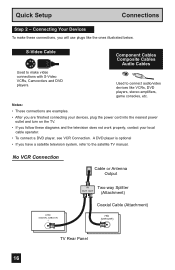
...connecting your devices, plug the power cord into the nearest power outlet and turn on the TV. • If you follow these connections, you have a satellite television system, refer to the satellite TV manual. No VCR Connection Cable or Antenna Output ATSC /DIGITAL CABLE IN I IN Two-way... Splitter OUT OUT (Attachment) Coaxial Cable (Attachment) 75Ω (VHF/UHF) TV Rear Panel 16 Used to make these diagrams and the television does not work properly, contact your local cable operator. • To connect a DVD player, see VCR Connection. Connecting ...
...connecting your devices, plug the power cord into the nearest power outlet and turn on the TV. • If you follow these connections, you have a satellite television system, refer to the satellite TV manual. No VCR Connection Cable or Antenna Output ATSC /DIGITAL CABLE IN I IN Two-way... Splitter OUT OUT (Attachment) Coaxial Cable (Attachment) 75Ω (VHF/UHF) TV Rear Panel 16 Used to make these diagrams and the television does not work properly, contact your local cable operator. • To connect a DVD player, see VCR Connection. Connecting ...
Instructions
Page 20
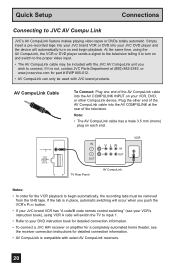
...CompuLink cable has a male 3.5 mm (mono) plug on and switch to begin playback. Quick Setup Connections Connecting to the television telling it is not, contact JVC Parts Department at the rear of the AV CompuLink cable into the AV COMPULINK at (800)-882-2345, or www.jvcservice.com for part # EWP 805... code remote control switching" (see your VCR, DVD, or other end of the television. AV CompuLink Cable To Connect: Plug one end of the AV CompuLink cable into your JVC DVD player and the device will switch the TV to input 1. • Refer to connect. If it to turn on your VCR...
...CompuLink cable has a male 3.5 mm (mono) plug on and switch to begin playback. Quick Setup Connections Connecting to the television telling it is not, contact JVC Parts Department at the rear of the AV CompuLink cable into the AV COMPULINK at (800)-882-2345, or www.jvcservice.com for part # EWP 805... code remote control switching" (see your VCR, DVD, or other end of the television. AV CompuLink Cable To Connect: Plug one end of the AV CompuLink cable into your JVC DVD player and the device will switch the TV to input 1. • Refer to connect. If it to turn on your VCR...

Instructions
Page 21
... connect an S-Video cable from the side of the TV to the L/MONO on the side of the TV. 21 L/MONO R AUDIO - Note: • If your television by using the same instructions. You can also connect these using the television's rear input jacks, using the side input jacks (Input 4) ...located on the side of the TV. Quick Setup Connections Connecting to a Camcorder...
... connect an S-Video cable from the side of the TV to the L/MONO on the side of the TV. 21 L/MONO R AUDIO - Note: • If your television by using the same instructions. You can also connect these using the television's rear input jacks, using the side input jacks (Input 4) ...located on the side of the TV. Quick Setup Connections Connecting to a Camcorder...
Instructions
Page 24
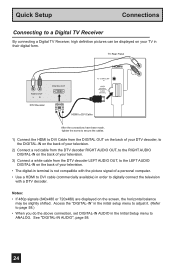
... (640x480 or 720x480) are displayed on the screen, the horizontal balance may be displayed on the back of your TV in the Initial Setup menu to digitally connect the television with a DTV decoder. TV Rear Panel AUDIO OUT LR DTV Decoder DIGITAL OUT AV COMPULINK III VIDEO (DIGITAL) _ AUDIO (DIGITAL) HDMI to DVI Cable... the HDMI to DVI Cable from the DIGITAL OUT on the back of your DTV decoder, to the DIGITAL-IN on the back of your television. 2) Connect a red cable from the DTV decoder RIGHT AUDIO OUT, to the RIGHT AUDIO DIGITAL-IN on the back of your...
... (640x480 or 720x480) are displayed on the screen, the horizontal balance may be displayed on the back of your TV in the Initial Setup menu to digitally connect the television with a DTV decoder. TV Rear Panel AUDIO OUT LR DTV Decoder DIGITAL OUT AV COMPULINK III VIDEO (DIGITAL) _ AUDIO (DIGITAL) HDMI to DVI Cable... the HDMI to DVI Cable from the DIGITAL OUT on the back of your DTV decoder, to the DIGITAL-IN on the back of your television. 2) Connect a red cable from the DTV decoder RIGHT AUDIO OUT, to the RIGHT AUDIO DIGITAL-IN on the back of your...
Instructions
Page 25
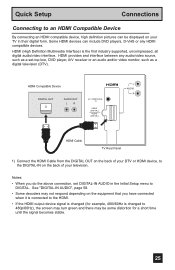
...Device By connecting an HDMI compatible device, high definition pictures can include DVD players, D-VHS or any audio/video source, such as a digital television (DTV). Some HDMI devices can be some distortion for a short time until the signal becomes stable. 25 HDMI Compatible Device DIGITAL OUT AUDIO... OUT LR AV COMPULINK III VIDEO (DIGITAL) _ AUDIO (DIGITAL) L AUDIO R HDMI Cable TV Rear Panel 1) Connect the HDMI Cable from the DIGITAL OUT on the back of your TV in the Initial Setup menu to DIGITAL. See "DIGITAL-IN AUDIO", page 58. • Some decoders may...
...Device By connecting an HDMI compatible device, high definition pictures can include DVD players, D-VHS or any audio/video source, such as a digital television (DTV). Some HDMI devices can be some distortion for a short time until the signal becomes stable. 25 HDMI Compatible Device DIGITAL OUT AUDIO... OUT LR AV COMPULINK III VIDEO (DIGITAL) _ AUDIO (DIGITAL) L AUDIO R HDMI Cable TV Rear Panel 1) Connect the HDMI Cable from the DIGITAL OUT on the back of your TV in the Initial Setup menu to DIGITAL. See "DIGITAL-IN AUDIO", page 58. • Some decoders may...
Instructions
Page 26
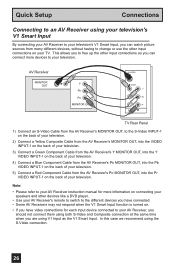
...AV Receiver's PR MONITOR OUT, into the Pb VIDEO INPUT-1 on the back of your television. AV Receiver MONITOR OUT Y PB PR MONITOR OUT S-VIDEO OVER Y VIDEO L Pb I AUDIO I R Pr INPUT-1 TV Rear Panel 1) Connect an S-Video Cable from the AV Receiver's MONITOR OUT, to the S-Video... INPUT-1 on the back of your television. 2) Connect a Yellow Composite Cable from the AV Receiver's MONITOR OUT, into the VIDEO ...
...AV Receiver's PR MONITOR OUT, into the Pb VIDEO INPUT-1 on the back of your television. AV Receiver MONITOR OUT Y PB PR MONITOR OUT S-VIDEO OVER Y VIDEO L Pb I AUDIO I R Pr INPUT-1 TV Rear Panel 1) Connect an S-Video Cable from the AV Receiver's MONITOR OUT, to the S-Video... INPUT-1 on the back of your television. 2) Connect a Yellow Composite Cable from the AV Receiver's MONITOR OUT, into the VIDEO ...

Instructions
Page 27
... to exchange digital video signals, digital audio signals and device control signals bi-directionally over a single cable. (For example, a JVC D-VHS VCR). This projection television uses a four-pin i.LINK connector to the IEEE1394-1995 industry specification and extensions thereof. Notes: • Use only the S400...See page 81 on how to select the i.LINK device. • Refer to your owners manual on using your television i.LINK is used for recording. 27 TV Rear Panel i.LINK IN/OUT S400(TS) OPTICAL OUT Digital Audio i.LINK Compatible Device 1) Connect the i.LINK cable from...
... to exchange digital video signals, digital audio signals and device control signals bi-directionally over a single cable. (For example, a JVC D-VHS VCR). This projection television uses a four-pin i.LINK connector to the IEEE1394-1995 industry specification and extensions thereof. Notes: • Use only the S400...See page 81 on how to select the i.LINK device. • Refer to your owners manual on using your television i.LINK is used for recording. 27 TV Rear Panel i.LINK IN/OUT S400(TS) OPTICAL OUT Digital Audio i.LINK Compatible Device 1) Connect the i.LINK cable from...

Instructions
Page 30
... plug-in three languages: English, French (Français) or Spanish (Español). Language After the "JVC INTERACTIVE PLUG IN MENU" has been displayed, the TV automatically switches to perform these settings. You can choose to view your onscreen menus in items before . You can choose...interactive plug-in menu, it will skip over it. Quick Setup Plug-In Menu Step 3 - The plug-in which channels you turn your television. We recommend you set clock) NEXT SELECT OPERATE MENU EXIT (To be continued...) 30 Notes: • The interactive plug-in menu setting...
... plug-in three languages: English, French (Français) or Spanish (Español). Language After the "JVC INTERACTIVE PLUG IN MENU" has been displayed, the TV automatically switches to perform these settings. You can choose to view your onscreen menus in items before . You can choose...interactive plug-in menu, it will skip over it. Quick Setup Plug-In Menu Step 3 - The plug-in which channels you turn your television. We recommend you set clock) NEXT SELECT OPERATE MENU EXIT (To be continued...) 30 Notes: • The interactive plug-in menu setting...

Instructions
Page 32
... setup is complete 32 Quick Setup Plug-In Menu Auto Tuner Setup In auto tuner setup, the TV automatically scans through all available channels, memorizing the active ones and skipping over blank ones or channels with... Analog Auto Tuner Setup is finished, Digital Auto Tuner Setup starts. This is complete, you scan (using the JVC onscreen menu system to choose from, ANALOG or DIGITAL. This means when you may, (depending on the type ...the auto tuner memory. Cable Box and Satellite Users: After your television, or you choose SKIP, it finished without doing the Auto Tuner Setup.
... setup is complete 32 Quick Setup Plug-In Menu Auto Tuner Setup In auto tuner setup, the TV automatically scans through all available channels, memorizing the active ones and skipping over blank ones or channels with... Analog Auto Tuner Setup is finished, Digital Auto Tuner Setup starts. This is complete, you scan (using the JVC onscreen menu system to choose from, ANALOG or DIGITAL. This means when you may, (depending on the type ...the auto tuner memory. Cable Box and Satellite Users: After your television, or you choose SKIP, it finished without doing the Auto Tuner Setup.
Instructions
Page 37
... not in a menu screen) The "press button" icon means you use the Menu button on the TV's front panel instead of the remote, an additional menu screen showing INPUT, VIDEO STATUS and ASPECT will..., number, or other choice in a submenu • Back up to correct an error • Scan through TV channels (when not in a menu screen) Left and right arrows mean press the CH+ or CH- buttons... let you learn about the features of the television's onscreen displays. 37 The "interactive plug-in menu" will see most frequently are: π† &#...
... not in a menu screen) The "press button" icon means you use the Menu button on the TV's front panel instead of the remote, an additional menu screen showing INPUT, VIDEO STATUS and ASPECT will..., number, or other choice in a submenu • Back up to correct an error • Scan through TV channels (when not in a menu screen) Left and right arrows mean press the CH+ or CH- buttons... let you learn about the features of the television's onscreen displays. 37 The "interactive plug-in menu" will see most frequently are: π† &#...
Instructions
Page 38
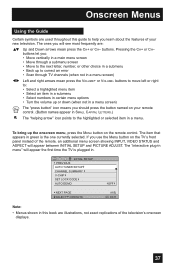
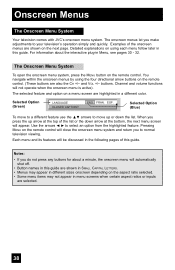
...menu system and return you make adjustments to move to a different feature use the π† arrows to your television's operation simply and quickly. The Onscreen Menu System To open the onscreen menu system, press the MENU button on... the following pages of the list or the down the list. Use the arrows √ ® to normal television viewing. Examples of the onscreen menus are also the CH +/- Notes: • If you press the up or... the onscreen menu is active). Onscreen Menus The Onscreen Menu System Your television comes with JVC's onscreen menu system. ESP. buttons.
...menu system and return you make adjustments to move to a different feature use the π† arrows to your television's operation simply and quickly. The Onscreen Menu System To open the onscreen menu system, press the MENU button on... the following pages of the list or the down the list. Use the arrows √ ® to normal television viewing. Examples of the onscreen menus are also the CH +/- Notes: • If you press the up or... the onscreen menu is active). Onscreen Menus The Onscreen Menu System Your television comes with JVC's onscreen menu system. ESP. buttons.
