User Guide
Page 9
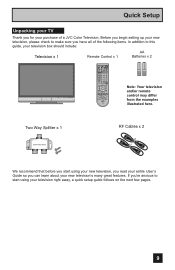
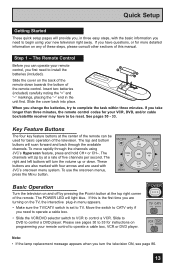
...WAY SPLITTER RF Cables x 2 We recommend that before you start using your new television, you read your entire User's Guide so you have all of a JVC Color Television. Before you begin setting up your new television, please check to make sure you can learn about your new television's many great features...SUB LIGHT MUTING CH GUIDE VOL OK VOL Note: Your television CH MENU VCR CHANNEL PREV NEXT BACK VCR DVD POWER TV VCR REW PLAY FF and/or remote control may differ POWER LAMP/PROGRAM REC STOP PAUSE OPEN CLOSE STILL PAUSE from the examples RM-C14G illustrated here. Quick...
...WAY SPLITTER RF Cables x 2 We recommend that before you start using your new television, you read your entire User's Guide so you have all of a JVC Color Television. Before you begin setting up your new television, please check to make sure you can learn about your new television's many great features...SUB LIGHT MUTING CH GUIDE VOL OK VOL Note: Your television CH MENU VCR CHANNEL PREV NEXT BACK VCR DVD POWER TV VCR REW PLAY FF and/or remote control may differ POWER LAMP/PROGRAM REC STOP PAUSE OPEN CLOSE STILL PAUSE from the examples RM-C14G illustrated here. Quick...
User Guide
Page 10
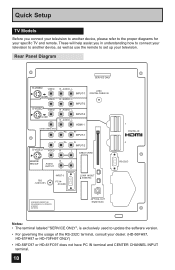
Rear Panel Diagram SERVICE ONLY S-VIDEO VIDEO OVER VIDEO S-VIDEO VIDEO OVER CENTER CHANNELINPUT Y R - L INPUT-2 R - L INPUT-3 R - L HDMI 1 Pb Pr... to update the software version. • For governing the usage of the RS-232C terminal, consult your specific TV and remote. AUDIO - Quick Setup TV Models Before you in understanding how to connect your television to another device, please refer to the proper diagrams for... AUDIO - AUDIO - AUDIO - These will help assist you connect your television to another device, as well as use the remote to set up your television.
Rear Panel Diagram SERVICE ONLY S-VIDEO VIDEO OVER VIDEO S-VIDEO VIDEO OVER CENTER CHANNELINPUT Y R - L INPUT-2 R - L INPUT-3 R - L HDMI 1 Pb Pr... to update the software version. • For governing the usage of the RS-232C terminal, consult your specific TV and remote. AUDIO - Quick Setup TV Models Before you in understanding how to connect your television to another device, please refer to the proper diagrams for... AUDIO - AUDIO - AUDIO - These will help assist you connect your television to another device, as well as use the remote to set up your television.
User Guide
Page 12
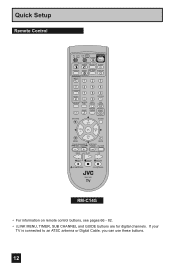
...can use these buttons. 12 Quick Setup Remote Control TV CATV VCR DVD POWER ASPECT MULTI SCREEN TWIN INDEX SELECT SLEEP FREEZE SWAP ML/MTS DISPLAY + INPUT 123 D/A 4 5 6 i.LINK MENU 78 TIMER TUNE THEATER FAVORITE PRO 0 VIDEO STATUS C.C. NATURAL SOUND CINEMA 9 RETURN+ TV SUB CHANNEL SUB LIGHT MUTING CH GUIDE... VOL OK VOL CH MENU VCR CHANNEL PREV NEXT BACK VCR DVD POWER TV VCR REW PLAY FF REC STOP PAUSE OPEN CLOSE STILL PAUSE RM-C14G RM-C14G • For information on remote control buttons, see pages 66 - 82. • i.LINK MENU, TIMER, SUB ...
...can use these buttons. 12 Quick Setup Remote Control TV CATV VCR DVD POWER ASPECT MULTI SCREEN TWIN INDEX SELECT SLEEP FREEZE SWAP ML/MTS DISPLAY + INPUT 123 D/A 4 5 6 i.LINK MENU 78 TIMER TUNE THEATER FAVORITE PRO 0 VIDEO STATUS C.C. NATURAL SOUND CINEMA 9 RETURN+ TV SUB CHANNEL SUB LIGHT MUTING CH GUIDE... VOL OK VOL CH MENU VCR CHANNEL PREV NEXT BACK VCR DVD POWER TV VCR REW PLAY FF REC STOP PAUSE OPEN CLOSE STILL PAUSE RM-C14G RM-C14G • For information on remote control buttons, see pages 66 - 82. • i.LINK MENU, TIMER, SUB ...
User Guide
Page 13
...two batteries (included) carefully noting the "+" and "-" markings, placing the "-" end in menu appears. • Make sure the TV/CATV switch is the first time you are turning on the TV, the interactive plug-in the unit first. When you need to operate a cable box. • Slide the VCR/DVD selector... will zip by pressing the POWER button at a rate of five channels per second. These buttons are also marked with CH JVC's onscreen menu system. If this manual. The Remote Control Before you can be reset. The POWER LED will light blue. See pages 30 - 33. Slide to DVD to...
...two batteries (included) carefully noting the "+" and "-" markings, placing the "-" end in menu appears. • Make sure the TV/CATV switch is the first time you are turning on the TV, the interactive plug-in the unit first. When you need to operate a cable box. • Slide the VCR/DVD selector... will zip by pressing the POWER button at a rate of five channels per second. These buttons are also marked with CH JVC's onscreen menu system. If this manual. The Remote Control Before you can be reset. The POWER LED will light blue. See pages 30 - 33. Slide to DVD to...
User Guide
Page 23
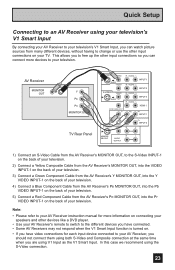
AV Receiver MONITOR OUT Y PB PR MONITOR OUT TV Rear Panel S-VIDEO VIDEO OVER VIDEO S-VIDEO VIDEO OVER CENTER CHANNELINPUT Y R - L INPUT-2 R - AUDIO - AUDIO - L HDMI 1...you can watch picture sources from the AV Receiver's PR MONITOR OUT, into the Pr VIDEO INPUT-1 on your TV. L INPUT-1 R - AUDIO - Note: • Please refer to your AV Receiver instruction manual for ... on connecting your speakers and other devices like a DVD player. • Use your AV Receiver's remote to switch to the different devices you have connected. • Some AV Receivers may not respond when...
AV Receiver MONITOR OUT Y PB PR MONITOR OUT TV Rear Panel S-VIDEO VIDEO OVER VIDEO S-VIDEO VIDEO OVER CENTER CHANNELINPUT Y R - L INPUT-2 R - AUDIO - AUDIO - L HDMI 1...you can watch picture sources from the AV Receiver's PR MONITOR OUT, into the Pr VIDEO INPUT-1 on your TV. L INPUT-1 R - AUDIO - Note: • Please refer to your AV Receiver instruction manual for ... on connecting your speakers and other devices like a DVD player. • Use your AV Receiver's remote to switch to the different devices you have connected. • Some AV Receivers may not respond when...

User Guide
Page 29
...174; To TUNER MODE (IN DIGITAL) To choose ATSC or Digital Cable (or SKIP when you scan (using the JVC onscreen menu system to customize your auto tuner setup is finished, Digital Auto Tuner Setup starts. Notes: • If ...SKIP, it finished without doing the Auto Tuner Setup. Quick Setup Auto Tuner Setup In auto tuner setup, the TV automatically scans through all available channels, memorizing the active ones and skipping over blank ones or channels with weak ... now begin watching your television, or you may, (depending on programming your remote control, or using the CHANNEL +/-
...174; To TUNER MODE (IN DIGITAL) To choose ATSC or Digital Cable (or SKIP when you scan (using the JVC onscreen menu system to customize your auto tuner setup is finished, Digital Auto Tuner Setup starts. Notes: • If ...SKIP, it finished without doing the Auto Tuner Setup. Quick Setup Auto Tuner Setup In auto tuner setup, the TV automatically scans through all available channels, memorizing the active ones and skipping over blank ones or channels with weak ... now begin watching your television, or you may, (depending on programming your remote control, or using the CHANNEL +/-

User Guide
Page 30
...hold down , and 10 key operation. 1) Find the cable box or satellite brand from the list of codes shown below . Quick Setup Remote Programming You can program your remote to operate your cable or satellite box does not respond to the first code, try the search codes function, on /off, channel up... button, then enter the first code number listed with cable box and satellite codes for power on page 33. Cable Box or Satellite Codes The remote control is programmed with the 10 key pad. 4) Release the DISPLAY button, and confirm the operation of the cable box/satellite receiver. • If ...
...hold down , and 10 key operation. 1) Find the cable box or satellite brand from the list of codes shown below . Quick Setup Remote Programming You can program your remote to operate your cable or satellite box does not respond to the first code, try the search codes function, on /off, channel up... button, then enter the first code number listed with cable box and satellite codes for power on page 33. Cable Box or Satellite Codes The remote control is programmed with the 10 key pad. 4) Release the DISPLAY button, and confirm the operation of the cable box/satellite receiver. • If ...

User Guide
Page 31
... 049, 050, 089 064 Gradiente 083, 084, 081, 000, 001 Hitachi 023, 045, 058, 093, 027, 081 Instant Replay 024, 023 Jensen 003 JVC 003, 004, 005, 000, 001, 002, 006, 007 VCR Marantz Marta Memorex MGA Minolta Mitsubishi Multitech NEC Olympic Optimus Orion Panasonic Penney Pentax Philco Philips... confirm the operation of codes shown below. 2) Slide the first 2-way selector switch to "TV" and the other 2-way selector switch to the first code, try the others listed. If so, use the VCR's remote. • To record, hold down the DISPLAY button, then enter the first code number ...
... 049, 050, 089 064 Gradiente 083, 084, 081, 000, 001 Hitachi 023, 045, 058, 093, 027, 081 Instant Replay 024, 023 Jensen 003 JVC 003, 004, 005, 000, 001, 002, 006, 007 VCR Marantz Marta Memorex MGA Minolta Mitsubishi Multitech NEC Olympic Optimus Orion Panasonic Penney Pentax Philco Philips... confirm the operation of codes shown below. 2) Slide the first 2-way selector switch to "TV" and the other 2-way selector switch to the first code, try the others listed. If so, use the VCR's remote. • To record, hold down the DISPLAY button, then enter the first code number ...

User Guide
Page 32
If so, use the DVD player's remote. DVD Player Aiwa Apex Bose Denon Funai Go-Video Harman Kardon Hitachi JVC Kenwood KLH Konka Koss Codes 043 040, 054, 055 058 020, 037 038 032 053... the DVD player brand from the list of the DVD player. • If your remote, some DVD buttons may not work properly. Quick Setup DVD Codes The remote control is programmed with DVD codes for power on page 33. • After you ..., and confirm the operation of codes shown below. 2) Slide the first 2-way selector switch to "TV" and the other 2-way selector switch to the first code, try the others listed.
If so, use the DVD player's remote. DVD Player Aiwa Apex Bose Denon Funai Go-Video Harman Kardon Hitachi JVC Kenwood KLH Konka Koss Codes 043 040, 054, 055 058 020, 037 038 032 053... the DVD player brand from the list of the DVD player. • If your remote, some DVD buttons may not work properly. Quick Setup DVD Codes The remote control is programmed with DVD codes for power on page 33. • After you ..., and confirm the operation of codes shown below. 2) Slide the first 2-way selector switch to "TV" and the other 2-way selector switch to the first code, try the others listed.

User Guide
Page 33
The codes are now set . If you repeat Step 3 a total of 80 times without a response, use the remote control that came with your equipment. 5) Press RETURN+/TV to exit. Quick Setup Search Codes Cable/Satellite Search Codes Function 1) Slide the first 2-Way Mode Selector switch to "VCR" or "DVD". 2)... Press the VCR or DVD POWER and RETURN+/TV buttons. Hold for at least three seconds and release. 3) Press the POWER button on the remote, and see if the VCR or DVD responds. 4) If there was a response, press RETURN...
The codes are now set . If you repeat Step 3 a total of 80 times without a response, use the remote control that came with your equipment. 5) Press RETURN+/TV to exit. Quick Setup Search Codes Cable/Satellite Search Codes Function 1) Slide the first 2-Way Mode Selector switch to "VCR" or "DVD". 2)... Press the VCR or DVD POWER and RETURN+/TV buttons. Hold for at least three seconds and release. 3) Press the POWER button on the remote, and see if the VCR or DVD responds. 4) If there was a response, press RETURN...
User Guide
Page 34
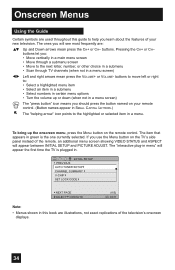
... menu" will appear the first time the TV is plugged in green is the one currently selected. Pressing the CH+ or CH- To bring up or down (when not in a menu screen) The "press button" icon means you should press the button named on your remote control. (Button names appear in SMALL... • Turn the volume up the onscreen menu, press the MENU button on the TV's side panel instead of your new television. The item that appears in . buttons let you learn about the features of the remote, an additional menu screen showing VIDEO STATUS and ASPECT will see most frequently are illustrations...
... menu" will appear the first time the TV is plugged in green is the one currently selected. Pressing the CH+ or CH- To bring up or down (when not in a menu screen) The "press button" icon means you should press the button named on your remote control. (Button names appear in SMALL... • Turn the volume up the onscreen menu, press the MENU button on the TV's side panel instead of your new television. The item that appears in . buttons let you learn about the features of the remote, an additional menu screen showing VIDEO STATUS and ASPECT will see most frequently are illustrations...
User Guide
Page 35
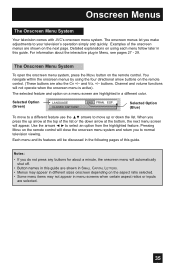
...the list or the down the list. Examples of this guide. FRAN. ESP. Onscreen Menus The Onscreen Menu System Your television comes with JVC's onscreen menu system. Channel and volume functions will be discussed in a different color. Selected Option (Blue) To move up arrow at ...feature use the π† arrows to normal television viewing. The selected feature and option on using the four directional arrow buttons on the remote control will automatically shut off. • Button names in this guide are also the CH +/- For information about a minute, the onscreen...
...the list or the down the list. Examples of this guide. FRAN. ESP. Onscreen Menus The Onscreen Menu System Your television comes with JVC's onscreen menu system. Channel and volume functions will be discussed in a different color. Selected Option (Blue) To move up arrow at ...feature use the π† arrows to normal television viewing. The selected feature and option on using the four directional arrow buttons on the remote control will automatically shut off. • Button names in this guide are also the CH +/- For information about a minute, the onscreen...

User Guide
Page 51
... INPUT LABEL POSITION ADJUSTMENT POWER INDICATOR NEXT PAGE SELECT OPERATE ON OFF ON OFF (2/5) MENU EXIT • Use the remote control. • Press the MENU button on the side of the TV, so that are connected to your AV Receiver. π† √® Press the MENU button To V1 ... button for more than 3 seconds. By turning this feature on the side of the TV for FRONT PANEL LOCK will remain ON. This feature will appear. Onscreen Menus Front Panel Lock This allows you lose your remote control. Do this case, the OSD for more than 3 seconds. In this if ...
... INPUT LABEL POSITION ADJUSTMENT POWER INDICATOR NEXT PAGE SELECT OPERATE ON OFF ON OFF (2/5) MENU EXIT • Use the remote control. • Press the MENU button on the side of the TV, so that are connected to your AV Receiver. π† √® Press the MENU button To V1 ... button for more than 3 seconds. By turning this feature on the side of the TV for FRONT PANEL LOCK will remain ON. This feature will appear. Onscreen Menus Front Panel Lock This allows you lose your remote control. Do this case, the OSD for more than 3 seconds. In this if ...
User Guide
Page 54
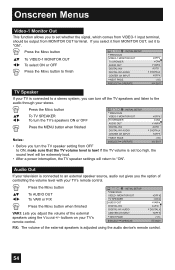
... (1/5) MENU EXIT FIX: The volume of controlling the volume level with your TV's remote control. Audio Out If your stereo. π† √® Press the MENU button To TV SPEAKER To turn the TV's speakers ON or OFF Press the MENU button when finished INITIAL SETUP PREVIOUS VIDEO... button to finish INITIAL SETUP PREVIOUS VIDEO-1 MONITOR OUT TV SPEAKER AUDIO OUT DIGITAL-IN DIGITAL-IN1 AUDIO CENTER CH INPUT NEXT PAGE SELECT OPERATE OFF ON VARI AUTO DIGITAL OFF (1/5) MENU EXIT TV Speaker If your TV's remote control. Onscreen Menus Video-1 Monitor Out This function allows...
... (1/5) MENU EXIT FIX: The volume of controlling the volume level with your TV's remote control. Audio Out If your stereo. π† √® Press the MENU button To TV SPEAKER To turn the TV's speakers ON or OFF Press the MENU button when finished INITIAL SETUP PREVIOUS VIDEO... button to finish INITIAL SETUP PREVIOUS VIDEO-1 MONITOR OUT TV SPEAKER AUDIO OUT DIGITAL-IN DIGITAL-IN1 AUDIO CENTER CH INPUT NEXT PAGE SELECT OPERATE OFF ON VARI AUTO DIGITAL OFF (1/5) MENU EXIT TV Speaker If your TV's remote control. Onscreen Menus Video-1 Monitor Out This function allows...

User Guide
Page 66
... the picture from the main screen channel (or input). The channel (or input) you were watching before pressing TWIN will appear on the remote control. If you press the OK button, select normal screen. The sound will continue to normal television viewing, press TWIN again or press ... not display digital channels. • Split-screen functions will not work in Twin mode. • When the cable card is inserted into the TV, the combination of screen: TWIN (2 channels) and INDEX (12 channels). Button Functions Multi Screen Function Your television has two kinds of analog broadcasting...
... the picture from the main screen channel (or input). The channel (or input) you were watching before pressing TWIN will appear on the remote control. If you press the OK button, select normal screen. The sound will continue to normal television viewing, press TWIN again or press ... not display digital channels. • Split-screen functions will not work in Twin mode. • When the cable card is inserted into the TV, the combination of screen: TWIN (2 channels) and INDEX (12 channels). Button Functions Multi Screen Function Your television has two kinds of analog broadcasting...

User Guide
Page 68
..., press the RETURN +/TV button or direct 10 key pad or CHANNEL +/- Notes: • When you decide the input channel and select it. Press the INPUT button By every press of the remote control. • i.LINK can not turn the power off . After you press the number buttons on , you can be... selected only when you have an i.LINK device connected. • If you can also access by pressing the INPUT button on the remote control to move to channel 12: 0 (Zero) 1 (One) 2 (Two) Tune Lets you return to a specific channel. Number Buttons - 10Key Pad Use the number buttons ...
..., press the RETURN +/TV button or direct 10 key pad or CHANNEL +/- Notes: • When you decide the input channel and select it. Press the INPUT button By every press of the remote control. • i.LINK can not turn the power off . After you press the number buttons on , you can be... selected only when you have an i.LINK device connected. • If you can also access by pressing the INPUT button on the remote control to move to channel 12: 0 (Zero) 1 (One) 2 (Two) Tune Lets you return to a specific channel. Number Buttons - 10Key Pad Use the number buttons ...

User Guide
Page 71
... button By every press of the VIDEO STATUS button, you change the mode by using the MENU button on the side of the TV instead of the remote control. buttons ( √ OPERATE ® ). • There are playing video games connected to the factory settings. Natural Cinema... - Changing the channel or input mode - Button Functions Video Status The VIDEO STATUS button gives you a choice of four TV picture display settings, including a display of your TV. Resets the picture display to your own preferences. Dynamic - Game - Used for each input connected to video when viewing...
... button By every press of the VIDEO STATUS button, you change the mode by using the MENU button on the side of the TV instead of the remote control. buttons ( √ OPERATE ® ). • There are playing video games connected to the factory settings. Natural Cinema... - Changing the channel or input mode - Button Functions Video Status The VIDEO STATUS button gives you a choice of four TV picture display settings, including a display of your TV. Resets the picture display to your own preferences. Dynamic - Game - Used for each input connected to video when viewing...

User Guide
Page 76
...can not change the aspect ratios. Press MENU to go back in one of the remote control. OK This button confirms your HDMI device when you are in FULL aspect mode...You can also access the FRONT PANEL CONTROL screen by using the MENU button on the side of the TV instead of the onscreen menus. Choose ASPECT by pressing Menu† on using the CHANNEL +/- Back ...This button allows you are receiving a 1080p signal, you to access JVC's onscreen menu system. SD (480i, 480p) HD (1080i, 720p) ATSC (480i, 480p) PC NTSC, 480i, 480p...
...can not change the aspect ratios. Press MENU to go back in one of the remote control. OK This button confirms your HDMI device when you are in FULL aspect mode...You can also access the FRONT PANEL CONTROL screen by using the MENU button on the side of the TV instead of the onscreen menus. Choose ASPECT by pressing Menu† on using the CHANNEL +/- Back ...This button allows you are receiving a 1080p signal, you to access JVC's onscreen menu system. SD (480i, 480p) HD (1080i, 720p) ATSC (480i, 480p) PC NTSC, 480i, 480p...

User Guide
Page 77
...power off . DVD Buttons You can also use this remote control to operate the basic functions of the remote control. Button Functions TV/CATV Slide Switch Use either the television's own tuner or a cable box to control JVC-brand VCR's. Set this remote control to operate the basic functions of your VCR....player. VCR/DVD Slide Switch You can use this switch to TV to control JVC-brand DVD players. For any other manufacturer's brand DVD player, please see the code chart and instructions on page 31. • The remote is preset with the code 000 to select channels. Light All...
...power off . DVD Buttons You can also use this remote control to operate the basic functions of the remote control. Button Functions TV/CATV Slide Switch Use either the television's own tuner or a cable box to control JVC-brand VCR's. Set this remote control to operate the basic functions of your VCR....player. VCR/DVD Slide Switch You can use this switch to TV to control JVC-brand DVD players. For any other manufacturer's brand DVD player, please see the code chart and instructions on page 31. • The remote is preset with the code 000 to select channels. Light All...

User Guide
Page 87
... the lamp has FULLY COOLED. DO NOT DROP the used lamp. Warning: The cool-down is complete. First, remove the screw located on the remote control or TV front panel. Set it cannot be cool enough to remove the lamp cover. Follow the recycling instructions included with the Lamp Replacement Kit. 87...
... the lamp has FULLY COOLED. DO NOT DROP the used lamp. Warning: The cool-down is complete. First, remove the screw located on the remote control or TV front panel. Set it cannot be cool enough to remove the lamp cover. Follow the recycling instructions included with the Lamp Replacement Kit. 87...

