User Guide
Page 10
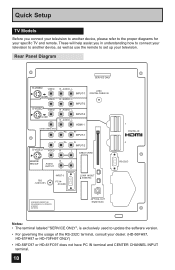
... L HDMI 1 Pb Pr INPUT-1 ATSC /DIGITAL CABLE IN S-VIDEO Y Pb VIDEO R Pr INPUT-2 L CABLE CARD MONITOR R L /REC OUT AUDIO OUTPUT 75Ω (VHF/UHF) INPUT-3 PC IN (D-SUB) i.LINK IN/OUT S400(TS) 1 DIGITAL-IN 2 RS-232C LICENSED UNDER THE FOLLOWING U.S. L INPUT-2 R - AUDIO - L INPUT-3 R - Rear Panel...used to update the software version. • For governing the usage of the RS-232C terminal, consult your specific TV and remote. Quick Setup TV Models Before you in understanding how to connect your television to another device, please refer to the proper diagrams for your...
... L HDMI 1 Pb Pr INPUT-1 ATSC /DIGITAL CABLE IN S-VIDEO Y Pb VIDEO R Pr INPUT-2 L CABLE CARD MONITOR R L /REC OUT AUDIO OUTPUT 75Ω (VHF/UHF) INPUT-3 PC IN (D-SUB) i.LINK IN/OUT S400(TS) 1 DIGITAL-IN 2 RS-232C LICENSED UNDER THE FOLLOWING U.S. L INPUT-2 R - AUDIO - L INPUT-3 R - Rear Panel...used to update the software version. • For governing the usage of the RS-232C terminal, consult your specific TV and remote. Quick Setup TV Models Before you in understanding how to connect your television to another device, please refer to the proper diagrams for your...

User Guide
Page 15
... OUT V R L IN OUT Two-Way Splitter (Attachment) IN OUT OUT Coaxial Cable (Attachment) ATSC /DIGITAL CABLE IN I 75Ω (VHF/UHF) TV Rear Panel OR S-VIDEO VIDEO OVER VIDEO S-VIDEO VIDEO OVER CENTER CHANNELINPUT Y R - AUDIO - Some models may also connect the DVD player to Input... 1. L HDMI 1 Pb Pr INPUT-1 S-VIDEO Y Pb VIDEO R Pr INPUT-2 L AUDIO OUT R L Y PB PR OUT MONITOR R L /REC OUT AUDIO OUTPUT Green Blue Red DVD Player...
... OUT V R L IN OUT Two-Way Splitter (Attachment) IN OUT OUT Coaxial Cable (Attachment) ATSC /DIGITAL CABLE IN I 75Ω (VHF/UHF) TV Rear Panel OR S-VIDEO VIDEO OVER VIDEO S-VIDEO VIDEO OVER CENTER CHANNELINPUT Y R - AUDIO - Some models may also connect the DVD player to Input... 1. L HDMI 1 Pb Pr INPUT-1 S-VIDEO Y Pb VIDEO R Pr INPUT-2 L AUDIO OUT R L Y PB PR OUT MONITOR R L /REC OUT AUDIO OUTPUT Green Blue Red DVD Player...

User Guide
Page 19
... surround amplifier's CENTER CHANNEL OUTPUT terminal. Notes: • Refer to your amplifier's manual for your TV. (See page 22). 2) When you home theater sound system. Front Front Surround TV Rear Panel CENTER CHANNEL INPUT CENTER CHANNEL OUTPUT (VARIABLE OUTPUT) 1) Connect the Pin cable from the center speaker... it can not output audio using the AUDIO OUTPUT under the following conditions: 1) When you have analog sound from an HDMI device connected to the HDMI 1 or HDMI 2 connection on the amplifier. A center speaker in a movie theater is set in back of this feature on page 56...
... surround amplifier's CENTER CHANNEL OUTPUT terminal. Notes: • Refer to your amplifier's manual for your TV. (See page 22). 2) When you home theater sound system. Front Front Surround TV Rear Panel CENTER CHANNEL INPUT CENTER CHANNEL OUTPUT (VARIABLE OUTPUT) 1) Connect the Pin cable from the center speaker... it can not output audio using the AUDIO OUTPUT under the following conditions: 1) When you have analog sound from an HDMI device connected to the HDMI 1 or HDMI 2 connection on the amplifier. A center speaker in a movie theater is set in back of this feature on page 56...

User Guide
Page 21
AUDIO - Access the "DIGITAL-IN" in the Initial Setup menu to ANALOG. L HDMI 1 1 DIGITAL-IN 2 HDMI to DVI Cable After the connections have been made to the HDMI 1 along with analog audio cables. 21 TV Rear Panel AUDIO OUT LR DTV Decoder DIGITAL OUT R - See "DIGITAL-IN1 AUDIO", page 55. • The... Analog Audio input can be displayed on the TV, please note that this setting only effects the HDMI 1 jack and that ...
AUDIO - Access the "DIGITAL-IN" in the Initial Setup menu to ANALOG. L HDMI 1 1 DIGITAL-IN 2 HDMI to DVI Cable After the connections have been made to the HDMI 1 along with analog audio cables. 21 TV Rear Panel AUDIO OUT LR DTV Decoder DIGITAL OUT R - See "DIGITAL-IN1 AUDIO", page 55. • The... Analog Audio input can be displayed on the TV, please note that this setting only effects the HDMI 1 jack and that ...

User Guide
Page 22
... the signal becomes stable. • When you have connected when it , and blocks the analog audio signal coming into the "HDMI 1" jacks. L HDMI 1 HDMI Cable TV Rear Panel 1 DIGITAL-IN 2 1) Connect the HDMI Cable from the HDMI device. 22 See "DIGITAL-IN1 AUDIO", page 55. • Some decoders may not respond depending on the equipment that you...
... the signal becomes stable. • When you have connected when it , and blocks the analog audio signal coming into the "HDMI 1" jacks. L HDMI 1 HDMI Cable TV Rear Panel 1 DIGITAL-IN 2 1) Connect the HDMI Cable from the HDMI device. 22 See "DIGITAL-IN1 AUDIO", page 55. • Some decoders may not respond depending on the equipment that you...
User Guide
Page 23
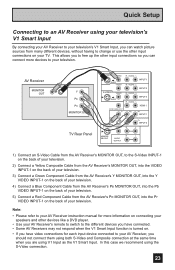
... V1 Input as the V1 Smart Input. In this case we recommend using the S-Video connection. 23 AV Receiver MONITOR OUT Y PB PR MONITOR OUT TV Rear Panel S-VIDEO VIDEO OVER VIDEO S-VIDEO VIDEO OVER CENTER CHANNELINPUT Y R - AUDIO - L INPUT-2 R - AUDIO - L INPUT-1 R - Quick Setup ... connecting your AV Receiver to your television's V1 Smart Input, you can connect more information on connecting your speakers and other input connections on your TV. L HDMI 1 Pb Pr INPUT-1 S-VIDEO Y Pb VIDEO R Pr INPUT-2 L MONITOR R L /REC OUT AUDIO OUTPUT 1) Connect an S-Video Cable...
... V1 Input as the V1 Smart Input. In this case we recommend using the S-Video connection. 23 AV Receiver MONITOR OUT Y PB PR MONITOR OUT TV Rear Panel S-VIDEO VIDEO OVER VIDEO S-VIDEO VIDEO OVER CENTER CHANNELINPUT Y R - AUDIO - L INPUT-2 R - AUDIO - L INPUT-1 R - Quick Setup ... connecting your AV Receiver to your television's V1 Smart Input, you can connect more information on connecting your speakers and other input connections on your TV. L HDMI 1 Pb Pr INPUT-1 S-VIDEO Y Pb VIDEO R Pr INPUT-2 L MONITOR R L /REC OUT AUDIO OUTPUT 1) Connect an S-Video Cable...
User Guide
Page 25
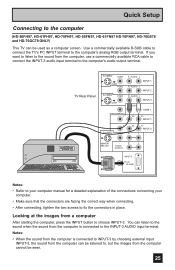
...starting the computer, press the INPUT button to choose INPUT-3. L INPUT-1 R - L INPUT-2 R - Quick Setup Connecting to fix the connectors in place. AUDIO - L HDMI 1 Pb Pr INPUT-1 S-VIDEO Y Pb VIDEO R Pr INPUT-2 L MONITOR R L /REC OUT AUDIO OUTPUT 75Ω (VHF/UHF) INPUT-3 PC IN (D-SUB) ...-61FH97, HD-70FH97, HD-56FN97, HD-61FN97 HD-70FN97, HD-70G678 and HD-70GC78 ONLY) This TV can be listened to the computer's analog RGB output terminal. AUDIO - TV Rear Panel S-VIDEO VIDEO OVER VIDEO S-VIDEO VIDEO OVER CENTER CHANNELINPUT Y R - Looking at the images from...
...starting the computer, press the INPUT button to choose INPUT-3. L INPUT-1 R - L INPUT-2 R - Quick Setup Connecting to fix the connectors in place. AUDIO - L HDMI 1 Pb Pr INPUT-1 S-VIDEO Y Pb VIDEO R Pr INPUT-2 L MONITOR R L /REC OUT AUDIO OUTPUT 75Ω (VHF/UHF) INPUT-3 PC IN (D-SUB) ...-61FH97, HD-70FH97, HD-56FN97, HD-61FN97 HD-70FN97, HD-70G678 and HD-70GC78 ONLY) This TV can be listened to the computer's analog RGB output terminal. AUDIO - TV Rear Panel S-VIDEO VIDEO OVER VIDEO S-VIDEO VIDEO OVER CENTER CHANNELINPUT Y R - Looking at the images from...

User Guide
Page 55
... button when finished AUDIO OUT DIGITAL-IN VARI AUTO Notes: DIGITAL-IN1 AUDIO CENTER CH INPUT DIGITAL OFF • If your DTV or HDMI component is used if you select DIGITAL, select PCM on Digital Sound in the INITIAL SETUP menu when an HDMI480p picture signal is being displayed... on the screen. • You can select AUTO only when the signal is being input to your TV. See page 57. 55 If your DTV or HDMI NEXT PAGE SELECT OPERATE (1/5) MENU EXIT component is capable of analog audio and digital video, choose ANALOG. • Refer to...
... button when finished AUDIO OUT DIGITAL-IN VARI AUTO Notes: DIGITAL-IN1 AUDIO CENTER CH INPUT DIGITAL OFF • If your DTV or HDMI component is used if you select DIGITAL, select PCM on Digital Sound in the INITIAL SETUP menu when an HDMI480p picture signal is being displayed... on the screen. • You can select AUTO only when the signal is being input to your TV. See page 57. 55 If your DTV or HDMI NEXT PAGE SELECT OPERATE (1/5) MENU EXIT component is capable of analog audio and digital video, choose ANALOG. • Refer to...

User Guide
Page 66
... not be automatically selected about 8 seconds later. • Aspect does not work in Twin mode. • When the cable card is inserted into the TV, the combination of analog broadcasting and digital broadcasting will not be displayed. • When you are watching is coming from the main screen channel (or... buttons, if you were watching before pressing TWIN will appear on the remote control. To turn split-screen off and return to come from the HDMI input, you cannot enter the SWAP or INDEX mode. • Main Screen and Split Screen will not display the same channel or input at ...
... not be automatically selected about 8 seconds later. • Aspect does not work in Twin mode. • When the cable card is inserted into the TV, the combination of analog broadcasting and digital broadcasting will not be displayed. • When you are watching is coming from the main screen channel (or... buttons, if you were watching before pressing TWIN will appear on the remote control. To turn split-screen off and return to come from the HDMI input, you cannot enter the SWAP or INDEX mode. • Main Screen and Split Screen will not display the same channel or input at ...

User Guide
Page 76
... signal is different from their broadcast or recorded program. If the television receives a 4:3 signal from your HDMI device when you to go back in the menu to activate the onscreen menu system. • See ...individual topics like "Sound Adjust" for specific information on the side of the TV instead of the onscreen menus. Back This button allows you are in one of the remote ...mode you choosed. • When you change the aspect ratio or signal, reset the picture position to access JVC's onscreen menu system. SD (480i, 480p) HD (1080i, 720p) ATSC (480i, 480p) PC NTSC...
... signal is different from their broadcast or recorded program. If the television receives a 4:3 signal from your HDMI device when you to go back in the menu to activate the onscreen menu system. • See ...individual topics like "Sound Adjust" for specific information on the side of the TV instead of the onscreen menus. Back This button allows you are in one of the remote ...mode you choosed. • When you change the aspect ratio or signal, reset the picture position to access JVC's onscreen menu system. SD (480i, 480p) HD (1080i, 720p) ATSC (480i, 480p) PC NTSC...
User Guide
Page 90
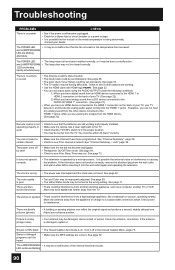
...the AUDIO OUTPUT under the following conditions: 1) When you have digital sound from an HDMI device connected to the HDMI 1 or HDMI 2 connection on the back of your TV detects it . See page 37. • The TV station may be within 23 feet (7 meters). See page 22. • You can...have analog sound from a DVI device connected to the AUDIO IN "HDMI 1" connection. (See page 21). • When you have an HDMI device connected to the TV. • Check that the batteries are viewing the images from the TV. Troubleshooting PROBLEMS CHECK There is no picture or sound • The ...
...the AUDIO OUTPUT under the following conditions: 1) When you have digital sound from an HDMI device connected to the HDMI 1 or HDMI 2 connection on the back of your TV detects it . See page 37. • The TV station may be within 23 feet (7 meters). See page 22. • You can...have analog sound from a DVI device connected to the AUDIO IN "HDMI 1" connection. (See page 21). • When you have an HDMI device connected to the TV. • Check that the batteries are viewing the images from the TV. Troubleshooting PROBLEMS CHECK There is no picture or sound • The ...
User Guide
Page 92
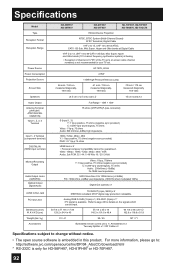
... Mercury Lamp 56 inch / 142 cm measured diagonally, 16:9 ratio 61 inch / 155 cm measured diagonally, 16:9 ratio 70 inch / ...720p / 480p / 480i Y: 1 Vp-p positive, 75 ohms (negative sync provided) Pb/Pr: 0.7 Vp-p 75 ohms HDMI Jack x 2 • Personal computer compatibility cannot be input. 50 7/8 x 37 1/8 x 17 3/4 129.2 x 94... subject to : http://software.jvc.com/opensource/lnx/DP/04_AtscCC/download.html * RS-232C is only for your TV set 's on the signals ...Accessories HD-56FH97 HD-56FN97 HD-61FH97 HD-61FN97 HD-ILA Device Projection HD-70FH97, HD-70FN97 HD-70G678, HD-70GC78 NTSC, BTSC ...
... Mercury Lamp 56 inch / 142 cm measured diagonally, 16:9 ratio 61 inch / 155 cm measured diagonally, 16:9 ratio 70 inch / ...720p / 480p / 480i Y: 1 Vp-p positive, 75 ohms (negative sync provided) Pb/Pr: 0.7 Vp-p 75 ohms HDMI Jack x 2 • Personal computer compatibility cannot be input. 50 7/8 x 37 1/8 x 17 3/4 129.2 x 94... subject to : http://software.jvc.com/opensource/lnx/DP/04_AtscCC/download.html * RS-232C is only for your TV set 's on the signals ...Accessories HD-56FH97 HD-56FN97 HD-61FH97 HD-61FN97 HD-ILA Device Projection HD-70FH97, HD-70FN97 HD-70G678, HD-70GC78 NTSC, BTSC ...
User Guide
Page 93
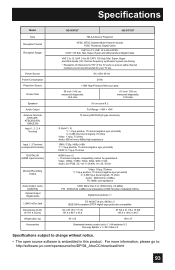
...recommended for your TV set. AC 120V, 60 Hz 215W 110W High-Pressure Mercury Lamp 56 inch / 142 cm measured diagonally, 16:9 ratio 61 inch / ... 480p / 480i Y: 1 Vp-p positive, 75 ohms (negative sync provided) Pb/Pr: 0.7 Vp-p 75 ohms HDMI Jack x 2 • Personal computer compatibility cannot be guaranteed. Video: 1080p / 1080i / 720p / 480p / ...2 Specifications subject to : http://software.jvc.com/opensource/lnx/DP/04_AtscCC/download.html 93 Specifications Model Type Reception Format Reception Range Power Source Power Consumption Projection Source Screen Size Speakers Audio Output Antenna...
...recommended for your TV set. AC 120V, 60 Hz 215W 110W High-Pressure Mercury Lamp 56 inch / 142 cm measured diagonally, 16:9 ratio 61 inch / ... 480p / 480i Y: 1 Vp-p positive, 75 ohms (negative sync provided) Pb/Pr: 0.7 Vp-p 75 ohms HDMI Jack x 2 • Personal computer compatibility cannot be guaranteed. Video: 1080p / 1080i / 720p / 480p / ...2 Specifications subject to : http://software.jvc.com/opensource/lnx/DP/04_AtscCC/download.html 93 Specifications Model Type Reception Format Reception Range Power Source Power Consumption Projection Source Screen Size Speakers Audio Output Antenna...

