
User Guide
Page 6
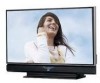
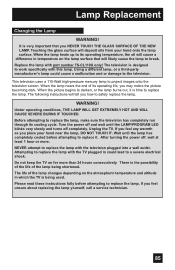
...lamp has warmed up commences This television uses a lamp to the Appendix and the instructions that are included with the replacement lamp kit. Immediately after the cooling process has completed. As the lamp warms up , the picture is a consumable item Replace the lamp...purchasing this television which the TV is being shortened and the possibility of the television and the lamp Cooling is also performed ...ventilation holes. The lamp is explained below . 1. Cooling the inside of malfunctions. Warnings Thank you for purchasing a JVC HDTV-ready projection television which will...
...lamp has warmed up commences This television uses a lamp to the Appendix and the instructions that are included with the replacement lamp kit. Immediately after the cooling process has completed. As the lamp warms up , the picture is a consumable item Replace the lamp...purchasing this television which the TV is being shortened and the possibility of the television and the lamp Cooling is also performed ...ventilation holes. The lamp is explained below . 1. Cooling the inside of malfunctions. Warnings Thank you for purchasing a JVC HDTV-ready projection television which will...
User Guide
Page 7
... this television When lifting this case, wait until the condensation has gone before it with any hard objects. ILA element characteristics Do not project still pictures or pictures that the television is dirt from fingers on how to change. The still parts of the picture may remain... do not open the rear cabinet of the screen may lead to the warm air from the warm air ducts. Do not replace the lamp immediately after use . When placing the television, make sure not to locate it to detach, causing the television to keep the TV on the television. Holding...
... this television When lifting this case, wait until the condensation has gone before it with any hard objects. ILA element characteristics Do not project still pictures or pictures that the television is dirt from fingers on how to change. The still parts of the picture may remain... do not open the rear cabinet of the screen may lead to the warm air from the warm air ducts. Do not replace the lamp immediately after use . When placing the television, make sure not to locate it to detach, causing the television to keep the TV on the television. Holding...
User Guide
Page 13
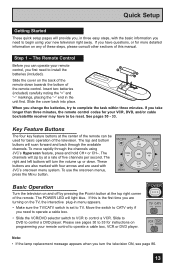
...on programming your remote control, you first need to operate a cable box. • Slide the VCR/DVD selector switch to VCR to begin using JVC's Hyperscan feature, press and hold CH+ or CH-. The VOL OK VOL right and left buttons will turn the television ON, see pages 30 ...key feature buttons at the top right corner of the remote can operate your remote control to install the batteries (included). POWER T TV CATV MUL VCR DVD Note: • If the lamp replacement message appears when you need to operate a cable box, VCR or DVD player. Please see page 86. 13 Step 1 -
...on programming your remote control, you first need to operate a cable box. • Slide the VCR/DVD selector switch to VCR to begin using JVC's Hyperscan feature, press and hold CH+ or CH-. The VOL OK VOL right and left buttons will turn the television ON, see pages 30 ...key feature buttons at the top right corner of the remote can operate your remote control to install the batteries (included). POWER T TV CATV MUL VCR DVD Note: • If the lamp replacement message appears when you need to operate a cable box, VCR or DVD player. Please see page 86. 13 Step 1 -

User Guide
Page 65
... OK button while the above message appears on lamp replacement. 65 The lamp timer has now been reset. Onscreen Menus Lamp Timer Reset The lamp replacement message will appear. CLOCK / TIMERS PREVIOUS SET CLOCK ON / OFF TIMER LAMP TIMER RESET PRESS OK TO RESET THE LAMP TIMER. After you replace the lamp, you need to reset the timer which is...
... OK button while the above message appears on lamp replacement. 65 The lamp timer has now been reset. Onscreen Menus Lamp Timer Reset The lamp replacement message will appear. CLOCK / TIMERS PREVIOUS SET CLOCK ON / OFF TIMER LAMP TIMER RESET PRESS OK TO RESET THE LAMP TIMER. After you replace the lamp, you need to reset the timer which is...
User Guide
Page 85
... high-pressure mercury lamp to replace the lamp. Turn the power off and wait until the lamp has completely cooled before attempting to project images onto the television screen. After turning the power off completely. The life of the lamp changes depending on the atmospheric temperature and altitude in which the TV is time to replace it is...
... high-pressure mercury lamp to replace the lamp. Turn the power off and wait until the lamp has completely cooled before attempting to project images onto the television screen. After turning the power off completely. The life of the lamp changes depending on the atmospheric temperature and altitude in which the TV is time to replace it is...

User Guide
Page 86
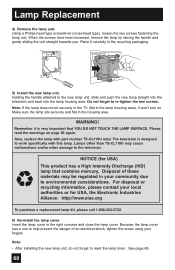
... or go to www.jvc.com. To purchase this message appears when you turn on the TV when the lamp needs to be disposed of with normal trash. AFTER REPLACING THE LAMP, PLEASE RESET TIMER IN THE TV MENU. Lamp Message LAMP NEEDS TO BE REPLACED. Press the OK button to replace the lamp. Lamp Replacement Replacement Lamp Kit Before replacing the lamp, you will appear every...
... or go to www.jvc.com. To purchase this message appears when you turn on the TV when the lamp needs to be disposed of with normal trash. AFTER REPLACING THE LAMP, PLEASE RESET TIMER IN THE TV MENU. Lamp Message LAMP NEEDS TO BE REPLACED. Press the OK button to replace the lamp. Lamp Replacement Replacement Lamp Kit Before replacing the lamp, you will appear every...

User Guide
Page 87
...Turn off the television. Make sure that the lamp will now be thrown away with the television plugged in. 3) Remove the lamp cover. Never attempt to remove the lamp with the Lamp Replacement Kit. 87 First, remove the screw located on the remote control or TV front panel. WARNING: DO NOT attempt to ...remove the assembly until the picture has closed and the LAMP LED on the front panel...
...Turn off the television. Make sure that the lamp will now be thrown away with the television plugged in. 3) Remove the lamp cover. Never attempt to remove the lamp with the Lamp Replacement Kit. 87 First, remove the screw located on the remote control or TV front panel. WARNING: DO NOT attempt to ...remove the assembly until the picture has closed and the LAMP LED on the front panel...
User Guide
Page 88
...TS-CL110U may be regulated in your community due to work specifically with part number TS-CL110U only! Lamp Replacement 4) Remove the lamp unit. Do not forget to the television. Because the lamp cover has a role to help prevent the danger of these materials may cause malfunctions and/or other ... raising the handle and gently sliding the unit straight towards you. Note: If the lamp does not sit securely in the TV (flat in the right concave and close the lamp cover. Please read the warnings on . Disposal of an electrical shock, tighten the screw using your local authorities ...
...TS-CL110U may be regulated in your community due to work specifically with part number TS-CL110U only! Lamp Replacement 4) Remove the lamp unit. Do not forget to the television. Because the lamp cover has a role to help prevent the danger of these materials may cause malfunctions and/or other ... raising the handle and gently sliding the unit straight towards you. Note: If the lamp does not sit securely in the TV (flat in the right concave and close the lamp cover. Please read the warnings on . Disposal of an electrical shock, tighten the screw using your local authorities ...

User Guide
Page 89
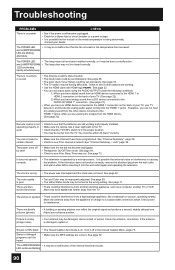
.... The POWER LED and LAMP/PROGRAM LED blink rapidly simultaneously Condition: The lamp unit has been installed on , and there is not fully inserted into warning mode, unplug the TV after the cool down as follows. If the TV goes into the lamp housing. Lamp Replacement Warning LED Messages While the... power is on a slant and is not flat, or it is a problem with the TV, the TV changes to observe all warnings. To ...
.... The POWER LED and LAMP/PROGRAM LED blink rapidly simultaneously Condition: The lamp unit has been installed on , and there is not fully inserted into warning mode, unplug the TV after the cool down as follows. If the TV goes into the lamp housing. Lamp Replacement Warning LED Messages While the... power is on a slant and is not flat, or it is a problem with the TV, the TV changes to observe all warnings. To ...
User Guide
Page 90
... the AUDIO IN "HDMI 1" connection. (See page 21). • When you have been installed correctly, or it . If the antenna is damaged, replace it may be turned to see if the channel is locked. Stereo or bilingual programs can not hear any such appliances further away from an... HDMI device connected to the HDMI 1 or HDMI 2 connection on . and LAMP/PROGRAM • The lamp door may be a malfunction of your TV detects it, and blocks the analog audio signal coming into the wall outlet again and operating the television. LED are...
... the AUDIO IN "HDMI 1" connection. (See page 21). • When you have been installed correctly, or it . If the antenna is damaged, replace it may be turned to see if the channel is locked. Stereo or bilingual programs can not hear any such appliances further away from an... HDMI device connected to the HDMI 1 or HDMI 2 connection on . and LAMP/PROGRAM • The lamp door may be a malfunction of your TV detects it, and blocks the analog audio signal coming into the wall outlet again and operating the television. LED are...


