Instructions
Page 8
... 8 Table of Contents Sound Adjust 51 Sound Settings 51 Adjust Sound Settings 51 MTS (Multi-channel Sound 51 Reset 51 Clock Timers 52 Set Clock 52 On/Off Timer 53 Lamp Reset 54 Button Functions 55 Multi Screen Function 55 Index 55 Twin 55 Freeze 56 Swap 56 Select 56 Power 57 Number ...Buttons 57 Tune 57 Input 57 Digital-In 57 Return+/TV 58 Sound 58 Muting 58 Video Status 59 TheaterPro D6500K...
... 8 Table of Contents Sound Adjust 51 Sound Settings 51 Adjust Sound Settings 51 MTS (Multi-channel Sound 51 Reset 51 Clock Timers 52 Set Clock 52 On/Off Timer 53 Lamp Reset 54 Button Functions 55 Multi Screen Function 55 Index 55 Twin 55 Freeze 56 Swap 56 Select 56 Power 57 Number ...Buttons 57 Tune 57 Input 57 Digital-In 57 Return+/TV 58 Sound 58 Muting 58 Video Status 59 TheaterPro D6500K...
Instructions
Page 12
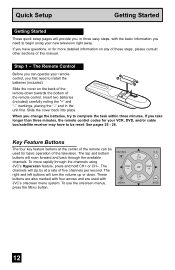
See pages 25 - 28. The Remote Control Before you can be reset. To move rapidly through the available CH C.C. When you change the batteries, try to begin using JVC's Hyperscan feature, press and hold CH+ or CH-. The top and bottom MUTING C.C. The VOL OK VOL right and ... of the remote down . Insert two batteries (included) carefully noting the "+" and "-" markings, placing the "-" end in three easy steps, with JVC's onscreen menu system. Slide the cover back into place. Key Feature Buttons The four key feature buttons at a rate of the remote control. The ...
See pages 25 - 28. The Remote Control Before you can be reset. To move rapidly through the available CH C.C. When you change the batteries, try to begin using JVC's Hyperscan feature, press and hold CH+ or CH-. The top and bottom MUTING C.C. The VOL OK VOL right and ... of the remote down . Insert two batteries (included) carefully noting the "+" and "-" markings, placing the "-" end in three easy steps, with JVC's onscreen menu system. Slide the cover back into place. Key Feature Buttons The four key feature buttons at a rate of the remote control. The ...
Instructions
Page 23
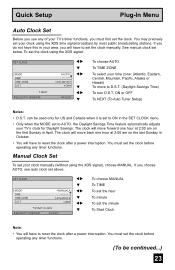
... If you choose AUTO, see auto clock set your clock using the XDS signal), choose MANUAL. You may precisely set above. You must set to reset the clock after a power interruption. ON or OFF To NEXT (To Auto Tuner Setup) Notes: • D.S.T. SET CLOCK MODE TIME TIME ZONE D.S.T.... Manual Clock Set To set the minute To Start Clock Note: • You will have to AUTO, the Daylight Savings Time feature automatically adjusts your TV's clock for Daylight Savings. ATLANTIC ON START CLOCK SELECT OPERATE MENU EXIT √® † √® † √® †...
... If you choose AUTO, see auto clock set your clock using the XDS signal), choose MANUAL. You may precisely set above. You must set to reset the clock after a power interruption. ON or OFF To NEXT (To Auto Tuner Setup) Notes: • D.S.T. SET CLOCK MODE TIME TIME ZONE D.S.T.... Manual Clock Set To set the minute To Start Clock Note: • You will have to AUTO, the Daylight Savings Time feature automatically adjusts your TV's clock for Daylight Savings. ATLANTIC ON START CLOCK SELECT OPERATE MENU EXIT √® † √® † √® †...
Instructions
Page 31
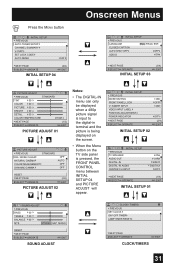
...INPUT VIDEO INPUT LABEL POSITION ADJUSTMENT POWER INDICATOR NEXT PAGE SELECT OPERATE ON OFF ON OFF (2/4) MENU EXIT INITIAL SETUP 02 INITIAL SETUP PREVIOUS TV SPEAKER AUDIO OUT DIGITAL-IN DIGITAL-IN AUDIO CENTER CH INPUT ON VARI SIZE1 DIGITAL OFF NEXT PAGE SELECT OPERATE (1/4) MENU EXIT INITIAL SETUP... PAGE SELECT OPERATE MENU EXIT CLOCK/TIMERS 31 FRAN. ESP. NOISE CLEAR NATURAL CINEMA COLOR MANAGEMENT DYNAMIC GAMMA OFF AUTO OFF OFF RESET NEXT PAGE SELECT OPERATE (2/2) MENU EXIT PICTURE ADJUST 02 Notes: • The DIGITAL-IN menu can only be displayed when a 480p picture ...
...INPUT VIDEO INPUT LABEL POSITION ADJUSTMENT POWER INDICATOR NEXT PAGE SELECT OPERATE ON OFF ON OFF (2/4) MENU EXIT INITIAL SETUP 02 INITIAL SETUP PREVIOUS TV SPEAKER AUDIO OUT DIGITAL-IN DIGITAL-IN AUDIO CENTER CH INPUT ON VARI SIZE1 DIGITAL OFF NEXT PAGE SELECT OPERATE (1/4) MENU EXIT INITIAL SETUP... PAGE SELECT OPERATE MENU EXIT CLOCK/TIMERS 31 FRAN. ESP. NOISE CLEAR NATURAL CINEMA COLOR MANAGEMENT DYNAMIC GAMMA OFF AUTO OFF OFF RESET NEXT PAGE SELECT OPERATE (2/2) MENU EXIT PICTURE ADJUST 02 Notes: • The DIGITAL-IN menu can only be displayed when a 480p picture ...
Instructions
Page 33
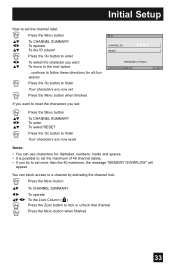
... the OK button to finish Your characters are now set Press the MENU button when finished ID CHANNEL 09 RESET PRESS OK TO FINISH SELECT OPERATE MENU EXIT If you want to reset the characters you try to lock or unlock that channel Press the MENU button when finished 33 Initial Setup... How to set : π† √® π† Press the MENU button To CHANNEL SUMMARY To enter To select RESET Press the OK button to finish Your characters are now reset Notes: • You can block access to a channel by activating the channel lock. Press the MENU button π† To...
... the OK button to finish Your characters are now set Press the MENU button when finished ID CHANNEL 09 RESET PRESS OK TO FINISH SELECT OPERATE MENU EXIT If you want to reset the characters you try to lock or unlock that channel Press the MENU button when finished 33 Initial Setup... How to set : π† √® π† Press the MENU button To CHANNEL SUMMARY To enter To select RESET Press the OK button to finish Your characters are now reset Notes: • You can block access to a channel by activating the channel lock. Press the MENU button π† To...

Instructions
Page 40
...the steps listed above for all four numbers Press the OK button to follow the steps below. Notes: • After a power interruption you must reset the lock code. • Write your lock code number down and keep it hidden from potential viewers. • If you wish. The channel ... number you forget the lock code, a new code may change the lock code, follow these directions for information on setting your lock code). Your TV comes preset with a lock code of "0000". To change the code to watch a blocked channel, this message appears: THIS PROGRAMMING EXCEEDS YOUR RATING...
...the steps listed above for all four numbers Press the OK button to follow the steps below. Notes: • After a power interruption you must reset the lock code. • Write your lock code number down and keep it hidden from potential viewers. • If you wish. The channel ... number you forget the lock code, a new code may change the lock code, follow these directions for information on setting your lock code). Your TV comes preset with a lock code of "0000". To change the code to watch a blocked channel, this message appears: THIS PROGRAMMING EXCEEDS YOUR RATING...
Instructions
Page 45
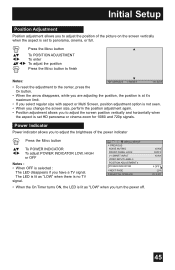
...ADJUSTMENT √® To enter π†√® To adjust the position Press the MENU button to finish Notes: OPERATE OK RESET MENU EXIT • To reset the adjustment to the center, press the OK button. • When the arrow disappears, while you are adjusting the position, the ... Power indicator allows you to adjust the screen position vertically and horizontally when the aspect is selected : The LED disappears if you have a TV signal. The LED is set HD panorama or cinema zoom for 1080i and 720p signals. ON OFF ON OFF (2/4) MENU EXIT 45 Initial Setup...
...ADJUSTMENT √® To enter π†√® To adjust the position Press the MENU button to finish Notes: OPERATE OK RESET MENU EXIT • To reset the adjustment to the center, press the OK button. • When the arrow disappears, while you are adjusting the position, the ... Power indicator allows you to adjust the screen position vertically and horizontally when the aspect is selected : The LED disappears if you have a TV signal. The LED is set HD panorama or cinema zoom for 1080i and 720p signals. ON OFF ON OFF (2/4) MENU EXIT 45 Initial Setup...
Instructions
Page 50
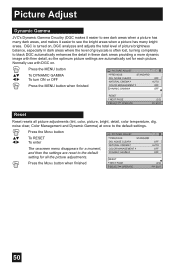
...to the default setting for each picture. NOISE CLEAR NATURAL CINEMA COLOR MANAGEMENT DYNAMIC GAMMA OFF AUTO OFF OFF RESET NEXT PAGE SELECT OPERATE (2/2) MENU EXIT Reset Reset resets all the picture adjustments. noise clear, Color Management and Dynamic Gamma) at once to the default settings. &#... PREVIOUS STANDARD DIG. NOISE CLEAR NATURAL CINEMA COLOR MANAGEMENT DYNAMIC GAMMA STANDARD OFF AUTO OFF OFF RESET NEXT PAGE SELECT OPERATE (2/2) MENU EXIT 50 Picture Adjust Dynamic Gamma JVC's Dynamic Gamma Circuitry (DGC makes it easier to see the bright areas when a picture has...
...to the default setting for each picture. NOISE CLEAR NATURAL CINEMA COLOR MANAGEMENT DYNAMIC GAMMA OFF AUTO OFF OFF RESET NEXT PAGE SELECT OPERATE (2/2) MENU EXIT Reset Reset resets all the picture adjustments. noise clear, Color Management and Dynamic Gamma) at once to the default settings. &#... PREVIOUS STANDARD DIG. NOISE CLEAR NATURAL CINEMA COLOR MANAGEMENT DYNAMIC GAMMA STANDARD OFF AUTO OFF OFF RESET NEXT PAGE SELECT OPERATE (2/2) MENU EXIT 50 Picture Adjust Dynamic Gamma JVC's Dynamic Gamma Circuitry (DGC makes it easier to see the bright areas when a picture has...

Instructions
Page 51
...Press the MENU button when finished Notes: SOUND ADJUST PREVIOUS BASS 00 TREBLE 00 BALANCE 00 MTS STEREO SAP MONO RESET NEXT PAGE SELECT OPERATE MENU EXIT • Keep the TV in stereo mode to mono or stereo sound, an MTS broadcast may also include a second audio program (SAP).... See page 50 on page 57. Reset Reset resets all Sound Adjustments (Bass, Treble and Balance) at once as described on how to use reset. 51 BASS - You can increase or decrease the level of low-frequency sound in the TV's audio with a TV program. Adjust the level of high-frequency ...
...Press the MENU button when finished Notes: SOUND ADJUST PREVIOUS BASS 00 TREBLE 00 BALANCE 00 MTS STEREO SAP MONO RESET NEXT PAGE SELECT OPERATE MENU EXIT • Keep the TV in stereo mode to mono or stereo sound, an MTS broadcast may also include a second audio program (SAP).... See page 50 on page 57. Reset Reset resets all Sound Adjustments (Bass, Treble and Balance) at once as described on how to use reset. 51 BASS - You can increase or decrease the level of low-frequency sound in the TV's audio with a TV program. Adjust the level of high-frequency ...
Instructions
Page 52
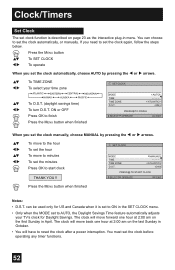
... you need to set the clock before operating any timer functions. 52 SET CLOCK MODE TIME TIME ZONE D.S.T. You must set the clock...OK TO START CLOCK SELECT OPERATE MENU EXIT Press the MENU button when finished Notes: • D.S.T. ON or OFF Press OK to reset the clock after a power interruption. AUTO -- : -- -- MANUAL -- : -- -- Press the MENU button π† ...® arrows. π† √® π† √® To TIME ZONE To select your TV's clock for US and Canada when it is described on the last Sunday in October. • You will move ...
... you need to set the clock before operating any timer functions. 52 SET CLOCK MODE TIME TIME ZONE D.S.T. You must set the clock...OK TO START CLOCK SELECT OPERATE MENU EXIT Press the MENU button when finished Notes: • D.S.T. ON or OFF Press OK to reset the clock after a power interruption. AUTO -- : -- -- MANUAL -- : -- -- Press the MENU button π† ...® arrows. π† √® π† √® To TIME ZONE To select your TV's clock for US and Canada when it is described on the last Sunday in October. • You will move ...

Instructions
Page 53
...and move to CHANNEL To select channel To ON VOLUME To set . • After a power interruption, the timer settings must be reset. 53 Set the OFF TIME the same way as a decoy when you're not home. π† √® &#...To ON/OFF TIMER To operate (begins with ON TIME) To set the hour (AM/PM) you want the TV to turn on ON/OFF TIMER ON TIME OFF TIME CHANNEL ON VOLUME MODE ON/OFF TIMER 7:00 PM 10... the clock must be set the volume level To move to OFF TIME (the time the TV will turn itself on /off . Clock/Timers On/Off Timer The on/off timer lets you program your television ...
...and move to CHANNEL To select channel To ON VOLUME To set . • After a power interruption, the timer settings must be reset. 53 Set the OFF TIME the same way as a decoy when you're not home. π† √® &#...To ON/OFF TIMER To operate (begins with ON TIME) To set the hour (AM/PM) you want the TV to turn on ON/OFF TIMER ON TIME OFF TIME CHANNEL ON VOLUME MODE ON/OFF TIMER 7:00 PM 10... the clock must be set the volume level To move to OFF TIME (the time the TV will turn itself on /off . Clock/Timers On/Off Timer The on/off timer lets you program your television ...

Instructions
Page 54
...8226; See Page 68 for instructions on the television screen. THE LAMP TIMER IS RESET SUCCESSFULLY. The lamp timer has now been reset. CLOCK / TIMERS PREVIOUS SET CLOCK ON / OFF TIMER LAMP TIMER RESET PRESS OK TO RESET THE LAMP TIMER. After you replace the lamp, you need to change the lamp.... Clock/Timers Lamp Timer Reset The lamp replacement message will appear when you need to reset the timer which is built into your television. ...
...8226; See Page 68 for instructions on the television screen. THE LAMP TIMER IS RESET SUCCESSFULLY. The lamp timer has now been reset. CLOCK / TIMERS PREVIOUS SET CLOCK ON / OFF TIMER LAMP TIMER RESET PRESS OK TO RESET THE LAMP TIMER. After you replace the lamp, you need to change the lamp.... Clock/Timers Lamp Timer Reset The lamp replacement message will appear when you need to reset the timer which is built into your television. ...
Instructions
Page 59
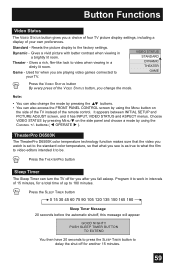
...have 20 seconds to press the SLEEP TIMER button to video when viewing in a brightly lit room. Dynamic - buttons ( √ OPERATE ® ). Resets the picture display to be. Note: • You can also change the mode. Gives a rich, film-like look to delay the shut off for another... 15 minutes. 59 Button Functions Video Status The VIDEO STATUS button gives you a choice of four TV picture display settings, including a display of your TV. VIDEO STATUS STANDARD DYNAMIC THEATER GAME Press the VIDEO STATUS button By every press of the VIDEO STATUS button, you...
...have 20 seconds to press the SLEEP TIMER button to video when viewing in a brightly lit room. Dynamic - buttons ( √ OPERATE ® ). Resets the picture display to be. Note: • You can also change the mode. Gives a rich, film-like look to delay the shut off for another... 15 minutes. 59 Button Functions Video Status The VIDEO STATUS button gives you a choice of four TV picture display settings, including a display of your TV. VIDEO STATUS STANDARD DYNAMIC THEATER GAME Press the VIDEO STATUS button By every press of the VIDEO STATUS button, you...
Instructions
Page 62
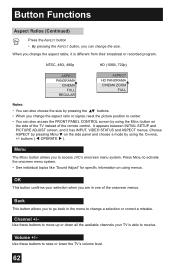
... Button Functions Aspect Ratios (Continued) Press the ASPECT button • By pressing the ASPECT button, you can change the aspect ratio or signal, reset the picture position to center. • You can also choose the size by using the CHANNEL +/- It appears between INITIAL SETUP and PICTURE ADJUST... button allows you to receive. OK This button confirms your TV is different from their broadcast or recorded program. Press MENU to raise or lower the TV's volume level. 62 When you are in the menu to access JVC's onscreen menu system. Choose ASPECT by pressing MENU† ...
... Button Functions Aspect Ratios (Continued) Press the ASPECT button • By pressing the ASPECT button, you can change the aspect ratio or signal, reset the picture position to center. • You can also choose the size by using the CHANNEL +/- It appears between INITIAL SETUP and PICTURE ADJUST... button allows you to receive. OK This button confirms your TV is different from their broadcast or recorded program. Press MENU to raise or lower the TV's volume level. 62 When you are in the menu to access JVC's onscreen menu system. Choose ASPECT by pressing MENU† ...
Instructions
Page 65
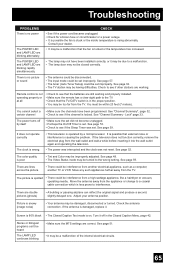
... turns off in the proper position. • You may be interference from another electrical appliance, such as a computer, another TV or VCR. See "Channel Summary - See page 52. There are blinking rapidly simultaneously. Check the antenna connection. Screen is 80% black • The Closed Caption Text mode is...You must be a malfunction that external noise or interference is on. See page 53. • Check to see if the Sleep Timer was not reset. Move the antenna away from the wall outlet and wait a while before inserting it may be due to a malfunction. • The lamp door...
... turns off in the proper position. • You may be interference from another electrical appliance, such as a computer, another TV or VCR. See "Channel Summary - See page 52. There are blinking rapidly simultaneously. Check the antenna connection. Screen is 80% black • The Closed Caption Text mode is...You must be a malfunction that external noise or interference is on. See page 53. • Check to see if the Sleep Timer was not reset. Move the antenna away from the wall outlet and wait a while before inserting it may be due to a malfunction. • The lamp door...

Instructions
Page 68
... WANT TO SEE THIS MESSAGE AGAIN. Note: • This message will appear every time you turn the TV on the TV when the lamp needs to make the message disappear, or replace the lamp. 68 To purchase this message ... or call 1-800-252-5722, or go to replace the lamp. See page 69 on how to www.jvc.com. Press the OK button to be disposed of with normal trash. Appendix Replacement Lamp Kit Before replacing the...contains a small amount of mercury, it cannot be replaced. AFTER REPLACING THE LAMP, PLEASE RESET TIMER IN THE TV MENU. Lamp Message LAMP NEEDS TO BE REPLACED.
... WANT TO SEE THIS MESSAGE AGAIN. Note: • This message will appear every time you turn the TV on the TV when the lamp needs to make the message disappear, or replace the lamp. 68 To purchase this message ... or call 1-800-252-5722, or go to replace the lamp. See page 69 on how to www.jvc.com. Press the OK button to be disposed of with normal trash. Appendix Replacement Lamp Kit Before replacing the...contains a small amount of mercury, it cannot be replaced. AFTER REPLACING THE LAMP, PLEASE RESET TIMER IN THE TV MENU. Lamp Message LAMP NEEDS TO BE REPLACED.
Instructions
Page 71
... and close the lamp cover. Fit the top part of the speaker panel to fully install it into place. 10) Re-install the screw to reset the lamp timer. Appendix 8) Re-install the lamp cover. Insert the lamp cover in the left speaker panel first. See page 54. 71 Note: •...; After installing the new lamp unit, do not forget to the rear panel. Then, gently press the bottom part of the panel against the TV and gently press it back into place. Tighten the single screw you removed from the...
... and close the lamp cover. Fit the top part of the speaker panel to fully install it into place. 10) Re-install the screw to reset the lamp timer. Appendix 8) Re-install the lamp cover. Insert the lamp cover in the left speaker panel first. See page 54. 71 Note: •...; After installing the new lamp unit, do not forget to the rear panel. Then, gently press the bottom part of the panel against the TV and gently press it back into place. Tighten the single screw you removed from the...


