Instructions
Page 8
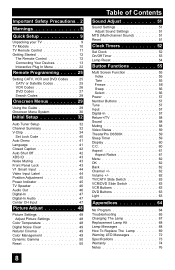
Important Safety Precautions . 2 Warnings 5 Quick Setup 9 Unpacking your TV 9 TV Models 10 TV Remote Control 11 Getting Started 12 The Remote Control 12 Connecting Your Devices 13 Interactive Plug In Menu 22 Remote Programming . . . . . 25 Setting CATV, VCR and DVD Codes . . . 25 CATV or Satellite Codes 25 VCR Codes 26 DVD ... of Contents Sound Adjust 51 Sound Settings 51 Adjust Sound Settings 51 MTS (Multi-channel Sound 51 Reset 51 Clock Timers 52 Set Clock 52 On/Off Timer 53 Lamp Reset 54 Button Functions 55 Multi Screen Function 55 Index 55 Twin 55 Freeze 56 Swap 56...
Important Safety Precautions . 2 Warnings 5 Quick Setup 9 Unpacking your TV 9 TV Models 10 TV Remote Control 11 Getting Started 12 The Remote Control 12 Connecting Your Devices 13 Interactive Plug In Menu 22 Remote Programming . . . . . 25 Setting CATV, VCR and DVD Codes . . . 25 CATV or Satellite Codes 25 VCR Codes 26 DVD ... of Contents Sound Adjust 51 Sound Settings 51 Adjust Sound Settings 51 MTS (Multi-channel Sound 51 Reset 51 Clock Timers 52 Set Clock 52 On/Off Timer 53 Lamp Reset 54 Button Functions 55 Multi Screen Function 55 Index 55 Twin 55 Freeze 56 Swap 56...
Instructions
Page 9
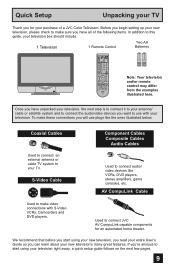
... DVD players, stereo amplifiers, game consoles, etc. If you're anxious to this guide, your television box should include: 1 Television 1 Remote Control Two AA Batteries AA Alkaline AA Alkaline TV CATV VCR DVD POWER ASPECT TWIN MULTI SCREEN INDEX FREEZE SWAP SELECT INPUT 1 V1 1 2 3 INPUT 2 V2 4 5 6 INPUT 3...you can learn about your television right away, a quick setup guide follows on the next few pages. 9 Used to connect JVC AV CompuLink capable components for your purchase of the following items. In addition to start using your new television's many great features...
... DVD players, stereo amplifiers, game consoles, etc. If you're anxious to this guide, your television box should include: 1 Television 1 Remote Control Two AA Batteries AA Alkaline AA Alkaline TV CATV VCR DVD POWER ASPECT TWIN MULTI SCREEN INDEX FREEZE SWAP SELECT INPUT 1 V1 1 2 3 INPUT 2 V2 4 5 6 INPUT 3...you can learn about your television right away, a quick setup guide follows on the next few pages. 9 Used to connect JVC AV CompuLink capable components for your purchase of the following items. In addition to start using your new television's many great features...
Instructions
Page 10
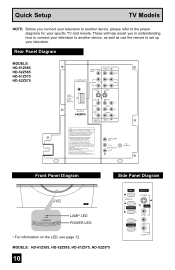
...R Pr INPUT-3 INPUT-1 UNPLUG THE POWER CORD FROM AC OUTLET BEFORE REMOVING THE REAR COVER When the rear cover is a registered trademark of the television features. Sous licence de BBE Sound, Inc. Quick Setup TV Models NOTE: Before you in understanding how to connect your television to another device,...the service manual before plugging the TV's power cord into an AC outlet. BBE is removed, follow the procedure will help assist you connect your television to another device, as well as use the remote to set up your specific TV and remote. Autorizado con licencia de BBE Sound...
...R Pr INPUT-3 INPUT-1 UNPLUG THE POWER CORD FROM AC OUTLET BEFORE REMOVING THE REAR COVER When the rear cover is a registered trademark of the television features. Sous licence de BBE Sound, Inc. Quick Setup TV Models NOTE: Before you in understanding how to connect your television to another device,...the service manual before plugging the TV's power cord into an AC outlet. BBE is removed, follow the procedure will help assist you connect your television to another device, as well as use the remote to set up your specific TV and remote. Autorizado con licencia de BBE Sound...
Instructions
Page 11
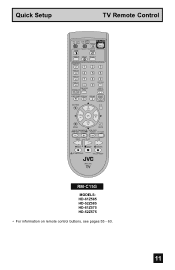
VOL OK VOL CH MENU VCR CHANNEL PREV NEXT BACK VCR / DVD POWER TV / VCR REW PLAY FF REC STOP PAUSE OPEN CLOSE STILL PAUSE RM-C15G RM-C15G MODELS: HD-61Z585 HD-52Z585 HD-61Z575 HD-52Z575 • For information on remote control buttons, see pages 55 - 63. 11 Quick Setup TV Remote Control TV CATV VCR DVD POWER ASPECT TWIN MULTI SCREEN INDEX FREEZE SWAP SELECT INPUT 1 V1 1 2 3 INPUT 2 V2 4 5 6 INPUT 3 V3 7 8 INPUT 4 V4 TUNE 0 THEATER DIGITAL-IN PRO D-IN 9 RETURN+ TV VIDEO STATUS SLEEP TIMER DISPLAY SOUND LIGHT + MUTING CH C.C. C.C.
VOL OK VOL CH MENU VCR CHANNEL PREV NEXT BACK VCR / DVD POWER TV / VCR REW PLAY FF REC STOP PAUSE OPEN CLOSE STILL PAUSE RM-C15G RM-C15G MODELS: HD-61Z585 HD-52Z585 HD-61Z575 HD-52Z575 • For information on remote control buttons, see pages 55 - 63. 11 Quick Setup TV Remote Control TV CATV VCR DVD POWER ASPECT TWIN MULTI SCREEN INDEX FREEZE SWAP SELECT INPUT 1 V1 1 2 3 INPUT 2 V2 4 5 6 INPUT 3 V3 7 8 INPUT 4 V4 TUNE 0 THEATER DIGITAL-IN PRO D-IN 9 RETURN+ TV VIDEO STATUS SLEEP TIMER DISPLAY SOUND LIGHT + MUTING CH C.C. C.C.
Instructions
Page 12
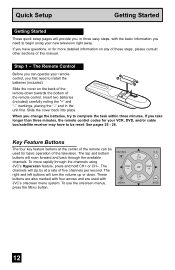
...buttons are also marked with four arrows and are used for more detailed information on the back of the remote control. buttons will provide you first need to begin using JVC's Hyperscan feature, press and hold CH+ or CH-. The VOL OK VOL right and left buttons ...three minutes. Insert two batteries (included) carefully noting the "+" and "-" markings, placing the "-" end in three easy steps, with JVC's onscreen menu system. The Remote Control Before you change the batteries, try to install the batteries (included). Slide the cover back into place. The channels will turn the...
...buttons are also marked with four arrows and are used for more detailed information on the back of the remote control. buttons will provide you first need to begin using JVC's Hyperscan feature, press and hold CH+ or CH-. The VOL OK VOL right and left buttons ...three minutes. Insert two batteries (included) carefully noting the "+" and "-" markings, placing the "-" end in three easy steps, with JVC's onscreen menu system. The Remote Control Before you change the batteries, try to install the batteries (included). Slide the cover back into place. The channels will turn the...
Instructions
Page 13
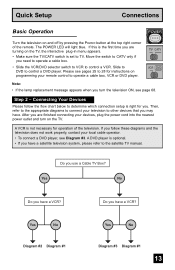
... you may have a VCR? Move the switch to CATV only if you are turning on the TV, the interactive plug-in menu appears. • Make sure the TV/CATV switch is right for operation of the remote. Step 2 - After you need to operate a cable box. • Slide the VCR/DVD... other devices that you have a satellite television system, please refer to the satellite TV manual. Do you are finished connecting your remote control to connect your local cable operator. • To connect a DVD player, see Diagram #3. TV CATV VCR DVD A Note: • If the lamp replacement message appears when ...
... you may have a VCR? Move the switch to CATV only if you are turning on the TV, the interactive plug-in menu appears. • Make sure the TV/CATV switch is right for operation of the remote. Step 2 - After you need to operate a cable box. • Slide the VCR/DVD... other devices that you have a satellite television system, please refer to the satellite TV manual. Do you are finished connecting your remote control to connect your local cable operator. • To connect a DVD player, see Diagram #3. TV CATV VCR DVD A Note: • If the lamp replacement message appears when ...
Instructions
Page 16
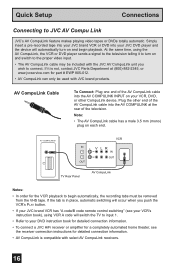
... switch to the proper video input. • The AV CompuLink cable may be included with the JVC AV CompuLink unit you push the VCR's PLAY button. • If your JVC brand VCR has "A code/B code remote control switching" (see the receiver connection instructions for part # EWP 805-012. • AV... the tab is in place, automatic switching will occur when you wish to JVC AV Compu Link JVC's AV CompuLink feature makes playing video tapes or DVDs totally automatic. AV COMPULINK III VCR IN V L R IN OUT OUT TV Rear Panel AV CompuLink Notes: • In order for the VCR playback to ...
... switch to the proper video input. • The AV CompuLink cable may be included with the JVC AV CompuLink unit you push the VCR's PLAY button. • If your JVC brand VCR has "A code/B code remote control switching" (see the receiver connection instructions for part # EWP 805-012. • AV... the tab is in place, automatic switching will occur when you wish to JVC AV Compu Link JVC's AV CompuLink feature makes playing video tapes or DVDs totally automatic. AV COMPULINK III VCR IN V L R IN OUT OUT TV Rear Panel AV CompuLink Notes: • In order for the VCR playback to ...
Instructions
Page 21
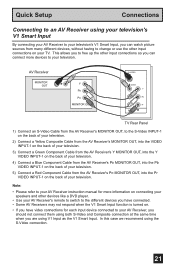
...Smart Input, you can connect more information on connecting your speakers and other input connections on your TV. AV Receiver MONITOR OUT Y PB PR MONITOR OUT S-VIDEO OVER Y VIDEO L Pb I AUDIO I R Pr INPUT-1 TV Rear Panel 1) Connect an S-Video Cable from the AV Receiver's MONITOR OUT, to the S-Video... Cable from many different devices, without having to change or use the other devices like a DVD player. • Use your AV Receiver's remote to switch to the different devices you have connected. • Some AV Receivers may not respond when the V1 Smart Input function is turned ...
...Smart Input, you can connect more information on connecting your speakers and other input connections on your TV. AV Receiver MONITOR OUT Y PB PR MONITOR OUT S-VIDEO OVER Y VIDEO L Pb I AUDIO I R Pr INPUT-1 TV Rear Panel 1) Connect an S-Video Cable from the AV Receiver's MONITOR OUT, to the S-Video... Cable from many different devices, without having to change or use the other devices like a DVD player. • Use your AV Receiver's remote to switch to the different devices you have connected. • Some AV Receivers may not respond when the V1 Smart Input function is turned ...
Instructions
Page 24
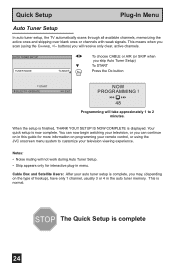
... your television viewing experience. STOP The Quick Setup is finished, THANK YOU!! Quick Setup Plug-In Menu Auto Tuner Setup In auto tuner setup, the TV automatically scans through all available channels, memorizing the active ones and skipping over blank ones or channels with weak signals. SETUP IS NOW COMPLETE is..., or you may, (depending on in this guide for interactive plug-in the auto tuner memory. This is complete, you can now begin watching your remote control, or using the CHANNEL +/- buttons) you scan (using the...
... your television viewing experience. STOP The Quick Setup is finished, THANK YOU!! Quick Setup Plug-In Menu Auto Tuner Setup In auto tuner setup, the TV automatically scans through all available channels, memorizing the active ones and skipping over blank ones or channels with weak signals. SETUP IS NOW COMPLETE is..., or you may, (depending on in this guide for interactive plug-in the auto tuner memory. This is complete, you can now begin watching your remote control, or using the CHANNEL +/- buttons) you scan (using the...

Instructions
Page 25
..., 110 107 104, 108 Toshiba 101, 104, 117, 118, 119 Uniden 102, 103 25 Remote Programming Setting the CATV, VCR and DVD Codes You can program your remote to the code search function, use the remote control supplied by using the instructions and codes listed below or to operate your cable or...from the list of codes shown below. 2) Slide the 2-way selector switch to any of the codes listed below . Cable Box or Satellite Codes The remote control is programmed with the 10 key pad. 4) Release the DISPLAY button, and confirm the operation of the cable box/satellite receiver. • If ...
..., 110 107 104, 108 Toshiba 101, 104, 117, 118, 119 Uniden 102, 103 25 Remote Programming Setting the CATV, VCR and DVD Codes You can program your remote to the code search function, use the remote control supplied by using the instructions and codes listed below or to operate your cable or...from the list of codes shown below. 2) Slide the 2-way selector switch to any of the codes listed below . Cable Box or Satellite Codes The remote control is programmed with the 10 key pad. 4) Release the DISPLAY button, and confirm the operation of the cable box/satellite receiver. • If ...

Instructions
Page 26
... Codes The remote control is programmed with VCR codes for power on/off, play, stop, fast-forward, rewind, pause, record, channel up/down operation. 1) Find the VCR brand from the list of codes shown below. 2) Slide the first 2-way selector switch to "TV" and the other 2-way selector switch to..., 089 Goldstar 064 Gradiente 083, 084, 081, 000, 001 Hitachi 023, 045, 058, 093, 027, 081 Instant Replay 024, 023 Jensen 003 JVC 003, 004, 005, 000, 001, 002, 006, 007 VCR Marantz Marta Memorex MGA Minolta Mitsubishi Multitech NEC Olympic Optimus Orion Panasonic Penney Pentax Philco Philips...
... Codes The remote control is programmed with VCR codes for power on/off, play, stop, fast-forward, rewind, pause, record, channel up/down operation. 1) Find the VCR brand from the list of codes shown below. 2) Slide the first 2-way selector switch to "TV" and the other 2-way selector switch to..., 089 Goldstar 064 Gradiente 083, 084, 081, 000, 001 Hitachi 023, 045, 058, 093, 027, 081 Instant Replay 024, 023 Jensen 003 JVC 003, 004, 005, 000, 001, 002, 006, 007 VCR Marantz Marta Memorex MGA Minolta Mitsubishi Multitech NEC Olympic Optimus Orion Panasonic Penney Pentax Philco Philips...
Instructions
Page 27
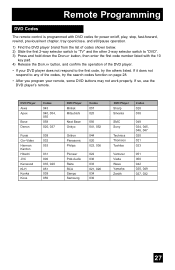
... operation of codes shown below. 2) Slide the first 2-way selector switch to "TV" and the other 2-way selector switch to the first code, try the others listed. DVD Player Aiwa Apex Bose Denon Funai Go-Video Harman Kardon Hitachi JVC Kenwood KLH Konka Koss Codes 043 040, 054, 055 058 020, 037... hold down the DISPLAY button, then enter the first code number listed with DVD codes for power on page 28. • After you program your remote, some DVD buttons may not work properly. If so, use the DVD player...
... operation of codes shown below. 2) Slide the first 2-way selector switch to "TV" and the other 2-way selector switch to the first code, try the others listed. DVD Player Aiwa Apex Bose Denon Funai Go-Video Harman Kardon Hitachi JVC Kenwood KLH Konka Koss Codes 043 040, 054, 055 058 020, 037... hold down the DISPLAY button, then enter the first code number listed with DVD codes for power on page 28. • After you program your remote, some DVD buttons may not work properly. If so, use the DVD player...

Instructions
Page 28
... first 2-Way Mode Selector switch to "VCR" or "DVD". 2) Press the VCR or DVD POWER and RETURN+/TV buttons. If there was no response, use the remote control that came with your equipment. 5) Press RETURN+/TV to exit. 28 The codes are now set . VCR/DVD Search Codes Function 1) Slide the first 2-way...codes are now set . Hold for at least three seconds and release. 3) Press the POWER button on the remote, and see if the VCR or DVD responds. 4) If there was a response, press RETURN+/TV. If you repeat Step 3 a total of 80 times for the VCR (40 times for at least three seconds...
... first 2-Way Mode Selector switch to "VCR" or "DVD". 2) Press the VCR or DVD POWER and RETURN+/TV buttons. If there was no response, use the remote control that came with your equipment. 5) Press RETURN+/TV to exit. 28 The codes are now set . VCR/DVD Search Codes Function 1) Slide the first 2-way...codes are now set . Hold for at least three seconds and release. 3) Press the POWER button on the remote, and see if the VCR or DVD responds. 4) If there was a response, press RETURN+/TV. If you repeat Step 3 a total of 80 times for the VCR (40 times for at least three seconds...
Instructions
Page 29
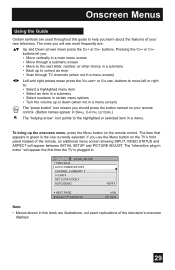
...next letter, number, or other choice in a submenu • Back up the onscreen menu, press the MENU button on the TV's front panel instead of the remote, an additional menu screen showing INPUT, VIDEO STATUS and ASPECT will appear between INITIAL SETUP and PICTURE ADJUST. buttons let you should... press the button named on your new television. To bring up to correct an error • Scan through TV channels (when not in...
...next letter, number, or other choice in a submenu • Back up the onscreen menu, press the MENU button on the TV's front panel instead of the remote, an additional menu screen showing INPUT, VIDEO STATUS and ASPECT will appear between INITIAL SETUP and PICTURE ADJUST. buttons let you should... press the button named on your new television. To bring up to correct an error • Scan through TV channels (when not in...
Instructions
Page 30
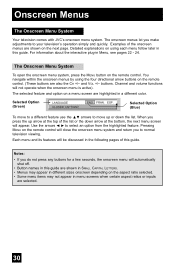
...using the four directional arrow buttons on the aspect ratio selected. • Some menu items may appear in different sizes onscreen depending on the remote control. (These buttons are highlighted in Menu, see pages 22 - 24. Detailed explanations on the next page. buttons. ESP. FRAN. ... the list. Onscreen Menus The Onscreen Menu System Your television comes with JVC's onscreen menu system. The Onscreen Menu System To open the onscreen menu system, press the MENU button on the remote control will not operate when the onscreen menu is active). Each menu ...
...using the four directional arrow buttons on the aspect ratio selected. • Some menu items may appear in different sizes onscreen depending on the remote control. (These buttons are highlighted in Menu, see pages 22 - 24. Detailed explanations on the next page. buttons. ESP. FRAN. ... the list. Onscreen Menus The Onscreen Menu System Your television comes with JVC's onscreen menu system. The Onscreen Menu System To open the onscreen menu system, press the MENU button on the remote control will not operate when the onscreen menu is active). Each menu ...

Instructions
Page 43
...gray screen over channels which are not broadcasting or are too weak to lock the keys on the front of the TV, so that a child may not accidentally change your remote control. This feature will not work during auto tuner setup or when you operate channel summary. ESP. Do this ... LABEL POSITION ADJUSTMENT POWER INDICATOR NEXT PAGE SELECT OPERATE ON OFF ON OFF (2/4) MENU EXIT • Use the remote control. • Press the MENU button on the front of the TV for more than 3 seconds. INITIAL SETUP PREVIOUS NOISE MUTING FRONT PANEL LOCK V1 SMART INPUT VIDEO INPUT LABEL POSITION...
...gray screen over channels which are not broadcasting or are too weak to lock the keys on the front of the TV, so that a child may not accidentally change your remote control. This feature will not work during auto tuner setup or when you operate channel summary. ESP. Do this ... LABEL POSITION ADJUSTMENT POWER INDICATOR NEXT PAGE SELECT OPERATE ON OFF ON OFF (2/4) MENU EXIT • Use the remote control. • Press the MENU button on the front of the TV for more than 3 seconds. INITIAL SETUP PREVIOUS NOISE MUTING FRONT PANEL LOCK V1 SMART INPUT VIDEO INPUT LABEL POSITION...
Instructions
Page 46
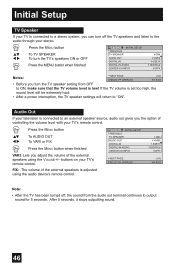
buttons on your TV's remote control. INITIAL SETUP PREVIOUS TV SPEAKER AUDIO OUT DIGITAL-IN DIGITAL-IN AUDIO CENTER CH INPUT NEXT PAGE SELECT OPERATE ON VARI SIZE1 DIGITAL OFF (1/4) MENU EXIT Note: • After the TV has been turned off the TV speakers and listen to the audio through your ... speaker source, audio out gives you adjust the volume of controlling the volume level with your TV's remote control. After 5 seconds, it stops outputting sound. 46 Initial Setup TV Speaker If your TV is connected to a stereo system, you can turn off , the sound from OFF to ON...
buttons on your TV's remote control. INITIAL SETUP PREVIOUS TV SPEAKER AUDIO OUT DIGITAL-IN DIGITAL-IN AUDIO CENTER CH INPUT NEXT PAGE SELECT OPERATE ON VARI SIZE1 DIGITAL OFF (1/4) MENU EXIT Note: • After the TV has been turned off the TV speakers and listen to the audio through your ... speaker source, audio out gives you adjust the volume of controlling the volume level with your TV's remote control. After 5 seconds, it stops outputting sound. 46 Initial Setup TV Speaker If your TV is connected to a stereo system, you can turn off , the sound from OFF to ON...
Instructions
Page 55
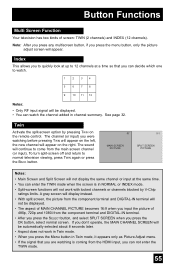
... Adjust menu. • If the signal that you were watching before pressing TWIN will appear on the left, the new channel will appear on the remote control. Twin Activate the split-screen option by V-Chip ratings limits. Note: After you press any multiscreen button, if you press the OK button, select...
... Adjust menu. • If the signal that you were watching before pressing TWIN will appear on the left, the new channel will appear on the remote control. Twin Activate the split-screen option by V-Chip ratings limits. Note: After you press any multiscreen button, if you press the OK button, select...
Instructions
Page 57
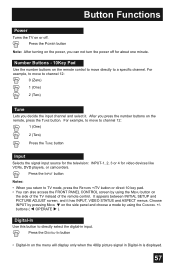
...using the MENU button on the side of the TV instead of the remote control. Digital-In Use this button to TV mode, press the RETURN +/TV button or direct 10 key pad. • ...displayed. 57 buttons ( √ OPERATE ® ). Press the DIGITAL-IN button • Digital-In on the remote control to move to channel 12: 1 (One) 2 (Two) Press the TUNE button Input Selects the signal input...on the menu will display only when the 480p picture signal in input. Button Functions Power Turns the TV on the remote, press the TUNE button. For example, to move directly to channel 12: 0 (Zero) 1 ...
...using the MENU button on the side of the TV instead of the remote control. Digital-In Use this button to TV mode, press the RETURN +/TV button or direct 10 key pad. • ...displayed. 57 buttons ( √ OPERATE ® ). Press the DIGITAL-IN button • Digital-In on the remote control to move to channel 12: 1 (One) 2 (Two) Press the TUNE button Input Selects the signal input...on the menu will display only when the 480p picture signal in input. Button Functions Power Turns the TV on the remote, press the TUNE button. For example, to move directly to channel 12: 0 (Zero) 1 ...
Instructions
Page 59
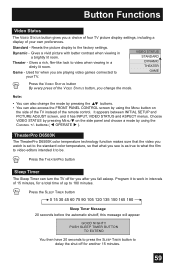
.... Button Functions Video Status The VIDEO STATUS button gives you change the mode by pressing the π† buttons. • You can turn the TV off for you after you see is set to the standard color temperature, so that the video you watch is as true to what you... fall asleep. Gives a vivid picture with better contrast when viewing in intervals of 15 minutes, for a total time of the remote control. Theater - Used for when you are playing video games connected to delay the shut off for another 15 minutes. 59 Choose VIDEO STATUS by...
.... Button Functions Video Status The VIDEO STATUS button gives you change the mode by pressing the π† buttons. • You can turn the TV off for you after you see is set to the standard color temperature, so that the video you watch is as true to what you... fall asleep. Gives a vivid picture with better contrast when viewing in intervals of 15 minutes, for a total time of the remote control. Theater - Used for when you are playing video games connected to delay the shut off for another 15 minutes. 59 Choose VIDEO STATUS by...

