
Instructions
Page 2
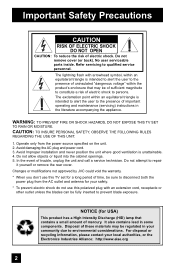
...from the power source specified on the unit. 2. WARNING: TO PREVENT FIRE OR SHOCK HAZARDS, DO NOT EXPOSE THIS TV SET TO RAIN OR MOISTURE. For disposal or recycling information, please contact your community due to prevent blade exposure. ... THE FOLLOWING RULES REGARDING THE USE OF THIS UNIT. 1. Changes or modifications not approved by JVC could void the warranty. * When you don't use this TV set for your safety. * To prevent electric shock do not use this polarized plug with ... Alliance: http://www.eiae.org 2 Refer servicing to repair it yourself or remove the rear cover.
...from the power source specified on the unit. 2. WARNING: TO PREVENT FIRE OR SHOCK HAZARDS, DO NOT EXPOSE THIS TV SET TO RAIN OR MOISTURE. For disposal or recycling information, please contact your community due to prevent blade exposure. ... THE FOLLOWING RULES REGARDING THE USE OF THIS UNIT. 1. Changes or modifications not approved by JVC could void the warranty. * When you don't use this TV set for your safety. * To prevent electric shock do not use this polarized plug with ... Alliance: http://www.eiae.org 2 Refer servicing to repair it yourself or remove the rear cover.

Instructions
Page 4
...tested and found to comply with the limits for help. 4 Reorient or relocate the receiving antenna. - Consult the dealer or an experienced radio/TV technician for a Class B digital device, pursuant to radio communications. Servicing is required when the apparatus has been damaged in any way, such... However, there is damaged, liquid has been spilled or objects have fallen into an outlet on , the user is impossible. Install the TV in accordance with liquids, such as vases, shall be maintained between the equipment and receiver. - These limits are designed to dripping or ...
...tested and found to comply with the limits for help. 4 Reorient or relocate the receiving antenna. - Consult the dealer or an experienced radio/TV technician for a Class B digital device, pursuant to radio communications. Servicing is required when the apparatus has been damaged in any way, such... However, there is damaged, liquid has been spilled or objects have fallen into an outlet on , the user is impossible. Install the TV in accordance with liquids, such as vases, shall be maintained between the equipment and receiver. - These limits are designed to dripping or ...

Instructions
Page 5
...the water to help remove spots of oily dirt. • DO NOT allow liquid to enter the TV through the ventilation slots. • DO NOT use strong or abrasive cleaners on the TV. • DO NOT spray liquids or cleaners directly on the screen surface and image distortions. 5 ... light dusting with a cloth dipped in a diluted kitchen cleaner and thoroughly wrung-out. Do not push or hit the screen. These will keep your TV clean. Then wipe gently with a soft cloth, slightly moistened with an electrostatic-proof coating. Then wipe immediately after with a clean, dry cloth. Do...
...the water to help remove spots of oily dirt. • DO NOT allow liquid to enter the TV through the ventilation slots. • DO NOT use strong or abrasive cleaners on the TV. • DO NOT spray liquids or cleaners directly on the screen surface and image distortions. 5 ... light dusting with a cloth dipped in a diluted kitchen cleaner and thoroughly wrung-out. Do not push or hit the screen. These will keep your TV clean. Then wipe gently with a soft cloth, slightly moistened with an electrostatic-proof coating. Then wipe immediately after with a clean, dry cloth. Do...
Instructions
Page 6
...picture onto the screen. Cautions related to the safe use this television which are 2 LED indicators on the atmospheric temperature and altitude in which the TV is turned on the screen. When the power is being used as a guide. As the lamp warms up , you for a long time...also performed while the television is turned on how to recycle the lamp, refer to learn about this device for purchasing JVC's model HD-52G886, HD-52G786, HD-56G886 or HD-56G786 HDTV-ready projection television which will help you for a long time This television uses a lamp to turn the power off . Once ...
...picture onto the screen. Cautions related to the safe use this television which are 2 LED indicators on the atmospheric temperature and altitude in which the TV is turned on the screen. When the power is being used as a guide. As the lamp warms up , you for a long time...also performed while the television is turned on how to recycle the lamp, refer to learn about this device for purchasing JVC's model HD-52G886, HD-52G786, HD-56G886 or HD-56G786 HDTV-ready projection television which will help you for a long time This television uses a lamp to turn the power off . Once ...
Instructions
Page 7
... This television has a DIGITAL-IN terminal. Do not replace the lamp immediately after use . Do not open the rear cabinet. 13. When connecting the television to keep the TV on for details on it with any hard objects. Warm air from the air ducts This unit has an air...frame could cause the color of the socket. ILA element characteristics Do not project still pictures or pictures that the television is called condensation. If the television is a possibility of time. Please do not open the rear cabinet of this condensation is still present, the picture may seem distorted, ...
... This television has a DIGITAL-IN terminal. Do not replace the lamp immediately after use . Do not open the rear cabinet. 13. When connecting the television to keep the TV on for details on it with any hard objects. Warm air from the air ducts This unit has an air...frame could cause the color of the socket. ILA element characteristics Do not project still pictures or pictures that the television is called condensation. If the television is a possibility of time. Please do not open the rear cabinet of this condensation is still present, the picture may seem distorted, ...
Instructions
Page 8
... Noise Muting 53 Front Panel Lock 54 V1 Smart Input 54 Video Input Label 55 Position Adjustment 56 Power Indicator 56 Video-1 Monitor Out 57 TV Speaker 57 Audio Out 57 Digital-In 58 Digital-In Audio 58 Center CH Input 59 Picture Adjust 60 Picture Settings 60 Adjust Picture Settings... Function 67 Twin 67 Index 68 Freeze 68 Swap 68 Select 68 Power 69 Number Buttons 69 Tune 69 Input 69 TheaterPro D6500K 69 Return+/TV 70 Sound 70 Muting 71 Video Status 71 Natural Cinema 71 Sleep Timer 72 ML/MTS 72 Display 73 C.C 73 Channel 73 Volume 73 Favorite...
... Noise Muting 53 Front Panel Lock 54 V1 Smart Input 54 Video Input Label 55 Position Adjustment 56 Power Indicator 56 Video-1 Monitor Out 57 TV Speaker 57 Audio Out 57 Digital-In 58 Digital-In Audio 58 Center CH Input 59 Picture Adjust 60 Picture Settings 60 Adjust Picture Settings... Function 67 Twin 67 Index 68 Freeze 68 Swap 68 Select 68 Power 69 Number Buttons 69 Tune 69 Input 69 TheaterPro D6500K 69 Return+/TV 70 Sound 70 Muting 71 Video Status 71 Natural Cinema 71 Sleep Timer 72 ML/MTS 72 Display 73 C.C 73 Channel 73 Volume 73 Favorite...
Instructions
Page 10
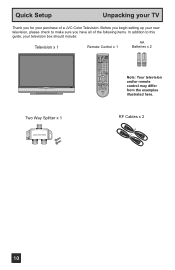
...please check to make sure you for your purchase of the following items. In addition to this guide, your TV Thank you have all of a JVC Color Television. NATURAL SOUND CINEMA 9 RETURN+ TV SUB CHANNEL SUB LIGHT MUTING CH GUIDE VOL OK VOL Note: Your television CH MENU BACK and/or remote ...VCR CHANNEL VCR DVD PREV NEXT POWER TV VCR REW PLAY FF control may differ LAMP/PROGRAM POWER REC STOP...
...please check to make sure you for your purchase of the following items. In addition to this guide, your TV Thank you have all of a JVC Color Television. NATURAL SOUND CINEMA 9 RETURN+ TV SUB CHANNEL SUB LIGHT MUTING CH GUIDE VOL OK VOL Note: Your television CH MENU BACK and/or remote ...VCR CHANNEL VCR DVD PREV NEXT POWER TV VCR REW PLAY FF control may differ LAMP/PROGRAM POWER REC STOP...
Instructions
Page 11
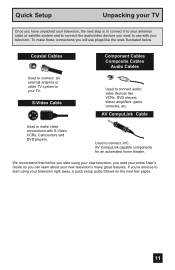
...want to use plugs like VCRs, DVD players, stereo amplifiers, game consoles, etc. Coaxial Cables Used to connect an external antenna or cable TV system to your television. We recommend that before you start using your new television, you read your entire User's Guide so you can ... away, a quick setup guide follows on the next few pages. 11 To make video connections with your TV. S-Video Cable Component Cables Composite Cables Audio Cables Used to connect JVC AV CompuLink capable components for an automated home theater. Used to connect audio/ video devices like the ones ...
...want to use plugs like VCRs, DVD players, stereo amplifiers, game consoles, etc. Coaxial Cables Used to connect an external antenna or cable TV system to your television. We recommend that before you start using your new television, you read your entire User's Guide so you can ... away, a quick setup guide follows on the next few pages. 11 To make video connections with your TV. S-Video Cable Component Cables Composite Cables Audio Cables Used to connect JVC AV CompuLink capable components for an automated home theater. Used to connect audio/ video devices like the ones ...
Instructions
Page 12
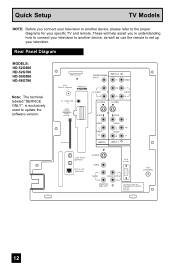
... connect your television to another device, please refer to the proper diagrams for your television. Rear Panel Diagram MODELS: HD-52G886 HD-52G786 HD-56G886 HD-56G786 Note: The terminal labeled "SERVICE ONLY", is exclusively used to set up your specific TV and remote. SERVICE ONLY ATSC /DIGITAL CABLE IN I DIGITAL IN AV COMPULINK III VIDEO (DIGITAL...
... connect your television to another device, please refer to the proper diagrams for your television. Rear Panel Diagram MODELS: HD-52G886 HD-52G786 HD-56G886 HD-56G786 Note: The terminal labeled "SERVICE ONLY", is exclusively used to set up your specific TV and remote. SERVICE ONLY ATSC /DIGITAL CABLE IN I DIGITAL IN AV COMPULINK III VIDEO (DIGITAL...

Instructions
Page 14
...123 D/A 4 5 6 i.LINK MENU 78 TIMER TUNE THEATER FAVORITE PRO 0 VIDEO STATUS C.C. If your TV is connected to an ATSC antenna or Digital Cable, you can use these buttons. 14 NATURAL SOUND CINEMA 9 RETURN+ TV SUB CHANNEL SUB LIGHT MUTING CH GUIDE VOL OK VOL CH MENU VCR CHANNEL PREV NEXT... BACK VCR DVD POWER TV VCR REW PLAY FF REC STOP PAUSE OPEN CLOSE STILL PAUSE RM-C14G RM-C14G MODELS: HD-52G886 HD-52G786 HD-56G886 HD-56G786 • For information on remote control buttons, see pages 67 - 77 and 81 -...
...123 D/A 4 5 6 i.LINK MENU 78 TIMER TUNE THEATER FAVORITE PRO 0 VIDEO STATUS C.C. If your TV is connected to an ATSC antenna or Digital Cable, you can use these buttons. 14 NATURAL SOUND CINEMA 9 RETURN+ TV SUB CHANNEL SUB LIGHT MUTING CH GUIDE VOL OK VOL CH MENU VCR CHANNEL PREV NEXT... BACK VCR DVD POWER TV VCR REW PLAY FF REC STOP PAUSE OPEN CLOSE STILL PAUSE RM-C14G RM-C14G MODELS: HD-52G886 HD-52G786 HD-56G886 HD-56G786 • For information on remote control buttons, see pages 67 - 77 and 81 -...
Instructions
Page 15
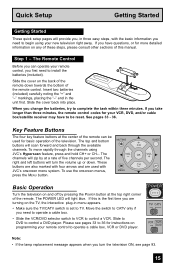
...you need to operate a cable box. • Slide the VCR/DVD selector switch to VCR to TV. POWER T TV CATV MUL VCR DVD Note: • If the lamp replacement message appears when you turn the volume ...provide you, in three easy steps, with the basic information you need to begin using JVC's Hyperscan feature, press and hold CH+ or CH-. To move rapidly through the available CH channels. ...These buttons are also marked with CH JVC's onscreen menu system. If this manual. Please see page 93. 15 If you have to ...
...you need to operate a cable box. • Slide the VCR/DVD selector switch to VCR to TV. POWER T TV CATV MUL VCR DVD Note: • If the lamp replacement message appears when you turn the volume ...provide you, in three easy steps, with the basic information you need to begin using JVC's Hyperscan feature, press and hold CH+ or CH-. To move rapidly through the available CH channels. ...These buttons are also marked with CH JVC's onscreen menu system. If this manual. Please see page 93. 15 If you have to ...
Instructions
Page 16
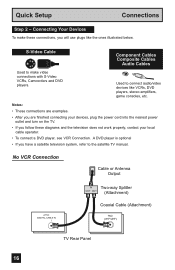
...finished connecting your devices, plug the power cord into the nearest power outlet and turn on the TV. • If you have a satellite television system, refer to the satellite TV manual. S-Video Cable Component Cables Composite Cables Audio Cables Used to connect audio/video devices like ... or Antenna Output ATSC /DIGITAL CABLE IN I IN Two-way Splitter OUT OUT (Attachment) Coaxial Cable (Attachment) 75Ω (VHF/UHF) TV Rear Panel 16 Used to make these diagrams and the television does not work properly, contact your local cable operator. • To connect a DVD ...
...finished connecting your devices, plug the power cord into the nearest power outlet and turn on the TV. • If you have a satellite television system, refer to the satellite TV manual. S-Video Cable Component Cables Composite Cables Audio Cables Used to connect audio/video devices like ... or Antenna Output ATSC /DIGITAL CABLE IN I IN Two-way Splitter OUT OUT (Attachment) Coaxial Cable (Attachment) 75Ω (VHF/UHF) TV Rear Panel 16 Used to make these diagrams and the television does not work properly, contact your local cable operator. • To connect a DVD ...
Instructions
Page 17
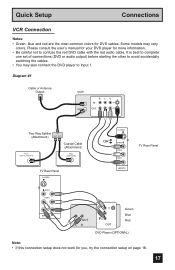
... OUT R L V IN OUT Two-Way Splitter IN (Attachment) OUT OUT Coaxial Cable (Attachment) ATSC /DIGITAL CABLE IN I 75Ω (VHF/UHF) TV Rear Panel S-VIDEO S-VIDEO OR OVER VIDEO L I AUDIO I R INPUT-3 TV Rear Panel OVER Y VIDEO L Pb I AUDIO I R Pr INPUT-1 AUDIO OUT L R Y PB PR OUT Green Blue Red DVD Player (OPTIONAL) Note: • If...
... OUT R L V IN OUT Two-Way Splitter IN (Attachment) OUT OUT Coaxial Cable (Attachment) ATSC /DIGITAL CABLE IN I 75Ω (VHF/UHF) TV Rear Panel S-VIDEO S-VIDEO OR OVER VIDEO L I AUDIO I R INPUT-3 TV Rear Panel OVER Y VIDEO L Pb I AUDIO I R Pr INPUT-1 AUDIO OUT L R Y PB PR OUT Green Blue Red DVD Player (OPTIONAL) Note: • If...
Instructions
Page 18
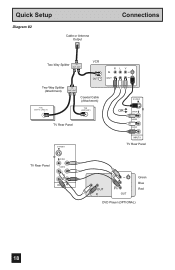
Quick Setup Diagram #2 Cable or Antenna Output Connections Two-Way Splitter IN OUT OUT VCR IN OUT Two-Way Splitter IN (Attachment) OUT OUT Coaxial Cable (Attachment) ATSC /DIGITAL CABLE IN I 75Ω (VHF/UHF) TV Rear Panel S-VIDEO R L V IN OUT S-VIDEO OR OVER VIDEO L I AUDIO I R INPUT-3 TV Rear Panel TV Rear Panel OVER Y VIDEO L Pb I AUDIO I R Pr INPUT-1 AUDIO OUT L R Y PB PR OUT Green Blue Red DVD Player (OPTIONAL) 18
Quick Setup Diagram #2 Cable or Antenna Output Connections Two-Way Splitter IN OUT OUT VCR IN OUT Two-Way Splitter IN (Attachment) OUT OUT Coaxial Cable (Attachment) ATSC /DIGITAL CABLE IN I 75Ω (VHF/UHF) TV Rear Panel S-VIDEO R L V IN OUT S-VIDEO OR OVER VIDEO L I AUDIO I R INPUT-3 TV Rear Panel TV Rear Panel OVER Y VIDEO L Pb I AUDIO I R Pr INPUT-1 AUDIO OUT L R Y PB PR OUT Green Blue Red DVD Player (OPTIONAL) 18
Instructions
Page 19
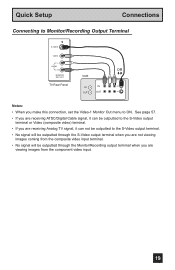
... Cable signal, it can be outputted to the S-Video output terminal or Video (composite video) terminal. • If you are receiving Analog TV signal, it can not be outputted to ON. Quick Setup Connections Connecting to Monitor/Recording Output Terminal S-VIDEO VIDEO L AUDIO R MONITOR /REC OUT... TV Rear Panel VCR IN OUT OR R L V IN OUT Notes: • When you are viewing images from the composite video input terminal. • No signal...
... Cable signal, it can be outputted to the S-Video output terminal or Video (composite video) terminal. • If you are receiving Analog TV signal, it can not be outputted to ON. Quick Setup Connections Connecting to Monitor/Recording Output Terminal S-VIDEO VIDEO L AUDIO R MONITOR /REC OUT... TV Rear Panel VCR IN OUT OR R L V IN OUT Notes: • When you are viewing images from the composite video input terminal. • No signal...
Instructions
Page 20
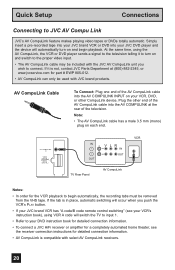
...'s instruction book), using the AV CompuLink, the VCR or DVD player sends a signal to the television telling it is not, contact JVC Parts Department at the rear of the AV CompuLink cable into the AV COMPULINK at (800)-882-2345, or www.jvcservice.com for part # EWP 805-012...automatically, the recording tabs must be removed from the VHS tape. AV COMPULINK III VIDEO (DIGITAL) _ AUDIO (DIGITAL) IN V L R IN OUT OUT TV Rear Panel AV CompuLink VCR Notes: • In order for detailed connection information. • AV CompuLink is in place, automatic switching will occur when you wish...
...'s instruction book), using the AV CompuLink, the VCR or DVD player sends a signal to the television telling it is not, contact JVC Parts Department at the rear of the AV CompuLink cable into the AV COMPULINK at (800)-882-2345, or www.jvcservice.com for part # EWP 805-012...automatically, the recording tabs must be removed from the VHS tape. AV COMPULINK III VIDEO (DIGITAL) _ AUDIO (DIGITAL) IN V L R IN OUT OUT TV Rear Panel AV CompuLink VCR Notes: • In order for detailed connection information. • AV CompuLink is in place, automatic switching will occur when you wish...
Instructions
Page 21
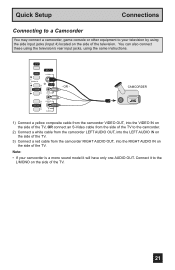
...using the television's rear input jacks, using the side input jacks (Input 4) located on the side of the television. INPUT MENU INPUT 4 S-VIDEO OPERATE + CHANNEL - OR - CAMCORDER 1) Connect a yellow composite cable from the camcorder VIDEO OUT, into the RIGHT AUDIO IN on the side of the TV. 21 Connect ...a red cable from the camcorder RIGHT AUDIO OUT, into the VIDEO IN on the side of the TV, OR connect an S-Video cable from the side of the TV to the L/MONO on the side of the TV. L/MONO R AUDIO - Note: • If your television by using the same instructions. OVER ...
...using the television's rear input jacks, using the side input jacks (Input 4) located on the side of the television. INPUT MENU INPUT 4 S-VIDEO OPERATE + CHANNEL - OR - CAMCORDER 1) Connect a yellow composite cable from the camcorder VIDEO OUT, into the RIGHT AUDIO IN on the side of the TV. 21 Connect ...a red cable from the camcorder RIGHT AUDIO OUT, into the VIDEO IN on the side of the TV, OR connect an S-Video cable from the side of the TV to the L/MONO on the side of the TV. L/MONO R AUDIO - Note: • If your television by using the same instructions. OVER ...
Instructions
Page 22
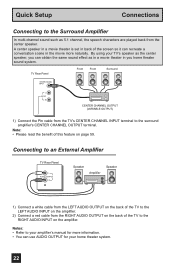
... as 5.1 channel, the speech characters are played back from the center speaker. Note: • Please read the benefit of the TV to the RIGHT AUDIO INPUT on page 59. TV Rear Panel Front Front Surround CENTER CHANNEL INPUT L AUDIO R CENTER CHANNEL OUTPUT (VARIABLE OUTPUT) 1) Connect the Pin cable from the RIGHT... AUDIO OUTPUT on the back of this feature on the amplifier. Connecting to an External Amplifier TV Rear Panel L AUDIO OUTPUT R Speaker Amplifier Speaker 1) Connect a white cable from the LEFT AUDIO OUTPUT on the back of the...
... as 5.1 channel, the speech characters are played back from the center speaker. Note: • Please read the benefit of the TV to the RIGHT AUDIO INPUT on page 59. TV Rear Panel Front Front Surround CENTER CHANNEL INPUT L AUDIO R CENTER CHANNEL OUTPUT (VARIABLE OUTPUT) 1) Connect the Pin cable from the RIGHT... AUDIO OUTPUT on the back of this feature on the amplifier. Connecting to an External Amplifier TV Rear Panel L AUDIO OUTPUT R Speaker Amplifier Speaker 1) Connect a white cable from the LEFT AUDIO OUTPUT on the back of the...
Instructions
Page 23
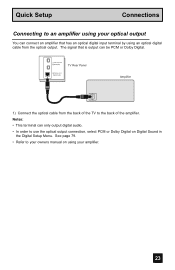
... Sound in the Digital Setup Menu. The signal that has an optical digital input terminal by using your amplifier. 23 i.LINK IN/OUT S400(TS) TV Rear Panel OPTICAL OUT Digital Audio Amplifier 1) Connect the optical cable from the optical output. Notes: • This terminal can be PCM or Dolby Digital. Quick.... • In order to use the optical output connection, select PCM or Dolby Digital on using an optical digital cable from the back of the TV to the back of the amplifier.
... Sound in the Digital Setup Menu. The signal that has an optical digital input terminal by using your amplifier. 23 i.LINK IN/OUT S400(TS) TV Rear Panel OPTICAL OUT Digital Audio Amplifier 1) Connect the optical cable from the optical output. Notes: • This terminal can be PCM or Dolby Digital. Quick.... • In order to use the optical output connection, select PCM or Dolby Digital on using an optical digital cable from the back of the TV to the back of the amplifier.
Instructions
Page 24
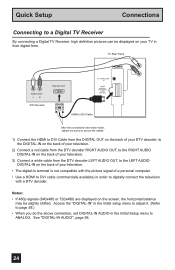
TV Rear Panel AUDIO OUT LR DTV Decoder DIGITAL OUT AV COMPULINK III VIDEO (DIGITAL) _ AUDIO (DIGITAL) ...Connect a white cable from the DTV decoder LEFT AUDIO OUT, to the LEFT AUDIO DIGITAL-IN on the back of your TV in their digital form. See "DIGITAL-IN AUDIO", page 58. 24 Access the "DIGITAL-IN" in the initial setup menu... digital-in terminal is not compatible with a DTV decoder. Quick Setup Connections Connecting to a Digital TV Receiver By connecting a Digital TV Receiver, high definition pictures can be displayed on the screen, the horizontal balance may be slightly shifted.
TV Rear Panel AUDIO OUT LR DTV Decoder DIGITAL OUT AV COMPULINK III VIDEO (DIGITAL) _ AUDIO (DIGITAL) ...Connect a white cable from the DTV decoder LEFT AUDIO OUT, to the LEFT AUDIO DIGITAL-IN on the back of your TV in their digital form. See "DIGITAL-IN AUDIO", page 58. 24 Access the "DIGITAL-IN" in the initial setup menu... digital-in terminal is not compatible with a DTV decoder. Quick Setup Connections Connecting to a Digital TV Receiver By connecting a Digital TV Receiver, high definition pictures can be displayed on the screen, the horizontal balance may be slightly shifted.


