
User Guide
Page 4
... , the user is connected. - These limits are designed to correct the interference by turning the equipment off and on standby even when all the LED lamps are not lit. When installing this TV is connected to the outlet as inside a tightly enclosed area or piece of furniture. ... the set and the wall, as well as possible. Install the TV in a corner on a circuit different from the wall outlet. HD-52G787 and HD-52G887 are for use only with JVC Model RK-CPRS7 stand. HD-70G887 and HD-70A478 are for this equipment does cause harmful interference to radio or ...
... , the user is connected. - These limits are designed to correct the interference by turning the equipment off and on standby even when all the LED lamps are not lit. When installing this TV is connected to the outlet as inside a tightly enclosed area or piece of furniture. ... the set and the wall, as well as possible. Install the TV in a corner on a circuit different from the wall outlet. HD-52G787 and HD-52G887 are for use only with JVC Model RK-CPRS7 stand. HD-70G887 and HD-70A478 are for this equipment does cause harmful interference to radio or ...

User Guide
Page 6
... about it's many features. When the POWER button is turned on the front panel blinks in orange at approximately every 3 seconds. When the cooling is turned on, since the lamp has not had time to project the picture onto the screen. Do not remove the electrical... temperature and altitude in order to project the picture onto the screen. Once again, thank you for purchasing a JVC HDTV-ready projection television which the TV is turned on the screen disappears. Before using your television in which uses the high-quality HD-ILA projection system. There are summarized below ....
... about it's many features. When the POWER button is turned on the front panel blinks in orange at approximately every 3 seconds. When the cooling is turned on, since the lamp has not had time to project the picture onto the screen. Do not remove the electrical... temperature and altitude in order to project the picture onto the screen. Once again, thank you for purchasing a JVC HDTV-ready projection television which the TV is turned on the screen disappears. Before using your television in which uses the high-quality HD-ILA projection system. There are summarized below ....

User Guide
Page 7
... of burns. Be careful not to wallpaper. Please do not open the rear cabinet of this television, Do not hold by another device. It subjects the... the electrical capacity of the socket. ILA element characteristics Do not project still pictures or pictures that the television is recommended that have still...the ducts could cause a minor burn. 7. Condensation When a heater is turned on or the television is made of the wallpaper to malfunctions and the...touch the lamp glass. 10. Also, take care to keep the TV on the lamp and screen. Holding the screen frame could cause the...
... of burns. Be careful not to wallpaper. Please do not open the rear cabinet of this television, Do not hold by another device. It subjects the... the electrical capacity of the socket. ILA element characteristics Do not project still pictures or pictures that the television is recommended that have still...the ducts could cause a minor burn. 7. Condensation When a heater is turned on or the television is made of the wallpaper to malfunctions and the...touch the lamp glass. 10. Also, take care to keep the TV on the lamp and screen. Holding the screen frame could cause the...
User Guide
Page 8
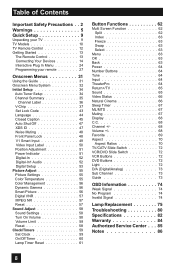
...52 Digital Setup 53 Picture Adjust 55 Picture Settings 55 Color Temperature 55 Color Management 56 Dynamic Gamma 56 Smart Picture 56 Digital VNR 57 MPEG NR 57 Reset 57 Sound Adjust 58 Sound Settings 58 Turn... 63 OK 63 Back 63 Power 64 Number Buttons 64 Tune 64 Input 64 TheaterPro 64 Return+/TV 65 Sound 65 Video Status 66 Natural Cinema 66 Sleep Timer 67 ML/MTS 67 Muting 67 ...Display 68 C.C 68 Channel 68 Volume 68 Favorite 69 Aspect 70 Aspect Ratios 70 TV/CATV Slide Switch 72 VCR/DVD Slide Switch 72 VCR Buttons 72 DVD Buttons 72 Light 72 D/A ...
...52 Digital Setup 53 Picture Adjust 55 Picture Settings 55 Color Temperature 55 Color Management 56 Dynamic Gamma 56 Smart Picture 56 Digital VNR 57 MPEG NR 57 Reset 57 Sound Adjust 58 Sound Settings 58 Turn... 63 OK 63 Back 63 Power 64 Number Buttons 64 Tune 64 Input 64 TheaterPro 64 Return+/TV 65 Sound 65 Video Status 66 Natural Cinema 66 Sleep Timer 67 ML/MTS 67 Muting 67 ...Display 68 C.C 68 Channel 68 Volume 68 Favorite 69 Aspect 70 Aspect Ratios 70 TV/CATV Slide Switch 72 VCR/DVD Slide Switch 72 VCR Buttons 72 DVD Buttons 72 Light 72 D/A ...
User Guide
Page 13
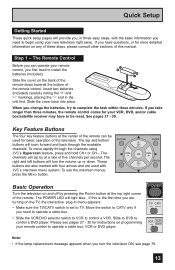
...have to TV. See pages 27 - 30. The POWER LED will turn the television ON, see pages 27 - 30 for basic operation of the television. Slide the cover on any of these steps, please consult other sections of the remote control. If this manual. If you are also marked with JVC's onscreen ...menu system. If you turn the volume up or down towards the bottom of this is set to be used with four arrows and are used for instructions...
...have to TV. See pages 27 - 30. The POWER LED will turn the television ON, see pages 27 - 30 for basic operation of the television. Slide the cover on any of these steps, please consult other sections of the remote control. If this manual. If you are also marked with JVC's onscreen ...menu system. If you turn the volume up or down towards the bottom of this is set to be used with four arrows and are used for instructions...

User Guide
Page 14
... • These connections are examples. • After you are finished connecting your devices, plug the power cord into the nearest power outlet and turn on the TV. • If you follow these connections, you have a satellite television system, refer to your local cable operator. • To connect a ...will use plugs like VCRs, DVD players, stereo amplifiers, game consoles, etc. No VCR Connection Cable or Antenna Output Coaxial Cable TV Rear Panel 75Ω (VHF/UHF) 14 Coaxial Cables Component Cables Composite Cables Audio Cables Used to connect an external antenna or cable...
... • These connections are examples. • After you are finished connecting your devices, plug the power cord into the nearest power outlet and turn on the TV. • If you follow these connections, you have a satellite television system, refer to your local cable operator. • To connect a ...will use plugs like VCRs, DVD players, stereo amplifiers, game consoles, etc. No VCR Connection Cable or Antenna Output Coaxial Cable TV Rear Panel 75Ω (VHF/UHF) 14 Coaxial Cables Component Cables Composite Cables Audio Cables Used to connect an external antenna or cable...

User Guide
Page 20
HDMI Compatible Device Digital Out TV Rear Panel R - HDMI provides an interface between any audio/video source, such as a ...into the "HDMI 1" jacks. HDMI (High Definition Multimedia Interface) is changed to 480p/60Hz), the screen may turn green and there may not respond depending on your television. Some HDMI devices can not hear any HDMI compatible ...1 DIGITAL-IN 2 HDMI Cable 1) Connect the HDMI Cable from the HDMI device. 20 See "DIGITAL-IN1 AUDIO", page 52. • Some decoders may be displayed on the equipment that you do the above connection, set -top box, DVD ...
HDMI Compatible Device Digital Out TV Rear Panel R - HDMI provides an interface between any audio/video source, such as a ...into the "HDMI 1" jacks. HDMI (High Definition Multimedia Interface) is changed to 480p/60Hz), the screen may turn green and there may not respond depending on your television. Some HDMI devices can not hear any HDMI compatible ...1 DIGITAL-IN 2 HDMI Cable 1) Connect the HDMI Cable from the HDMI device. 20 See "DIGITAL-IN1 AUDIO", page 52. • Some decoders may be displayed on the equipment that you do the above connection, set -top box, DVD ...

User Guide
Page 21
AUDIO - In this case we recommend using V1 Input as the V1 Smart Input. L INPUT-3 R - TV Rear Panel AV Receiver MONITOR OUT Y PB PR MONITOR OUT S-VIDEO VIDEO OVER VIDEO S-VIDEO VIDEO OVER R - AUDIO - L INPUT-2 R - L HDMI 1 Y Pb Pr INPUT-1 Y Pb Pr INPUT-2 1) ... Receiver's remote to switch to the different devices you have connected. • Some AV Receivers may not respond when the V1 Smart Input function is turned on, see page 49. • If you have video connections for each input device connected to your AV Receiver, you should not connect them using...
AUDIO - In this case we recommend using V1 Input as the V1 Smart Input. L INPUT-3 R - TV Rear Panel AV Receiver MONITOR OUT Y PB PR MONITOR OUT S-VIDEO VIDEO OVER VIDEO S-VIDEO VIDEO OVER R - AUDIO - L INPUT-2 R - L HDMI 1 Y Pb Pr INPUT-1 Y Pb Pr INPUT-2 1) ... Receiver's remote to switch to the different devices you have connected. • Some AV Receivers may not respond when the V1 Smart Input function is turned on, see page 49. • If you have video connections for each input device connected to your AV Receiver, you should not connect them using...

User Guide
Page 24
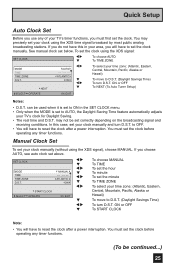
... to the correct time so your preferences for setting the clock. • The auto tuner setup of which you wish to get your TV has been turned on for the first time the interactive plug-in three languages: English, French (Français) or Spanish (Español). LANGUAGE... you press the Menu button while setting up the interactive plug-in items before . Quick Setup Step 3 - Language After the "JVC INTERACTIVE PLUG IN MENU" has been displayed, the TV automatically switches to perform these settings. Notes: • The interactive plug-in menu setting does not appear if your...
... to the correct time so your preferences for setting the clock. • The auto tuner setup of which you wish to get your TV has been turned on for the first time the interactive plug-in three languages: English, French (Français) or Spanish (Español). LANGUAGE... you press the Menu button while setting up the interactive plug-in items before . Quick Setup Step 3 - Language After the "JVC INTERACTIVE PLUG IN MENU" has been displayed, the TV automatically switches to perform these settings. Notes: • The interactive plug-in menu setting does not appear if your...
User Guide
Page 25
...† To select your time zone: (Atlantic, Eastern, Central, Mountain, Pacific, Alaska or Hawaii) To move to D.S.T. (Daylight Savings Time) To turn D.S.T. may precisely set above. ON or OFF To START CLOCK Note: • You will have to AUTO, the Daylight Saving Time feature automatically adjusts your... your time zone: (Atlantic, Eastern, Central, Mountain, Pacific, Alaska or Hawaii) To move to D.S.T. (Daylight Savings Time) To turn D.S.T. If you choose AUTO, see auto clock set your TV's clock for Daylight Saving. • The real time and D.S.T. can be continued...) 25
...† To select your time zone: (Atlantic, Eastern, Central, Mountain, Pacific, Alaska or Hawaii) To move to D.S.T. (Daylight Savings Time) To turn D.S.T. may precisely set above. ON or OFF To START CLOCK Note: • You will have to AUTO, the Daylight Saving Time feature automatically adjusts your... your time zone: (Atlantic, Eastern, Central, Mountain, Pacific, Alaska or Hawaii) To move to D.S.T. (Daylight Savings Time) To turn D.S.T. If you choose AUTO, see auto clock set your TV's clock for Daylight Saving. • The real time and D.S.T. can be continued...) 25

User Guide
Page 31
... • Move to the next letter, number, or other choice in a submenu • Scan through TV channels (when not in a menu. The "interactive plug-in menu" will appear the first time the TV is the one currently selected. Pressing the CH+ or CH- To bring up or down (when not... Select a highlighted menu item • Select an item in a submenu • Select numbers in certain menu options • Turn the volume up the onscreen menu, press the MENU button on the TV's side panel instead of the remote, an additional menu screen showing VIDEO STATUS and ASPECT will see most frequently...
... • Move to the next letter, number, or other choice in a submenu • Scan through TV channels (when not in a menu. The "interactive plug-in menu" will appear the first time the TV is the one currently selected. Pressing the CH+ or CH- To bring up or down (when not... Select a highlighted menu item • Select an item in a submenu • Select numbers in certain menu options • Turn the volume up the onscreen menu, press the MENU button on the TV's side panel instead of the remote, an additional menu screen showing VIDEO STATUS and ASPECT will see most frequently...

User Guide
Page 33
... EXIT INITIAL SETUP 01 SOUND ADJUST PREVIOUS BASS 00 TREBLE 00 BALANCE 00 NEXT PAGE SELECT OPERATE (1/2) MENU EXIT SOUND ADJUST 01 SOUND ADJUST PREVIOUS TURN ON VOLUME 10 VOLUME LIMIT 40 RESET NEXT PAGE SELECT OPERATE (2/2) MENU EXIT SOUND ADJUST 02 CLOCK / TIMERS PREVIOUS SET CLOCK ON / OFF TIMER ...picture signal is input to the digital-in terminal and the picture is being displayed on the screen. • When the Menu button on the TV side panel is pressed, the FRONT PANEL CONTROL menu between INITIAL SETUP 05 and PICTURE ADJUST 01 will appear. 33 FRAN. Press the MENU ...
... EXIT INITIAL SETUP 01 SOUND ADJUST PREVIOUS BASS 00 TREBLE 00 BALANCE 00 NEXT PAGE SELECT OPERATE (1/2) MENU EXIT SOUND ADJUST 01 SOUND ADJUST PREVIOUS TURN ON VOLUME 10 VOLUME LIMIT 40 RESET NEXT PAGE SELECT OPERATE (2/2) MENU EXIT SOUND ADJUST 02 CLOCK / TIMERS PREVIOUS SET CLOCK ON / OFF TIMER ...picture signal is input to the digital-in terminal and the picture is being displayed on the screen. • When the Menu button on the TV side panel is pressed, the FRONT PANEL CONTROL menu between INITIAL SETUP 05 and PICTURE ADJUST 01 will appear. 33 FRAN. Press the MENU ...

User Guide
Page 37
...next six pages along with V-Chip technology which enables you to block channels or content that you feel to be turned ON for rating settings to operate) To move to SET US TV RATINGS, SET MOVIE RATINGS, or SET CANADIAN RATINGS (see following message appears: To watch a guarded channel, the... Guard Message When a viewer attempts to watch a channel that you set up V-CHIP ratings limits, these programs will not be accessed until the television is turned off. • See also "Set Lock Code", page 43. Notes: • Once a channel has been unlocked, it will flash on video signals ...
...next six pages along with V-Chip technology which enables you to block channels or content that you feel to be turned ON for rating settings to operate) To move to SET US TV RATINGS, SET MOVIE RATINGS, or SET CANADIAN RATINGS (see following message appears: To watch a guarded channel, the... Guard Message When a viewer attempts to watch a channel that you set up V-CHIP ratings limits, these programs will not be accessed until the television is turned off. • See also "Set Lock Code", page 43. Notes: • Once a channel has been unlocked, it will flash on video signals ...

User Guide
Page 40
...; Press the MENU button To V-CHIP To operate (lock icon appears) Press ZERO to access the V-Chip menu To turn the locking feature on the top row, everything in the column (TV PG, TV G, etc.) with the content row (V/FV, S, etc.) and press the π† or √® to move the cursor... to block. Press OK to turn V-Chip ON or OFF To move to SET US TV RATINGS To enter V-CHIP V-CHIP SET US TV RATINGS SET MOVIE RATINGS SET CANADIAN RATINGS ENG SET CANADIAN RATINGS FRE UNRATED SELECT OPERATE OFF VIEW...
...; Press the MENU button To V-CHIP To operate (lock icon appears) Press ZERO to access the V-Chip menu To turn the locking feature on the top row, everything in the column (TV PG, TV G, etc.) with the content row (V/FV, S, etc.) and press the π† or √® to move the cursor... to block. Press OK to turn V-Chip ON or OFF To move to SET US TV RATINGS To enter V-CHIP V-CHIP SET US TV RATINGS SET MOVIE RATINGS SET CANADIAN RATINGS ENG SET CANADIAN RATINGS FRE UNRATED SELECT OPERATE OFF VIEW...

User Guide
Page 47
... PAGE SELECT OPERATE (3/5) MENU EXIT 47 The XDS ID information is on. π† √® Press the MENU button To AUTO SHUT OFF To turn ON or OFF Press the MENU button when finished INITIAL SETUP PREVIOUS LANGUAGE ENG. If no signal is being received within 10 minutes, the... there is no signal from the channel the TV is provided by the broadcaster. π† √® Press the MENU button To XDS ID To turn ON or OFF Press the MENU button when finished INITIAL SETUP PREVIOUS LANGUAGE ENG. appears on does not receive a signal for more than one minute...
... PAGE SELECT OPERATE (3/5) MENU EXIT 47 The XDS ID information is on. π† √® Press the MENU button To AUTO SHUT OFF To turn ON or OFF Press the MENU button when finished INITIAL SETUP PREVIOUS LANGUAGE ENG. If no signal is being received within 10 minutes, the... there is no signal from the channel the TV is provided by the broadcaster. π† √® Press the MENU button To XDS ID To turn ON or OFF Press the MENU button when finished INITIAL SETUP PREVIOUS LANGUAGE ENG. appears on does not receive a signal for more than one minute...

User Guide
Page 48
... SELECT OPERATE when you lose your remote control. Press the MENU button INITIAL SETUP π† √® To NOISE MUTING To turn ON/OFF the TV, press the power button for more than 3 seconds. INITIAL SETUP PREVIOUS NOISE MUTING FRONT PANEL LOCK V1 SMART INPUT VIDEO INPUT LABEL POSITION... 3 seconds. Do this feature in the following ways: • Unplug the power cord, and plug it back in. Note: • To turn noise muting ON or OFF PREVIOUS NOISE MUTING FRONT PANEL LOCK V1 SMART INPUT Press the MENU button when finished VIDEO INPUT LABEL POSITION ADJUSTMENT ...
... SELECT OPERATE when you lose your remote control. Press the MENU button INITIAL SETUP π† √® To NOISE MUTING To turn ON/OFF the TV, press the power button for more than 3 seconds. INITIAL SETUP PREVIOUS NOISE MUTING FRONT PANEL LOCK V1 SMART INPUT VIDEO INPUT LABEL POSITION... 3 seconds. Do this feature in the following ways: • Unplug the power cord, and plug it back in. Note: • To turn noise muting ON or OFF PREVIOUS NOISE MUTING FRONT PANEL LOCK V1 SMART INPUT Press the MENU button when finished VIDEO INPUT LABEL POSITION ADJUSTMENT ...

User Guide
Page 49
...PANEL LOCK V1 SMART INPUT VIDEO INPUT LABEL POSITION ADJUSTMENT POWER INDICATOR NEXT PAGE SELECT OPERATE ON OFF ON LOW (2/5) MENU EXIT 49 By turning this feature on, your television can automatically detect the signal source from your components that are connected to your television. Onscreen Menus V1 ...Smart Input This feature is used if you do not have connected an AV Receiver to your television, turn ON or OFF Press the MENU button when finished Notes: • If you have an AV Receiver connected to your AV Receiver. π...
...PANEL LOCK V1 SMART INPUT VIDEO INPUT LABEL POSITION ADJUSTMENT POWER INDICATOR NEXT PAGE SELECT OPERATE ON OFF ON LOW (2/5) MENU EXIT 49 By turning this feature on, your television can automatically detect the signal source from your components that are connected to your television. Onscreen Menus V1 ...Smart Input This feature is used if you do not have connected an AV Receiver to your television, turn ON or OFF Press the MENU button when finished Notes: • If you have an AV Receiver connected to your AV Receiver. π...

User Guide
Page 51
...power indicator. Press the MENU button INITIAL SETUP π† To POWER INDICATOR √® To turn the power off. • If you set a timer on the TV, the power indicator will light even if the TV is on the screen vertically when the aspect is set to panorama or cinema. π†... is not seen. • When you change the screen size, perform the position adjustment again. • Position adjustment allows you turn LOW, HIGH or OFF Notes : • When OFF is no TV signal. The LED is lit as "LOW" when you to adjust the brightness of the picture on stand by. 51...
...power indicator. Press the MENU button INITIAL SETUP π† To POWER INDICATOR √® To turn the power off. • If you set a timer on the TV, the power indicator will light even if the TV is on the screen vertically when the aspect is set to panorama or cinema. π†... is not seen. • When you change the screen size, perform the position adjustment again. • Position adjustment allows you turn LOW, HIGH or OFF Notes : • When OFF is no TV signal. The LED is lit as "LOW" when you to adjust the brightness of the picture on stand by. 51...

User Guide
Page 53
...; √® To DIGITAL SETUP To enter The onscreen will appear Antenna Level Digital Sound Software Version PCM Notes: Software Update • Software Update will turn blank. In this case, the tuner will switch to digital, since you are doing this function when you are accessing the digital setup menu. Select...
...; √® To DIGITAL SETUP To enter The onscreen will appear Antenna Level Digital Sound Software Version PCM Notes: Software Update • Software Update will turn blank. In this case, the tuner will switch to digital, since you are doing this function when you are accessing the digital setup menu. Select...

User Guide
Page 56
...or "OFF" COLOR MANAGEMENT ON OFF Press the MENU button when finished Dynamic Gamma JVC's Dynamic Gamma Circuitry (DGC) makes it easier to see dark areas when a picture has many bright... areas. Onscreen Menus Color Management This TV supports the COLOR MANAGEMENT function to ensure dull colors are automatically set for each picture. ...level of picture brightness balance, especially in dark areas where the level of grayscale is often lost, turning completely to see the bright areas when a picture has many dark areas, and makes it easier...
...or "OFF" COLOR MANAGEMENT ON OFF Press the MENU button when finished Dynamic Gamma JVC's Dynamic Gamma Circuitry (DGC) makes it easier to see dark areas when a picture has many bright... areas. Onscreen Menus Color Management This TV supports the COLOR MANAGEMENT function to ensure dull colors are automatically set for each picture. ...level of picture brightness balance, especially in dark areas where the level of grayscale is often lost, turning completely to see the bright areas when a picture has many dark areas, and makes it easier...


