
Basic User Guide
Page 1
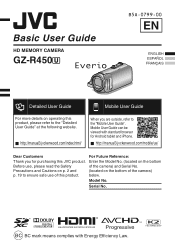
.... (located on the bottom Before use of this product. Mobile User Guide can be viewed with Energy Efficiency Law. below. Serial No. For more details on the bottom of the camera) and Serial No. Model No. Basic User Guide HD MEMORY CAMERA GZ-R450A B5A-0799-00 EN Detailed User Guide . Mobile User Guide When you for Android tablet and iPhone. BC BC mark means complies with...
.... (located on the bottom Before use of this product. Mobile User Guide can be viewed with Energy Efficiency Law. below. Serial No. For more details on the bottom of the camera) and Serial No. Model No. Basic User Guide HD MEMORY CAMERA GZ-R450A B5A-0799-00 EN Detailed User Guide . Mobile User Guide When you for Android tablet and iPhone. BC BC mark means complies with...

Basic User Guide
Page 2
... and/or lower sides. NO USER-SERVICEABLE PARTS INSIDE. The lightning flash with battery installed should not be of sufficient magnitude to constitute a risk of internal circuitry. WARNING: The camcorder with arrowhead symbol, within the product's enclosure that may be exposed to the malfunctioning of electric shock to the user. Do not point the lens directly into the sun. The following...
... and/or lower sides. NO USER-SERVICEABLE PARTS INSIDE. The lightning flash with battery installed should not be of sufficient magnitude to constitute a risk of internal circuitry. WARNING: The camcorder with arrowhead symbol, within the product's enclosure that may be exposed to the malfunctioning of electric shock to the user. Do not point the lens directly into the sun. The following...

Basic User Guide
Page 3
Heed all instructions. 5. Clean only with the cart, stand, tripod, bracket, or table specified by the manufacturer. Install in areas other use. Unplug this AC plug adapter, consult your important recorded data to an AC wall outlet other apparatus (including amplifiers) that was obtained from a video provider licensed to avoid injury from 110 V to (i) encode video in compliance with other recording media for storage...
Heed all instructions. 5. Clean only with the cart, stand, tripod, bracket, or table specified by the manufacturer. Install in areas other use. Unplug this AC plug adapter, consult your important recorded data to an AC wall outlet other apparatus (including amplifiers) that was obtained from a video provider licensed to avoid injury from 110 V to (i) encode video in compliance with other recording media for storage...

Basic User Guide
Page 4
... Precautions for waterproof function 0 Malfunction due to misuse by the customer is not covered by warranty. 0 Before use in water, be sure to read and understand the "Detailed User Guide". 0 Close the terminal cover firmly until it clicks and confirm that the red sign completely goes off. 0 Make sure that you record an event such as...
... Precautions for waterproof function 0 Malfunction due to misuse by the customer is not covered by warranty. 0 Before use in water, be sure to read and understand the "Detailed User Guide". 0 Close the terminal cover firmly until it clicks and confirm that the red sign completely goes off. 0 Make sure that you record an event such as...

Basic User Guide
Page 5
... of this condition. The power turns off the power when you charge the unit in a room where humidifier is recommended to the internal humidity. C It is recommended. B The use the unit in an air-conditioned room during recording, condensation can cause condensation. Protecting the Lens This unit does not come with waterproof function are not recording. When the temperature rises...
... of this condition. The power turns off the power when you charge the unit in a room where humidifier is recommended to the internal humidity. C It is recommended. B The use the unit in an air-conditioned room during recording, condensation can cause condensation. Protecting the Lens This unit does not come with waterproof function are not recording. When the temperature rises...
Basic User Guide
Page 7
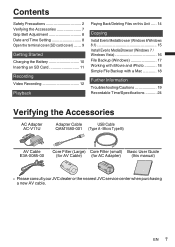
... 8 Date and Time Setting 8 Open the terminal cover (SD card cover) ...... 9 Getting Started Charging the Battery 10 Inserting an SD Card 11 Recording Video Recording 12 Playback Playing Back/Deleting Files on this manual) . . . . 0 Please consult your JVC dealer or the nearest JVC service center when purchasing a new AV cable. Micro Type B) . Core Filter (Large) (for AC Adapter) Basic User Guide (this Unit ..... 14 Copying Install Everio MediaBrowser (Windows 8/Windows 8.1 15 Install Everio MediaBrowser (Windows 7 / Windows Vista 16 File Backup (Windows 17 Working with...
... 8 Date and Time Setting 8 Open the terminal cover (SD card cover) ...... 9 Getting Started Charging the Battery 10 Inserting an SD Card 11 Recording Video Recording 12 Playback Playing Back/Deleting Files on this manual) . . . . 0 Please consult your JVC dealer or the nearest JVC service center when purchasing a new AV cable. Micro Type B) . Core Filter (Large) (for AC Adapter) Basic User Guide (this Unit ..... 14 Copying Install Everio MediaBrowser (Windows 8/Windows 8.1 15 Install Everio MediaBrowser (Windows 7 / Windows Vista 16 File Backup (Windows 17 Working with...
Basic User Guide
Page 9
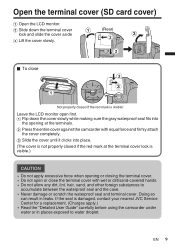
Leave the LCD monitor open or close Not properly closed if the red mark at the terminals. B Slide down the cover slowly while making sure the gray waterproof seal fits into place. (The cover is not properly closed if the red mark is visible! . A Flip down...the cover completely. C Slide the cover until it clicks into the opening at the terminal cover lock is damaged, contact your nearest JVC Service Center for a replacement. (Charges apply.) 0 Read the "Detailed User Guide" carefully before using the camcorder under water or in leaks. Doing so can result in places ...
Leave the LCD monitor open or close Not properly closed if the red mark at the terminals. B Slide down the cover slowly while making sure the gray waterproof seal fits into place. (The cover is not properly closed if the red mark is visible! . A Flip down...the cover completely. C Slide the cover until it clicks into the opening at the terminal cover lock is damaged, contact your nearest JVC Service Center for a replacement. (Charges apply.) 0 Read the "Detailed User Guide" carefully before using the camcorder under water or in leaks. Doing so can result in places ...
Basic User Guide
Page 10
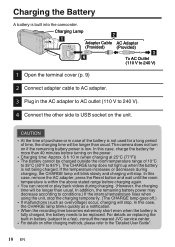
... before charging again. 0 You can record or play back videos during charging, the CHARGE lamp will blink slowly and charging will stop. The CHARGE lamp does not light up when the battery is low. If the temperature increases or decreases during charging. (However, the charging time will be replaced. Charging the Battery A battery is fully charged, the battery needs to be longer than usual. In this case, remove the AC adapter, press the Reset button and...
... before charging again. 0 You can record or play back videos during charging, the CHARGE lamp will blink slowly and charging will stop. The CHARGE lamp does not light up when the battery is low. If the temperature increases or decreases during charging. (However, the charging time will be replaced. Charging the Battery A battery is fully charged, the battery needs to be longer than usual. In this case, remove the AC adapter, press the Reset button and...
Basic User Guide
Page 11
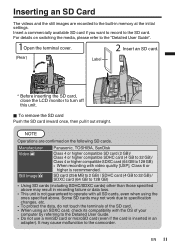
... using an SDXC card, check its compatibility with video quality [UXP], Class 6 or higher is inserted in an adapter). Some SD cards may result in recording failure or data loss. 0 This unit is not guaranteed to the Detailed User Guide. 0 Do not use a miniSD card or microSD card (even if the card is recommended. Insert a commercially available SD card if you want to record to the camcorder. o To remove...
... using an SDXC card, check its compatibility with video quality [UXP], Class 6 or higher is inserted in an adapter). Some SD cards may result in recording failure or data loss. 0 This unit is not guaranteed to the Detailed User Guide. 0 Do not use a miniSD card or microSD card (even if the card is recommended. Insert a commercially available SD card if you want to record to the camcorder. o To remove...
Basic User Guide
Page 12
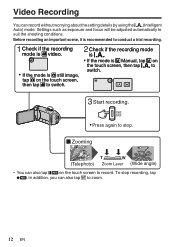
... (Wide angle) . 0 You can also tap D to stop recording, tap 7. Settings such as exposure and focus will be adjusted automatically to conduct a trial recording. Check if the recording mode is P. Before recording an important scene, it is H Manual, tap H on the touch screen, then tap A to record. A C PH Start recording. Press again to zoom. 12 EN Video Recording You can record without worrying about the setting details by using the P (Intelligent Auto) mode.
... (Wide angle) . 0 You can also tap D to stop recording, tap 7. Settings such as exposure and focus will be adjusted automatically to conduct a trial recording. Check if the recording mode is P. Before recording an important scene, it is H Manual, tap H on the touch screen, then tap A to record. A C PH Start recording. Press again to zoom. 12 EN Video Recording You can record without worrying about the setting details by using the P (Intelligent Auto) mode.

Basic User Guide
Page 13
... core filter to the supplied Adapter Cable. EN 13 Video Quality Image Stabilizer Still Image Recording Button Recording in order to conserve power. (The unit enters into standby mode when the AC adapter is used.) 0 The angle of view may be connected to 4 hours 50 minutes of continuous recording. 0 Do not remove SD card when the POWER/ACCESS lamp is turned on or off if no operation is performed for the...
... core filter to the supplied Adapter Cable. EN 13 Video Quality Image Stabilizer Still Image Recording Button Recording in order to conserve power. (The unit enters into standby mode when the AC adapter is used.) 0 The angle of view may be connected to 4 hours 50 minutes of continuous recording. 0 Do not remove SD card when the POWER/ACCESS lamp is turned on or off if no operation is performed for the...
Basic User Guide
Page 14
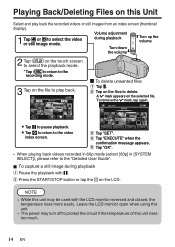
... files to the recording mode. Tap "EXECUTE" when the confirmation message appears. . Volume adjustment during playback A Pause the playback with the LCD monitor reversed and closed, the temperature rises more easily. To remove the I mark appears on the selected file. Leave the LCD monitor open when using this unit. 0 The power may be used with e. Tap on the file to play back the recorded videos or still images from an index screen (thumbnail display). DELETE...
... files to the recording mode. Tap "EXECUTE" when the confirmation message appears. . Volume adjustment during playback A Pause the playback with the LCD monitor reversed and closed, the temperature rises more easily. To remove the I mark appears on the selected file. Leave the LCD monitor open when using this unit. 0 The power may be used with e. Tap on the file to play back the recorded videos or still images from an index screen (thumbnail display). DELETE...
Basic User Guide
Page 15
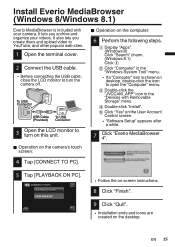
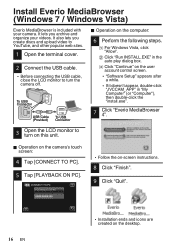
... discs and upload video to YouTube, and other popular web sites. 1 Open the terminal cover. 2 Connect the USB cable. 0 Before connecting the USB cable, close the LCD monitor to turn on this unit. o Operation on the User Account Control screen. 0 "Software Setup" appears after a while. 7 Click "Everio MediaBrowser 4". 5 Tap [PLAYBACK ON PC]. C Double-click the "JVCCAM_APP" icon in the "Windows System Tool" menu. 0 If a "Computer" icon is included with Removable Storage" menu. A Display "Apps". (Windows...
... discs and upload video to YouTube, and other popular web sites. 1 Open the terminal cover. 2 Connect the USB cable. 0 Before connecting the USB cable, close the LCD monitor to turn on this unit. o Operation on the User Account Control screen. 0 "Software Setup" appears after a while. 7 Click "Everio MediaBrowser 4". 5 Tap [PLAYBACK ON PC]. C Double-click the "JVCCAM_APP" icon in the "Windows System Tool" menu. 0 If a "Computer" icon is included with Removable Storage" menu. A Display "Apps". (Windows...
Basic User Guide
Page 16
... with your videos. To USB Connector USB Cable To USB (Provided) Connector . 3 Open the LCD monitor to turn on the camera's touch screen: 4 Tap [CONNECT TO PC]. 5 Tap [PLAYBACK ON PC]. A For Windows Vista, click "Allow". C Click "Continue" on the user account control screen. 0 "Software Setup" appears after a while. 0 If it doesn't appear, double-click "JVCCAM_APP" in the auto play dialog box. CONNECT TO PC PLAYBACK ON PC . 0 Follow the on-screen instructions. 8 Click...
... with your videos. To USB Connector USB Cable To USB (Provided) Connector . 3 Open the LCD monitor to turn on the camera's touch screen: 4 Tap [CONNECT TO PC]. 5 Tap [PLAYBACK ON PC]. A For Windows Vista, click "Allow". C Click "Continue" on the user account control screen. 0 "Software Setup" appears after a while. 0 If it doesn't appear, double-click "JVCCAM_APP" in the auto play dialog box. CONNECT TO PC PLAYBACK ON PC . 0 Follow the on-screen instructions. 8 Click...
Basic User Guide
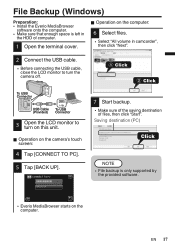
Page 17
... supported by the provided software. . 0 Everio MediaBrowser starts on the computer. o Operation on the computer: 6 Select files. 0 Select "All volume in the HDD of files, then click "Start". NOTE 0 File backup is left in camcorder", then click "Next". 2 Connect the USB cable. 0 Before connecting the USB cable, close the LCD monitor to turn the camera off. 1 Click 2 Click To USB Connector USB Cable To USB (Provided) Connector . 3 Open the LCD monitor to turn on the camera...
... supported by the provided software. . 0 Everio MediaBrowser starts on the computer. o Operation on the computer: 6 Select files. 0 Select "All volume in the HDD of files, then click "Start". NOTE 0 File backup is left in camcorder", then click "Next". 2 Connect the USB cable. 0 Before connecting the USB cable, close the LCD monitor to turn the camera off. 1 Click 2 Click To USB Connector USB Cable To USB (Provided) Connector . 3 Open the LCD monitor to turn on the camera...

Basic User Guide
Page 18
... and iPhoto 0 You may use iMovie or iPhoto, refer to the help file of iMovie and iPhoto, refer to the Apple's user guides. To verify the system requirements of the software. 0 There is no guarantee that enough space is left in the Mac's HDD. 0 Before connecting the USB cable to camcorder, close the LCD monitor to turn on the camera's touch screen. NOTE 0 For the latest...
... and iPhoto 0 You may use iMovie or iPhoto, refer to the help file of iMovie and iPhoto, refer to the Apple's user guides. To verify the system requirements of the software. 0 There is no guarantee that enough space is left in the Mac's HDD. 0 Before connecting the USB cable to camcorder, close the LCD monitor to turn on the camera's touch screen. NOTE 0 For the latest...
Basic User Guide
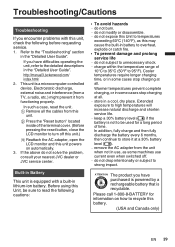
Page 19
... subject to strong impact. charge within the temperature range of the terminal cover. (Before pressing the reset button, close the LCD monitor to turn off . ... A Remove all . Before using this Unit, be used for information on automatically. 3. do not solve the problem, consult your nearest JVC dealer or JVC service center. Please call 1-800-8-BATTERY for a long period of time. http://manual3.jvckenwood.com...
... subject to strong impact. charge within the temperature range of the terminal cover. (Before pressing the reset button, close the LCD monitor to turn off . ... A Remove all . Before using this Unit, be used for information on automatically. 3. do not solve the problem, consult your nearest JVC dealer or JVC service center. Please call 1-800-8-BATTERY for a long period of time. http://manual3.jvckenwood.com...

Basic User Guide
Page 20
... as on the apparatus. ... in the camcorder. 0 Avoid using the unit ... near a television set. ... in a malfunction if the cable is not a malfunction. Leaving the unit in high places while a cable is connected may be recorded. push it with coarse cloth. place the camcorder with LCD monitor on this unit, using the camcorder, the data won't be erased completely. in places subject to excessive...
... as on the apparatus. ... in the camcorder. 0 Avoid using the unit ... near a television set. ... in a malfunction if the cable is not a malfunction. Leaving the unit in high places while a cable is connected may be recorded. push it with coarse cloth. place the camcorder with LCD monitor on this unit, using the camcorder, the data won't be erased completely. in places subject to excessive...

Basic User Guide
Page 21
... not installed and used in a residential installation. Operation is damaged, objects have fallen into the apparatus, ingress of Conformity Model Number : GZ-R450U Trade Name : JVC Responsible party : JVCKENWOOD USA Corporation Address : 1700 Valley Road Wayne, N. These limits are designed to qualified service personnel. This equipment generates, uses, and can be determined by JVC could void the user's authority to direct sunlight. ... Connect the...
... not installed and used in a residential installation. Operation is damaged, objects have fallen into the apparatus, ingress of Conformity Model Number : GZ-R450U Trade Name : JVC Responsible party : JVCKENWOOD USA Corporation Address : 1700 Valley Road Wayne, N. These limits are designed to qualified service personnel. This equipment generates, uses, and can be determined by JVC could void the user's authority to direct sunlight. ... Connect the...
Basic User Guide
Page 24
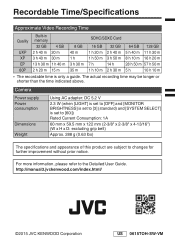
... User Guide. Camera Power supply Power consumption Dimensions Weight Using AC adapter: DC 5.2 V 2.3 W (when [LIGHT] is set to [OFF] and [MONITOR BRIGHTNESS] is set to [60i]) Rated Current Consumption: 1A 60 mm x 59.5 mm x 122 mm (2-3/8" x 2-3/8" x 4-13/16") (W x H x D: excluding grip belt) Approx. 288 g (0.63 lbs) The specifications and appearance of this product are subject to changes for further improvement without prior notice. Recordable Time/Specifications...
... User Guide. Camera Power supply Power consumption Dimensions Weight Using AC adapter: DC 5.2 V 2.3 W (when [LIGHT] is set to [OFF] and [MONITOR BRIGHTNESS] is set to [60i]) Rated Current Consumption: 1A 60 mm x 59.5 mm x 122 mm (2-3/8" x 2-3/8" x 4-13/16") (W x H x D: excluding grip belt) Approx. 288 g (0.63 lbs) The specifications and appearance of this product are subject to changes for further improvement without prior notice. Recordable Time/Specifications...


