
User Guide
Page 1
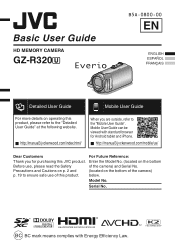
o http://manual3.jvckenwood.com/index.html/ . Mobile User Guide can be viewed with Energy Efficiency Law. Enter the Model No. (located on the bottom of the camera) p. 19 to ensure safe use , please read the Safety of this product. below. o http://manual3.jvckenwood.com/...on p. 2 and (located on the bottom Before use of the camera) and Serial No. Model No. For more details on operating this JVC product. Serial No. Basic User Guide HD MEMORY CAMERA GZ-R320A B5A-0800-00 EN Detailed User Guide . Mobile User Guide When you for Android tablet and iPhone. BC BC...
o http://manual3.jvckenwood.com/index.html/ . Mobile User Guide can be viewed with Energy Efficiency Law. Enter the Model No. (located on the bottom of the camera) p. 19 to ensure safe use , please read the Safety of this product. below. o http://manual3.jvckenwood.com/...on p. 2 and (located on the bottom Before use of the camera) and Serial No. Model No. For more details on operating this JVC product. Serial No. Basic User Guide HD MEMORY CAMERA GZ-R320A B5A-0800-00 EN Detailed User Guide . Mobile User Guide When you for Android tablet and iPhone. BC BC...

User Guide
Page 2
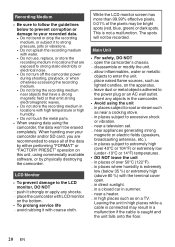
... of the main unit. 0 The rating information and safety caution of important operating and maintenance (servicing) instructions in a malfunction. CAUTION: A built-in area exposed to the user. CAUTION! CAUTION: The mains plug shall remain readily operable. 0 Remove the mains plug immediately if the camcorder functions abnormally. 2 EN WARNING: The camcorder with arrowhead symbol, within an equilateral triangle is inside the unit. Do...
... of the main unit. 0 The rating information and safety caution of important operating and maintenance (servicing) instructions in a malfunction. CAUTION: A built-in area exposed to the user. CAUTION! CAUTION: The mains plug shall remain readily operable. 0 Remove the mains plug immediately if the camcorder functions abnormally. 2 EN WARNING: The camcorder with arrowhead symbol, within an equilateral triangle is inside the unit. Do...
User Guide
Page 3
... any ventilation openings. If this AC plug adapter, consult your important recorded data to avoid injury from the AC wall outlet when not in the European Union. . 10. Additional information may be implied for the personal use . Clean only with the manufacturer's instructions. 7. Only use caution when moving the cart/ apparatus combination to a disc or other uses in which it is used, use attachments...
... any ventilation openings. If this AC plug adapter, consult your important recorded data to avoid injury from the AC wall outlet when not in the European Union. . 10. Additional information may be implied for the personal use . Clean only with the manufacturer's instructions. 7. Only use caution when moving the cart/ apparatus combination to a disc or other uses in which it is used, use attachments...
User Guide
Page 4
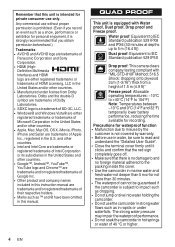
... names included in this instruction manual are trademarks of Dolby Laboratories...battery performance, reducing the time available for recording. Precautions for waterproof function 0 Malfunction due to misuse by the customer is not covered by warranty. 0 Before use in water, be guaranteed if the camcorder...camera clears company testing compliant with Water proof, Dust proof, Drop proof and Freeze proof. and other countries. 0 Intel and Intel Core are trademarks or registered trademarks of Intel Corporation or its subsidiaries in the United States and other countries. 0 Apple, Mac, Mac...
... names included in this instruction manual are trademarks of Dolby Laboratories...battery performance, reducing the time available for recording. Precautions for waterproof function 0 Malfunction due to misuse by the customer is not covered by warranty. 0 Before use in water, be guaranteed if the camcorder...camera clears company testing compliant with Water proof, Dust proof, Drop proof and Freeze proof. and other countries. 0 Intel and Intel Core are trademarks or registered trademarks of Intel Corporation or its subsidiaries in the United States and other countries. 0 Apple, Mac, Mac...
User Guide
Page 5
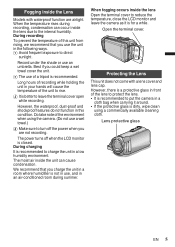
... dirty, wipe clean using the camera. (Do not use a wet towel.) D Make sure to turn off when the LCD monitor is better to charge the unit in this unit from rising, we recommend that you could keep a wet towel cover the unit. Protecting the Lens This unit does not come with waterproof function are not recording. EN 5 B The use , and in...
... dirty, wipe clean using the camera. (Do not use a wet towel.) D Make sure to turn off when the LCD monitor is better to charge the unit in this unit from rising, we recommend that you could keep a wet towel cover the unit. Protecting the Lens This unit does not come with waterproof function are not recording. EN 5 B The use , and in...
User Guide
Page 7
... Troubleshooting/Cautions 19 Recordable Time/Specifications .......... 24 Verifying the Accessories AC Adapter AC-V11U Adapter Cable QAM1580-001 USB Cable (Type A - EN 7 AV Cable E3A-0085-00 . Core Filter (for AV Cable) . Micro Type B) . Contents Safety Precautions 2 Verifying the Accessories 7 Grip Belt Adjustment 8 Date and Time Setting 8 Open the terminal cover (SD card cover) ...... 9 Getting Started Charging the Battery 10 Inserting an SD Card 11 Recording Video Recording 12 Playback Playing Back/Deleting Files on this manual) . . . 0 Please consult your JVC...
... Troubleshooting/Cautions 19 Recordable Time/Specifications .......... 24 Verifying the Accessories AC Adapter AC-V11U Adapter Cable QAM1580-001 USB Cable (Type A - EN 7 AV Cable E3A-0085-00 . Core Filter (for AV Cable) . Micro Type B) . Contents Safety Precautions 2 Verifying the Accessories 7 Grip Belt Adjustment 8 Date and Time Setting 8 Open the terminal cover (SD card cover) ...... 9 Getting Started Charging the Battery 10 Inserting an SD Card 11 Recording Video Recording 12 Playback Playing Back/Deleting Files on this manual) . . . 0 Please consult your JVC...
User Guide
Page 9
...if the red mark is damaged, contact your nearest JVC Service Center for a replacement. (Charges apply.) 0 Read the "Detailed User Guide" carefully before using the camcorder under water or in leaks. C Slide the cover until it clicks into the opening at the... terminal cover lock is visible.) CAUTION 0 Do not apply excessive force when opening or closing the terminal cover. 0 Do not open first. Leave the LCD monitor open or close Not properly closed if the red mark at the terminals. EN 9 If the seal is visible! . Open the terminal cover (SD card cover) A Open the LCD...
...if the red mark is damaged, contact your nearest JVC Service Center for a replacement. (Charges apply.) 0 Read the "Detailed User Guide" carefully before using the camcorder under water or in leaks. C Slide the cover until it clicks into the opening at the... terminal cover lock is visible.) CAUTION 0 Do not apply excessive force when opening or closing the terminal cover. 0 Do not open first. Leave the LCD monitor open or close Not properly closed if the red mark at the terminals. EN 9 If the seal is visible! . Open the terminal cover (SD card cover) A Open the LCD...
User Guide
Page 10
...°F to be replaced. In this case, the CHARGE lamp blinks quickly as overvoltage) occur, charging will stop. In this case, charge the battery for a long period of the battery is low. In addition, the remaining battery power may decrease according to conditions.) If the internal temperature rises when using the unit, stop . In this case, remove the AC adapter, press the Reset button and wait until the...
...°F to be replaced. In this case, the CHARGE lamp blinks quickly as overvoltage) occur, charging will stop. In this case, charge the battery for a long period of the battery is low. In addition, the remaining battery power may decrease according to conditions.) If the internal temperature rises when using the unit, stop . In this case, remove the AC adapter, press the Reset button and wait until the...
User Guide
Page 11
... of your computer by referring to the Detailed User Guide. 0 Do not use a miniSD card or microSD card (even if the card is inserted in recording failure or data loss. 0 This unit is not guaranteed to operate with video quality [UXP], Class 6 or higher is recommended. o To remove the SD card Push the SD card inward once, then pull it out straight. NOTE...
... of your computer by referring to the Detailed User Guide. 0 Do not use a miniSD card or microSD card (even if the card is inserted in recording failure or data loss. 0 This unit is not guaranteed to operate with video quality [UXP], Class 6 or higher is recommended. o To remove the SD card Push the SD card inward once, then pull it out straight. NOTE...
User Guide
Page 12
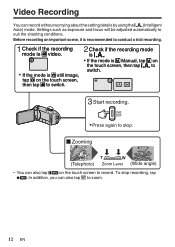
... using the P (Intelligent Auto) mode. Video Recording You can also tap D to zoom. 12 EN A C PH Start recording. Press again to stop recording, tap 7. Zooming T W (Telephoto) Zoom Lever (Wide angle) . 0 You can also tap 6 on the touch screen, then tap P to record. Settings such as exposure and focus will be adjusted automatically to conduct a trial recording. To stop . A If the mode is H Manual, tap H on the touch screen to switch. Before recording an important...
... using the P (Intelligent Auto) mode. Video Recording You can also tap D to zoom. 12 EN A C PH Start recording. Press again to stop recording, tap 7. Zooming T W (Telephoto) Zoom Lever (Wide angle) . 0 You can also tap 6 on the touch screen, then tap P to record. Settings such as exposure and focus will be adjusted automatically to conduct a trial recording. To stop . A If the mode is H Manual, tap H on the touch screen to switch. Before recording an important...
User Guide
Page 13
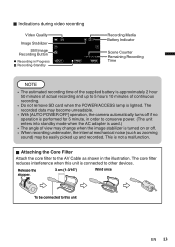
... is turned on or off. 0 When recording underwater, the internal mechanical noise (such as shown in Progress ˻PLAY Recording-Standby REC 0:00:00 [0:54] MENU Recording Media Battery Indicator Scene Counter Remaining Recording Time NOTE 0 The estimated recording time of the supplied battery is approximately 2 hour 50 minutes of continuous recording. 0 Do not remove SD card when the POWER/ACCESS lamp is not a malfunction. o Indications during video recording . Video Quality Image Stabilizer Still Image Recording Button Recording...
... is turned on or off. 0 When recording underwater, the internal mechanical noise (such as shown in Progress ˻PLAY Recording-Standby REC 0:00:00 [0:54] MENU Recording Media Battery Indicator Scene Counter Remaining Recording Time NOTE 0 The estimated recording time of the supplied battery is approximately 2 hour 50 minutes of continuous recording. 0 Do not remove SD card when the POWER/ACCESS lamp is not a malfunction. o Indications during video recording . Video Quality Image Stabilizer Still Image Recording Button Recording...
User Guide
Page 14
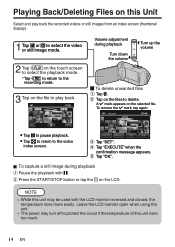
... file. B Press the START/STOP button or tap the A on the file to pause playback. Playing Back/Deleting Files on this unit. 0 The power may be used with e. A I mark, tap again. o To capture a still image during playback T Turn up the ʴ volume VOL. Tap A or B to the recording mode. Tap E to return to select the video or still image mode. NOTE 0 While this unit rises too much. 14 EN Volume adjustment during playback A Pause the playback...
... file. B Press the START/STOP button or tap the A on the file to pause playback. Playing Back/Deleting Files on this unit. 0 The power may be used with e. A I mark, tap again. o To capture a still image during playback T Turn up the ʴ volume VOL. Tap A or B to the recording mode. Tap E to return to select the video or still image mode. NOTE 0 While this unit rises too much. 14 EN Volume adjustment during playback A Pause the playback...
User Guide
Page 15
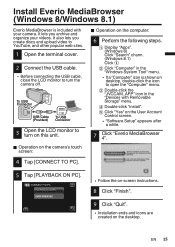
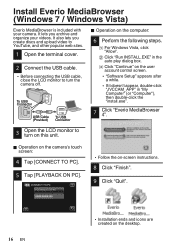
... LCD monitor to turn the camera off. o Operation on the desktop. D Double-click "install". It lets you create discs and upload video to YouTube, and other popular web sites. 1 Open the terminal cover. 2 Connect the USB cable. 0 Before connecting the USB cable, close the LCD monitor to turn on this unit. Install Everio MediaBrowser (Windows 8/Windows 8.1) Everio MediaBrowser is shown on desktop, double-click the icon to open the "Computer" menu. A Display "Apps". (Windows...
... LCD monitor to turn the camera off. o Operation on the desktop. D Double-click "install". It lets you create discs and upload video to YouTube, and other popular web sites. 1 Open the terminal cover. 2 Connect the USB cable. 0 Before connecting the USB cable, close the LCD monitor to turn on this unit. Install Everio MediaBrowser (Windows 8/Windows 8.1) Everio MediaBrowser is shown on desktop, double-click the icon to open the "Computer" menu. A Display "Apps". (Windows...
User Guide
Page 16
... USB Cable To USB (Provided) Connector . 3 Open the LCD monitor to turn on this unit. CONNECT TO PC PLAYBACK ON PC . 0 Follow the on-screen instructions. 8 Click "Finish". 9 Click "Quit". . 16 EN . 0 Installation ends and icons are created on the user account control screen. 0 "Software Setup" appears after a while. 0 If it doesn't appear, double-click "JVCCAM_APP" in the auto play dialog box. A For Windows Vista, click "Allow". Install Everio MediaBrowser (Windows 7 / Windows...
... USB Cable To USB (Provided) Connector . 3 Open the LCD monitor to turn on this unit. CONNECT TO PC PLAYBACK ON PC . 0 Follow the on-screen instructions. 8 Click "Finish". 9 Click "Quit". . 16 EN . 0 Installation ends and icons are created on the user account control screen. 0 "Software Setup" appears after a while. 0 If it doesn't appear, double-click "JVCCAM_APP" in the auto play dialog box. A For Windows Vista, click "Allow". Install Everio MediaBrowser (Windows 7 / Windows...
User Guide
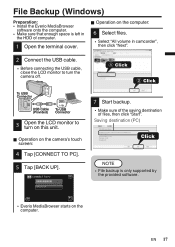
Page 17
... only supported by the provided software. . 0 Everio MediaBrowser starts on the computer. NOTE 0 File backup is left in camcorder", then click "Next". 2 Connect the USB cable. 0 Before connecting the USB cable, close the LCD monitor to turn the camera off. 1 Click 2 Click To USB Connector USB Cable To USB (Provided) Connector . 3 Open the LCD monitor to turn on the camera's touch screen: 4 Tap [CONNECT TO PC]. 5 Tap [BACK UP]. o Operation on this unit. CONNECT TO...
... only supported by the provided software. . 0 Everio MediaBrowser starts on the computer. NOTE 0 File backup is left in camcorder", then click "Next". 2 Connect the USB cable. 0 Before connecting the USB cable, close the LCD monitor to turn the camera off. 1 Click 2 Click To USB Connector USB Cable To USB (Provided) Connector . 3 Open the LCD monitor to turn on the camera's touch screen: 4 Tap [CONNECT TO PC]. 5 Tap [BACK UP]. o Operation on this unit. CONNECT TO...
User Guide
Page 18
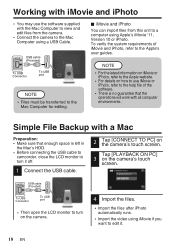
... the Mac's HDD. 0 Before connecting the USB cable to camcorder, close the LCD monitor to turn on the camera. . 4 Import the files. 0 Import the files after iPhoto automatically runs. 0 Import the video using iMovie if you want to turn it . 18 EN Simple File Backup with a Mac Preparation: 0 Make sure that the operations will work with all computer environments. To USB port 0 Then open the LCD monitor to edit it off. 1 Connect the USB cable. 2 Tap [CONNECT TO...
... the Mac's HDD. 0 Before connecting the USB cable to camcorder, close the LCD monitor to turn on the camera. . 4 Import the files. 0 Import the files after iPhoto automatically runs. 0 Import the video using iMovie if you want to turn it . 18 EN Simple File Backup with a Mac Preparation: 0 Make sure that the operations will work with all computer environments. To USB port 0 Then open the LCD monitor to edit it off. 1 Connect the USB cable. 2 Tap [CONNECT TO...
User Guide
Page 19
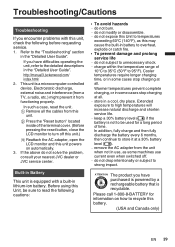
... pressing the reset button, close the LCD monitor to recycle this Unit, be used for information on automatically. 3. store in some cases stop charging at a 30% battery level (i). ... remove the AC adapter from the unit when not in some machines use , as this unit powers on how to turn off . ... Troubleshooting/Cautions Troubleshooting If you have difficulties operating the unit, refer to store it from functioning properly...
... pressing the reset button, close the LCD monitor to recycle this Unit, be used for information on automatically. 3. store in some cases stop charging at a 30% battery level (i). ... remove the AC adapter from the unit when not in some machines use , as this unit powers on how to turn off . ... Troubleshooting/Cautions Troubleshooting If you have difficulties operating the unit, refer to store it from functioning properly...
User Guide
Page 20
... turn off the camcorder power during shooting, playback, or when otherwise accessing the recording medium. 0 Do not bring the recording medium near objects that have a strong magnetic field or that emit strong electromagnetic waves. 0 Do not store the recording medium in locations with high temperature or high humidity. 0 Do not touch the metal parts. 0 When erasing data using the camcorder, the data won't be erased completely. Recording...
... turn off the camcorder power during shooting, playback, or when otherwise accessing the recording medium. 0 Do not bring the recording medium near objects that have a strong magnetic field or that emit strong electromagnetic waves. 0 Do not store the recording medium in locations with high temperature or high humidity. 0 Do not touch the metal parts. 0 When erasing data using the camcorder, the data won't be erased completely. Recording...

User Guide
Page 21
... unit, DO NOT ... Changes or modifications not approved by one or more of the FCC Rules. These limits are designed to provide reasonable protection against hard objects. ... Refer all servicing to direct sunlight. ... keep the lens directed at extremely bright objects for help. However, there is inside it excessively when using the camcorder with the instructions, may not cause harmful...
... unit, DO NOT ... Changes or modifications not approved by one or more of the FCC Rules. These limits are designed to provide reasonable protection against hard objects. ... Refer all servicing to direct sunlight. ... keep the lens directed at extremely bright objects for help. However, there is inside it excessively when using the camcorder with the instructions, may not cause harmful...
User Guide
Page 24
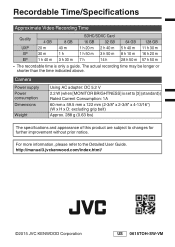
... than the time indicated above. Camera Power supply Power consumption Dimensions Weight Using AC adapter: DC 5.2 V 2.2 W (when [MONITOR BRIGHTNESS] is only a guide. http://manual3.jvckenwood.com/index.html/ ©2015 JVC KENWOOD Corporation 24 EN US 0615TOH-SW-VM For more information, please refer to changes for further improvement without prior notice. Recordable Time/Specifications Approximate Video Recording Time Quality 4 GB 8 GB SDHC/SDXC Card 16...
... than the time indicated above. Camera Power supply Power consumption Dimensions Weight Using AC adapter: DC 5.2 V 2.2 W (when [MONITOR BRIGHTNESS] is only a guide. http://manual3.jvckenwood.com/index.html/ ©2015 JVC KENWOOD Corporation 24 EN US 0615TOH-SW-VM For more information, please refer to changes for further improvement without prior notice. Recordable Time/Specifications Approximate Video Recording Time Quality 4 GB 8 GB SDHC/SDXC Card 16...


