
User Guide
Page 1
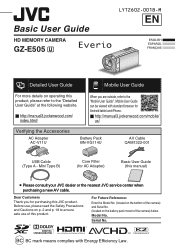
... AC Adapter) Basic User Guide (this JVC product. Mobile User Guide can be viewed with Energy Efficiency Law. Mini Type B) Core Filter (for purchasing this manual) Please consult your JVC dealer or the nearest JVC service center when purchasing a new AV cable. For Future Reference: Enter the Model No. (located on the bottom of the camera) and Serial No. (located on p. 2 and p. 18 to ensure safe use , please...
... AC Adapter) Basic User Guide (this JVC product. Mobile User Guide can be viewed with Energy Efficiency Law. Mini Type B) Core Filter (for purchasing this manual) Please consult your JVC dealer or the nearest JVC service center when purchasing a new AV cable. For Future Reference: Enter the Model No. (located on the bottom of the camera) and Serial No. (located on p. 2 and p. 18 to ensure safe use , please...
User Guide
Page 2
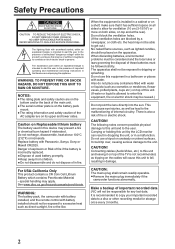
... of the TV is on the battery pack mount. • The rating information and safety caution of important recorded data JVC will cause this equipment in damage. CAUTION: The mains plug shall remain readily operable. • Remove the mains plug immediately if the camcorder functions abnormally. Make a backup of the AC adapter are blocked by the LCD monitor can cause eye injuries, as...
... of the TV is on the battery pack mount. • The rating information and safety caution of important recorded data JVC will cause this equipment in damage. CAUTION: The mains plug shall remain readily operable. • Remove the mains plug immediately if the camcorder functions abnormally. Make a backup of the AC adapter are blocked by the LCD monitor can cause eye injuries, as...
User Guide
Page 3
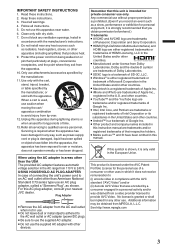
... uses in which it does not receive remuneration to (i) encode video in compliance with the AVC standard ("AVC Video") and/or (ii) decode AVC Video that you record an event such as power-supply cord or plug is a trademark of Google Inc. • Other product and company names included in this instruction manual are trademarks and/or registered trademarks of connecting...
... uses in which it does not receive remuneration to (i) encode video in compliance with the AVC standard ("AVC Video") and/or (ii) decode AVC Video that you record an event such as power-supply cord or plug is a trademark of Google Inc. • Other product and company names included in this instruction manual are trademarks and/or registered trademarks of connecting...
User Guide
Page 4
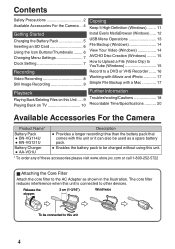
... 2 Available Accessories For the Camera . . 4 Getting Started Charging the Battery Pack 5 Inserting an SD Card 6 Using the Icon Buttons/Thumbnails ........ 6 Changing Menu Settings 7 Clock Setting 7 Recording Video Recording 8 Still Image Recording 9 Copying Keep It High Definition (Windows) ....... 11 Install Everio MediaBrowser (Windows) ..... 12 USB Menu Operations 13 File Backup (Windows 14 View Your Video (Windows 14 AVCHD Disc Creation (Windows) ........ 15 How to Upload a File (Video Clip) to YouTube (Windows 15 Record to other devices. The core filter reduces interference...
... 2 Available Accessories For the Camera . . 4 Getting Started Charging the Battery Pack 5 Inserting an SD Card 6 Using the Icon Buttons/Thumbnails ........ 6 Changing Menu Settings 7 Clock Setting 7 Recording Video Recording 8 Still Image Recording 9 Copying Keep It High Definition (Windows) ....... 11 Install Everio MediaBrowser (Windows) ..... 12 USB Menu Operations 13 File Backup (Windows 14 View Your Video (Windows 14 AVCHD Disc Creation (Windows) ........ 15 How to Upload a File (Video Clip) to YouTube (Windows 15 Record to other devices. The core filter reduces interference...

User Guide
Page 5
... 35°C (50°F to 240 V) Plug in a slow cycle for notification. 0 You can record or play back videos while the AC adapter is connected. (Battery charging cannot be performed during recording or playback.) Remove the battery when the unit is attempted for a long time. Performance of purchase. In these cases, the CHARGE lamp blinks quickly for notification if the battery charge does not start . Also, please note that...
... 35°C (50°F to 240 V) Plug in a slow cycle for notification. 0 You can record or play back videos while the AC adapter is connected. (Battery charging cannot be performed during recording or playback.) Remove the battery when the unit is attempted for a long time. Performance of purchase. In these cases, the CHARGE lamp blinks quickly for notification if the battery charge does not start . Also, please note that...

User Guide
Page 6
... displayed button (icon) or thumbnail (file) on the touch screen to the Detailed User Guide. Insert an SD card. Terminal .. * Turn off the power of your computer by referring to search for the desired file. Some SD cards may result in recording failure or data loss. 0 This unit is recommended. NOTE Operations are confirmed on the following SD cards. Recording Screen Playback Screen Index Screen 0:01:23 0:12:34 ˻PLAY REC MENU...
... displayed button (icon) or thumbnail (file) on the touch screen to the Detailed User Guide. Insert an SD card. Terminal .. * Turn off the power of your computer by referring to search for the desired file. Some SD cards may result in recording failure or data loss. 0 This unit is recommended. NOTE Operations are confirmed on the following SD cards. Recording Screen Playback Screen Index Screen 0:01:23 0:12:34 ˻PLAY REC MENU...

User Guide
Page 7
... return to scroll the screen. SET DATE/TIME! CLOCK SETTING DEC DATE 24 2013 TIME 10 00 AM . 0 The unit turns on. YES NO . . Changing Menu Settings To change the settings. (Icon type screen) .. . ˻PLAY REC MENU 2 Tap the desired item in the menu. 0 Tap 0 or 1 to scroll the screen. (List type screen) . Clock Setting 1 Open the LCD monitor. 3 Set the date and time. Tap 3 or 2 to adjust the value. 0 Repeat this step to input the year, month, day...
... return to scroll the screen. SET DATE/TIME! CLOCK SETTING DEC DATE 24 2013 TIME 10 00 AM . 0 The unit turns on. YES NO . . Changing Menu Settings To change the settings. (Icon type screen) .. . ˻PLAY REC MENU 2 Tap the desired item in the menu. 0 Tap 0 or 1 to scroll the screen. (List type screen) . Clock Setting 1 Open the LCD monitor. 3 Set the date and time. Tap 3 or 2 to adjust the value. 0 Repeat this step to input the year, month, day...
User Guide
Page 8
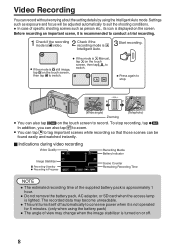
... recommended to conduct a trial recording. 2 Check if the recording mode is displayed on the screen. The recorded data may change when the image stabilizer is C Intelligent Auto. Press again to suit the shooting conditions. 0 In case of the supplied battery pack is approximately 1 hour. 0 Do not remove the battery pack, AC adapter, or SD card when the access lamp is lighted. Settings such as exposure and focus will be found easily...
... recommended to conduct a trial recording. 2 Check if the recording mode is displayed on the screen. The recorded data may change when the image stabilizer is C Intelligent Auto. Press again to suit the shooting conditions. 0 In case of the supplied battery pack is approximately 1 hour. 0 Do not remove the battery pack, AC adapter, or SD card when the access lamp is lighted. Settings such as exposure and focus will be found easily...
User Guide
Page 9
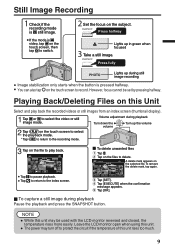
.../Deleting Files on the file to play back the recorded videos or still images from an index screen (thumbnail display). Volume adjustment during playback Pause the playback and press the SNAPSHOT button. Tap [EXECUTE] when the confirmation message appears. Tap F on the subject. To remove the delete mark, tap again. ≪REC PLAY Tap e to the index screen. . SEL ALL REL ALL SET QUIT Tap [SET]. Set the focus on the touch screen to select the playback mode...
.../Deleting Files on the file to play back the recorded videos or still images from an index screen (thumbnail display). Volume adjustment during playback Pause the playback and press the SNAPSHOT button. Tap [EXECUTE] when the confirmation message appears. Tap F on the subject. To remove the delete mark, tap again. ≪REC PLAY Tap e to the index screen. . SEL ALL REL ALL SET QUIT Tap [SET]. Set the focus on the touch screen to select the playback mode...
User Guide
Page 10
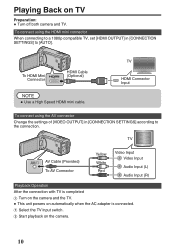
... compatible TV, set [HDMI OUTPUT] in [CONNECTION SETTINGS] according to [AUTO]. B Select the TV input switch. Playing Back on the camera. 10 To HDMI Mini Connector HDMI Cable (Optional) NOTE 0 Use a High Speed HDMI mini cable. C Start playback on TV Preparation: 0 Turn off both camera and TV. TV HDMI Connector Input .. To connect using the AV connector Change the settings of [VIDEO OUTPUT] in [CONNECTION SETTINGS] to the connection. TV AV Cable (Provided) To AV Connector Yellow White Red Video Input Video Input Audio Input (L) Audio Input (R) Playback Operation...
... compatible TV, set [HDMI OUTPUT] in [CONNECTION SETTINGS] according to [AUTO]. B Select the TV input switch. Playing Back on the camera. 10 To HDMI Mini Connector HDMI Cable (Optional) NOTE 0 Use a High Speed HDMI mini cable. C Start playback on TV Preparation: 0 Turn off both camera and TV. TV HDMI Connector Input .. To connect using the AV connector Change the settings of [VIDEO OUTPUT] in [CONNECTION SETTINGS] to the connection. TV AV Cable (Provided) To AV Connector Yellow White Red Video Input Video Input Audio Input (L) Audio Input (R) Playback Operation...
User Guide
Page 11
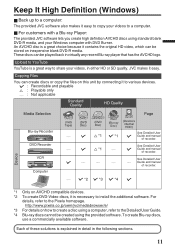
... DVD-R media, and your Windows computer with DVD Burner. See Detailed User - - Guide and manual of recorder. http://www.pixela.co.jp/oem/jvc/mediabrowser/e/ *3 For details on this unit by connecting it to a computer. To create Blu-ray discs, use a commercially available software. I Guide and manual of these solutions is necessary to install the additional software. I *2 I *3 I *4 I Guide and manual of recorder. - These discs can be stored on AVCHD compatible devices. *2 To create DVD-Video discs...
... DVD-R media, and your Windows computer with DVD Burner. See Detailed User - - Guide and manual of recorder. http://www.pixela.co.jp/oem/jvc/mediabrowser/e/ *3 For details on this unit by connecting it to a computer. To create Blu-ray discs, use a commercially available software. I Guide and manual of these solutions is necessary to install the additional software. I *2 I *3 I *4 I Guide and manual of recorder. - These discs can be stored on AVCHD compatible devices. *2 To create DVD-Video discs...
User Guide
Page 12
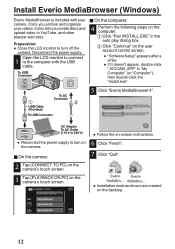
Disconnect the power supply. 1 Open the LCD monitor to connect to turn off the camera. To DC Connector 5 Click "Everio MediaBrowser 4". Preparation: 0 Close the LCD monitor to YouTube, and other popular web sites. To USB Connector o On the computer: 4 Perform the following steps on the user account control screen. 0 "Software Setup" appears after a while. 0 If it doesn't appear, double-click "JVCCAM_APP" in the auto play dialog...
Disconnect the power supply. 1 Open the LCD monitor to connect to turn off the camera. To DC Connector 5 Click "Everio MediaBrowser 4". Preparation: 0 Close the LCD monitor to YouTube, and other popular web sites. To USB Connector o On the computer: 4 Perform the following steps on the user account control screen. 0 "Software Setup" appears after a while. 0 If it doesn't appear, double-click "JVCCAM_APP" in the auto play dialog...

User Guide
Page 13
...: 0 Install the Everio MediaBrowser software onto the computer. 0 Disconnect the power supply to turn on a disc. DIRECT 0 To save your recordings DISC on the camera's touch screen. Tap [CONNECT TO PC] on a disc. CONNECT TO PC PLAYBACK ON PC . CREATE 0 To save all unsaved DISC recordings on the camera. 1 The [SELECT DEVICE] menu appears. sharing sites. Tap an option that makes it easy to file- UPLOAD 0 To upload videos to find any video you can perform operations...
...: 0 Install the Everio MediaBrowser software onto the computer. 0 Disconnect the power supply to turn on a disc. DIRECT 0 To save your recordings DISC on the camera's touch screen. Tap [CONNECT TO PC] on a disc. CONNECT TO PC PLAYBACK ON PC . CREATE 0 To save all unsaved DISC recordings on the camera. 1 The [SELECT DEVICE] menu appears. sharing sites. Tap an option that makes it easy to file- UPLOAD 0 To upload videos to find any video you can perform operations...
User Guide
Page 14
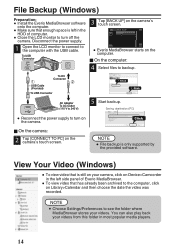
... to turn off the camera. File Backup (Windows) Preparation: 0 Install the Everio MediaBrowser software onto the computer. 0 Make sure that has already been archived to the computer, click on Library>Calendar and then choose the date the video was recorded. Disconnect the power supply. 1 Open the LCD monitor to connect to the computer with the USB cable. o On the camera: 2 Tap [CONNECT TO PC] on the camera's touch screen...
... to turn off the camera. File Backup (Windows) Preparation: 0 Install the Everio MediaBrowser software onto the computer. 0 Make sure that has already been archived to the computer, click on Library>Calendar and then choose the date the video was recorded. Disconnect the power supply. 1 Open the LCD monitor to connect to the computer with the USB cable. o On the camera: 2 Tap [CONNECT TO PC] on the camera's touch screen...
User Guide
Page 15
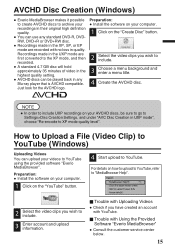
... to XP mode quality level". For details on the "Create Disc" button. . 2 Select the video clips you wish to include. 3 Choose a menu background and enter a menu title. 4 Create the AVCHD disc. . RW, DVD+R or DVD+RW disc. 0 Recordings made in the UXP mode are recorded with YouTube. o Trouble with Uploading Videos 0 Check if you wish to include. 3 Enter account and upload information. 4 Start upload to YouTube. Preparation: 0 Install the software on your...
... to XP mode quality level". For details on the "Create Disc" button. . 2 Select the video clips you wish to include. 3 Choose a menu background and enter a menu title. 4 Create the AVCHD disc. . RW, DVD+R or DVD+RW disc. 0 Recordings made in the UXP mode are recorded with YouTube. o Trouble with Uploading Videos 0 Check if you wish to include. 3 Enter account and upload information. 4 Start upload to YouTube. Preparation: 0 Install the software on your...
User Guide
Page 16
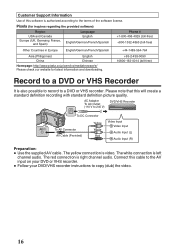
... recording with standard definition picture quality. Record to a DVD or VHS Recorder It is also possible to record to 240 V) DVD/VHS Recorder To DC Connector AV/ To AV Connector AV Cable (Provided) Yellow White Red Video Input Video Input Audio Input (L) Audio Input (R) Preparation: 0 Use the supplied AV cable. AC Adapter To AC Outlet (110 V to a DVD or VHS recorder. The red connection is video. The yellow connection is right channel audio. Customer Support Information Use of the software license. The white connection...
... recording with standard definition picture quality. Record to a DVD or VHS Recorder It is also possible to record to 240 V) DVD/VHS Recorder To DC Connector AV/ To AV Connector AV Cable (Provided) Yellow White Red Video Input Video Input Audio Input (L) Audio Input (R) Preparation: 0 Use the supplied AV cable. AC Adapter To AC Outlet (110 V to a DVD or VHS recorder. The red connection is video. The yellow connection is right channel audio. Customer Support Information Use of the software license. The white connection...

User Guide
Page 17
... image). USB cable (Provided) o iMovie and iPhoto You can determine the operating system version, processor and amount of the software. 0 There is no guarantee that enough space is left in the Mac's HDD. 0 Close the LCD monitor to turn on the camera's touch screen. Working with iMovie and iPhoto 0 You may use iMovie or iPhoto, refer to the help file of memory. . Disconnect the power supply. 1 Open the LCD...
... image). USB cable (Provided) o iMovie and iPhoto You can determine the operating system version, processor and amount of the software. 0 There is no guarantee that enough space is left in the Mac's HDD. 0 Close the LCD monitor to turn on the camera's touch screen. Working with iMovie and iPhoto 0 You may use iMovie or iPhoto, refer to the help file of memory. . Disconnect the power supply. 1 Open the LCD...
User Guide
Page 18
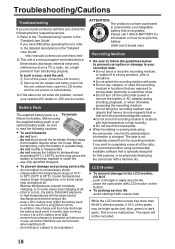
... range of the data, we recommend either using the camcorder, only the file administration information is changed. The data is recyclable. do not drop or subject to strong impact. do not short-circuit the terminals. http://manual3.jvckenwood.com/index.html/ 2. A Turn off the camcorder power or remove the battery or AC adapter during shooting, playback, or when otherwise accessing the recording medium. •...
... range of the data, we recommend either using the camcorder, only the file administration information is changed. The data is recyclable. do not drop or subject to strong impact. do not short-circuit the terminals. http://manual3.jvckenwood.com/index.html/ 2. A Turn off the camcorder power or remove the battery or AC adapter during shooting, playback, or when otherwise accessing the recording medium. •...
User Guide
Page 19
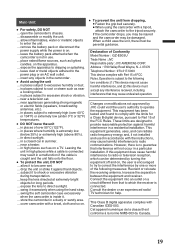
... to try to correct the interference by JVC could void the user's authority to extremely high (over 50°C (122°F). ... This Class B digital apparatus complies with Part 15 of Conformity Model Number : GZ-E505U Trade Name : JVC Responsible party : JVC AMERICAS CORP. expose the apparatus to direct sunlight. ... in places subject to operate the equipment. in flammables, water or...
... to try to correct the interference by JVC could void the user's authority to extremely high (over 50°C (122°F). ... This Class B digital apparatus complies with Part 15 of Conformity Model Number : GZ-E505U Trade Name : JVC Responsible party : JVC AMERICAS CORP. expose the apparatus to direct sunlight. ... in places subject to operate the equipment. in flammables, water or...
User Guide
Page 20
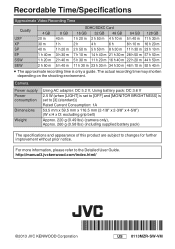
...) (camera only), Approx. 260 g (0.58 lbs) (including supplied battery pack) The specifications and appearance of this product are subject to changes for further improvement without prior notice. http://manual3.jvckenwood.com/index.html/ *LYT2602-001B-M* ©2013 JVC KENWOOD Corporation 20 US 0113MZR-SW-VM The actual recording time may shorten depending on the shooting environment. Recordable Time/Specifications Approximate Video Recording Time Quality...
...) (camera only), Approx. 260 g (0.58 lbs) (including supplied battery pack) The specifications and appearance of this product are subject to changes for further improvement without prior notice. http://manual3.jvckenwood.com/index.html/ *LYT2602-001B-M* ©2013 JVC KENWOOD Corporation 20 US 0113MZR-SW-VM The actual recording time may shorten depending on the shooting environment. Recordable Time/Specifications Approximate Video Recording Time Quality...


