
Instruction Manual
Page 7
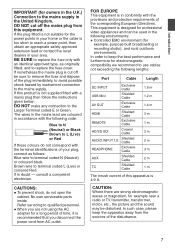
... Cable Length DC INPUT Exclusive Cable USB Mini Shielded Cable AV OUT Exclusive Cable HDMI Shielded Cable REMOTE Exclusive Cable HD/SD SDI Coaxial Cable AUDIO INPUT 1/2 Shielded Cable HEADPHONE Exclusive Cable AUX Shielded Cable TC Shielded Cable 1.8 m 1.2 m 1.4 m 3 m 1 m 3 m 2 m 3 m 2 m 1 m The inrush current of this equipment. DO NOT cut off the mains plug from AC outlet. . No user serviceable parts inside. This equipment is designed for professional video appliances and can be sure to remove...
... Cable Length DC INPUT Exclusive Cable USB Mini Shielded Cable AV OUT Exclusive Cable HDMI Shielded Cable REMOTE Exclusive Cable HD/SD SDI Coaxial Cable AUDIO INPUT 1/2 Shielded Cable HEADPHONE Exclusive Cable AUX Shielded Cable TC Shielded Cable 1.8 m 1.2 m 1.4 m 3 m 1 m 3 m 2 m 3 m 2 m 1 m The inrush current of this equipment. DO NOT cut off the mains plug from AC outlet. . No user serviceable parts inside. This equipment is designed for professional video appliances and can be sure to remove...
Instruction Manual
Page 10
..., File Format and Video Format 46 Zoom Operation 48 Focus Operation 49 Adjusting the Focusing by Face Detection ...... 52 Adjusting the Brightness 53 Adjusting the Iris 54 Setting the Gain 55 Setting the Electronic Shutter 56 Setting the ND Filter 58 Adjusting the White Balance 59 Adjusting the Camera Image 62 Using the Image Stabilizer 63 Audio Recording 63 Monitoring Audio Sound During Recording Using a Headphone 65 Time Code and User's Bit 66 Setting Time Code Generator 67 Setting the User's Bit 69 Synchronizing Time Code on Another Camera 70 Setting Zebra...
..., File Format and Video Format 46 Zoom Operation 48 Focus Operation 49 Adjusting the Focusing by Face Detection ...... 52 Adjusting the Brightness 53 Adjusting the Iris 54 Setting the Gain 55 Setting the Electronic Shutter 56 Setting the ND Filter 58 Adjusting the White Balance 59 Adjusting the Camera Image 62 Using the Image Stabilizer 63 Audio Recording 63 Monitoring Audio Sound During Recording Using a Headphone 65 Time Code and User's Bit 66 Setting Time Code Generator 67 Setting the User's Bit 69 Synchronizing Time Code on Another Camera 70 Setting Zebra...
Instruction Manual
Page 11
... Menu 115 Record Set Item 117 Network/Settings Item a 122 Adding/Editing Frequently Used Menu Items (Favorites Menu 127 Adding Menu Items to Favorites Menu ...... 128 Editing Favorites Menu 128 Display/Status Screen Display Screen in Camera Mode 131 Display Screen in Media Mode 136 Status Screen 139 Camera Features Marker and Safety Zone Displays (Camera Mode Only 140 Smoothening the Skin Color (Skin Detail Function 140 Color Bar Output 140 Adjusting Color Matrix 141 Configuring Setup Files 142 Saving Setup Files 143 Loading a Setup File 144 Deleting Setup Files 144 Connecting...
... Menu 115 Record Set Item 117 Network/Settings Item a 122 Adding/Editing Frequently Used Menu Items (Favorites Menu 127 Adding Menu Items to Favorites Menu ...... 128 Editing Favorites Menu 128 Display/Status Screen Display Screen in Camera Mode 131 Display Screen in Media Mode 136 Status Screen 139 Camera Features Marker and Safety Zone Displays (Camera Mode Only 140 Smoothening the Skin Color (Skin Detail Function 140 Color Bar Output 140 Adjusting Color Matrix 141 Configuring Setup Files 142 Saving Setup Files 143 Loading a Setup File 144 Deleting Setup Files 144 Connecting...
Instruction Manual
Page 14
... Various Video Parameter Settings Switches for Gain and White Balance are available on the side panel to enable quick switching according to previous models. With the wide dynamic range, soft sounds and loud sounds can be recorded as remote control, viewing, editing of ND filters. Diverse Network Functions a This camera recorder supports various operations from the GPS satellite can switch to the user guides for checking the video images. (For MP4 file format) The disc provided with this camera recorder...
... Various Video Parameter Settings Switches for Gain and White Balance are available on the side panel to enable quick switching according to previous models. With the wide dynamic range, soft sounds and loud sounds can be recorded as remote control, viewing, editing of ND filters. Diverse Network Functions a This camera recorder supports various operations from the GPS satellite can switch to the user guides for checking the video images. (For MP4 file format) The disc provided with this camera recorder...
Instruction Manual
Page 16
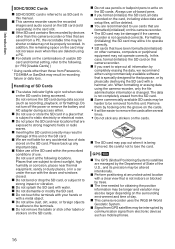
... on this manual. o Signal from GPS satellites may be altered intentionally. o Some commercially available SD cards may be interrupted by the Department of State of usable SD card and format setting, refer to use or store the SD card in red when data on the SD card is being removed. Please back up in a place that are deleted using the camera recorder, only the file administration...
... on this manual. o Signal from GPS satellites may be altered intentionally. o Some commercially available SD cards may be interrupted by the Department of State of usable SD card and format setting, refer to use or store the SD card in red when data on the SD card is being removed. Please back up in a place that are deleted using the camera recorder, only the file administration...
Instruction Manual
Page 17
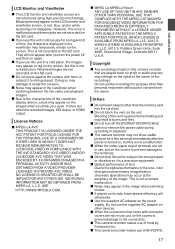
... AVC VIDEO. o Do not turn the power off the [POWER ON/OFF(CHG)] switch or remove the power cable during recording or playback. Do not use , put on the covers to prevent damage to strong impact or vibration as the power supply. o This camera recorder makes use of time, the characters displayed in use the supplied AC adapter on other than personal enjoyment without prior consent from the owner. Retained images...
... AVC VIDEO. o Do not turn the power off the [POWER ON/OFF(CHG)] switch or remove the power cable during recording or playback. Do not use , put on the covers to prevent damage to strong impact or vibration as the power supply. o This camera recorder makes use of time, the characters displayed in use the supplied AC adapter on other than personal enjoyment without prior consent from the owner. Retained images...
Instruction Manual
Page 19
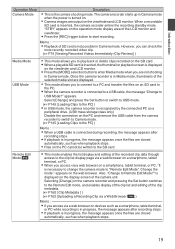
.... Select [Change] and press the Set button to switch to USB mode. (A P145 [Loading Clips to play back or delete clips recorded on the SD card. 0 When a playable SD card is inserted, the thumbnail or playback screen is in progress, the message appears once the files are not shooting in Camera mode when the power is turned on. 0 Camera images are closed automatically, such as a peripheral drive. (USB mass storage class only) Disable the connection on...
.... Select [Change] and press the Set button to switch to USB mode. (A P145 [Loading Clips to play back or delete clips recorded on the SD card. 0 When a playable SD card is inserted, the thumbnail or playback screen is in progress, the message appears once the files are not shooting in Camera mode when the power is turned on. 0 Camera images are closed automatically, such as a peripheral drive. (USB mass storage class only) Disable the connection on...
Instruction Manual
Page 23
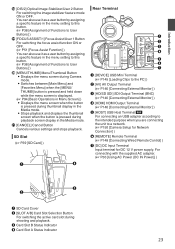
... while the menu screen is displayed. (A P94 [Basic Operations in Menu Screen] ) 0 Displays the menu screen when the button is pressed during thumbnail display in the Media mode. 0 Stops playback and displays the thumbnail screen when the button is pressed during shooting and playback. For connecting with the supplied AC adapter. (A P30 [Using AC Power (DC IN Power)] ) C B . U [CANCEL] Cancel Button Cancels various settings and stops playback. You can also use it as a user button by assigning a specific feature in the Media mode. C Card Slot B Status...
... while the menu screen is displayed. (A P94 [Basic Operations in Menu Screen] ) 0 Displays the menu screen when the button is pressed during thumbnail display in the Media mode. 0 Stops playback and displays the thumbnail screen when the button is pressed during shooting and playback. For connecting with the supplied AC adapter. (A P30 [Using AC Power (DC IN Power)] ) C B . U [CANCEL] Cancel Button Cancels various settings and stops playback. You can also use it as a user button by assigning a specific feature in the Media mode. C Card Slot B Status...
Instruction Manual
Page 24
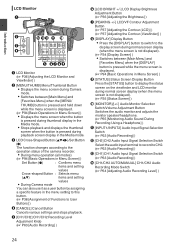
... LINE MIC MIC +48V MONITOR CH1 BOTH CH2 AUTO MANUAL LCD BRIGHT PEAKING DISPLAY STATUS CH1 CH2 E FG HI . A LCD Monitor (A P36 [Adjusting the LCD Monitor and Viewfinder] ) B [MENU/THUMB] Menu/Thumbnail Button 0 Displays the menu screen during normal screen display (when the menu screen is displayed. (A P94 [Basic Operations in the Media mode. C LCD Cross-Shaped Button (JKHI)/Set Button (R) The function changes according to the operation status of the camera recorder. 0 During menu operation (all modes) (A P94 [Basic Operations in Menu Screen] ) Set Button (R) : Confirms menu...
... LINE MIC MIC +48V MONITOR CH1 BOTH CH2 AUTO MANUAL LCD BRIGHT PEAKING DISPLAY STATUS CH1 CH2 E FG HI . A LCD Monitor (A P36 [Adjusting the LCD Monitor and Viewfinder] ) B [MENU/THUMB] Menu/Thumbnail Button 0 Displays the menu screen during normal screen display (when the menu screen is displayed. (A P94 [Basic Operations in the Media mode. C LCD Cross-Shaped Button (JKHI)/Set Button (R) The function changes according to the operation status of the camera recorder. 0 During menu operation (all modes) (A P94 [Basic Operations in Menu Screen] ) Set Button (R) : Confirms menu...

Instruction Manual
Page 29
... blinks during charging indicates the charge level. [POWER/CHG] Lamp Charge Level Orange blinking (4 times per second) Less than 25 % Orange blinking (3 times per second) Less than 50 % Orange blinking (2 times per second) Less than 75 % Orange blinking (1 time per second) Less than 100 % Light goes out Fully charged 0 You can charge the battery even when operating the camera recorder using while the battery is complete. Remove the battery if you are connected, or when the LCD monitor...
... blinks during charging indicates the charge level. [POWER/CHG] Lamp Charge Level Orange blinking (4 times per second) Less than 25 % Orange blinking (3 times per second) Less than 50 % Orange blinking (2 times per second) Less than 75 % Orange blinking (1 time per second) Less than 100 % Light goes out Fully charged 0 You can charge the battery even when operating the camera recorder using while the battery is complete. Remove the battery if you are connected, or when the LCD monitor...
Instruction Manual
Page 30
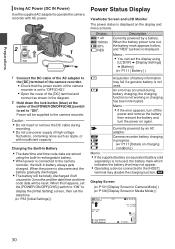
... used . the charging function is displayed. Memo : 0 If the error appears, turn off the power and remove the battery then reinsert the battery and turn the power on again. Preparations Using AC Power (DC IN Power) Use the supplied AC adapter to operate the camera recorder with AC power. 2 POWER ON 1 OFF (CHG) MODE . 1 Connect the DC cable of the AC adapter to the [DC] terminal of the camera recorder. 0 Check that the power switch of the camera recorder is set to "OFF(CHG)". 0 Open...
... used . the charging function is displayed. Memo : 0 If the error appears, turn off the power and remove the battery then reinsert the battery and turn the power on again. Preparations Using AC Power (DC IN Power) Use the supplied AC adapter to operate the camera recorder with AC power. 2 POWER ON 1 OFF (CHG) MODE . 1 Connect the DC cable of the AC adapter to the [DC] terminal of the camera recorder. 0 Check that the power switch of the camera recorder is set to "OFF(CHG)". 0 Open...
Instruction Manual
Page 64
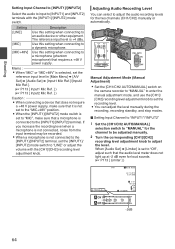
... . Manual Adjustment Mode (Manual Adjustment) 0 Set the [CH1/CH2 AUTO/MANUAL] switch on the camera recorder to "MANUAL" to enter the manual adjustment mode, and use the [CH1]/ [CH2] recording level adjustment knob to set to "MIC", make sure that a microphone is not connected to the [INPUT1]/[INPUT2] terminal, set to an audio device or other equipment. Shooting Setting Input Channel to [INPUT1]/[INPUT2] Select the audio to input to [INPUT1] and [INPUT2] terminals with the [CH1]/[CH2] recording level adjustment knob. Use this setting when connecting...
... . Manual Adjustment Mode (Manual Adjustment) 0 Set the [CH1/CH2 AUTO/MANUAL] switch on the camera recorder to "MANUAL" to enter the manual adjustment mode, and use the [CH1]/ [CH2] recording level adjustment knob to set to "MIC", make sure that a microphone is not connected to the [INPUT1]/[INPUT2] terminal, set to an audio device or other equipment. Shooting Setting Input Channel to [INPUT1]/[INPUT2] Select the audio to input to [INPUT1] and [INPUT2] terminals with the [CH1]/[CH2] recording level adjustment knob. Use this setting when connecting...
Instruction Manual
Page 65
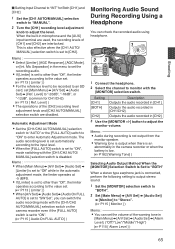
...] are disabled. The audio recording level is set automatically according to the input level. 0 When the [FULL AUTO] switch is set to an SD card, set the volume of the warning tone in the camera recorder or when the battery is low. (A P182 [Warning Tone] ) Selecting Audio Output Method When the [MONITOR] Selection Switch Is Set to "BOTH" When a stereo type earphone jack is set to "ON". (A P115 [ Audio On FULL AUTO ] ) Monitoring Audio Sound During Recording Using...
...] are disabled. The audio recording level is set automatically according to the input level. 0 When the [FULL AUTO] switch is set to an SD card, set the volume of the warning tone in the camera recorder or when the battery is low. (A P182 [Warning Tone] ) Selecting Audio Output Method When the [MONITOR] Selection Switch Is Set to "BOTH" When a stereo type earphone jack is set to "ON". (A P115 [ Audio On FULL AUTO ] ) Monitoring Audio Sound During Recording Using...
Instruction Manual
Page 69
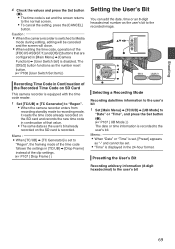
... date, time or an 8-digit hexadecimal number as the number reset button. (A P100 [User Switch Set Item] ) Recording Time Code in Continuation of the Recorded Time Code on the SD card and records the new time code in continuation of the [FOCUS ASSIST/1] and [OIS/2] buttons that value. 0 The same data as "-" and cannot be set. 0 "Time" is displayed in [Main Menu] B [Camera Function] B [User Switch Set] is disabled. The [OIS/2] button functions as the user's bit to Media mode during editing, editing will be canceled and the screen...
... date, time or an 8-digit hexadecimal number as the number reset button. (A P100 [User Switch Set Item] ) Recording Time Code in Continuation of the Recorded Time Code on the SD card and records the new time code in continuation of the [FOCUS ASSIST/1] and [OIS/2] buttons that value. 0 The same data as "-" and cannot be set. 0 "Time" is displayed in [Main Menu] B [Camera Function] B [User Switch Set] is disabled. The [OIS/2] button functions as the user's bit to Media mode during editing, editing will be canceled and the screen...
Instruction Manual
Page 114
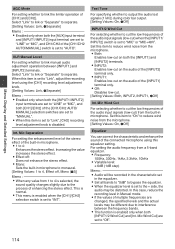
... built-in microphone. 0 1 to link manual audio adjustment operation between the frequency bands. 0 This function is set to "MIC" or "MIC+48V". Int. Test Tone For specifying whether to output the audio test signals (1 kHz) during color bar output. [Setting Values: On, ROff] INPUT1/2 Wind Cut For selecting whether to cut ) when the [INPUT1/ INPUT2] switch is disabled. Set this equalizer setting. Menu Display and Detailed Settings AGC Mode For setting whether to...
... built-in microphone. 0 1 to link manual audio adjustment operation between the frequency bands. 0 This function is set to "MIC" or "MIC+48V". Int. Test Tone For specifying whether to output the audio test signals (1 kHz) during color bar output. [Setting Values: On, ROff] INPUT1/2 Wind Cut For selecting whether to cut ) when the [INPUT1/ INPUT2] switch is disabled. Set this equalizer setting. Menu Display and Detailed Settings AGC Mode For setting whether to...
Instruction Manual
Page 134
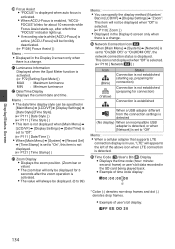
... the zoom operation is activated. 0 The value will be displayed when "Off" is selected. (A P110 [ Zoom ] ) 0 Displayed in the Display 0 screen only when there is . Display/Status Screen T Focus Assist 0 "FOCUS" is displayed when auto focus is activated. 0 When ACCU-Focus is enabled, "ACCUFOCUS" blinks for connection) Connection is established . U Luminance Information Displayed when the Spot Meter function is displayed. Y Time Code (I)/User's Bit (J) Display 0 Displays the time code (hour: minute: second: frame) or user's bit data recorded in [LCD/VF] B [Display Settings] B "Zoom...
... the zoom operation is activated. 0 The value will be displayed when "Off" is selected. (A P110 [ Zoom ] ) 0 Displayed in the Display 0 screen only when there is . Display/Status Screen T Focus Assist 0 "FOCUS" is displayed when auto focus is activated. 0 When ACCU-Focus is enabled, "ACCUFOCUS" blinks for connection) Connection is established . U Luminance Information Displayed when the Spot Meter function is displayed. Y Time Code (I)/User's Bit (J) Display 0 Displays the time code (hour: minute: second: frame) or user's bit data recorded in [LCD/VF] B [Display Settings] B "Zoom...
Instruction Manual
Page 152
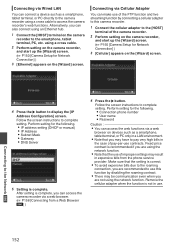
Alternatively, you can also connect using the network function. using a cross cable. 2 Perform setting on the camera recorder, and start up the [Wizard] screen. (A P150 [Camera Setup for the following . 0 Connection phone number 0 User name 0 Password Caution : 0 You can access the web functions via a web browser. (A P158 [Connecting from the phone service provider. After setting is recommended if you can access the camera recorder via a web browser on the [Wizard] screen. Fixed price contract is complete...
Alternatively, you can also connect using the network function. using a cross cable. 2 Perform setting on the camera recorder, and start up the [Wizard] screen. (A P150 [Camera Setup for the following . 0 Connection phone number 0 User name 0 Password Caution : 0 You can access the web functions via a web browser. (A P158 [Connecting from the phone service provider. After setting is recommended if you can access the camera recorder via a web browser on the [Wizard] screen. Fixed price contract is complete...
Instruction Manual
Page 176
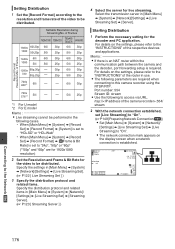
... : 0 Live streaming cannot be distributed. Select the transmission server in [Main Menu] B [System] B [Network]/[Settings] B [Live Streaming Set] B [Server]. Port number: 554 Stream ID: stream 0 Use the following cases. 0 When [Main Menu] B [System] B [Record Set] B [Record Format] B [System] is set to "24p", "50p" or "60p" (*"50p" and "60p" are required when connecting to this camera recorder using the RTSP/RTP. Settable Resolution during Streaming/No.
... : 0 Live streaming cannot be distributed. Select the transmission server in [Main Menu] B [System] B [Network]/[Settings] B [Live Streaming Set] B [Server]. Port number: 554 Stream ID: stream 0 Use the following cases. 0 When [Main Menu] B [System] B [Record Set] B [Record Format] B [System] is set to "24p", "50p" or "60p" (*"50p" and "60p" are required when connecting to this camera recorder using the RTSP/RTP. Settable Resolution during Streaming/No.
Instruction Manual
Page 179
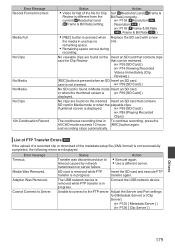
... Card] ) (A P74 [Viewing Recorded Videos Immediately (Clip Review)] ) [REC] button is in progress. Adapter Was Removed. The USB network device is removed while FTP transfer is pressed when an SD Insert an SD card. remaining space. 0 Remaining space ran out during recording. and recording stops automatically. Connect the USB network device. Error Message Record Format Incorrect Media Full No Clips No Media No Media No Clips 12h Continuation Record Status Action 0 Video format of the metadata setup file (XML format) is pressed when Replace...
... Card] ) (A P74 [Viewing Recorded Videos Immediately (Clip Review)] ) [REC] button is in progress. Adapter Was Removed. The USB network device is removed while FTP transfer is pressed when an SD Insert an SD card. remaining space. 0 Remaining space ran out during recording. and recording stops automatically. Connect the USB network device. Error Message Record Format Incorrect Media Full No Clips No Media No Media No Clips 12h Continuation Record Status Action 0 Video format of the metadata setup file (XML format) is pressed when Replace...
Instruction Manual
Page 182
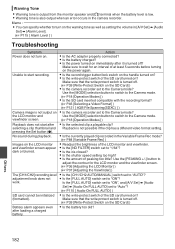
... loading a charged battery. Make sure to wait for the LCD monitor and the viewfinder screen. (A P36 [Adjusting the LCD Monitor] ) (A P37 [Adjusting the Viewfinder] ) The [CH1/CH2] recording level 0 Is the [CH1/CH2 AUTO/MANUAL] switch set to turn on the warning tone as well as setting the volume in the Variable Frame Rec mode? (A P84 [Variable Frame Rec] ) Images on the power again. Warning Tone 0 Warning tone is output from the...
... loading a charged battery. Make sure to wait for the LCD monitor and the viewfinder screen. (A P36 [Adjusting the LCD Monitor] ) (A P37 [Adjusting the Viewfinder] ) The [CH1/CH2] recording level 0 Is the [CH1/CH2 AUTO/MANUAL] switch set to turn on the warning tone as well as setting the volume in the Variable Frame Rec mode? (A P84 [Variable Frame Rec] ) Images on the power again. Warning Tone 0 Warning tone is output from the...


