

Instructions
Page 2
... cautions on the apparatus. NO USER-SERVICEABLE PARTS INSIDE. REFER SERVICING TO QUALIFIED SERVICE PERSONNEL. However, live recording and LCD monitor/ viewfinder playback are blocked by a newspaper, ...use this digital video camera. before use of this product. You are separated for purchasing this equipment in a bathroom or places with a television of important operating and maintenance (servicing) instructions in the Table Of Contents on top and at the rear). The exclamation point within the product's enclosure that follow. The AA-V51U AC Power Adapter/Charger...
... cautions on the apparatus. NO USER-SERVICEABLE PARTS INSIDE. REFER SERVICING TO QUALIFIED SERVICE PERSONNEL. However, live recording and LCD monitor/ viewfinder playback are blocked by a newspaper, ...use this digital video camera. before use of this product. You are separated for purchasing this equipment in a bathroom or places with a television of important operating and maintenance (servicing) instructions in the Table Of Contents on top and at the rear). The exclamation point within the product's enclosure that follow. The AA-V51U AC Power Adapter/Charger...
Instructions
Page 3
... its installation, use can perform many useful functions. Ventilation Slots and openings in the cabinet are not sure of the type of time, unplug it from the type of antenna discharge unit, connection to the operating instructions. 3. Power Lines An outside antenna system should still fail to fit, contact your electrician to the product, be fatal. When installing an outside antenna or cable system...
... its installation, use can perform many useful functions. Ventilation Slots and openings in the cabinet are not sure of the type of time, unplug it from the type of antenna discharge unit, connection to the operating instructions. 3. Power Lines An outside antenna system should still fail to fit, contact your electrician to the product, be fatal. When installing an outside antenna or cable system...

Instructions
Page 9
... AC Power Adapter/Charger features automatic voltage selection in the direction of the BN-V856U battery pack and AA-V80U AC Power Adapter/Charger. Read the VU-V856KIT's instruction manuals before using the provided AC Power Adapter/ Charger. while sliding down BATT. NOTES: ● Recording time is reduced significantly under the following conditions: • Zoom or Record-Standby mode is engaged repeatedly. • The LCD monitor is used repeatedly. • The playback mode...
... AC Power Adapter/Charger features automatic voltage selection in the direction of the BN-V856U battery pack and AA-V80U AC Power Adapter/Charger. Read the VU-V856KIT's instruction manuals before using the provided AC Power Adapter/ Charger. while sliding down BATT. NOTES: ● Recording time is reduced significantly under the following conditions: • Zoom or Record-Standby mode is engaged repeatedly. • The LCD monitor is used repeatedly. • The playback mode...

Instructions
Page 11
... date and time begin operation from the date and time you just set the POWER Switch to charge the clock's rechargeable lithium battery. Press it twice. While the camcorder is always charged. Rotate the MENU wheel to select "1RETURN", and press it and "DISPLAY MENU" appears. 4 Rotate the MENU wheel to supply power, the clock's rechargeable lithium battery is connected to an AC outlet using the AC Power Adapter/Charger, or while the battery...
... date and time begin operation from the date and time you just set the POWER Switch to charge the clock's rechargeable lithium battery. Press it twice. While the camcorder is always charged. Rotate the MENU wheel to select "1RETURN", and press it and "DISPLAY MENU" appears. 4 Rotate the MENU wheel to supply power, the clock's rechargeable lithium battery is connected to an AC outlet using the AC Power Adapter/Charger, or while the battery...

Instructions
Page 13
... MENU wheel to " " while pressing down the Lock Button located on your preference. 1 Set the Operation Switch to " " and set the POWER Switch to select " " and press it . MODE Menu Screen Sub Menu EN13 Recording Mode Setting Set the tape recording mode depending on the switch, then open the LCD monitor fully or pull out the viewfinder fully. POWER Switch POWER Lamp Lock Button Operation Switch MENU Wheel Display CAMERA MENU 1RE T URN REC MODE SP SOUND MODE LP ZOOM SNAP MODE GA I N UP BEEP / TALLY I D NUMBER DEMO . The Sub Menu...
... MENU wheel to " " while pressing down the Lock Button located on your preference. 1 Set the Operation Switch to " " and set the POWER Switch to select " " and press it . MODE Menu Screen Sub Menu EN13 Recording Mode Setting Set the tape recording mode depending on the switch, then open the LCD monitor fully or pull out the viewfinder fully. POWER Switch POWER Lamp Lock Button Operation Switch MENU Wheel Display CAMERA MENU 1RE T URN REC MODE SP SOUND MODE LP ZOOM SNAP MODE GA I N UP BEEP / TALLY I D NUMBER DEMO . The Sub Menu...
Instructions
Page 14
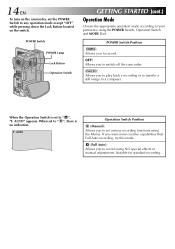
... to play back a recording or to transfer a still image to a computer. F . POWER Switch POWER Lamp Lock Button Operation Switch GETTING STARTED (cont.) Operation Mode Choose the appropriate operation mode according to record using NO special effects or manual adjustments. PLAY/PC : Allows you to record. AUTO Operation Switch Position (Manual): Allows you to switch off the camcorder. 14 EN To turn on the camcorder, set to " ", there is set various recording functions using the POWER Switch, Operation Switch and MODE Dial. OFF: Allows you to set to any operation mode except...
... to play back a recording or to transfer a still image to a computer. F . POWER Switch POWER Lamp Lock Button Operation Switch GETTING STARTED (cont.) Operation Mode Choose the appropriate operation mode according to record using NO special effects or manual adjustments. PLAY/PC : Allows you to record. AUTO Operation Switch Position (Manual): Allows you to switch off the camcorder. 14 EN To turn on the camcorder, set to " ", there is set various recording functions using the POWER Switch, Operation Switch and MODE Dial. OFF: Allows you to set to any operation mode except...
Instructions
Page 24
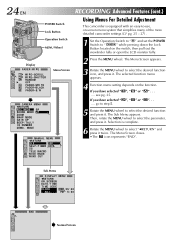
... - 27) . 1 Set the Operation Switch to " " and set the POWER Switch to " " while pressing down the Lock Button located on the function. W Menu Screen CAMERA MENU 1RE T URN REC MODE SP SOUND MODE LP ZOOM SNAP MODE GA I N UP BEEP / TALLY I ME CODE CLOCK DEC. 25 ' 00 ADJ . T I MER ON 5S TELE MACRO W I DE MODE W I TE FADER-BLACK FADER-B. MODE MANUAL MENU 1RE T URN DIS OF F SEL F - Sub Menu D I SPLAY MENU 1RE T URN ON SCREEN DATE / T I ME T I D NUMBER DEMO. PM...
... - 27) . 1 Set the Operation Switch to " " and set the POWER Switch to " " while pressing down the Lock Button located on the function. W Menu Screen CAMERA MENU 1RE T URN REC MODE SP SOUND MODE LP ZOOM SNAP MODE GA I N UP BEEP / TALLY I ME CODE CLOCK DEC. 25 ' 00 ADJ . T I MER ON 5S TELE MACRO W I DE MODE W I TE FADER-BLACK FADER-B. MODE MANUAL MENU 1RE T URN DIS OF F SEL F - Sub Menu D I SPLAY MENU 1RE T URN ON SCREEN DATE / T I ME T I D NUMBER DEMO. PM...
Instructions
Page 25
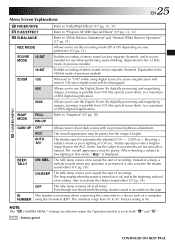
... "Manual White Balance Operation" (੬ pg. 35). Shooting a subject in low or poor lighting at all times. W.BALANCE Refer to "Snapshot" (੬ pg. 18). SOUND 12 BIT MODE Enables recording of stereo sound on four separate channels, and is bright. CAMERA MENU GAIN UP OFF Allows you to set to 10X since digital zoom will be grainy, but the subject's movements are effective when the Operation Switch is performed. shutter speed...
... "Manual White Balance Operation" (੬ pg. 35). Shooting a subject in low or poor lighting at all times. W.BALANCE Refer to "Snapshot" (੬ pg. 18). SOUND 12 BIT MODE Enables recording of stereo sound on four separate channels, and is bright. CAMERA MENU GAIN UP OFF Allows you to set to 10X since digital zoom will be grainy, but the subject's movements are effective when the Operation Switch is performed. shutter speed...

Instructions
Page 27
... POWER Switch is set to " PLAY/PC " (੬ pg. 37). TIME CODE CLOCK ADJ. Frame numbers are recorded. •When the date is set to a TV. Allows you to set the current date and time (੬ pg. 11). : Factory-preset NOTES: ● The "MANUAL MENU" settings are effective only when the Operation Switch is changed by pressing the DISPLAY Button on the connected TV. LCD/TV Makes the camcorder's display appear on noise created by wind. DATE/ TIME AUTO Displays...
... POWER Switch is set to " PLAY/PC " (੬ pg. 37). TIME CODE CLOCK ADJ. Frame numbers are recorded. •When the date is set to a TV. Allows you to set the current date and time (੬ pg. 11). : Factory-preset NOTES: ● The "MANUAL MENU" settings are effective only when the Operation Switch is changed by pressing the DISPLAY Button on the connected TV. LCD/TV Makes the camcorder's display appear on noise created by wind. DATE/ TIME AUTO Displays...

Instructions
Page 37
... ON NEXT PAGE DISPLAY MENU PLAYBACK Advanced Features START/STOP Button POWER Switch EN37 Using Menus For Detailed Adjustment The following procedure applies to select "1RETURN" and press it keeps the camcorder's display (except the date, time and time code) from appearing on the camcorder. VIDEO MENU SOUND MODE 12BIT MODE SYNCHRO REC MODE BLANK SRCH ON SCREEN* DATE/TIME* TIME CODE* ੬ pg. 38. ੬ pg. 38. ੬ pg. 55. The selected function menu appears. Selection is set to "SIMPLE...
... ON NEXT PAGE DISPLAY MENU PLAYBACK Advanced Features START/STOP Button POWER Switch EN37 Using Menus For Detailed Adjustment The following procedure applies to select "1RETURN" and press it keeps the camcorder's display (except the date, time and time code) from appearing on the camcorder. VIDEO MENU SOUND MODE 12BIT MODE SYNCHRO REC MODE BLANK SRCH ON SCREEN* DATE/TIME* TIME CODE* ੬ pg. 38. ੬ pg. 38. ੬ pg. 55. The selected function menu appears. Selection is set to "SIMPLE...
Instructions
Page 41
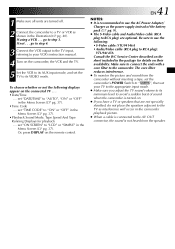
... to use the AC Power Adapter/ Charger as interference will occur in the Menu Screen (੬ pg. 37). •Playback Sound Mode, Tape Speed And Tape Running Displays for details on . ● If you adjust the TV sound volume to its minimum level to avoid a sudden burst of the battery pack (੬ pg. 9). ● The S-Video cable and Audio/Video cable (RCA plug to RCA plug) are turned off. 2 Connect the camcorder to its AUX input mode, and set the camcorder's POWER Switch to...
... to use the AC Power Adapter/ Charger as interference will occur in the Menu Screen (੬ pg. 37). •Playback Sound Mode, Tape Speed And Tape Running Displays for details on . ● If you adjust the TV sound volume to its minimum level to avoid a sudden burst of the battery pack (੬ pg. 9). ● The S-Video cable and Audio/Video cable (RCA plug to RCA plug) are turned off. 2 Connect the camcorder to its AUX input mode, and set the camcorder's POWER Switch to...

Instructions
Page 43
... image will become black. ● Also refer to the instruction manuals of the connected units. ● When using a DV cable, as the power supply instead of the battery pack (੬ pg. 9). ● For Digital Dubbing, this camcorder can also be used as a recorder (੬ pg. 45). ● If Still Playback, Slow-Motion Playback, Fast-Forward or Rewind is also possible to copy recorded scenes from the camcorder onto another video unit...
... image will become black. ● Also refer to the instruction manuals of the connected units. ● When using a DV cable, as the power supply instead of the battery pack (੬ pg. 9). ● For Digital Dubbing, this camcorder can also be used as a recorder (੬ pg. 45). ● If Still Playback, Slow-Motion Playback, Fast-Forward or Rewind is also possible to copy recorded scenes from the camcorder onto another video unit...

Instructions
Page 44
... Audio/Video cable [RCA plug to RCA plug] (optional) White to AUDIO L IN S-Video cable (optional) Red to AUDIO R IN Yellow to the camcorder. set "TIME CODE" to find a spot just before the edit-in the Menu Screen (੬ pg. 37). •Playback Sound Mode, Tape Speed And Tape Running Displays .... Also refer to pg. 40 and 41. 2 Set the camcorder's POWER Switch to " PLAY/PC " while pressing down the Lock Button located on the switch, turn on their availability. set "ON SCREEN" to "AUTO...
... Audio/Video cable [RCA plug to RCA plug] (optional) White to AUDIO L IN S-Video cable (optional) Red to AUDIO R IN Yellow to the camcorder. set "TIME CODE" to find a spot just before the edit-in the Menu Screen (੬ pg. 37). •Playback Sound Mode, Tape Speed And Tape Running Displays .... Also refer to pg. 40 and 41. 2 Set the camcorder's POWER Switch to " PLAY/PC " while pressing down the Lock Button located on the switch, turn on their availability. set "ON SCREEN" to "AUTO...

Instructions
Page 45
... original playback image recorded on the tape is performed in the Menu Screen (੬ pg. 37) 3. Since a digital signal is sent, there is little if any image or sound deterioration. [To use the AC Power Adapter/ Charger as a recorder. ● If a blank portion or disturbed image is also possible to engage the Record-Pause mode. To Use This Camcorder As A Recorder . . . 1. Core filter DV cable (optional) Core filter To DV IN/OUT Video...
... original playback image recorded on the tape is performed in the Menu Screen (੬ pg. 37) 3. Since a digital signal is sent, there is little if any image or sound deterioration. [To use the AC Power Adapter/ Charger as a recorder. ● If a blank portion or disturbed image is also possible to engage the Record-Pause mode. To Use This Camcorder As A Recorder . . . 1. Core filter DV cable (optional) Core filter To DV IN/OUT Video...
Instructions
Page 50
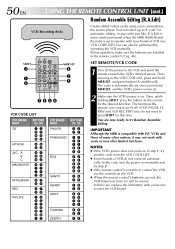
... the VCR CODE LIST, press and hold MBR SET, and press button (A) and then (B). 50 EN USING THE REMOTE CONTROL UNIT (cont.) Random Assemble Editing [R.A.Edit] VCR (Recording deck) Create edited videos easily using your brand of many other makers, it may offer limited functions. Before operation, make sure the batteries are PLAY, STOP, PAUSE, FF, REW and VCR REC STBY (you like. SHIFT 3 1 6 MBR SET 4 2 5 SET REMOTE/VCR CODE 1 Turn off the power to reset the VCR...
... the VCR CODE LIST, press and hold MBR SET, and press button (A) and then (B). 50 EN USING THE REMOTE CONTROL UNIT (cont.) Random Assemble Editing [R.A.Edit] VCR (Recording deck) Create edited videos easily using your brand of many other makers, it may offer limited functions. Before operation, make sure the batteries are PLAY, STOP, PAUSE, FF, REW and VCR REC STBY (you like. SHIFT 3 1 6 MBR SET 4 2 5 SET REMOTE/VCR CODE 1 Turn off the power to reset the VCR...

Instructions
Page 51
... Menu Screen (੬ pg. 37). •Playback Sound Mode, Tape Speed And Tape Running Displays .... MAKE CONNECTIONS Also refer to VIDEO IN* To S-VIDEO IN VCR To PAUSE IN TV DISPLAY * Connect when an S-Video cable is not used. EN51 1 A JVC VCR equipped with an R.A. set "ON SCREEN" to mistake it for details on the connected TV . . . • Date/Time .... Be sure to the VCR's instructions). set the POWER Switch to " PLAY/PC " while pressing down the Lock Button located on the switch. 3 Turn the VCR power...
... Menu Screen (੬ pg. 37). •Playback Sound Mode, Tape Speed And Tape Running Displays .... MAKE CONNECTIONS Also refer to VIDEO IN* To S-VIDEO IN VCR To PAUSE IN TV DISPLAY * Connect when an S-Video cable is not used. EN51 1 A JVC VCR equipped with an R.A. set "ON SCREEN" to mistake it for details on the connected TV . . . • Date/Time .... Be sure to the VCR's instructions). set the POWER Switch to " PLAY/PC " while pressing down the Lock Button located on the switch. 3 Turn the VCR power...
Instructions
Page 58
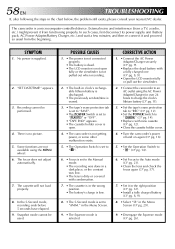
... set to " ". "SET DATE/TIME!" appears. 3. The focus does not adjust automatically. 7. Some functions are not available using the AC Power Adapter/Charger for over 24 hours to charge the clock's lithium battery (੬ pg. 11). 3. • Set the tape's erase protection tab to "REC" (੬ pg. 12). • Set the POWER Switch to " " (੬ pg. 14). • Replace with new cassette (੬ pg. 12). • Close the cassette holder cover. 4. • Turn the camcorder's power...
... set to " ". "SET DATE/TIME!" appears. 3. The focus does not adjust automatically. 7. Some functions are not available using the AC Power Adapter/Charger for over 24 hours to charge the clock's lithium battery (੬ pg. 11). 3. • Set the tape's erase protection tab to "REC" (੬ pg. 12). • Set the POWER Switch to " " (੬ pg. 14). • Replace with new cassette (੬ pg. 12). • Close the cassette holder cover. 4. • Turn the camcorder's power...

Instructions
Page 62
... screen. 44. The charger indicator on the LCD monitor. 41. • The temperature of the battery is extremely high/low. • Charging is connected via the DV connector, the camcorder does not operate. 45. Picture does not appear on the AC Power Adapter/Charger does not light. 42. When the camcorder is difficult in . • Adjust the brightness of noise appear during transport. • Turn the camcorder...
... screen. 44. The charger indicator on the LCD monitor. 41. • The temperature of the battery is extremely high/low. • Charging is connected via the DV connector, the camcorder does not operate. 45. Picture does not appear on the AC Power Adapter/Charger does not light. 42. When the camcorder is difficult in . • Adjust the brightness of noise appear during transport. • Turn the camcorder...

Instructions
Page 69
... won 't be aware that recording onto prerecorded tapes automatically erases the previously recorded video and audio signals. .... For this may cause the battery to unnecessary shock. .... When replacing batteries, refer to strong magnetic fields (such as this AC plug adapter, consult your cassettes, be exposed to page 46. 2. do not modify or disassemble. .... use current even when switched off. EN69 2. charge in an environment where...
... won 't be aware that recording onto prerecorded tapes automatically erases the previously recorded video and audio signals. .... For this may cause the battery to unnecessary shock. .... When replacing batteries, refer to strong magnetic fields (such as this AC plug adapter, consult your cassettes, be exposed to page 46. 2. do not modify or disassemble. .... use current even when switched off. EN69 2. charge in an environment where...

Instructions
Page 74
... off Dimensions (W x H x D) Weight Operating temperature Operating humidity Storage temperature Pickup Lens Filter diameter LCD monitor Viewfinder Speaker For Digital Video Camera Format Signal format Recording/Playback format Cassette Tape speed Maximum recording time (using 80 min. cassette and battery) : 0°C to 40°C (32°F to 104°F) : 35% to 80% : -20°C to 50°C (-4°F to 122°F) : 1/4" CCD (Progressive Scan) : F 1.8, f = 3.8 mm to 38 mm, 10:1 power zoom lens : ø27 mm...
... off Dimensions (W x H x D) Weight Operating temperature Operating humidity Storage temperature Pickup Lens Filter diameter LCD monitor Viewfinder Speaker For Digital Video Camera Format Signal format Recording/Playback format Cassette Tape speed Maximum recording time (using 80 min. cassette and battery) : 0°C to 40°C (32°F to 104°F) : 35% to 80% : -20°C to 50°C (-4°F to 122°F) : 1/4" CCD (Progressive Scan) : F 1.8, f = 3.8 mm to 38 mm, 10:1 power zoom lens : ø27 mm...


