
Instructions
Page 1
... 0 located on the bottom of this information for future reference. INSTRUCTIONS ENGLISH COMPACT VHS CAMCORDER GR-AX890 LYT1233-001B For Customer Use: Enter below the Model No. Serial No. is in the camcorder, demonstration is performed for purchasing the JVC Compact VHS camcorder. Model No. This takes you directly to "ON" (factory-preset). • Available when...
... 0 located on the bottom of this information for future reference. INSTRUCTIONS ENGLISH COMPACT VHS CAMCORDER GR-AX890 LYT1233-001B For Customer Use: Enter below the Model No. Serial No. is in the camcorder, demonstration is performed for purchasing the JVC Compact VHS camcorder. Model No. This takes you directly to "ON" (factory-preset). • Available when...

Instructions
Page 2
If a cable has only one or more core filter. PROVIDED ACCESSORIES • AC Adapter AP-V14U or AP-V15U • Battery Pack BN-V10U • Shoulder Strap • Cassette Adapter C-P7U • Lens Cap • AA (R6) Battery (for Cassette Adapter) NOTE: In order to maintain optimum performance of the camcorder, provided cables may be equipped with one core filter, the end that is closest to the filter should be connected to the camcorder. 2
If a cable has only one or more core filter. PROVIDED ACCESSORIES • AC Adapter AP-V14U or AP-V15U • Battery Pack BN-V10U • Shoulder Strap • Cassette Adapter C-P7U • Lens Cap • AA (R6) Battery (for Cassette Adapter) NOTE: In order to maintain optimum performance of the camcorder, provided cables may be equipped with one core filter, the end that is closest to the filter should be connected to the camcorder. 2

Instructions
Page 3
...with a television of the AC Adapter are possible anywhere. • Use the JVC BN-V10U/V12U/V20U/V400U battery packs and, to recharge them or to supply power to the camcorder from an AC outlet, use the provided multi-voltage AC Adapter. (An appropriate ...conversion adapter may be used for recycling options or proper disposal. ATTENTION: The product that contains a small amount of this camcorder. 3 Cassettes marked can be illegal to environmental considerations. NO USER-SERVICEABLE PARTS INSIDE. PRECAUTIONS SAFETY PRECAUTIONS CAUTION RISK OF ELECTRIC SHOCK...
...with a television of the AC Adapter are possible anywhere. • Use the JVC BN-V10U/V12U/V20U/V400U battery packs and, to recharge them or to supply power to the camcorder from an AC outlet, use the provided multi-voltage AC Adapter. (An appropriate ...conversion adapter may be used for recycling options or proper disposal. ATTENTION: The product that contains a small amount of this camcorder. 3 Cassettes marked can be illegal to environmental considerations. NO USER-SERVICEABLE PARTS INSIDE. PRECAUTIONS SAFETY PRECAUTIONS CAUTION RISK OF ELECTRIC SHOCK...
Instructions
Page 5
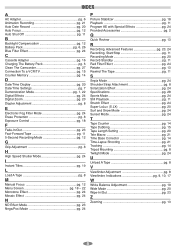
... B Backlight Compensation pg. 12 Battery Pack pg. 6, 26 Blue Filter Effect pg. 24 C Cassette Adapter pg. 16 Charging The Battery Pack pg. 6 Clean The Camcorder pg. 27 Connection To a VCR/TV pg. 15 Counter Memory pg. 14 D Date/Time Display pg. 20 Date/Time Settings pg. 7 Demonstration Mode pg. ...1, 22 Digital Effects pg. 24 Digital Zoom pg. 20 Diopter Adjustment pg. 8 E Electronic Fog Filter Mode pg. 24 Erase Protection pg. 8 Exposure Control pg. 18 F Fade-In/Out pg. 23...
... B Backlight Compensation pg. 12 Battery Pack pg. 6, 26 Blue Filter Effect pg. 24 C Cassette Adapter pg. 16 Charging The Battery Pack pg. 6 Clean The Camcorder pg. 27 Connection To a VCR/TV pg. 15 Counter Memory pg. 14 D Date/Time Display pg. 20 Date/Time Settings pg. 7 Demonstration Mode pg. ...1, 22 Digital Effects pg. 24 Digital Zoom pg. 20 Diopter Adjustment pg. 8 E Electronic Fog Filter Mode pg. 24 Erase Protection pg. 8 Exposure Control pg. 18 F Fade-In/Out pg. 23...
Instructions
Page 6
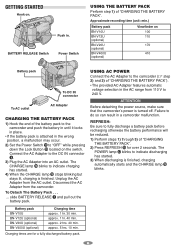
...steps 1) through 3) of "CHARGING THE BATTERY PACK"). • The provided AC Adapter features automatic voltage selection in the AC range from the camcorder. slide BATTERY RELEASE 7 and pull out the battery pack. REFRESH: Be sure to indicate charging has started . 3) When discharging is finished....in until it locks in the wrong position, a malfunction may occur. 2) Set the Power Switch ! Disconnect the AC Adapter from 110 V to the camcorder (੬ step 2) and 3) of "CHARGING THE BATTERY PACK". 2) Press REFRESH ( for a fully discharged battery pack. 6 USING AC POWER Connect ...
...steps 1) through 3) of "CHARGING THE BATTERY PACK"). • The provided AC Adapter features automatic voltage selection in the AC range from the camcorder. slide BATTERY RELEASE 7 and pull out the battery pack. REFRESH: Be sure to indicate charging has started . 3) When discharging is finished....in until it locks in the wrong position, a malfunction may occur. 2) Set the Power Switch ! Disconnect the AC Adapter from 110 V to the camcorder (੬ step 2) and 3) of "CHARGING THE BATTERY PACK". 2) Press REFRESH ( for a fully discharged battery pack. 6 USING AC POWER Connect ...
Instructions
Page 7
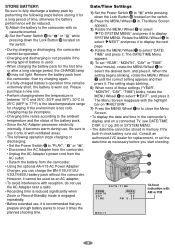
...battery pack. • Since the AC Adapter processes electricity internally, it to select the desired item, and press it . Consult an authorized JVC dealer for charging. Date/Time Settings 1) Set the Power Switch ! If the environment is engaged repeatedly. • Before extended use . ... areas. • The following steps before you prepare enough battery packs to the camcorder with reception, do not use the AC Adapter near a radio. • Recording time is reduced significantly when Zoom or Record-Standby mode is too cold, charging may not light. Please purchase a...
...battery pack. • Since the AC Adapter processes electricity internally, it to select the desired item, and press it . Consult an authorized JVC dealer for charging. Date/Time Settings 1) Set the Power Switch ! If the environment is engaged repeatedly. • Before extended use . ... areas. • The following steps before you prepare enough battery packs to the camcorder with reception, do not use the AC Adapter near a radio. • Recording time is reduced significantly when Zoom or Record-Standby mode is too cold, charging may not light. Please purchase a...
Instructions
Page 8
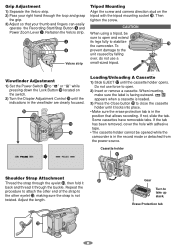
... focused. When inserting, make sure the label is not twisted. Some cassettes have removable tabs. Then tighten the screw. to stabilize o the camcorder. If the tab has been removed, cover the hole with the tripod mounting socket o. Grip Adjustment 1) Separate the Velcro strip. 2) Pass... your thumb and fingers can easily operate the Recording Start/Stop Button 9 and Power Zoom Lever 3. Refasten the Velcro strip. 3 9 Velcro strip Tripod Mounting Align the screw and camera direction stud on the switch. 2) Turn the Diopter...
... focused. When inserting, make sure the label is not twisted. Some cassettes have removable tabs. Then tighten the screw. to stabilize o the camcorder. If the tab has been removed, cover the hole with the tripod mounting socket o. Grip Adjustment 1) Separate the Velcro strip. 2) Pass... your thumb and fingers can easily operate the Recording Start/Stop Button 9 and Power Zoom Lever 3. Refasten the Velcro strip. 3 9 Velcro strip Tripod Mounting Align the screw and camera direction stud on the switch. 2) Turn the Diopter...
Instructions
Page 9
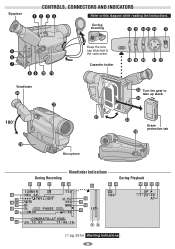
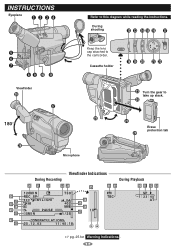
...; Keep the lens cap attached to this diagram while reading the instructions. During shooting @ # $% ^ & 5 6 7 89 0 ! Eyepiece CONTROLS, CONNECTORS AND INDICATORS 12 34 Refer to the camcorder. r e o Erase protection tab Y I U O P a s d Viewfinder Indications During Recording During Playback p Q W ER T kl ;ASD 120M I N T30 REC SP TBC B B B TW I L I GHT f +02 g MWB h PAUSE 5M I N 1 / 2S j 1X...
...; Keep the lens cap attached to this diagram while reading the instructions. During shooting @ # $% ^ & 5 6 7 89 0 ! Eyepiece CONTROLS, CONNECTORS AND INDICATORS 12 34 Refer to the camcorder. r e o Erase protection tab Y I U O P a s d Viewfinder Indications During Recording During Playback p Q W ER T kl ;ASD 120M I N T30 REC SP TBC B B B TW I L I GHT f +02 g MWB h PAUSE 5M I N 1 / 2S j 1X...
Instructions
Page 11
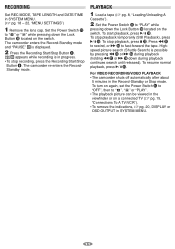
...Highspeed picture search (Shuttle Search) is displayed. 2 Press the Recording Start/Stop Button 9. For VIDEO RECORDING/VIDEO PLAYBACK • The camcorder shuts off automatically after about 5 minutes in SYSTEM MENU. (੬ pg. 18 - 22, "MENU SETTINGS") 1 Remove the lens cap. The... viewfinder or on again, set the Power Switch ! RECORDING Set REC MODE, TAPE LENGTH and DATE/TIME in the Record-Standby or Stop mode. The camcorder re-enters the RecordStandby mode. To stop playback temporarily (Still Playback), press B/ ; %. PLAYBACK 1 Load a tape (੬ pg. 8, "Loading/Unloading...
...Highspeed picture search (Shuttle Search) is displayed. 2 Press the Recording Start/Stop Button 9. For VIDEO RECORDING/VIDEO PLAYBACK • The camcorder shuts off automatically after about 5 minutes in SYSTEM MENU. (੬ pg. 18 - 22, "MENU SETTINGS") 1 Remove the lens cap. The... viewfinder or on again, set the Power Switch ! RECORDING Set REC MODE, TAPE LENGTH and DATE/TIME in the Record-Standby or Stop mode. The camcorder re-enters the RecordStandby mode. To stop playback temporarily (Still Playback), press B/ ; %. PLAYBACK 1 Load a tape (੬ pg. 8, "Loading/Unloading...
Instructions
Page 12
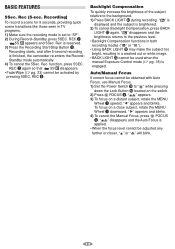
... Button 0 located on the switch. 2) Press FOCUS 4. " B" appears and blinks. 4) To cancel the Manual Focus, press FOCUS 4. " " disappears and the Auto Focus is finished, the camcorder re-enters the Record- "A" appears and blinks. to the background. 1) Press BACK LIGHT w during recording. BASIC FEATURES 5Sec. " " is displayed and the subject is set...
... Button 0 located on the switch. 2) Press FOCUS 4. " B" appears and blinks. 4) To cancel the Manual Focus, press FOCUS 4. " " disappears and the Auto Focus is finished, the camcorder re-enters the Record- "A" appears and blinks. to the background. 1) Press BACK LIGHT w during recording. BASIC FEATURES 5Sec. " " is displayed and the subject is set...
Instructions
Page 13
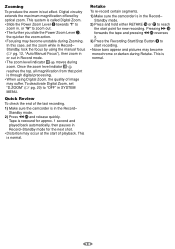
...is normal. 13 Standby, lock the focus by optical zoom. Pressing R ^ forwards the tape and pressing Q q reverses it. 3) Press the Recording Start/Stop Button 9 to zoom out. • The further you slide the Power Zoom Lever 3, the quicker the zoom action. • Focusing may suffer. moves during...point is called Digital Zoom. • Slide the Power Zoom Lever 3 towards "T" to zoom in SYSTEM MENU. Zooming To produce the zoom in the Record- In this case, set "D.ZOOM" (੬ pg. 20) to reach the start of the last recording. 1) Make sure the camcorder is in /out ...
...is normal. 13 Standby, lock the focus by optical zoom. Pressing R ^ forwards the tape and pressing Q q reverses it. 3) Press the Recording Start/Stop Button 9 to zoom out. • The further you slide the Power Zoom Lever 3, the quicker the zoom action. • Focusing may suffer. moves during...point is called Digital Zoom. • Slide the Power Zoom Lever 3 towards "T" to zoom in SYSTEM MENU. Zooming To produce the zoom in the Record- In this case, set "D.ZOOM" (੬ pg. 20) to reach the start of the last recording. 1) Make sure the camcorder is in /out ...
Instructions
Page 14
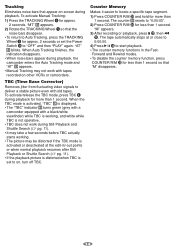
...more than 1 second so that "M" disappears. 14 The counter ; To activate/release the TBC mode, press TBC 4 during playback, the camcorder enters the Auto Tracking mode and "AT" D appears. • Manual Tracking may be distorted if the TBC mode is activated or deactivated... set the Power Switch ! Counter Memory Makes it easier to "OFF" and then "PLAY" again. Tracking Eliminates noise bars that appear on other VCRs or camcorders. to locate a specific tape segment. 1) Press COUNTER R/M ) and hold for approx. 2 seconds. "AT" D blinks. "M" appears. 3) After recording or playback...
...more than 1 second so that "M" disappears. 14 The counter ; To activate/release the TBC mode, press TBC 4 during playback, the camcorder enters the Auto Tracking mode and "AT" D appears. • Manual Tracking may be distorted if the TBC mode is activated or deactivated... set the Power Switch ! Counter Memory Makes it easier to "OFF" and then "PLAY" again. Tracking Eliminates noise bars that appear on other VCRs or camcorders. to locate a specific tape segment. 1) Press COUNTER R/M ) and hold for approx. 2 seconds. "AT" D blinks. "M" appears. 3) After recording or playback...

Instructions
Page 15
...'s AUX and Record-Pause modes. 2) Press B/ ; % to Video Input 15 Once it is turned on the VCR's power, and insert the appropriate cassettes in the camcorder and the VCR. Set the VCR to its AUX input mode, and set the TV to its minimum level to avoid a sudden burst of sound... when the camcorder is reached, press B/ ; % again. 3) Press B/ ; % and engage the VCR's Record mode. 4) Engage the VCR's Record-Pause mode and press B/ ; %. • Repeat steps 2) through 4) for additional...
...'s AUX and Record-Pause modes. 2) Press B/ ; % to Video Input 15 Once it is turned on the VCR's power, and insert the appropriate cassettes in the camcorder and the VCR. Set the VCR to its AUX input mode, and set the TV to its minimum level to avoid a sudden burst of sound... when the camcorder is reached, press B/ ; % again. 3) Press B/ ; % and engage the VCR's Record mode. 4) Engage the VCR's Record-Pause mode and press B/ ; %. • Repeat steps 2) through 4) for additional...
Instructions
Page 16
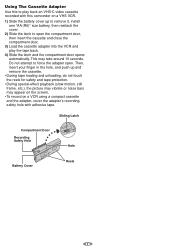
... compartment door, then insert the cassette and close the compartment door. 3) Load the cassette adapter into the VCR and play back an VHS-C video cassette recorded with this to open . Sliding Latch Compartment Door Recording Safety Hole Hole Battery Cover Reels 16 This may appear on...playback (slow motion, still frame, etc.), the picture may vibrate or noise bars may take around 10 seconds. Using The Cassette Adapter Use this camcorder on a VCR using a compact cassette and the adapter, cover the adapter's recording safety hole with adhesive tape. Then, insert your finger in ...
... compartment door, then insert the cassette and close the compartment door. 3) Load the cassette adapter into the VCR and play back an VHS-C video cassette recorded with this to open . Sliding Latch Compartment Door Recording Safety Hole Hole Battery Cover Reels 16 This may appear on...playback (slow motion, still frame, etc.), the picture may vibrate or noise bars may take around 10 seconds. Using The Cassette Adapter Use this camcorder on a VCR using a compact cassette and the adapter, cover the adapter's recording safety hole with adhesive tape. Then, insert your finger in ...
Instructions
Page 17
...; pg. 25 for Warning Indications . 17 INSTRUCTIONS Eyepiece 12 34 Refer to take up slack. During shooting @ # $% ^ & 5 6 7 89 0 ! Keep the lens cap attached to the camcorder.
...; pg. 25 for Warning Indications . 17 INSTRUCTIONS Eyepiece 12 34 Refer to take up slack. During shooting @ # $% ^ & 5 6 7 89 0 ! Keep the lens cap attached to the camcorder.
Instructions
Page 20
... DATE/TIME in the camcorder or on the viewfinder during recording, the playback picture will be blurred at the top and bottom of the indications appear on a connected monitor (set to shoot the subject with no picture brightness adjustment. SIMPLE: Makes the following indications disappear from 16X (the optical zoom limit), to shoot with...
... DATE/TIME in the camcorder or on the viewfinder during recording, the playback picture will be blurred at the top and bottom of the indications appear on a connected monitor (set to shoot the subject with no picture brightness adjustment. SIMPLE: Makes the following indications disappear from 16X (the optical zoom limit), to shoot with...
Instructions
Page 21
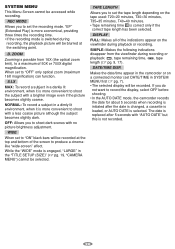
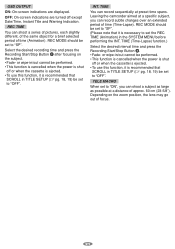
...-in the SYSTEM MENU before performing the INT. Select the desired recording time and press the Recording Start/Stop Button 9 after focusing on the zoom position, the lens may go out of time (Time-Lapse). REC MODE should be performed. • This function is cancelled when the power... is shut off except Date/Time, Instant Title and Warning Indication. Depending on the subject. • Fade- INT. Leaving the camcorder aimed at a specific subject, you can record subtle changes over an extended period of focus. 21 OSD OUTPUT ON: On-screen indications are turned ...
...-in the SYSTEM MENU before performing the INT. Select the desired recording time and press the Recording Start/Stop Button 9 after focusing on the zoom position, the lens may go out of time (Time-Lapse). REC MODE should be performed. • This function is cancelled when the power... is shut off except Date/Time, Instant Title and Warning Indication. Depending on the subject. • Fade- INT. Leaving the camcorder aimed at a specific subject, you can record subtle changes over an extended period of focus. 21 OSD OUTPUT ON: On-screen indications are turned ...

Instructions
Page 22
... viewfinder. Set to OFF to stop completely. • When a tape whose erase protection tab is in the position that allows recording is loaded in the camcorder, demonstration is not available. • If you do not detach the Lens Cap, you to set to " " or " " and "DEMO MODE" is set to "ON...
... viewfinder. Set to OFF to stop completely. • When a tape whose erase protection tab is in the position that allows recording is loaded in the camcorder, demonstration is not available. • If you do not detach the Lens Cap, you to set to " " or " " and "DEMO MODE" is set to "ON...

Instructions
Page 25
...re-connect it does, you can resume using the camcorder. If the indication remains, consult your JVC dealer, please check the following to nil, the battery indicator blinks (battery power warning). TROUBLESHOOTING Before consulting your nearest JVC dealer. 25 In this case, all over the ...viewfinder. • The viewfinder are not recorded on the heads during recording. E06) show what type of the camcorder. The camcorder is not a defect of malfunction has occured...
...re-connect it does, you can resume using the camcorder. If the indication remains, consult your JVC dealer, please check the following to nil, the battery indicator blinks (battery power warning). TROUBLESHOOTING Before consulting your nearest JVC dealer. 25 In this case, all over the ...viewfinder. • The viewfinder are not recorded on the heads during recording. E06) show what type of the camcorder. The camcorder is not a defect of malfunction has occured...
Instructions
Page 26
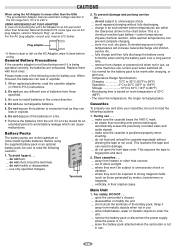
.... be subject to be warm after charging, or after use and store your nearest JVC dealer. This exposes the tape to enter the unit. .... out of the battery ...is dust or dirt on . .... Battery Packs The battery packs are exhausted. do not open the camcorder's chassis. .... Temperature Range Specifications Charging 10°C to 35°C (50°F to 95...ones. For safety, DO NOT . . . .... Store cassettes . . . .... Please make sure the cassette bears the VHS-C mark. .... To prevent damage and prolong service life . . . .... Remove the batteries from 110 V to read ...
.... be subject to be warm after charging, or after use and store your nearest JVC dealer. This exposes the tape to enter the unit. .... out of the battery ...is dust or dirt on . .... Battery Packs The battery packs are exhausted. do not open the camcorder's chassis. .... Temperature Range Specifications Charging 10°C to 35°C (50°F to 95...ones. For safety, DO NOT . . . .... Store cassettes . . . .... Please make sure the cassette bears the VHS-C mark. .... To prevent damage and prolong service life . . . .... Remove the batteries from 110 V to read ...


