Instruction Manual
Page 2
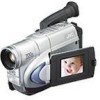
...use of time, it immediately. Do not attempt to qualified personnel. Ⅲ When you are separated for purchasing the JVC Compact VHS camcorder. You are listed in fire. read these conditions could lead to carefully read the safety information and precautions contained in ...this product. Using This Instruction Manual •All major sections and subsections are recommended to fire or electric shock. 2 EN Dear Customer, Thank you . . . .... Do not recharge, disassemble, heat above 100°C or incinerate. Contact your JVC dealer. SAFETY PRECAUTIONS WARNING: TO...
...use of time, it immediately. Do not attempt to qualified personnel. Ⅲ When you are separated for purchasing the JVC Compact VHS camcorder. You are listed in fire. read these conditions could lead to carefully read the safety information and precautions contained in ...this product. Using This Instruction Manual •All major sections and subsections are recommended to fire or electric shock. 2 EN Dear Customer, Thank you . . . .... Do not recharge, disassemble, heat above 100°C or incinerate. Contact your JVC dealer. SAFETY PRECAUTIONS WARNING: TO...
Instruction Manual
Page 7
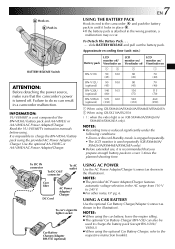
...under the following conditions: •Zoom or Record-Standby mode is engaged repeatedly. •The LCD monitor is used to charge the battery pack (except BN-V20U/ V856U). ● When using GR-SX210A/SX21EA ( ) : ... ● The optional Car Battery Charger (BH-V3E) can result in until it is recommended that the camcorder's power is turned off 1 LCD monitor on/ Viewfinder on 1 BN-V11U 90 100 80 70 (45... and AA-V80EG or AA-V80EA AC Power Adapter/Charger. Read the VU-V856KIT's instruction manuals before using the provided AC Power Adapter/ Charger. To DC IN connector To DC OUT...
...under the following conditions: •Zoom or Record-Standby mode is engaged repeatedly. •The LCD monitor is used to charge the battery pack (except BN-V20U/ V856U). ● When using GR-SX210A/SX21EA ( ) : ... ● The optional Car Battery Charger (BH-V3E) can result in until it is recommended that the camcorder's power is turned off 1 LCD monitor on/ Viewfinder on 1 BN-V11U 90 100 80 70 (45... and AA-V80EG or AA-V80EA AC Power Adapter/Charger. Read the VU-V856KIT's instruction manuals before using the provided AC Power Adapter/ Charger. To DC IN connector To DC OUT...
Instruction Manual
Page 14
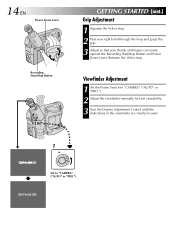
... hand through the loop and grasp the grip. 3 Adjust so that your thumb and fingers can easily operate the Recording Start/Stop Button and Power Zoom Lever. Viewfinder Adjustment 1 Set the Power Switch to "CAMERA" ("AUTO" or "PRO."). Refasten the Velcro strip. PAUSE Set to "CAMERA" ("AUTO" or "PRO."). 2 Adjust the...
... hand through the loop and grasp the grip. 3 Adjust so that your thumb and fingers can easily operate the Recording Start/Stop Button and Power Zoom Lever. Viewfinder Adjustment 1 Set the Power Switch to "CAMERA" ("AUTO" or "PRO."). Refasten the Velcro strip. PAUSE Set to "CAMERA" ("AUTO" or "PRO."). 2 Adjust the...
Instruction Manual
Page 16
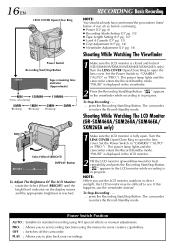
... Monitor (GR-SXM460A/SXM260A/SXM46EA/ SXM26EA only) 1 Make sure the LCD monitor is reached. Set the Power Switch to "CAMERA" ("AUTO" or "PRO."). PRO. : Allows you to set recording functions using the menus for standard recording using NO special effects or manual adjustments. ... in direct sunlight, the LCD monitor may be difficult to open the lens cover. To Stop Recording . . . .... OFF : Switches off the camcorder. 16 EN LENS COVER Open/Close Ring Power Switch Recording Start/Stop Button 2 5M I N Tape remaining time indicator (Approximate) MIN 120MIN (Now calculating) ...
... Monitor (GR-SXM460A/SXM260A/SXM46EA/ SXM26EA only) 1 Make sure the LCD monitor is reached. Set the Power Switch to "CAMERA" ("AUTO" or "PRO."). PRO. : Allows you to set recording functions using the menus for standard recording using NO special effects or manual adjustments. ... in direct sunlight, the LCD monitor may be difficult to open the lens cover. To Stop Recording . . . .... OFF : Switches off the camcorder. 16 EN LENS COVER Open/Close Ring Power Switch Recording Start/Stop Button 2 5M I N Tape remaining time indicator (Approximate) MIN 120MIN (Now calculating) ...
Instruction Manual
Page 18
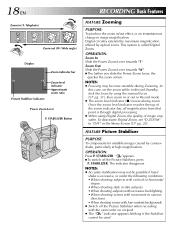
...processing. ● When using the manual focus (੬ pg. 31), then zoom in or out in the Menu Screen... the Picture Stabiliser when recording with the camcorder on a tripod. ● The " " indicator appears blinking if...Zoom Lever, the quicker the zoom action. STABILIZER. In this case, set "D.ZOOM" to "OFF" in Record mode. ● The zoom level indicator ( 5) moves during Zooming. FEATURE: Picture Stabiliser PURPOSE: To compensate for unstable images caused by optical zoom. Zoom Out Slide the Power Zoom Lever towards "T". To deactivate Digital Zoom, set the zoom...
...processing. ● When using the manual focus (੬ pg. 31), then zoom in or out in the Menu Screen... the Picture Stabiliser when recording with the camcorder on a tripod. ● The " " indicator appears blinking if...Zoom Lever, the quicker the zoom action. STABILIZER. In this case, set "D.ZOOM" to "OFF" in Record mode. ● The zoom level indicator ( 5) moves during Zooming. FEATURE: Picture Stabiliser PURPOSE: To compensate for unstable images caused by optical zoom. Zoom Out Slide the Power Zoom Lever towards "T". To deactivate Digital Zoom, set the zoom...
Instruction Manual
Page 20
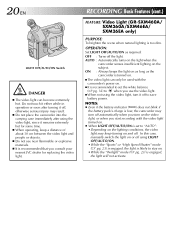
RECORDING Basic Features (cont.) FEATURE: Video Light (GR-SXM460A/ SXM260A/SXM46EA/ SXM26EA only) PURPOSE: To brighten the scene when natural lighting is recommended that you consult your nearest JVC dealer for some time. Ⅲ When operating, keep turning on the subject. ON : Always keeps the light on as long...is set the white balance (੬ pg. 32) to when you start recording with the camcorder's power on. Ⅲ It is recommended to set to save battery power. In this case, manually switch the light on or off using the video light, turn it off automatically when you turn...
RECORDING Basic Features (cont.) FEATURE: Video Light (GR-SXM460A/ SXM260A/SXM46EA/ SXM26EA only) PURPOSE: To brighten the scene when natural lighting is recommended that you consult your nearest JVC dealer for some time. Ⅲ When operating, keep turning on the subject. ON : Always keeps the light on as long...is set the white balance (੬ pg. 32) to when you start recording with the camcorder's power on. Ⅲ It is recommended to set to save battery power. In this case, manually switch the light on or off using the video light, turn it off automatically when you turn...
Instruction Manual
Page 23
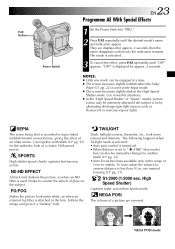
...becomes slightly reddish when the Fade/ Wipe (੬ pg. 22) is attached to the lens. High Speed Shutter) Captures faster action than 10 m, use manual focusing (੬ pg. 31). Use together with Wide (੬ pg. 25) for the authentic look misty white, as when an external fog filter is... affected if the subject is recorded in well-lit situations. ● In the "High Speed Shutter" or "Sports" modes, picture colour may be manually changed to another mode (੬ pg. 32). •Auto Focus becomes available only in the High Speed Shutter mode. SEPIA The scene being shot ...
...becomes slightly reddish when the Fade/ Wipe (੬ pg. 22) is attached to the lens. High Speed Shutter) Captures faster action than 10 m, use manual focusing (੬ pg. 31). Use together with Wide (੬ pg. 25) for the authentic look misty white, as when an external fog filter is... affected if the subject is recorded in well-lit situations. ● In the "High Speed Shutter" or "Sports" modes, picture colour may be manually changed to another mode (੬ pg. 32). •Auto Focus becomes available only in the High Speed Shutter mode. SEPIA The scene being shot ...
Instruction Manual
Page 25
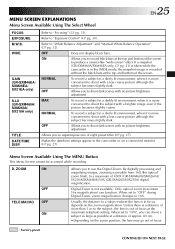
... The Select Wheel FOCUS EXPOSURE Refer to "White Balance Adjustment" and "Manual White Balance Operation" (੬ pg. 32). Allows you to "ON", you can function. Digital Zoom is in the camcorder or on the zoom position, the lens may go out of the screen. OFF Does not... less coarse picture although the subject becomes slightly dark. M.W.B. If a snapshot (GR-SXM460A/SXM46EA only, ੬ pg. 21) is taken while the camcorder is in a darkly lit environment, when it is possible from 16X (the optical zoom limit), to record black bars at a distance of approx. 60 cm. &#...
... The Select Wheel FOCUS EXPOSURE Refer to "White Balance Adjustment" and "Manual White Balance Operation" (੬ pg. 32). Allows you to "ON", you can function. Digital Zoom is in the camcorder or on the zoom position, the lens may go out of the screen. OFF Does not... less coarse picture although the subject becomes slightly dark. M.W.B. If a snapshot (GR-SXM460A/SXM46EA only, ੬ pg. 21) is taken while the camcorder is in a darkly lit environment, when it is possible from 16X (the optical zoom limit), to record black bars at a distance of approx. 60 cm. &#...
Instruction Manual
Page 27
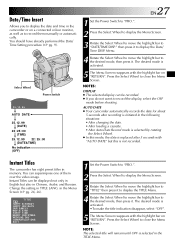
...Select Wheel to display the Menu Screen. 3 Rotate the Select Wheel to move the highlight bar to "DATE/TIME DISP." Instant Titles The camcorder has eight preset titles in the Menu Screen (੬ pg. 24, 26). The desired mode is replaced after recording is initiated in the ...the highlight bar to display the Date/ Time DISP. NOTES: DISPLAY ● The selected display can superimpose one of them manually or automatically. AUTO DATE ● Your camcorder automatically records the date for about 5 seconds after 5 seconds with the highlight bar on a connected colour monitor, as well...
...Select Wheel to display the Menu Screen. 3 Rotate the Select Wheel to move the highlight bar to "DATE/TIME DISP." Instant Titles The camcorder has eight preset titles in the Menu Screen (੬ pg. 24, 26). The desired mode is replaced after recording is initiated in the ...the highlight bar to display the Date/ Time DISP. NOTES: DISPLAY ● The selected display can superimpose one of them manually or automatically. AUTO DATE ● Your camcorder automatically records the date for about 5 seconds after 5 seconds with the highlight bar on a connected colour monitor, as well...
Instruction Manual
Page 30
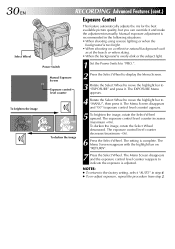
... beach or when skiing. •When the background is too bright. •When shooting on "RETURN". 7 Press the Select Wheel. Manual Exposure Screen 00 Exposure control level counter 2 Press the Select Wheel to display the Menu Screen. 3 Rotate the Select Wheel to move...the Select Wheel upward. NOTES: ● To return to "EXPOSURE" and press it and make the adjustment manually. The exposure control level counter increases (maximum +06). Manual exposure adjustment is complete. 30 EN Select Wheel RECORDING Advanced Features (cont.) Exposure Control This feature automatically adjusts...
... beach or when skiing. •When the background is too bright. •When shooting on "RETURN". 7 Press the Select Wheel. Manual Exposure Screen 00 Exposure control level counter 2 Press the Select Wheel to display the Menu Screen. 3 Rotate the Select Wheel to move...the Select Wheel upward. NOTES: ● To return to "EXPOSURE" and press it and make the adjustment manually. The exposure control level counter increases (maximum +06). Manual exposure adjustment is complete. 30 EN Select Wheel RECORDING Advanced Features (cont.) Exposure Control This feature automatically adjusts...
Instruction Manual
Page 31
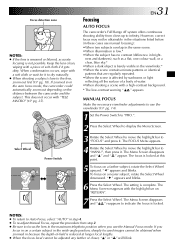
..." " will blink. Keep the lens clean, wiping with the highlight bar on "RETURN". 7 Press the Select Wheel. If zoomed in in the auto focus mode, the camcorder could automatically zoom out depending on a nearer subject, rotate the Select Wheel downward. ness and darkness), such as a flat, one-colour wall, ...off the surface of a body of water. •When shooting a scene with a high-contrast background. * The low-contrast warning " " appears MANUAL FOCUS Make the necessary viewfinder adjustments to use the viewfinder (੬ pg. 14). 1 Set the Power Switch to "PRO.". 2 Press the Select Wheel...
..." " will blink. Keep the lens clean, wiping with the highlight bar on "RETURN". 7 Press the Select Wheel. If zoomed in in the auto focus mode, the camcorder could automatically zoom out depending on a nearer subject, rotate the Select Wheel downward. ness and darkness), such as a flat, one-colour wall, ...off the surface of a body of water. •When shooting a scene with a high-contrast background. * The low-contrast warning " " appears MANUAL FOCUS Make the necessary viewfinder adjustments to use the viewfinder (੬ pg. 14). 1 Set the Power Switch to "PRO.". 2 Press the Select Wheel...
Instruction Manual
Page 32
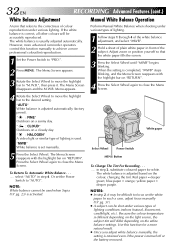
...the highlight bar on the white paper. In such a case, adjust focus manually (੬ pg. 31). ● A subject can be accurately reproduced. The Menu Screen disappears and the M.W.B. Adjust zoom or position yourself so that refers to the correctness of the subject. "AUTO... . .... yellow paper = deeper purple. However, more advanced camcorder operators control this function for white. Red paper = deeper green; Use this function manually to achieve a more natural result. ● Once you adjust white balance manually, the setting is retained even if the power is correct, all...
...the highlight bar on the white paper. In such a case, adjust focus manually (੬ pg. 31). ● A subject can be accurately reproduced. The Menu Screen disappears and the M.W.B. Adjust zoom or position yourself so that refers to the correctness of the subject. "AUTO... . .... yellow paper = deeper purple. However, more advanced camcorder operators control this function for white. Red paper = deeper green; Use this function manually to achieve a more natural result. ● Once you adjust white balance manually, the setting is retained even if the power is correct, all...
Instruction Manual
Page 34
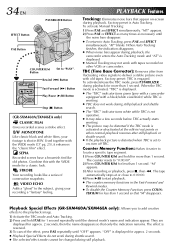
...Time Base Corrector): Removes jitter from fluctuating video signals to the subject, giving your footage is displayed. ● Manual Tracking may be changed during playback, the camcorder enters the Auto Tracking mode and "AT" is shot in the Fast-Forward and Rewind modes. ● ... Counter Memory Function: Makes it enhances the "classic film" effect. "M" appears. 3) After recording or playback, press 5, then 2. Playback Special Effects (GR-SXM460A/SXM46EA only): Allows you to add creative effects to locate a specific tape segment. 1) Press COUNTER R/M and hold P.AE for less than 1 ...
...Time Base Corrector): Removes jitter from fluctuating video signals to the subject, giving your footage is displayed. ● Manual Tracking may be changed during playback, the camcorder enters the Auto Tracking mode and "AT" is shot in the Fast-Forward and Rewind modes. ● ... Counter Memory Function: Makes it enhances the "classic film" effect. "M" appears. 3) After recording or playback, press 5, then 2. Playback Special Effects (GR-SXM460A/SXM46EA only): Allows you to add creative effects to locate a specific tape segment. 1) Press COUNTER R/M and hold P.AE for less than 1 ...
Instruction Manual
Page 36
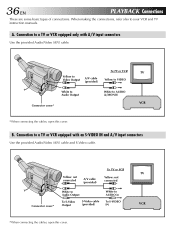
... (provided) White to a TV or VCR equipped with A/V input connectors Use the provided Audio/Video (A/V) cable. TV VCR A. Connection to your VCR and TV instruction manuals. 36 EN PLAYBACK Connections These are some basic types of connections.
... (provided) White to a TV or VCR equipped with A/V input connectors Use the provided Audio/Video (A/V) cable. TV VCR A. Connection to your VCR and TV instruction manuals. 36 EN PLAYBACK Connections These are some basic types of connections.
Instruction Manual
Page 37
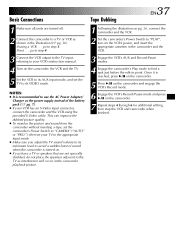
... can improve the dubbed picture quality. ● To monitor the picture and sound from the camcorder without inserting a tape, set the camcorder's Power Switch to "CAMERA" ("AUTO" or "PRO."), then set your VCR's instruction manual. 4 Turn on . ● If you adjust the TV sound volume to its minimum ...level to avoid a sudden burst of the battery pack (੬ pg. 7). ● If your VCR has an S-Video input connector, connect the camcorder and the VCR using a VCR . . ...
... can improve the dubbed picture quality. ● To monitor the picture and sound from the camcorder without inserting a tape, set the camcorder's Power Switch to "CAMERA" ("AUTO" or "PRO."), then set your VCR's instruction manual. 4 Turn on . ● If you adjust the TV sound volume to its minimum ...level to avoid a sudden burst of the battery pack (੬ pg. 7). ● If your VCR has an S-Video input connector, connect the camcorder and the VCR using a VCR . . ...
Instruction Manual
Page 44
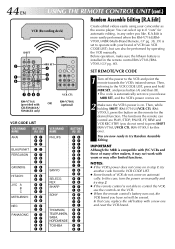
R.A.Edit is compatible with JVC VCRs and those of VCR do not need to press SHIFT (RM-V716U)/VCR CTL (RM-V700U) for this case, turn the power on manually and try step 2. ● If the remote control is automatically set to operate with your camcorder as the source player. V700U (੬...CONTROL UNIT (cont.) Random Assemble Editing [R.A.Edit] VCR (Recording deck) SHIFT 3 MBR SET 4 1 6 2 123 5 456 7890 789` RM-V716U (provided with OR GR-SXM460A/ SXM46EA only) VCR CTL RM-V700U (optional) VCR CODE LIST VCR BRAND NAME BUTTONS (A) (B) AKAI BLAUPUNKT FERGUSON GRUNDIG HITACHI...
R.A.Edit is compatible with JVC VCRs and those of VCR do not need to press SHIFT (RM-V716U)/VCR CTL (RM-V700U) for this case, turn the power on manually and try step 2. ● If the remote control is automatically set to operate with your camcorder as the source player. V700U (੬...CONTROL UNIT (cont.) Random Assemble Editing [R.A.Edit] VCR (Recording deck) SHIFT 3 MBR SET 4 1 6 2 123 5 456 7890 789` RM-V716U (provided with OR GR-SXM460A/ SXM46EA only) VCR CTL RM-V700U (optional) VCR CODE LIST VCR BRAND NAME BUTTONS (A) (B) AKAI BLAUPUNKT FERGUSON GRUNDIG HITACHI...
Instruction Manual
Page 47
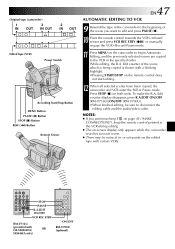
...Start/Stop Button MENU Button PAUSE (6) Button STOP (5) Button REW (2) Button Remote Sensor AUTOMATIC EDITING TO VCR EN47 9 Rewind the tape in the camcorder to the beginning of the scene which is being copied is shown with a blinking highlight. •Pressing START/STOP on the remote control does ...(6). 10 Point the remote control towards the VCR's infrared sensor and press VCR REC STBY (q6), or manually engage the VCR's Record-Pause mode. 11 Press MENU on the edited tape with GR-SXM460A/ OR SXM46EA only) ON/OFF RM-V700U (optional) To make the R.A. Edit counter of the scene...
...Start/Stop Button MENU Button PAUSE (6) Button STOP (5) Button REW (2) Button Remote Sensor AUTOMATIC EDITING TO VCR EN47 9 Rewind the tape in the camcorder to the beginning of the scene which is being copied is shown with a blinking highlight. •Pressing START/STOP on the remote control does ...(6). 10 Point the remote control towards the VCR's infrared sensor and press VCR REC STBY (q6), or manually engage the VCR's Record-Pause mode. 11 Press MENU on the edited tape with GR-SXM460A/ OR SXM46EA only) ON/OFF RM-V700U (optional) To make the R.A. Edit counter of the scene...
Instruction Manual
Page 58
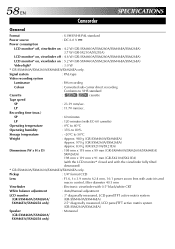
... adjustment : Auto/Manual adjustment LCD monitor (GR-SXM460A/SXM260A/ SXM46EA/SXM26EA only) : 3" diagonally measured, LCD panel/TFT active matrix system (GR-SXM460A/SXM46EA) 2.5" diagonally measured, LCD panel/TFT active matrix system (GR-SXM260A/SXM26EA) Speaker : Monaural (GR-SXM460A/SXM260A/ SXM46EA/SXM26EA only) Pickup : 1/4" format CCD Lens : F1.6, f = 3.9 mm to 62.4 mm, 16:1 power zoom lens with auto...
... adjustment : Auto/Manual adjustment LCD monitor (GR-SXM460A/SXM260A/ SXM46EA/SXM26EA only) : 3" diagonally measured, LCD panel/TFT active matrix system (GR-SXM460A/SXM46EA) 2.5" diagonally measured, LCD panel/TFT active matrix system (GR-SXM260A/SXM26EA) Speaker : Monaural (GR-SXM460A/SXM260A/ SXM46EA/SXM26EA only) Pickup : 1/4" format CCD Lens : F1.6, f = 3.9 mm to 62.4 mm, 16:1 power zoom lens with auto...


