
Instruction Manual
Page 2
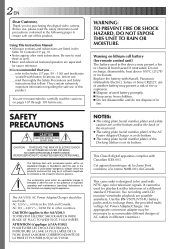
...;F) or incinerate. Replace the battery with Maxell, Panasonic (Matsushita Electric), Sanyo or Sony CR2025; Using This Instruction Manual • All major sections and subsections are separated for remote control unit) The battery used battery promptly. Ⅲ Keep away from children. Ⅲ Do not disassemble and do not dispose of this digital video camera. You are possible anywhere. REFER SERVICING TO QUALIFIED SERVICE PERSONNEL. WARNING: TO...
...;F) or incinerate. Replace the battery with Maxell, Panasonic (Matsushita Electric), Sanyo or Sony CR2025; Using This Instruction Manual • All major sections and subsections are separated for remote control unit) The battery used battery promptly. Ⅲ Keep away from children. Ⅲ Do not disassemble and do not dispose of this digital video camera. You are possible anywhere. REFER SERVICING TO QUALIFIED SERVICE PERSONNEL. WARNING: TO...
Instruction Manual
Page 3
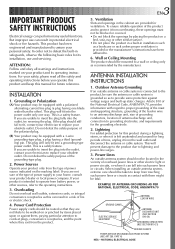
... a built-in installation such as to replace your product and its installation, use can perform many useful functions. IMPORTANT PRODUCT SAFETY INSTRUCTIONS Electrical energy can result in potential electrical shock or fire hazards. ATTENTION: Follow and obey all the safety and operating instructions before you are provided for long periods of power supply to be equipped with a 3-wire grounding-type plug, a plug having one...
... a built-in installation such as to replace your product and its installation, use can perform many useful functions. IMPORTANT PRODUCT SAFETY INSTRUCTIONS Electrical energy can result in potential electrical shock or fire hazards. ATTENTION: Follow and obey all the safety and operating instructions before you are provided for long periods of power supply to be equipped with a 3-wire grounding-type plug, a plug having one...

Instruction Manual
Page 11
... planned shooting time. Use the optional AA-V80U AC Power Adapter/Charger. Approximate recording time Batterypack BN-V507U BN-V514U BN-V856U LCD monitor on/ Viewfinder off / Viewfinder on 65 min. 130 min. 8 hrs. 30 min. Also read thoroughly the VU-V856KIT's instruction manuals. NOTES: ● The provided AC Power Adapter/Charger features automatic voltage selection in a camcorder malfunction. RELEASE, detach it locks into the battery...
... planned shooting time. Use the optional AA-V80U AC Power Adapter/Charger. Approximate recording time Batterypack BN-V507U BN-V514U BN-V856U LCD monitor on/ Viewfinder off / Viewfinder on 65 min. 130 min. 8 hrs. 30 min. Also read thoroughly the VU-V856KIT's instruction manuals. NOTES: ● The provided AC Power Adapter/Charger features automatic voltage selection in a camcorder malfunction. RELEASE, detach it locks into the battery...

Instruction Manual
Page 13
... Power Switch to operate. Lock Button /PCOFF CAME Power lamp PLAY RA5S DSC DS C PLAY MENU/SET Dial Display P. It is your choice to display it and the Mode Menu appears. 4 ACCESS DATE/TIME MENU Move the highlight bar to the camcorder, the clock's rechargeable lithium battery is connected to an AC outlet using the AC Power Adapter/Charger, or while the battery pack attached to the camcorder continues to supply power to "TO DATE/TIME MENU" by rotating MENU/SET. Rotating MENU/SET, input...
... Power Switch to operate. Lock Button /PCOFF CAME Power lamp PLAY RA5S DSC DS C PLAY MENU/SET Dial Display P. It is your choice to display it and the Mode Menu appears. 4 ACCESS DATE/TIME MENU Move the highlight bar to the camcorder, the clock's rechargeable lithium battery is connected to an AC outlet using the AC Power Adapter/Charger, or while the battery pack attached to the camcorder continues to supply power to "TO DATE/TIME MENU" by rotating MENU/SET. Rotating MENU/SET, input...

Instruction Manual
Page 15
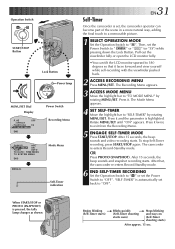
... this camcorder be played back on this camcorder. ● During playback of a tape recorded on . 2 ACCESS RECORDING MENU Press MENU/SET. Open the LCD monitor fully or pull out the viewfinder fully. •The power lamp comes on and the camcorder is recommended that tapes recorded in the sound. AE OFF / EFFECT FLASH ADJ. 0 4 TO MODE MENU END Power Switch Recording Menu 4 REC MODE SP WIDE MODE OFF ZOOM 40X DIS OFF GAIN UP AGC SELF-TIMER OFF FLASH AUTO TO DATE / TIME MENU...
... this camcorder be played back on this camcorder. ● During playback of a tape recorded on . 2 ACCESS RECORDING MENU Press MENU/SET. Open the LCD monitor fully or pull out the viewfinder fully. •The power lamp comes on and the camcorder is recommended that tapes recorded in the sound. AE OFF / EFFECT FLASH ADJ. 0 4 TO MODE MENU END Power Switch Recording Menu 4 REC MODE SP WIDE MODE OFF ZOOM 40X DIS OFF GAIN UP AGC SELF-TIMER OFF FLASH AUTO TO DATE / TIME MENU...

Instruction Manual
Page 19
... "MANUAL" appears in Manual mode. EN19 Operation Mode Turning the Power Switch and Operation Switch allows you to a computer. Allows you to play back a recording on the tape or to transfer a still image recorded on a tape in the MultiMediaCard to record using the MENU/SET Dial. Allows you to choose the appropriate operation mode among the following table: Lock Button A M /PCOFF CAME Power lamp Power Switch/ Operation Switch Position 5 second recording mode: 5S Digital Still Camera: Function Suitable for standard recording on the camcorder, first set to display...
... "MANUAL" appears in Manual mode. EN19 Operation Mode Turning the Power Switch and Operation Switch allows you to a computer. Allows you to play back a recording on the tape or to transfer a still image recorded on a tape in the MultiMediaCard to record using the MENU/SET Dial. Allows you to choose the appropriate operation mode among the following table: Lock Button A M /PCOFF CAME Power lamp Power Switch/ Operation Switch Position 5 second recording mode: 5S Digital Still Camera: Function Suitable for standard recording on the camcorder, first set to display...
Instruction Manual
Page 31
... MODE MENU END Power Switch Recording Menu GAIN UP AGC 4 SELF-TIMER ON FLASH AUTO TO DATE / TIME MENU TO SYSTEM MENU END - - - - -6- - - - - After 15 seconds, the beep sounds and video recording starts. Pull out the viewfinder fully or open the LCD monitor fully. •You can tilt the LCD monitor upward to 180 degrees so that , the camcorder re-enters Record-Standby mode. 6 END SELF-TIMER RECORDING Set the Operation Switch to " " or set , the camcorder operator...
... MODE MENU END Power Switch Recording Menu GAIN UP AGC 4 SELF-TIMER ON FLASH AUTO TO DATE / TIME MENU TO SYSTEM MENU END - - - - -6- - - - - After 15 seconds, the beep sounds and video recording starts. Pull out the viewfinder fully or open the LCD monitor fully. •You can tilt the LCD monitor upward to 180 degrees so that , the camcorder re-enters Record-Standby mode. 6 END SELF-TIMER RECORDING Set the Operation Switch to " " or set , the camcorder operator...

Instruction Manual
Page 34
...4 FLASH AUTO TO DATE / TIME MENU TO SYSTEM MENU END - - - - -6- - - - - Then, set to " .... the Red-Eye reduction indicator lights, then press PHOTO (SNAPSHOT). The flash automatically fires using the flash. The Recording Menu appears. 3 ACCESS MODE MENU Move the highlight bar to " " or " ". PLAY PHOTO (SNAPSHOT) Button Lock Button /PCOFF CAME Power lamp 1 ENGAGE RECORD-STANDBY Set the Operation Switch to "TO MODE MENU" by rotating MENU/SET. If the Operation Switch is set the Power Switch to step 6. Press MENU/SET. RA5S DSC DS C PLAY MENU/SET Dial Display Power...
...4 FLASH AUTO TO DATE / TIME MENU TO SYSTEM MENU END - - - - -6- - - - - Then, set to " .... the Red-Eye reduction indicator lights, then press PHOTO (SNAPSHOT). The flash automatically fires using the flash. The Recording Menu appears. 3 ACCESS MODE MENU Move the highlight bar to " " or " ". PLAY PHOTO (SNAPSHOT) Button Lock Button /PCOFF CAME Power lamp 1 ENGAGE RECORD-STANDBY Set the Operation Switch to "TO MODE MENU" by rotating MENU/SET. If the Operation Switch is set the Power Switch to step 6. Press MENU/SET. RA5S DSC DS C PLAY MENU/SET Dial Display Power...

Instruction Manual
Page 36
... RECORDING Advanced Features For Video And D.S.C. (cont.) Operation Switch Using Menu For Detailed Adjustment A M This camcorder is equipped with an easy-to-use, on the function you select. If you select "TO SYSTEM MENU the System Menu appears. Go to step 6. If you select "TO MODE MENU the Mode Menu appears. finder fully or open the LCD monitor fully. 2 ACCESS RECORDING MENU Press MENU/SET. The Recording Menu appears. If you select other than "TO DATE/TIME MENU...
... RECORDING Advanced Features For Video And D.S.C. (cont.) Operation Switch Using Menu For Detailed Adjustment A M This camcorder is equipped with an easy-to-use, on the function you select. If you select "TO SYSTEM MENU the System Menu appears. Go to step 6. If you select "TO MODE MENU the Mode Menu appears. finder fully or open the LCD monitor fully. 2 ACCESS RECORDING MENU Press MENU/SET. The Recording Menu appears. If you select other than "TO DATE/TIME MENU...

Instruction Manual
Page 39
DISPLAY ON Makes the date/time settings appear in the camcorder, the demonstration cannot be used to confirm how these functions operate. System Menu Explanations TELE MACRO SCENE BEEP/TALLY WIND CUT SOUND MODE ID NUMBER REC SELECT DEMO. The beep sounds when the power is recorded on the zoom position, the lens may go out of focus. ੬ pg. 30. ੬ pg. 30. OFF The tally lamp remains off at...
DISPLAY ON Makes the date/time settings appear in the camcorder, the demonstration cannot be used to confirm how these functions operate. System Menu Explanations TELE MACRO SCENE BEEP/TALLY WIND CUT SOUND MODE ID NUMBER REC SELECT DEMO. The beep sounds when the power is recorded on the zoom position, the lens may go out of focus. ੬ pg. 30. ੬ pg. 30. OFF The tally lamp remains off at...
Instruction Manual
Page 47
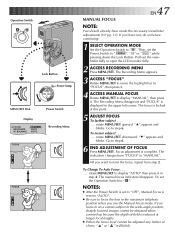
... changes from step 2. rotate MENU/SET to reset the focus, repeat from "FOCUS" to "OFF", Manual Focus is complete. Operation Switch A M Lock Button /PCOFF CAME Power lamp PLAY RA5S DSC DS C PLAY MENU/SET Dial Power Switch Display 4 FOCUS EXPOSURE W. If you want to display "AUTO" then press it . The focus is reduced at this point. 5 ADJUST FOCUS To farther subject . . . .... The manual focus indicators disappear. finder fully or open the LCD monitor fully. 2 ACCESS RECORDING MENU Press MENU/SET. The Recording Menu disappears and "FOCUS" is displayed...
... changes from step 2. rotate MENU/SET to reset the focus, repeat from "FOCUS" to "OFF", Manual Focus is complete. Operation Switch A M Lock Button /PCOFF CAME Power lamp PLAY RA5S DSC DS C PLAY MENU/SET Dial Power Switch Display 4 FOCUS EXPOSURE W. If you want to display "AUTO" then press it . The focus is reduced at this point. 5 ADJUST FOCUS To farther subject . . . .... The manual focus indicators disappear. finder fully or open the LCD monitor fully. 2 ACCESS RECORDING MENU Press MENU/SET. The Recording Menu disappears and "FOCUS" is displayed...

Instruction Manual
Page 48
... adjustment manually. 1 SELECT OPERATION MODE Set the Operation Switch to reset the exposure, repeat step 2. Go to "EXPOSURE", then press it. finder fully or open the LCD monitor fully. The Recording Menu appears. 3 ACCESS "EXPOSURE" Rotate MENU/SET to move the highlight bar to step 6. PLAY C PLAY RA5S DSC DS /PCOFF CAME Power lamp 4 ACCESS EXPOSURE CONTROL Rotate MENU/SET to display "AUTO" then press it . The To darken the image indication "EXP." The exposure control...
... adjustment manually. 1 SELECT OPERATION MODE Set the Operation Switch to reset the exposure, repeat step 2. Go to "EXPOSURE", then press it. finder fully or open the LCD monitor fully. The Recording Menu appears. 3 ACCESS "EXPOSURE" Rotate MENU/SET to move the highlight bar to step 6. PLAY C PLAY RA5S DSC DS /PCOFF CAME Power lamp 4 ACCESS EXPOSURE CONTROL Rotate MENU/SET to display "AUTO" then press it . The To darken the image indication "EXP." The exposure control...

Instruction Manual
Page 50
... Lock Button. When using a video light or other colors will be used when Sepia or Monotone (੬ pg. 45) is adjusted automatically. Then, set on the subject (੬ pg. 51). PLAY C PLAY MENU/SET Dial Display Power Switch 4 ACCESS WHITE BALANCE ADJUSTMENT The Recording Menu disappears. This is displayed. " " - When shooting outdoors on a cloudy day. finder fully or open the LCD monitor fully. 2 ACCESS RECORDING MENU Press MENU/SET. When shooting outdoors on a sunny day. " " - changes to " ". Or, set the Operation Switch to control this function manually and...
... Lock Button. When using a video light or other colors will be used when Sepia or Monotone (੬ pg. 45) is adjusted automatically. Then, set on the subject (੬ pg. 51). PLAY C PLAY MENU/SET Dial Display Power Switch 4 ACCESS WHITE BALANCE ADJUSTMENT The Recording Menu disappears. This is displayed. " " - When shooting outdoors on a cloudy day. finder fully or open the LCD monitor fully. 2 ACCESS RECORDING MENU Press MENU/SET. When shooting outdoors on a sunny day. " " - changes to " ". Or, set the Operation Switch to control this function manually and...

Instruction Manual
Page 59
OR Select "INDEX" in memory six at a time. Use this mode when looking for an image you wish to view. 1 SELECT OPERATION MODE Set the Power Switch to the desired image and press it. The INDEX Screen appears. /PCOFF CAME PLAY MENU/SET Dial Power lamp RA5S DSC DS Power Switch C PLAY Lock Button MULTI SCREEN Button Index Playback EN59 You can view the images stored in the Playback Menu (To access the Playback Menu, press MENU/SET). 3 DISPLAY DESIRED IMAGE Rotate MENU/SET to move the green...
OR Select "INDEX" in memory six at a time. Use this mode when looking for an image you wish to view. 1 SELECT OPERATION MODE Set the Power Switch to the desired image and press it. The INDEX Screen appears. /PCOFF CAME PLAY MENU/SET Dial Power lamp RA5S DSC DS Power Switch C PLAY Lock Button MULTI SCREEN Button Index Playback EN59 You can view the images stored in the Playback Menu (To access the Playback Menu, press MENU/SET). 3 DISPLAY DESIRED IMAGE Rotate MENU/SET to move the green...

Instruction Manual
Page 64
... delete and press it . Power lamp RA5S DSC DS C PLAY Lock Button /PCOFF CAME PLAY Power Switch •A stored image is displayed. 2 ACCESS PLAYBACK MENU Press MENU/SET. Display INDEX SLIDE SHOW MULTI VIEW IrTran-P PROTECT 4 FILE DELETE TITLE DELETE FORMAT OFF OFF END FILE DELETE ALL 4 SELECTED CANCEL Playback Menu FILE DELETE Screen NEXT 001 F DELETE 002 S 003 E DELETE Index Screen 004 F 005 F 006 F TO SELECT AN IMAGE BY BROWSING IMAGES STORED IN MEMORY Before doing the following, perform steps 1 through the operation...
... delete and press it . Power lamp RA5S DSC DS C PLAY Lock Button /PCOFF CAME PLAY Power Switch •A stored image is displayed. 2 ACCESS PLAYBACK MENU Press MENU/SET. Display INDEX SLIDE SHOW MULTI VIEW IrTran-P PROTECT 4 FILE DELETE TITLE DELETE FORMAT OFF OFF END FILE DELETE ALL 4 SELECTED CANCEL Playback Menu FILE DELETE Screen NEXT 001 F DELETE 002 S 003 E DELETE Index Screen 004 F 005 F 006 F TO SELECT AN IMAGE BY BROWSING IMAGES STORED IN MEMORY Before doing the following, perform steps 1 through the operation...
Instruction Manual
Page 71
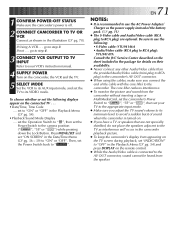
...". go to its VIDEO mode. set the Power Switch to "ON" or "OFF" in the Playback Menu (੬ pg. 54) and press DISPLAY on the camcorder, the VCR and the TV. 5 SELECT MODE Set the VCR to its minimum level to avoid a sudden burst of the battery pack. (੬ pg. 11) ● The S-Video cable and Audio/Video cable (RCA plug to " ". If Using A VCR . . . set the Operation Switch to " ", then set to the camera position (" ", "5S" or...
...". go to its VIDEO mode. set the Power Switch to "ON" or "OFF" in the Playback Menu (੬ pg. 54) and press DISPLAY on the camcorder, the VCR and the TV. 5 SELECT MODE Set the VCR to its minimum level to avoid a sudden burst of the battery pack. (੬ pg. 11) ● The S-Video cable and Audio/Video cable (RCA plug to " ". If Using A VCR . . . set the Operation Switch to " ", then set to the camera position (" ", "5S" or...

Instruction Manual
Page 75
... using the recording mode selected in the Mode Menu (੬ pg. 15). ● Digital Dubbing is output from the spot on the tape is performed in the illustration and load a cassette to engage the Record-Pause mode. "DV IN" appears on . 3. Turn the Power Switch to engage the Record-Pause mode. Since a digital signal is sent, there is little if any image or sound deterioration. 1 CONFIRM POWER-OFF STATUS Make sure the camcorder's power...
... using the recording mode selected in the Mode Menu (੬ pg. 15). ● Digital Dubbing is output from the spot on the tape is performed in the illustration and load a cassette to engage the Record-Pause mode. "DV IN" appears on . 3. Turn the Power Switch to engage the Record-Pause mode. Since a digital signal is sent, there is little if any image or sound deterioration. 1 CONFIRM POWER-OFF STATUS Make sure the camcorder's power...

Instruction Manual
Page 84
... operating the VCR manually. In that case, replace the old battery with your camcorder as the source player. 84 EN USING THE REMOTE CONTROL UNIT (cont.) Random Assemble Editing [R.A.Edit] VCR (Recording deck) 3 SHIFT 1 6 RM-V713U (provided) TW 789` MBR SET 2 4 5 Create edited videos easily using your brand of VCR (see VCR CODE LIST), but can also be erased. Then, referring to operate with a new one ). SET REMOTE/VCR CODE 1 SET REMOTE TO OPERATE VCR Turn off the power...
... operating the VCR manually. In that case, replace the old battery with your camcorder as the source player. 84 EN USING THE REMOTE CONTROL UNIT (cont.) Random Assemble Editing [R.A.Edit] VCR (Recording deck) 3 SHIFT 1 6 RM-V713U (provided) TW 789` MBR SET 2 4 5 Create edited videos easily using your brand of VCR (see VCR CODE LIST), but can also be erased. Then, referring to operate with a new one ). SET REMOTE/VCR CODE 1 SET REMOTE TO OPERATE VCR Turn off the power...
Instruction Manual
Page 92
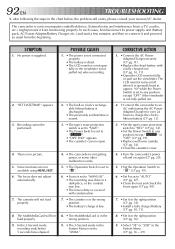
... outlet using MENU/SET. 6. Some functions are not available using the AC Power Adapter/Charger for over 24 hours to charge the clock's lithium battery (੬ pg. 13). 3. • Set the tape's erase protection switch to "REC" (੬ pg. 14). • Set the Power Switch to "AUTO" (੬ pg. 47). • Clean the lens and check the focus again (੬ pg. 98). 7. • Set it in the right position (੬ pg. 14). • Install a fully charged battery...
... outlet using MENU/SET. 6. Some functions are not available using the AC Power Adapter/Charger for over 24 hours to charge the clock's lithium battery (੬ pg. 13). 3. • Set the tape's erase protection switch to "REC" (੬ pg. 14). • Set the Power Switch to "AUTO" (੬ pg. 47). • Clean the lens and check the focus again (੬ pg. 98). 7. • Set it in the right position (੬ pg. 14). • Install a fully charged battery...

Instruction Manual
Page 110
... Still Camera Storage media : MultiMediaCard Compression system : JPEG (compatible) Picture quality : 3 modes (FINE/STANDARD/ECONOMY) Number of storable images (with 0.55" color LCD Speaker : Monaural For Digital Video Camera Format Signal format Video signal recording format Cassette Tape Speed Maximum recording time : DV Format (SD mode) : NTSC Standard : Digital Component Recording : Mini DV Cassette : SP: 18.8 mm/s LP: 12.5 mm/s : SP: 60 min. 110 EN Camcorder SPECIFICATIONS For General Power supply : DC 6.3 V DC 7.2 V (Using the AC Power Adapter/Charger) (Using battery...
... Still Camera Storage media : MultiMediaCard Compression system : JPEG (compatible) Picture quality : 3 modes (FINE/STANDARD/ECONOMY) Number of storable images (with 0.55" color LCD Speaker : Monaural For Digital Video Camera Format Signal format Video signal recording format Cassette Tape Speed Maximum recording time : DV Format (SD mode) : NTSC Standard : Digital Component Recording : Mini DV Cassette : SP: 18.8 mm/s LP: 12.5 mm/s : SP: 60 min. 110 EN Camcorder SPECIFICATIONS For General Power supply : DC 6.3 V DC 7.2 V (Using the AC Power Adapter/Charger) (Using battery...


